ASP.NET Core 中间件基本用法
Posted youring2
tags:
篇首语:本文由小常识网(cha138.com)小编为大家整理,主要介绍了ASP.NET Core 中间件基本用法相关的知识,希望对你有一定的参考价值。
ASP.NET Core 中间件
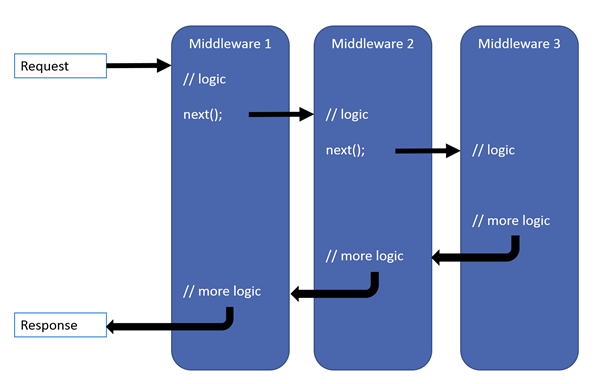
ASP.NET Core的处理流程是一个管道,而中间件是装配到管道中的用于处理请求和响应的组件。中间件按照装配的先后顺序执行,并决定是否进入下一个组件。中间件管道的处理流程如下图(图片来源于官网):

管道式的处理方式,更加方便我们对程序进行扩展。
使用中间件
ASP.NET Core中间件模型是我们能够快捷的开发自己的中间件,完成对应用的扩展,我们先从一个简单的例子了解一下中间件的开发。
Run
首先,我们创建一个ASP.NET Core 应用,在Startup.cs中有如下代码:
app.Run(async (context) =>
{
    await context.Response.WriteAsync("Hello World!");
});这段代码中,使用Run方法运行一个委托,这就是最简单的中间件,它拦截了所有请求,返回一段文本作为响应。Run委托终止了管道的运行,因此也叫作终端中间件。
Use
我们再看另外一个例子:
app.Use(async (context, next) =>
{
    //Do something here

    //Invoke next middleware
    await next.Invoke();

    //Do something here

});这段代码中,使用Use方法运行一个委托,我们可以在Next调用之前和之后分别执行自定义的代码,从而可以方便的进行日志记录等工作。这段代码中,使用next.Invoke()方法调用下一个中间件,从而将中间件管道连贯起来;如果不调用next.Invoke()方法,则会造成管道短路。
Map和MapWhen
处理上面两种方式,ASP.NET Core 还可以使用Map创建基于路径匹配的分支、使用MapWhen创建基于条件的分支。代码如下:
private static void HandleMap(IApplicationBuilder app)
{
    app.Run(async context =>
    {
        await context.Response.WriteAsync("Handle Map");
    });
}

private static void HandleBranch(IApplicationBuilder app)
{
    app.Run(async context =>
    {
        var branchVer = context.Request.Query["branch"];
        await context.Response.WriteAsync($"Branch used = {branchVer}");
    });
}

public void Configure(IApplicationBuilder app, IHostingEnvironment env)
{
    app.Map("/map", HandleMap);

    app.MapWhen(context => context.Request.Query.ContainsKey("branch"),
               HandleBranch);

    app.Run(async context =>
    {
        await context.Response.WriteAsync("Hello World!");
    });
}
上面的代码演示了如何使用Map和MapWhen创建基于路径和条件的分支。另外,Map方法还支持层级的分支,我们参照下面的代码:
app.Map("/level1", level1App => {
    level1App.Map("/level2a", level2AApp => {
        // "/level1/level2a" processing
    });
    level1App.Map("/level2b", level2BApp => {
        // "/level1/level2b" processing
    });
});
需要注意,使用 Map 时,将从 HttpRequest.Path 中删除匹配的Path,并针对每个请求将该线段追加到 HttpRequest.PathBase。例如对于路径/level1/level2a,当在level1App中进行处理时,它的请求路径被截断为/level2a,当在level2AApp中进行处理时,它的路径就变成/了,而相应的PathBase会变为/level1/level2a。
开发中间件
看到这里,我们已经知道中间件的基本用法,是时候写一个真正意义的中间件了。
基于约定的中间件开发
在 ASP.NET Core 官网上面提供了一个简单的例子,通过中间件来设置应用的区域信息,代码如下:
public void Configure(IApplicationBuilder app)
{
    app.Use((context, next) =>
    {
        var cultureQuery = context.Request.Query["culture"];
        if (!string.IsNullOrWhiteSpace(cultureQuery))
        {
            var culture = new CultureInfo(cultureQuery);

            CultureInfo.CurrentCulture = culture;
            CultureInfo.CurrentUICulture = culture;
        }

        // Call the next delegate/middleware in the pipeline
        return next();
    });

    app.Run(async (context) =>
    {
        await context.Response.WriteAsync(
            $"Hello {CultureInfo.CurrentCulture.DisplayName}");
    });
}
通过这段代码,我们可以通过QueryString的方式设置应用的区域信息。但是这样的代码怎样复用呢?注意,中间件一定要是可复用、方便复用的。我们来改造这段代码:
public class RequestCultureMiddleware
{
    private readonly RequestDelegate _next;

    public RequestCultureMiddleware(RequestDelegate next)
    {
        _next = next;
    }

    public async Task InvokeAsync(HttpContext context)
    {
        //......

        // Call the next delegate/middleware in the pipeline
        await _next(context);
    }
}
这里定义一个委托,用于执行具体的业务逻辑,然后在Configure中调用这个委托:
app.UseMiddleware<RequestCultureMiddleware>();这样还是不太方便,不像我们使用app.UseMvc()这么方便,那么我们来添加一个扩展方法,来实现更方便的复用:
public static class RequestCultureMiddlewareExtensions
{
    public static IApplicationBuilder UseRequestCulture(
        this IApplicationBuilder builder)
    {
        return builder.UseMiddleware<RequestCultureMiddleware>();
    }
}
然后我们就可以这样使用中间件了:
app.UseRequestCulture();通过委托构造中间件,应用程序在运行时创建这个中间件,并将它添加到管道中。这里需要注意的是,中间件的创建是单例的,每个中间件在应用程序生命周期内只有一个实例。那么问题来了,如果我们业务逻辑需要多个实例时,该如何操作呢?请继续往下看。
基于请求的依赖注入
通过上面的代码我们已经知道了如何编写一个中间件,如何方便的复用这个中间件。在中间件的创建过程中,容器会为我们创建一个中间件实例,并且整个应用程序生命周期中只会创建一个该中间件的实例。通常我们的程序不允许这样的注入逻辑。
其实,我们可以把中间件理解成业务逻辑的入口,真正的业务逻辑是通过Application Service层实现的,我们只需要把应用服务注入到Invoke方法中即可。
ASP.NET Core为我们提供了这种机制,允许我们按照请求进行依赖的注入,也就是每次请求创建一个服务。代码如下:
public class CustomMiddleware
{
    private readonly RequestDelegate _next;

    public CustomMiddleware(RequestDelegate next)
    {
        _next = next;
    }

    // IMyScopedService is injected into Invoke
    public async Task Invoke(HttpContext httpContext, IMyScopedService svc)
    {
        svc.MyProperty = 1000;
        await _next(httpContext);
    }
}
在这段代码中,CustomMiddleware的实例仍然是单例的,但是IMyScopedService是按照请求进行注入的,每次请求都会创建IMyScopedService的实例,svc对象的生命周期是PerRequest的。
基于约定的中间件模板
这里提供一个完整的示例,可以理解为一个中间件的开发模板,方便以后使用的时候参考。整个过程分以下几步:
- 将业务逻辑封装到ApplicationService中
- 创建中间件代理类
- 创建中间件扩展类
- 使用中间件
代码如下:
namespace MiddlewareDemo
{
    using Microsoft.AspNetCore.Http;
    using System.Threading.Tasks;

    //1.定义并实现业务逻辑
    public interface IMyScopedService
    {
        int MyProperty { get; set; }
    }

    public class MyScopedService : IMyScopedService
    {
        public int MyProperty { get; set; }
    }

    //2.创建中间件代理类
    public class CustomMiddleware
    {
        private readonly RequestDelegate _next;

        public CustomMiddleware(RequestDelegate next)
        {
            _next = next;
        }

        // IMyScopedService is injected into Invoke
        public async Task Invoke(HttpContext httpContext, IMyScopedService svc)
        {
            svc.MyProperty = 1000;
            await _next(httpContext);
        }
    }
}

//3.1 添加依赖服务注册
namespace Microsoft.Extensions.DependencyInjection
{
    using MiddlewareDemo;
    public static partial class CustomMiddlewareExtensions
    {
        /// <summary>
        /// 添加服务的依赖注册
        /// </summary>
        public static IServiceCollection AddCustom(this IServiceCollection services)
        {
            return services.AddScoped<IMyScopedService, MyScopedService>();
        }

    }
}

//3.2 创建中间件扩展类
namespace Microsoft.AspNetCore.Builder
{
    using MiddlewareDemo;

    public static partial class CustomMiddlewareExtensions
    {
        /// <summary>
        /// 使用中间件
        /// </summary>
        public static IApplicationBuilder UseCustom(this IApplicationBuilder builder)
        {
            return builder.UseMiddleware<CustomMiddleware>();
        }
    }
}

//4. 使用中间件
public void ConfigureServices(IServiceCollection services)
{
    services.AddCustom();
}

public void Configure(IApplicationBuilder app, IHostingEnvironment env)
{
    app.UseCustom();
}
基于工厂激活的中间件
我们前面介绍的中间件开发都是基于约定的,可以让我们快速上手进行开发。同时ASP.NET Core还提供了基于工厂激活的中间件开发方式,我们可以通过实现IMiddlewareFactory、IMiddleware接口进行中间件开发。
public class FactoryActivatedMiddleware : IMiddleware
{
    private readonly AppDbContext _db;

    public FactoryActivatedMiddleware(AppDbContext db)
    {
        _db = db;
    }

    public async Task InvokeAsync(HttpContext context, RequestDelegate next)
    {
        var keyValue = context.Request.Query["key"];

        if (!string.IsNullOrWhiteSpace(keyValue))
        {
            _db.Add(new Request()
                {
                    DT = DateTime.UtcNow,
                    MiddlewareActivation = "FactoryActivatedMiddleware",
                    Value = keyValue
                });

            await _db.SaveChangesAsync();
        }

        await next(context);
    }
}
上面这段代码演示了如何使用基于工厂激活的中间件,在使用过程中有两点需要注意:1.需要在ConfigureServices中进行服务注册;2.在UseMiddleware()方法中不支持传递参数。
参考文档
- https://docs.microsoft.com/zh-cn/aspnet/core/fundamentals/middleware/
- https://docs.microsoft.com/zh-cn/aspnet/core/fundamentals/middleware/write
- https://docs.microsoft.com/zh-cn/aspnet/core/fundamentals/middleware/extensibility
以上是关于ASP.NET Core 中间件基本用法的主要内容,如果未能解决你的问题,请参考以下文章