Kafka+ELK完成日志采集处理
Posted taleg
tags:
篇首语:本文由小常识网(cha138.com)小编为大家整理,主要介绍了Kafka+ELK完成日志采集处理相关的知识,希望对你有一定的参考价值。
此文档为了做一次记录,按回忆粗略补写。
环境信息
Centos V7.6.1810
JDK V1.8.0_171
Rsyslog V8.24.0-34.el7
Kafka V2.12-0.10.2.1
zookeeper V3.4.10
ELK V6.2.3
服务器分配
配置尽量高点,此次部署kafka+zookeeper和ES皆为集群模式。
| 服务器名 | IP地址 | 配置 | 备注 |
| node1 | 192.168.101.55 | CPU:2C 内存:4G 磁盘:100G | |
| node2 | 192.168.101.56 | CPU:2C 内存:4G 磁盘:100G | |
| node3 | 192.168.101.57 | CPU:2C 内存:4G 磁盘:100G |
此文档主要以部署为主,部署的时候遇到很多问题,忘做记录了。
一、环境配置(三台机器同样操作)
如果关闭防火墙那就算了。否则需要配置以下策略。
1、firewall
每台机器加一条策略
[[email protected] home]# firewall-cmd --permanent --add-rich-rule="rule family="ipv4" source address="192.168.101.1/24" accept"
# 此条作用就是打通101网段允许访问

查看防火墙:
[[email protected] home]# firewall-cmd --list-all
public (active)
  target: default
  icmp-block-inversion: no
  interfaces: eth0
  sources:
  services: ssh dhcpv6-client
  ports:
  protocols:
  masquerade: no
  forward-ports:
  source-ports:
  icmp-blocks:
  rich rules:
        rule family="ipv4" source address="192.168.101.1/24" accept

注:为了部署不出问题,最好telnet测试一直是否生效可用。

2、关闭selinux
[[email protected] home]# vim /etc/sysconfig/selinux
# This file controls the state of SELinux on the system.
# SELINUX= can take one of these three values:
# enforcing - SELinux security policy is enforced.
# permissive - SELinux prints warnings instead of enforcing.
# disabled - No SELinux policy is loaded.
SELINUX=disabled
# SELINUXTYPE= can take one of three values:
# targeted - Targeted processes are protected,
# minimum - Modification of targeted policy. Only selected processes are protected.
# mls - Multi Level Security protection.
SELINUXTYPE=targeted
3、设置JAVA环境变量
[[email protected] home]# mkdir /home/jdk #此处是个人习惯,我喜欢放到/home下
[[email protected] home]# tar xf jdk-8u171-linux-x64.tar.gz -C /home/jdk/
[[email protected] home]# vim /etc/profile
...在最下面加入这行
export JAVA_HOME=/home/jdk/jdk1.8.0_171
export JRE_HOME=/home/jdk/jdk1.8.0_171/jre
export CLASSPATH=.:$JAVA_HOME/lib/dt.jar:$JAVA_HOME/lib/tools.jar:$JRE_HOME/lib:$CLASSPATH
export PATH=$JAVA_HOME/bin:$PATH
[[email protected] home]# source /etc/profile
# 检查环境变量是否生效
[[email protected] opt]# java -version
java version "1.8.0_171"
Java(TM) SE Runtime Environment (build 1.8.0_171-b11)
Java HotSpot(TM) 64-Bit Server VM (build 25.171-b11, mixed mode)
4、加两条系统优化参数(因为后面ES服务会用到,所以别说那么多加上吧。)
[[email protected] opt]# vim /etc/sysctl.conf
vm.max_map_count=262144
[[email protected] opt]# vim /etc/security/limits.conf
...最下面加
* soft nofile 65536
* hard nofile 65536
* soft nproc 65536
* hard nproc 65536
二、Kafka+Zookeeper集群部署
1、Zookeeper
[[email protected] opt]# mkdir /home/zookeeper
[[email protected] opt]# tar xf zookeeper-3.4.10.tar.gz -C /home/zookeeper/ && cd /home/zookeeper/zookeeper-3.4.10
[[email protected] zookeeper-3.4.10]# vim conf/zoo.cfg
tickTime=2000
initLimit=10
syncLimit=10
dataDir=/home/zookeeper/data
dataLogDir=/home/zookeeper/log
clientPort=2181
server.1=192.168.101.55:2888:3888
server.2=192.168.101.56:2888:3888
server.3=192.168.101.57:2888:3888
注:echo "1" > /home/zookeeper/data/myid 三台机器上必须都要创建myid文件。看着点,1~3节点ID是不一样的(按上面配置server.*去每台机器做配置)
# 批量拷贝文件到各节点
[[email protected] zookeeper-3.4.10]# for i in {55, 56, 57};do scp conf/zoo.cfg [email protected]$i:/home/zookeeper/conf/ ;done
重要事说三遍:每台机器都要做myid
启动三台zookeeper服务
# 报什么先不用管,启动完在讲
[[email protected] zookeeper-3.4.10]# bin/zkServer.sh start
# 每台机器都执行一下,总会有一个leader(无报错则启动完成。有报错先看日志。。。日志。。。日志)
[[email protected] zookeeper-3.4.10]# bin/zkServer.sh status
ZooKeeper JMX enabled by default
Using config: /home/zookeeper/zookeeper-3.4.10/bin/../conf/zoo.cfg
Mode: follower
2、kafka
[[email protected] opt]# mkdir /home/kafka
# 先备份
[[email protected] opt]# tar xf kafka_2.12-0.10.2.1.tgz -C /home/kafka/ && cd /home/kafka/kafka_2.12-0.10.2.1/
#每个节点都要改(标红的哈),别忘了。
broker.id=1
delete.topic.enable=true
listeners=PLAINTEXT://192.168.101.55:9092
num.network.threads=4
num.io.threads=8
socket.send.buffer.bytes=102400
socket.receive.buffer.bytes=102400
socket.request.max.bytes=104857600
log.dirs=/home/kafka/kafka-logs
num.partitions=3
num.recovery.threads.per.data.dir=1
log.retention.hours=168
log.segment.bytes=1073741824
log.retention.check.interval.ms=300000
zookeeper.connect=192.168.101.55:2181,192.168.101.56:2181,192.168.101.57:2181
zookeeper.connection.timeout.ms=6000
# 是时候启动了
[[email protected] kafka_2.12-0.10.2.1]# nohup bin/kafka-server-start.sh config/server.properties &
# 创建一个topic测试
bin/kafka-topics.sh --create --topic tg_system_log --zookeeper 192.168.101.55:2181,192.168.101.56:2181,192.168.101.57:2181 --partitions 3 --replication-factor 1
# 创建一个生产者
bin/kafka-console-producer.sh --broker-list 192.169.101.57:9092 --topic tg_system_log
# 创建一个消费者
bin/kafka-console-consumer.sh --bootstrap-server 192.168.101.57:9092 --topic tg_system_log
注:生产者里发消息,消费者如果有接收那这个架构也部署完成了。(有问题请先看日志。。。日志。。。日志)
三、配置Logstash(数据采集)
1、检查安装包(两个包必须都要有)
[[email protected] kafka_2.12-0.10.2.1]# tar xf logstash-6.2.3.tar.gz -C /home && cd /home
# 创建此采集文件,本次案例采集的message和docker日志(注意标红点)
[[email protected] logstash-6.2.3]# vim conf/system_up.conf
input {
file {
path => "/var/log/messages"
start_position => "beginning"
type => "system-log"
discover_interval => 2
}
file {
path => "/var/lib/docker/containers/*/*-json.log"
start_position => "beginning"
type => "docker-log"
discover_interval => 2
}
}
output {
if [type] == "system-log" {
kafka {
bootstrap_servers => "192.168.101.55:9092"
topic_id => "tg_system_log"
compression_type => "snappy"
}
}
else if [type] == "docker-log" {
kafka {
bootstrap_servers => "192.168.101.55:9092"
topic_id => "tg_docker_log"
compression_type => "snappy"
}
}
}
[[email protected] kafka_2.12-0.10.2.1]# systemctl start rsyslog.service
# 功能测试
[[email protected] kafka_2.12-0.10.2.1]# bin/kafka-console-consumer.sh --bootstrap-server 192.168.101.55:9092 --topic tg_system_log
# 为了快捷手动创建日志
向/var/log/message里插数据,看topic里是否有数据,如果有则配置成功。
四、配置ES(node1~node3都要配置)
注:创建一个普通用户,把包放到该用户下。
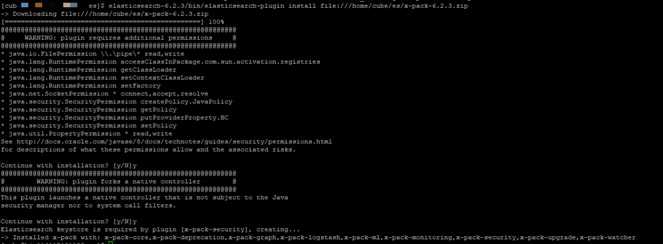
1、切记需要安装x-pack
[[email protected] es]$ elasticsearch-6.2.3/bin/elasticsearch-plugin install file:///home/cube/es/x-pack-6.2.3.zip (三台机器要安装)

[[email protected] es]$ vim elasticsearch-6.2.3/config/elasticsearch.yml
cluster.name: master-cluster
node.name: node1 (三台机器要改动)
node.master: true
node.data: true
path.data: /home/cube/es/elasticsearch-6.2.3/data
path.logs: /home/cube/es/elasticsearch-6.2.3/log
network.host: 192.168.101.55 (三台机器要改动)
http.port: 9200
discovery.zen.ping.unicast.hosts: ["192.168.101.55", "192.168.101.57", "192.168.101.57"]
# 选举时需要的节点连接数
discovery.zen.minimum_master_nodes: 2
# 一个节点多久ping一次,默认1s
discovery.zen.fd.ping_interval: 1s
# 等待ping返回时间,默认30s
discovery.zen.fd.ping_timeout: 10s
# ping超时重试次数,默认3次
discovery.zen.fd.ping_retries: 3
2、启动检测(三台都要启动)
[[email protected] elasticsearch-6.2.3]$ bin/elasticsearch -d
# 查看master-cluster.log日志,无报错则启动无问题
3、设置密码
[[email protected] ~]$ elasticsearch-6.2.4/bin/x-pack/setup-passwords interactive

五、配置kibana
1、安装x-pack
[[email protected] kibana]# bin/kibana-plugin install file:///home/kibana/x-pack-6.2.3.zip
2、修改配置kibana.yml
[[email protected] kibana]# vim config/kibana.yml
server.port: 5601
server.host: "192.168.101.55"
elasticsearch.url: "http://192.168.101.55:9200"
elasticsearch.username: "elastic"
elasticsearch.password: "elastic"
3、启动kibana
[[email protected] kibana]# bin/kibana
# 浏览器打开URL:http://192.168.101.55:5601
# 登录后找Monitoring>>Nodes:3可以看到ES的节点数。
六、配置Logstash(数据整合中间件)
1、创建conf目录,然后在里面创建kafka_to_es.conf文件
[[email protected] logstash-6.2.3]# vim conf/kafka_to_es.conf
input {
kafka {
bootstrap_servers => ["192.168.101.55:9082"]
topics => ["tg_system_log"]
codec => "json"
type => "system_log"
consumer_threads => 5
decorate_events => true
}
kafka {
bootstrap_servers => ["192.168.101.55:9082"]
topics => ["tg_docker_log"]
codec => "json"
type => "docker_log"
consumer_threads => 5
decorate_events => true
}
}
output {
if [type] == "system_log"{
elasticsearch {
hosts => ["192.168.101.55:9200","192.168.101.56:9200","192.168.101.56:9200"]
index => "systems-logs-%{+YYY.MM.dd}"
user => elastic
password => elastic
}
}
else if [type] == "docker_log" {
elasticsearch {
hosts => ["192.168.101.55:9200","192.168.101.56:9200","192.168.101.56:9200"]
index => "dockers-logs-%{+YYY.MM.dd}"
user => elastic
password => elastic
}
}
}
这里直接启动logstash即可
七、打开kibana页面
点开Management>>index Patterns创建一个新的Index这里会出现中间件output的index配置名字。直接创建index即可。到此配置已完在。
补充内容:
本来想着用fluentd把docker输出日志传到kafka,但是没成功这里直接传到ES,后续在研究吧。或许有其他大神完成也可以分享一下文档我学习一下。
1、配置fluentd服务
[[email protected] ~]# rpm -qa | grep td-agent
td-agent-3.4.0-0.el7.x86_64
2、需要先安装fluent-plugin-elasticsearch(更新ruby2.5 看下面文献)
[[email protected] ~]# gem install fluent-plugin-elasticsearch
[[email protected] ~]# vim /etc/td-agent/td-agent.conf
<source>
@type debug_agent
@id input_debug_agent
bind 127.0.0.1
port 24230
</source>
<match docker.**>
type stdout
</match>
<match nginx-test.**>
type elasticsearch
host 192.168.101.55
port 9200
user elastic
password elastic
logstash_format true
logstash_prefix docker
logstash_dateformat %Y_%m
index_name docker_log
flush_interval 5s
type_name docker
include_tag_key true
</match>
3、启动docker
docker run -d --log-driver fluentd --log-opt fluentd-address=localhost:24224 --log-opt tag="nginx-test" --log-opt fluentd-async-connect --name nginx-test -p 9080:80 nginx
其他按第七步操作。
更新ruby看:https://blog.csdn.net/qq_26440803/article/details/82717244
其他文献:https://blog.csdn.net/qq_26440803/article/details/82717244
以上是关于Kafka+ELK完成日志采集处理的主要内容,如果未能解决你的问题,请参考以下文章
「视频小课堂」ELK和Kafka是怎么就玩在一起成了日志采集解决方案文字版
分布式ELK+KAFKA日志采集 docker-compose