ELK
Posted -abm
tags:
篇首语:本文由小常识网(cha138.com)小编为大家整理,主要介绍了ELK相关的知识,希望对你有一定的参考价值。
参考原文:
https://blog.51cto.com/zero01/2079879
ELK介绍
需求背景:
- 业务发展越来越庞大,服务器越来越多
- 各种访问日志、应用日志、错误日志量越来越多,导致运维人员无法很好的去管理日志
- 开发人员排查问题,需要到服务器上查日志,不方便
- 运营人员需要一些数据,需要我们运维到服务器上分析日志
为什么要用到ELK:
一般我们需要进行日志分析场景:直接在日志文件中 grep、awk 就可以获得自己想要的信息。但在规模较大也就是日志量多而复杂的场景中,此方法效率低下,面临问题包括日志量太大如何归档、文本搜索太慢怎么办、如何多维度查询。需要集中化的日志管理,所有服务器上的日志收集汇总。常见解决思路是建立集中式日志收集系统,将所有节点上的日志统一收集,管理,访问。
大型系统通常都是一个分布式部署的架构,不同的服务模块部署在不同的服务器上,问题出现时,大部分情况需要根据问题暴露的关键信息,定位到具体的服务器和服务模块,构建一套集中式日志系统,可以提高定位问题的效率。
一个完整的集中式日志系统,需要包含以下几个主要特点:
- 收集-能够采集多种来源的日志数据
- 传输-能够稳定的把日志数据传输到中央系统
- 存储-如何存储日志数据
- 分析-可以支持 UI 分析
- 警告-能够提供错误报告,监控机制
而ELK则提供了一整套解决方案,并且都是开源软件,之间互相配合使用,完美衔接,高效的满足了很多场合的应用。是目前主流的一种日志系统。
ELK简介:
ELK是三个开源软件的缩写,分别为:Elasticsearch 、 Logstash以及Kibana , 它们都是开源软件。不过现在还新增了一个Beats,它是一个轻量级的日志收集处理工具(Agent),Beats占用资源少,适合于在各个服务器上搜集日志后传输给Logstash,官方也推荐此工具,目前由于原本的ELK Stack成员中加入了 Beats 工具所以已改名为Elastic Stack。
Elastic Stack包含:
-
Elasticsearch是个开源分布式搜索引擎,提供搜集、分析、存储数据三大功能。它的特点有:分布式,零配置,自动发现,索引自动分片,索引副本机制,restful风格接口,多数据源,自动搜索负载等。详细可参考Elasticsearch权威指南
-
Logstash 主要是用来日志的搜集、分析、过滤日志的工具,支持大量的数据获取方式。一般工作方式为c/s架构,client端安装在需要收集日志的主机上,server端负责将收到的各节点日志进行过滤、修改等操作在一并发往elasticsearch上去。
-
Kibana 也是一个开源和免费的工具,Kibana可以为 Logstash 和 ElasticSearch 提供的日志分析友好的 Web 界面,可以帮助汇总、分析和搜索重要数据日志。
- Beats在这里是一个轻量级日志采集器,其实Beats家族有6个成员,早期的ELK架构中使用Logstash收集、解析日志,但是Logstash对内存、cpu、io等资源消耗比较高。相比 Logstash,Beats所占系统的CPU和内存几乎可以忽略不计
ELK Stack (5.0版本之后)--> Elastic Stack == (ELK Stack + Beats)。目前Beats包含六种工具:
- Packetbeat: 网络数据(收集网络流量数据)
- Metricbeat: 指标 (收集系统、进程和文件系统级别的 CPU 和内存使用情况等数据)
- Filebeat: 日志文件(收集文件数据)
- Winlogbeat: windows事件日志(收集 Windows 事件日志数据)
- Auditbeat:审计数据 (收集审计日志)
- Heartbeat:运行时间监控 (收集系统运行时的数据)
关于x-pack工具:
- x-pack对Elastic Stack提供了安全、警报、监控、报表、图表于一身的扩展包,是收费的,所以本文不涉及x-pack的安装
ELK官网:
中文指南:
https://www.gitbook.com/book/chenryn/elk-stack-guide-cn/details
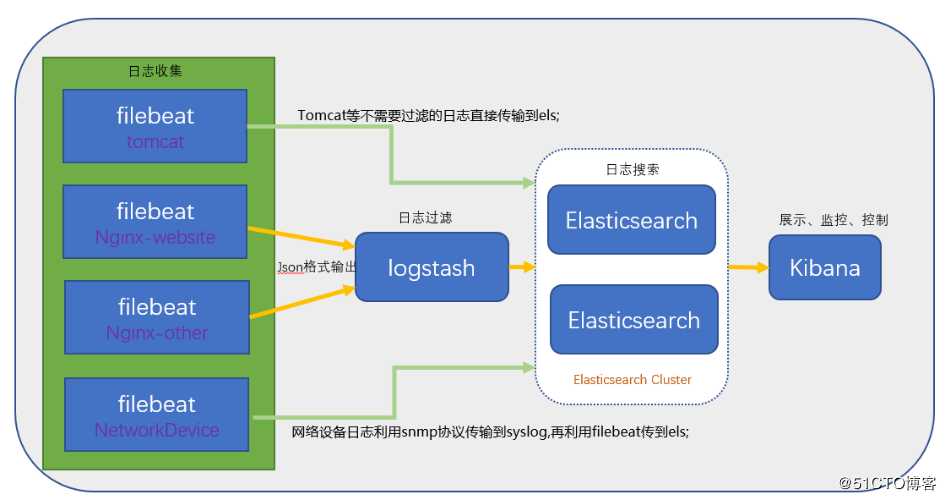
ELK架构图:
ELK安装准备工作
环境:SentOS7
准备3台机器,这样才能完成分布式集群的实验,当然能有更多机器更好:
- master:192.168.137.111
- node1:192.168.137.121
- node2:192.168.137.122
角色划分:
- 3台机器全部安装jdk1.8,因为elasticsearch是java开发的
- 3台全部安装elasticsearch (后续都简称为es)
- 192.168.137.111作为主节点
- 192.168.137.121以及192.168.137.122作为数据节点
- 主节点上需要安装kibana
- 在192.168.137.121上安装 logstash
ELK版本信息:
- elasticsearch-6.7.2
- kabana-6.7.2
- logstash-6.7.2
- filebeat-6.7.2
主机hosts文件配置:
$ vim /etc/hosts#elk
192.168.137.111 master
192.168.137.121 node01
192.168.137.122 node02
然后三台机器都得关闭防火墙或清空防火墙规则。
三台主机都安装jdk1.8:
下载:https://www.oracle.com/technetwork/java/javase/downloads/java-archive-javase8-2177648.html
解压:tar -zxvf  jdk-8u202-linux-x64.tar.gz

[[email protected] jvm]# mv /tools/jdk1.8.0_202/ /lib/jvm
[[email protected] tools]#
配置环境变量:
如果是对所有的用户都生效就修改vi /etc/profile 文件
如果只针对当前用户生效就修改 vi ~/.bahsrc 文件
在文件底部添加如下代码,如果上一步的路径和我的不一致要改一下
$ vi /etc/profile
#jdk
export JAVA_HOME=/lib/jvm
export JRE_HOME=${JAVA_HOME}/jre
export CLASSPATH=.:${JAVA_HOME}/lib:${JRE_HOME}/lib
export PATH=${JAVA_HOME}/bin:$PATH
使环境变量生效:运行 source /etc/profile使/etc/profile文件生效
$ source /etc/profile
验证:使用 java -version 和 javac -version 命令查看jdk版本及其相关信息,不会出现command not found错误,且显示的版本信息与前面安装的一致
安装配置es
官方配置文档:https://www.elastic.co/guide/en/elasticsearch/reference/6.0/rpm.html
设置es的yum,并安装
[[email protected] ~]# rpm --import https://packages.elastic.co/GPG-KEY-elasticsearch    //下载并安装公共签名密匙

如遇到报错,命令加   --no-check-certificate   下载后import
[[email protected] ~]# wget https://packages.elastic.co/GPG-KEY-elasticsearch --no-check-certificate

[[email protected] ~]# rpm --import GPG-KEY-elasticsearch


添加es的yum
[[email protected] ~]# vim /etc/yum.repos.d/elasticsearch.repo
[elasticsearch-6.x]
name=Elasticsearch repository for 6.x packages
baseurl=https://artifacts.elastic.co/packages/6.x/yum
gpgcheck=1
gpgkey=https://artifacts.elastic.co/GPG-KEY-elasticsearch
enabled=1
autorefresh=1
type=rpm-md

 安装:yum install elasticsearch
配置elasticsearch后yum安装出现了奇葩的问题,主要原因是curl需要升级到最新:yum update -y nss curl libcurl

[[email protected] yum.repos.d]# yum install elasticsearch
Loaded plugins: fastestmirror, langpacks
https://artifacts.elastic.co/packages/6.x/yum/repodata/repomd.xml: [Errno 14] curl#35 - "Peer reports incompatible or unsupported protocol version."
Trying other mirror.


 One of the configured repositories failed (Elasticsearch repository for 6.x packages),
 and yum doesn‘t have enough cached data to continue. At this point the only
 safe thing yum can do is fail. There are a few ways to work "fix" this:

     1. Contact the upstream for the repository and get them to fix the problem.

     2. Reconfigure the baseurl/etc. for the repository, to point to a working
        upstream. This is most often useful if you are using a newer
        distribution release than is supported by the repository (and the
        packages for the previous distribution release still work).

     3. Run the command with the repository temporarily disabled
            yum --disablerepo=sticsearch-6.x ...

     4. Disable the repository permanently, so yum won‘t use it by default. Yum
        will then just ignore the repository until you permanently enable it
        again or use --enablerepo for temporary usage:

            yum-config-manager --disable sticsearch-6.x
        or
            subscription-manager repos --disable=sticsearch-6.x

     5. Configure the failing repository to be skipped, if it is unavailable.
        Note that yum will try to contact the repo. when it runs most commands,
        so will have to try and fail each time (and thus. yum will be be much
        slower). If it is a very temporary problem though, this is often a nice
        compromise:

            yum-config-manager --save --setopt=sticsearch-6.x.skip_if_unavailable=true

failure: repodata/repomd.xml from sticsearch-6.x: [Errno 256] No more mirrors to try.
https://artifacts.elastic.co/packages/6.x/yum/repodata/repomd.xml: [Errno 14] curl#35 - "Peer reports incompatible or unsupported protocol version."
问题解决:

先停用es源,将elasticsearch.repo中的enabled=1改为enabled=0,再执行
# yum update -y nss curl libcurl

再启用es源,重新yum安装es即可
如果太慢的话可以直接下载rpm包安装:
[[email protected] ~]# wget https://artifacts.elastic.co/downloads/elasticsearch/elasticsearch-6.7.2.rpm
[[email protected] ~]# rpm -ivh elasticsearch-6.7.2.rpm
配置es
官方的配置文档:https://www.elastic.co/guide/en/elasticsearch/reference/6.0/rpm.html
/etc/elasticsearch/elasticsearch.yml 文件用于配置集群节点等相关信息
/etc/sysconfig/elasticsearch 文件则是配置服务本身相关的配置,例如某个配置文件的路径以及java的一些路径配置什么的
[[email protected] ~]# vim /etc/elasticsearch/elasticsearch.yml  # 增加或更改以下内容
cluster.name: master-node  # 集群中的名称
node.name: master  # 该节点名称
node.master: true  # 意思是该节点为主节点
node.data: false  # 表示这不是数据节点
network.host: 0.0.0.0  # 监听全部ip,在实际环境中应设置为一个安全的ip
http.port: 9200  # es服务的端口号
discovery.zen.ping.unicast.hosts: ["192.168.137.111", "192.168.137.121", "192.168.137.122"] # 配置自动发现
然后修改node节点配置
[[email protected] ~]# vim /etc/elasticsearch/elasticsearch.yml
cluster.name: master-node # 集群中的名称
node.name: node01 # 该节点名称
node.master: false # 意思是该节点为主节点
node.data: true # 表示这不是数据节点
network.host: 0.0.0.0  # 监听全部ip,在实际环境中应设置为一个安全的ip
http.port: 9200  # es服务的端口号
discovery.zen.ping.unicast.hosts: ["192.168.137.111", "192.168.137.121", "192.168.137.122"] # 配置自动发现
配置完成,依次在主节点上启动es,然后启动其他节点es
systemctl start elasticsearch.service
启动失败的问题解决:
[[email protected] ~]# systemctl status elasticsearch.service
● elasticsearch.service - Elasticsearch
   Loaded: loaded (/usr/lib/systemd/system/elasticsearch.service; disabled; vendor preset: disabled)
   Active: failed (Result: exit-code) since Mon 2019-05-13 21:13:34 CST; 3s ago
     Docs: http://www.elastic.co
  Process: 31521 ExecStart=/usr/share/elasticsearch/bin/elasticsearch -p ${PID_DIR}/elasticsearch.pid --quiet (code=exited, status=1/FAILURE)
 Main PID: 31521 (code=exited, status=1/FAILURE)

May 13 21:13:34 master systemd[1]: Started Elasticsearch.
May 13 21:13:34 master elasticsearch[31521]: which: no java in (/usr/local/sbin:/usr/local/bin:/usr/sbin:/usr/bin)
May 13 21:13:34 master elasticsearch[31521]: warning: Falling back to java on path. This behavior is deprecated. Specify JAVA_HOME
May 13 21:13:34 master elasticsearch[31521]: could not find java; set JAVA_HOME
May 13 21:13:34 master systemd[1]: elasticsearch.service: main process exited, code=exited, status=1/FAILURE
May 13 21:13:34 master systemd[1]: Unit elasticsearch.service entered failed state.
May 13 21:13:34 master systemd[1]: elasticsearch.service failed.


提示找不到java_home,但是我的jdk已经正常配置,应该是要在es的配置文件中再配置一下(echo $JAVA_HOME获取系统java_home路径)
[[email protected] ~]# vim /etc/sysconfig/elasticsearch

################################
# Elasticsearch
################################

# Elasticsearch home directory
#ES_HOME=/usr/share/elasticsearch

# Elasticsearch Java path
JAVA_HOME=/lib/jvm
再次启动es服务,这次就终于启动成功了:
[[email protected] ~]# ps aux |grep elasticsearch
elastic+  31816  8.2 34.0 3693980 1314872 ?     Ssl  21:16   0:38 /lib/jvm/bin/java -Xms1g -Xmx1g -XX:+UseConcMarkSweepGC -XX:CMSInitiatingOccupancyFraction=75 -XX:+UseCMSInitiatingOccupancyOnly -Des.networkaddress.cache.ttl=60 -Des.networkaddress.cache.negative.ttl=10 -XX:+AlwaysPreTouch -Xss1m -Djava.awt.headless=true -Dfile.encoding=UTF-8 -Djna.nosys=true -XX:-OmitStackTraceInFastThrow -Dio.netty.noUnsafe=true -Dio.netty.noKeySetOptimization=true -Dio.netty.recycler.maxCapacityPerThread=0 -Dlog4j.shutdownHookEnabled=false -Dlog4j2.disable.jmx=true -Djava.io.tmpdir=/tmp/elasticsearch-1164940414714088494 -XX:+HeapDumpOnOutOfMemoryError -XX:HeapDumpPath=/var/lib/elasticsearch -XX:ErrorFile=/var/log/elasticsearch/hs_err_pid%p.log -XX:+PrintGCDetails -XX:+PrintGCDateStamps -XX:+PrintTenuringDistribution -XX:+PrintGCApplicationStoppedTime -Xloggc:/var/log/elasticsearch/gc.log -XX:+UseGCLogFileRotation -XX:NumberOfGCLogFiles=32 -XX:GCLogFileSize=64m -Des.path.home=/usr/share/elasticsearch -Des.path.conf=/etc/elasticsearch -Des.distribution.flavor=default -Des.distribution.type=rpm -cp /usr/share/elasticsearch/lib/* org.elasticsearch.bootstrap.Elasticsearch -p /var/run/elasticsearch/elasticsearch.pid --quiet
elastic+  31895  0.0  0.1  72084  5084 ?        Sl   21:16   0:00 /usr/share/elasticsearch/modules/x-pack-ml/platform/linux-x86_64/bin/controller
root      32366  0.0  0.0 112636   984 pts/3    S+   21:24   0:00 grep --color=auto elasticsearch
[[email protected] ~]# netstat -lntp |grep java  # es服务会监听两个端口
tcp6       0      0 :::9200                 :::*                    LISTEN      31816/java
tcp6       0      0 :::9300                 :::*                    LISTEN      31816/java
9300端口是集群通信用的,9200则是数据传输时用的。
主节点启动成功后,依次启动其他节点即可,我这里其他节点都是启动正常的。
[[email protected] ~]# netstat -lntp |grep java
tcp6       0      0 :::9200                 :::*                    LISTEN      31816/java
tcp6       0      0 :::9300                 :::*                    LISTEN      31816/java

[[email protected] ~]# netstat -lntp |grep java
tcp6       0      0 127.0.0.1:9200          :::*                    LISTEN      72001/java
tcp6       0      0 ::1:9200                :::*                    LISTEN      72001/java
tcp6       0      0 127.0.0.1:9300          :::*                    LISTEN      72001/java
tcp6       0      0 ::1:9300                :::*                    LISTEN      72001/java

[[email protected] ~]# netstat -lntp |grep java
tcp6       0      0 127.0.0.1:9200          :::*                    LISTEN      53079/java
tcp6       0      0 ::1:9200                :::*                    LISTEN      53079/java
tcp6       0      0 127.0.0.1:9300          :::*                    LISTEN      53079/java
tcp6       0      0 ::1:9300                :::*                    LISTEN      53079/java
检查es
curl检查es群集健康情况
[[email protected] ~]# curl ‘192.168.137.111:9200/_cluster/health?pretty‘
{
  "cluster_name" : "master-node",
  "status" : "green",     //green就代表健康,如果是yellow或red则有问题
  "timed_out" : false,    //是否有超时
  "number_of_nodes" : 3,     //群集中的节点数量
  "number_of_data_nodes" : 2,   //群集中的data节点的数量
  "active_primary_shards" : 0,
  "active_shards" : 0,
  "relocating_shards" : 0,
  "initializing_shards" : 0,
  "unassigned_shards" : 0,
  "delayed_unassigned_shards" : 0,
  "number_of_pending_tasks" : 0,
  "number_of_in_flight_fetch" : 0,
  "task_max_waiting_in_queue_millis" : 0,
  "active_shards_percent_as_number" : 100.0
}
查询群集详细信息
[[email protected] ~]# curl ‘192.168.137.111:9200/_cluster/state?pretty‘
这个集群的状态信息也可以通过浏览器查看:
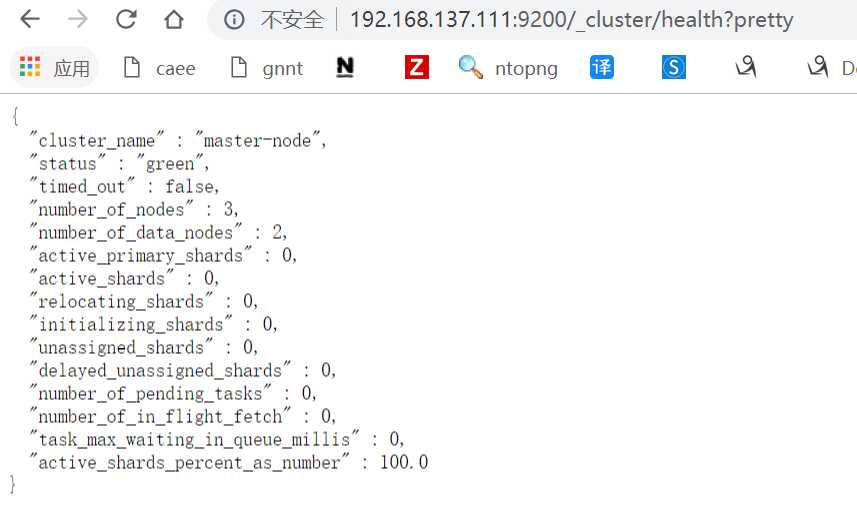
但是显示出来的也是一堆字符串,我们希望这些信息能以图形化的方式显示出来,那就需要安装kibana来为我们展示这些数据了。
更多使用curl命令操作elasticsearch的内容,可参考以下文章:
http://zhaoyanblog.com/archives/732.html
安装配置kibana
由于上一篇中我们已经配置过yum源,这里就不用再配置了,直接yum安装即可,安装命令如下,在主节点上安装:
[[email protected] ~]# yum install -y kibana
若yum安装的速度太慢,可以直接下载rpm包来进行安装:
[[email protected]~]# wget https://artifacts.elastic.co/downloads/kibana/kibana-6.7.2-x86_64.rpm
[[email protected]~]# rpm -ivh kibana-6.7.2-x86_64.rpm
安装完成后对kibana进行配置:
[[email protected] ~]# vim /etc/kibana/kibana.yml  # 增加以下内容
server.port: 5601  # 配置kibana的端口
server.host: 192.168.137.111  # 配置监听ip
elasticsearch.url: "http://192.168.137.111:9200"  # 配置es服务器的ip,如果是集群则配置该集群中主节点的ip
logging.dest: /var/log/kibana.log  # 配置kibana的日志文件路径,不然默认是messages里记录日志
创建日志文件
[[email protected] ~]# touch /var/log/kibana.log; chmod 777 /var/log/kibana.log
启动kibana服务,并检查进程和监听端口:
[[email protected] ~]# systemctl start kibana
[[email protected] ~]# ps aux |grep kibana
kibana    36351  117  4.5 1262056 174212 ?      Rsl  22:26   0:07 /usr/share/kibana/bin/../node/bin/node --no-warnings --max-http-header-size=65536 /usr/share/kibana/bin/../src/cli -c /etc/kibana/kibana.yml
root      36368  0.0  0.0 112636   976 pts/3    R+   22:26   0:00 grep --color=auto kibana
[[email protected] ~]#  netstat -lntp |grep 5601
tcp        0      0 192.168.137.111:5601    0.0.0.0:*               LISTEN      36351/node
注:由于kibana是使用node.js开发的,所以进程名称为node
然后在浏览器里进行访问,如:http://192.168.137.111:5601/ ,由于我们并没有安装x-pack,所以此时是没有用户名和密码的,可以直接访问的:


到此我们的kibana就安装完成了,很简单,接下来就是安装logstash,不然kibana是没法用的。
安装配置logstash
在192.168.137.111上安装logstash,但是要注意的是目前logstash不支持JDK1.9。
直接yum安装,安装命令如下:
[[email protected] ~]# yum install -y logstash
如果yum源的速度太慢的话就下载rpm包来进行安装:
[[email protected]de01 ~]#wget https://artifacts.elastic.co/downloads/logstash/logstash-6.7.2.rpm
[[email protected] ~]# rpm -ivh logstash-6.0.0.rpm
安装完之后,先不要启动服务,先配置logstash收集syslog日志:
[[email protected] ~]## vim /etc/logstash/conf.d/syslog.conf  # 加入如下内容
input {  # 定义日志源
  syslog {
    type => "system-syslog"  # 定义类型
    port => 10514    # 定义监听端口
  }
}
output {  # 定义日志输出
  stdout {
    codec => rubydebug  # 将日志输出到当前的终端上显示
  }
}
检测配置文件是否有错:
[[email protected] ~]# cd /usr/share/logstash/bin
[[email protected] bin]# ./logstash --path.settings /etc/logstash/ -f /etc/logstash/conf.d/syslog.conf --config.test_and_exit
Sending Logstash logs to /var/log/logstash which is now configured via log4j2.properties
[2019-05-14T08:30:58,003][INFO ][logstash.setting.writabledirectory] Creating directory {:setting=>"path.queue", :path=>"/var/lib/logstash/queue"}
[2019-05-14T08:30:58,123][INFO ][logstash.setting.writabledirectory] Creating directory {:setting=>"path.dead_letter_queue", :path=>"/var/lib/logstash/dead_letter_queue"}
[2019-05-14T08:30:58,640][WARN ][logstash.config.source.multilocal] Ignoring the ‘pipelines.yml‘ file because modules or command line options are specified
Configuration OK
[2019-05-14T08:31:09,117][INFO ][logstash.runner          ] Using config.test_and_exit mode. Config Validation Result: OK. Exiting Logstash
命令说明:
- --path.settings 用于指定logstash的配置文件所在的目录
- -f 指定需要被检测的配置文件的路径
- --config.test_and_exit 指定检测完之后就退出,不然就会直接启动了
配置kibana服务器的ip以及配置的监听端口:
[[email protected] ~]# vim /etc/rsyslog.conf
#### RULES ####

*.* @@192.168.137.121:10514
重启rsyslog,让配置生效:
[[email protected] ~]# systemctl restart rsyslog
指定配置文件,启动logstash:
[[email protected] ~]# cd /usr/share/logstash/bin
[[email protected] /usr/share/logstash/bin]# ./logstash --path.settings /etc/logstash/ -f /etc/logstash/conf.d/syslog.conf
Sending Logstash‘s logs to /var/log/logstash which is now configured via log4j2.properties
# 这时终端会停留在这里,因为我们在配置文件中定义的是将信息输出到当前终端打开新终端检查一下10514端口是否已被监听:
[[email protected] ~]#  netstat -lntp |grep 10514
tcp6       0      0 :::10514                :::*                    LISTEN      74491/java
然后在别的机器ssh登录到这台机器上,测试一下有没有日志输出:
[[email protected] bin]# ./logstash --path.settings /etc/logstash/ -f /etc/logstash/conf.d/syslog.conf
Sending Logstash logs to /var/log/logstash which is now configured via log4j2.properties
[2019-05-14T08:34:39,044][WARN ][logstash.config.source.multilocal] Ignoring the ‘pipelines.yml‘ file because modules or command line options are specified
[2019-05-14T08:34:39,106][INFO ][logstash.runner          ] Starting Logstash {"logstash.version"=>"6.7.2"}
[2019-05-14T08:34:39,143][INFO ][logstash.agent           ] No persistent UUID file found. Generating new UUID {:uuid=>"0c796314-f630-46bb-9453-f05e5e27fdf4", :path=>"/var/lib/logstash/uuid"}
[2019-05-14T08:34:47,408][INFO ][logstash.pipeline        ] Starting pipeline {:pipeline_id=>"main", "pipeline.workers"=>2, "pipeline.batch.size"=>125, "pipeline.batch.delay"=>50}
[2019-05-14T08:34:47,883][INFO ][logstash.pipeline        ] Pipeline started successfully {:pipeline_id=>"main", :thread=>"#<Thread:0x50abc663 run>"}
[2019-05-14T08:34:47,928][INFO ][logstash.inputs.syslog   ] Starting syslog udp listener {:address=>"0.0.0.0:10514"}
[2019-05-14T08:34:47,933][INFO ][logstash.inputs.syslog   ] Starting syslog tcp listener {:address=>"0.0.0.0:10514"}
[2019-05-14T08:34:48,034][INFO ][logstash.agent           ] Pipelines running {:count=>1, :running_pipelines=>[:main], :non_running_pipelines=>[]}
[2019-05-14T08:34:48,342][INFO ][logstash.agent           ] Successfully started Logstash API endpoint {:port=>9600}

[2019-05-14T08:44:40,777][INFO ][logstash.inputs.syslog   ] new connection {:client=>"192.168.137.121:37190"}
/usr/share/logstash/vendor/bundle/jruby/2.5.0/gems/awesome_print-1.7.0/lib/awesome_print/formatters/base_formatter.rb:31: warning: constant ::Fixnum is deprecated
{
           "message" => "imjournal: 180004 messages lost due to rate-limiting\\n",
         "timestamp" => "May 14 08:44:40",
           "program" => "rsyslogd-2177",
    "severity_label" => "Informational",
          "@version" => "1",
              "type" => "system-syslog",
              "host" => "192.168.137.121",
          "facility" => 5,
          "severity" => 6,
    "facility_label" => "syslogd",
        "@timestamp" => 2019-05-14T00:44:40.000Z,
         "logsource" => "node01",
          "priority" => 46
}
{
           "message" => "Accepted password for root from 192.168.137.111 port 46140 ssh2\\n",
         "timestamp" => "May 14 08:44:40",
           "program" => "sshd",
    "severity_label" => "Informational",
          "@version" => "1",
              "type" => "system-syslog",
              "host" => "192.168.137.121",
          "facility" => 10,
          "severity" => 6,
    "facility_label" => "security/authorization",
               "pid" => "74733",
        "@timestamp" => 2019-05-14T00:44:40.000Z,
         "logsource" => "node01",
          "priority" => 86
}
{
           "message" => "pam_unix(sshd:session): session opened for user root by (uid=0)\\n",
         "timestamp" => "May 14 08:44:40",
           "program" => "sshd",
    "severity_label" => "Informational",
          "@version" => "1",
              "type" => "system-syslog",
              "host" => "192.168.137.121",
          "facility" => 10,
          "severity" => 6,
    "facility_label" => "security/authorization",
               "pid" => "74733",
        "@timestamp" => 2019-05-14T00:44:40.000Z,
         "logsource" => "node01",
          "priority" => 86
}
{
           "message" => "Started Session 203 of user root.\\n",
         "timestamp" => "May 14 08:44:40",
           "program" => "systemd",
    "severity_label" => "Informational",
          "@version" => "1",
              "type" => "system-syslog",
              "host" => "192.168.137.121",
          "facility" => 3,
          "severity" => 6,
    "facility_label" => "system",
        "@timestamp" => 2019-05-14T00:44:40.000Z,
         "logsource" => "node01",
          "priority" => 30
}
{
           "message" => "New session 203 of user root.\\n",
         "timestamp" => "May 14 08:44:40",
           "program" => "systemd-logind",
    "severity_label" => "Informational",
          "@version" => "1",
              "type" => "system-syslog",
              "host" => "192.168.137.121",
          "facility" => 4,
          "severity" => 6,
    "facility_label" => "security/authorization",
        "@timestamp" => 2019-05-14T00:44:40.000Z,
         "logsource" => "node01",
          "priority" => 38
}
{
           "message" => "Received disconnect from 192.168.137.111: 11: disconnected by user\\n",
         "timestamp" => "May 14 08:44:42",
           "program" => "sshd",
    "severity_label" => "Informational",
          "@version" => "1",
              "type" => "system-syslog",
              "host" => "192.168.137.121",
          "facility" => 10,
          "severity" => 6,
    "facility_label" => "security/authorization",
               "pid" => "74733",
        "@timestamp" => 2019-05-14T00:44:42.000Z,
         "logsource" => "node01",
          "priority" => 86
}
{
           "message" => "pam_unix(sshd:session): session closed for user root\\n",
         "timestamp" => "May 14 08:44:42",
           "program" => "sshd",
    "severity_label" => "Informational",
          "@version" => "1",
              "type" => "system-syslog",
              "host" => "192.168.137.121",
          "facility" => 10,
          "severity" => 6,
    "facility_label" => "security/authorization",
               "pid" => "74733",
        "@timestamp" => 2019-05-14T00:44:42.000Z,
         "logsource" => "node01",
          "priority" => 86
}
{
           "message" => "Removed session 203.\\n",
         "timestamp" => "May 14 08:44:42",
           "program" => "systemd-logind",
    "severity_label" => "Informational",
          "@version" => "1",
              "type" => "system-syslog",
              "host" => "192.168.137.121",
          "facility" => 4,
          "severity" => 6,
    "facility_label" => "security/authorization",
        "@timestamp" => 2019-05-14T00:44:42.000Z,
         "logsource" => "node01",
          "priority" => 38
}
如上,可以看到,终端中以JSON的格式打印了收集到的日志,测试成功。
配置logstash
以上只是测试的配置,这一步我们需要重新改一下配置文件,让收集的日志信息输出到es服务器中,而不是当前终端:
[[email protected] ~]# vim /etc/logstash/conf.d/syslog.conf # 更改为如下内容
input {
  syslog {
    type => "system-syslog"
    port => 10514
  }
}
output {
  elasticsearch {
    hosts => ["192.168.137.111:9200"]  # 定义es服务器的ip
    index => "system-syslog-%{+YYYY.MM}" # 定义索引
  }
}
同样的需要检测配置文件有没有错:
[[email protected] bin]# ./logstash --path.settings /etc/logstash/ -f /etc/logstash/conf.d/syslog.conf --config.test_and_exit
Sending Logstash logs to /var/log/logstash which is now configured via log4j2.properties
[2019-05-14T08:49:18,935][WARN ][logstash.config.source.multilocal] Ignoring the ‘pipelines.yml‘ file because modules or command line options are specified
Configuration OK
[2019-05-14T08:49:24,640][INFO ][logstash.runner          ] Using config.test_and_exit mode. Config Validation Result: OK. Exiting Logstash
没问题后,启动logstash服务,并检查进程以及监听端口:
[[email protected] bin]# systemctl start logstash
[[email protected] bin]# ps aux |grep logstash
root      74917  0.0  0.0 112636   984 pts/0    S+   08:51   0:00 grep --color=auto logstash
错误解决:
发现logstash没有正常启动
[[email protected] bin]# systemctl status logstash
● logstash.service - logstash
   Loaded: loaded (/etc/systemd/system/logstash.service; disabled; vendor preset: disabled)
   Active: failed (Result: start-limit) since Tue 2019-05-14 08:53:57 CST; 1s ago
  Process: 74997 ExecStart=/usr/share/logstash/bin/logstash --path.settings /etc/logstash (code=exited, status=1/FAILURE)
 Main PID: 74997 (code=exited, status=1/FAILURE)

May 14 08:53:57 node01 systemd[1]: Unit logstash.service entered failed state.
May 14 08:53:57 node01 systemd[1]: logstash.service failed.
May 14 08:53:57 node01 systemd[1]: logstash.service holdoff time over, scheduling restart.
May 14 08:53:57 node01 systemd[1]: Stopped logstash.
May 14 08:53:57 node01 systemd[1]: start request repeated too quickly for logstash.service
May 14 08:53:57 node01 systemd[1]: Failed to start logstash.
May 14 08:53:57 node01 systemd[1]: Unit logstash.service entered failed state.
May 14 08:53:57 node01 systemd[1]: logstash.service failed.
错误原因:
[[email protected] bin]# tail -f /var/log/messages
May 14 08:53:57 node01 logstash: could not find java; set JAVA_HOME or ensure java is in PATH
解决:
vim /etc/sysconfig/logstash
新增JAVA_HOME=/lib/jvm
我这里启动logstash后,进程是正常存在的,但是9600以及10514端口却没有被监听。于是查看logstash的日志看看有没有错误信息的输出,但是发现没有记录日志信息,那就只能转而去查看messages的日志,发现错误信息如下:
这是因为权限不够,既然是权限不够,那就设置权限即可:
[[email protected] ~]# chown logstash /var/log/logstash/logstash-plain.log
[[email protected]-node1 ~]# ll !$
ll /var/log/logstash/logstash-plain.log
-rw-r--r-- 1 logstash root 7597 Mar  4 04:35 /var/log/logstash/logstash-plain.log
[[email protected]-node1 ~]# systemctl restart logstash
设置完权限重启服务之后,发现还是没有监听端口,查看logstash-plain.log文件记录的错误日志信息如下:

可以看到,依旧是权限的问题,这是因为之前我们以root的身份在终端启动过logstash,所以产生的相关文件的属组属主都是root,同样的,也是设置一下权限即可:
[[email protected] ~]# ll /var/lib/logstash/
total 4
drwxr-xr-x 2 root root 6 May 14 08:30 dead_letter_queue
drwxr-xr-x 2 root root 6 May 14 08:30 queue
-rw-r--r-- 1 root root 36 May 14 08:34 uuid
[[email protected] ~]# chown -R logstash /var/lib/logstash/
[[email protected] ~]# systemctl restart logstash
这次就没问题了,端口正常监听了,这样我们的logstash服务就启动成功了:
[[email protected] ~]# netstat -lntp |grep 9600
tcp6 0 0 127.0.0.1:9600 :::* LISTEN 78824/java
[[email protected] ~]# netstat -lnp | grep 10514
tcp6 0 0 :::10514 :::* LISTEN 78824/java
udp 0 0 0.0.0.0:10514 0.0.0.0:* 78824/java
但是可以看到,logstash的监听ip是127.0.0.1这个本地ip,本地ip无法远程通信,所以需要修改一下配置文件,配置一下监听的ip:
[[email protected] ~]# vim /etc/logstash/logstash.yml
http.host: "192.168.137.121"
[[email protected]-node1 ~]# systemctl restart logstash
[[email protected]-node1 ~]# netstat -lntp |grep 9600
tcp6       0      0 192.168.137.121:9600     :::*                    LISTEN      10091/java
kibana上查看日志
完成了logstash服务器的搭建之后,回到kibana服务器上查看日志,执行以下命令可以获取索引信息:
[[email protected] ~]# curl ‘192.168.137.111:9200/_cat/indices?v‘
health status index                 uuid                   pri rep docs.count docs.deleted store.size pri.store.size
green  open   system-syslog-2019.05 m2FXb2vnSjGypq7fjAustw   5   1          4            0     45.1kb         22.5kb
green  open   .kibana_1             GNnfFYCNTIKswb9d8GtyOw   1   1          3            1     32.9kb         16.4kb
green  open   .kibana_task_manager  0jagFWxpRJu4fNB33LLK3A   1   1          2            0     19.4kb         12.6kb
如上,可以看到,在logstash配置文件中定义的system-syslog索引成功获取到了,证明配置没问题,logstash与es通信正常。
获取指定索引详细信息:
[[email protected] ~]# curl -XGET ‘192.168.137.111:9200/system-syslog-2019.05?pretty‘
{
  "system-syslog-2019.05" : {
    "aliases" : { },
    "mappings" : {
      "doc" : {
        "properties" : {
          "@timestamp" : {
            "type" : "date"
          },
          "@version" : {
            "type" : "text",
            "fields" : {
              "keyword" : {
                "type" : "keyword",
                "ignore_above" : 256
              }
            }
          },
          "facility" : {
            "type" : "long"
          },
          "facility_label" : {
            "type" : "text",
            "fields" : {
              "keyword" : {
                "type" : "keyword",
                "ignore_above" : 256
              }
            }
          },
          "host" : {
            "type" : "text",
            "fields" : {
              "keyword" : {
                "type" : "keyword",
                "ignore_above" : 256
              }
            }
          },
          "logsource" : {
            "type" : "text",
            "fields" : {
              "keyword" : {
                "type" : "keyword",
                "ignore_above" : 256
              }
            }
          },
          "message" : {
            "type" : "text",
            "fields" : {
              "keyword" : {
                "type" : "keyword",
                "ignore_above" : 256
              }
            }
          },
          "pid" : {
            "type" : "text",
            "fields" : {
              "keyword" : {
                "type" : "keyword",
                "ignore_above" : 256
              }
            }
          },
          "priority" : {
            "type" : "long"
          },
          "program" : {
            "type" : "text",
            "fields" : {
              "keyword" : {
                "type" : "keyword",
                "ignore_above" : 256
              }
            }
          },
          "severity" : {
            "type" : "long"
          },
          "severity_label" : {
            "type" : "text",
            "fields" : {
              "keyword" : {
                "type" : "keyword",
                "ignore_above" : 256
              }
            }
          },
          "timestamp" : {
            "type" : "text",
            "fields" : {
              "keyword" : {
                "type" : "keyword",
                "ignore_above" : 256
              }
            }
          },
          "type" : {
            "type" : "text",
            "fields" : {
              "keyword" : {
                "type" : "keyword",
                "ignore_above" : 256
              }
            }
          }
        }
      }
    },
    "settings" : {
      "index" : {
        "creation_date" : "1557837687493",
        "number_of_shards" : "5",
        "number_of_replicas" : "1",
        "uuid" : "m2FXb2vnSjGypq7fjAustw",
        "version" : {
          "created" : "6070299"
        },
        "provided_name" : "system-syslog-2019.05"
      }
    }
  }
}
如果日后需要删除索引的话,使用以下命令可以删除指定索引
curl -XDELETE ‘localhost:9200/system-syslog-2019.05‘
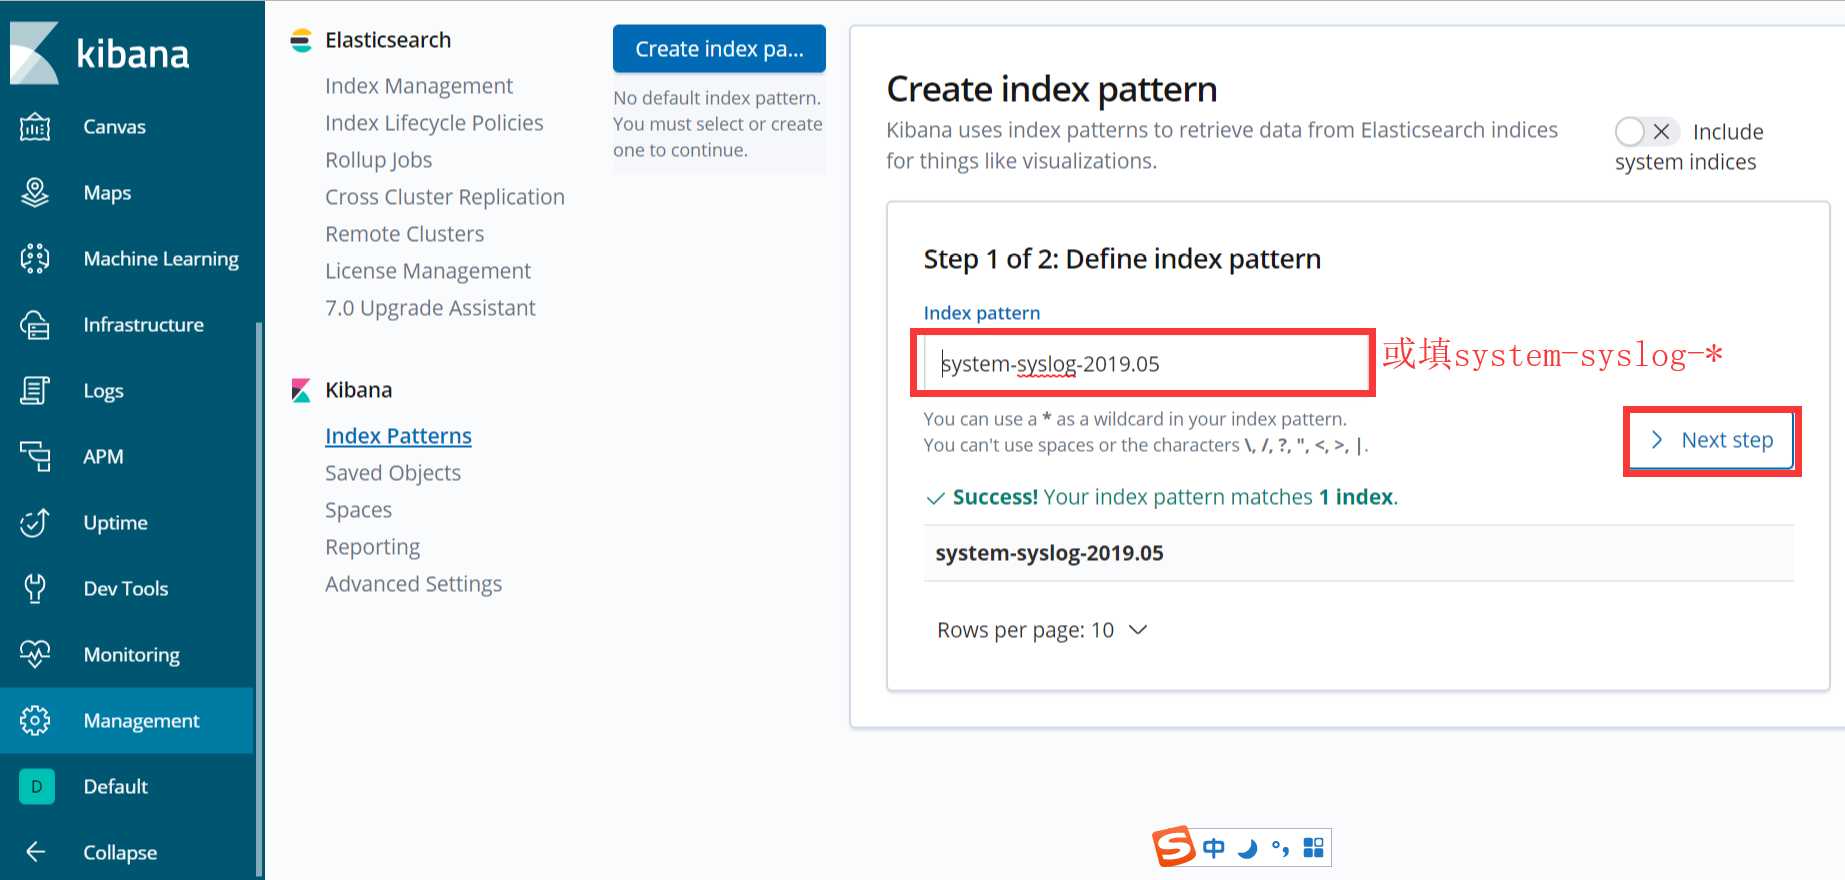
es与logstash能够正常通信后就可以去配置kibana了,浏览器访问192.168.137.111:5601,到kibana页面上配置索引:
点下一步
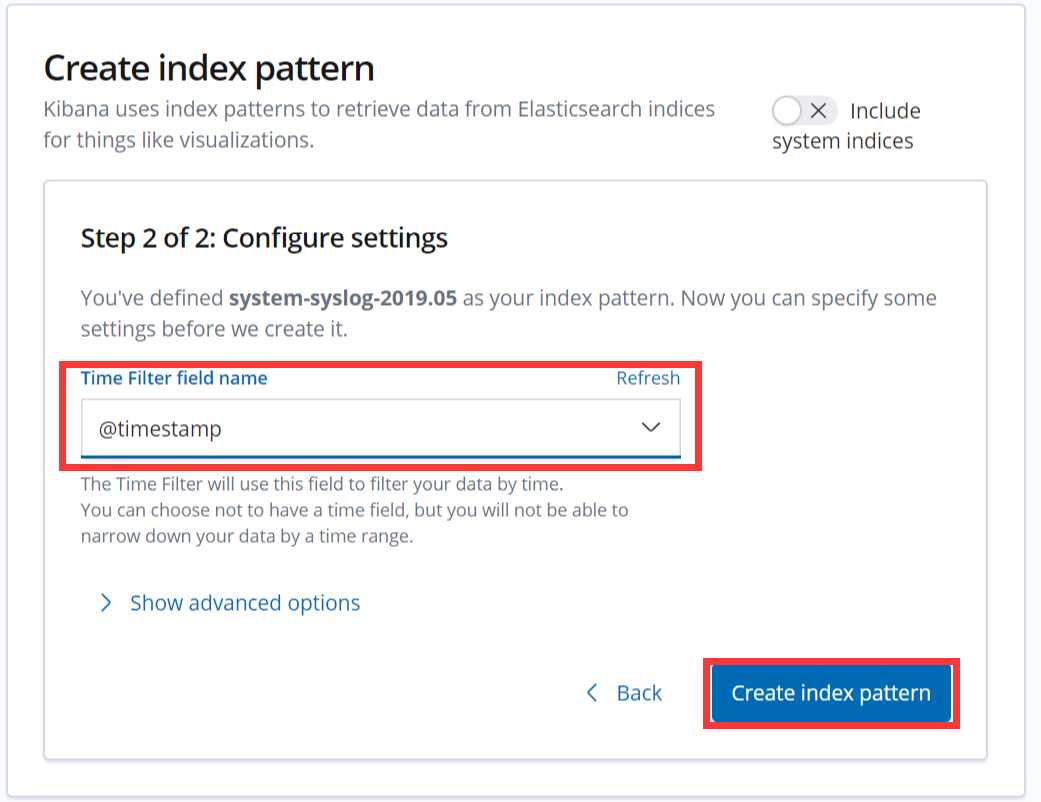
配置成功后点击 “Discover” :
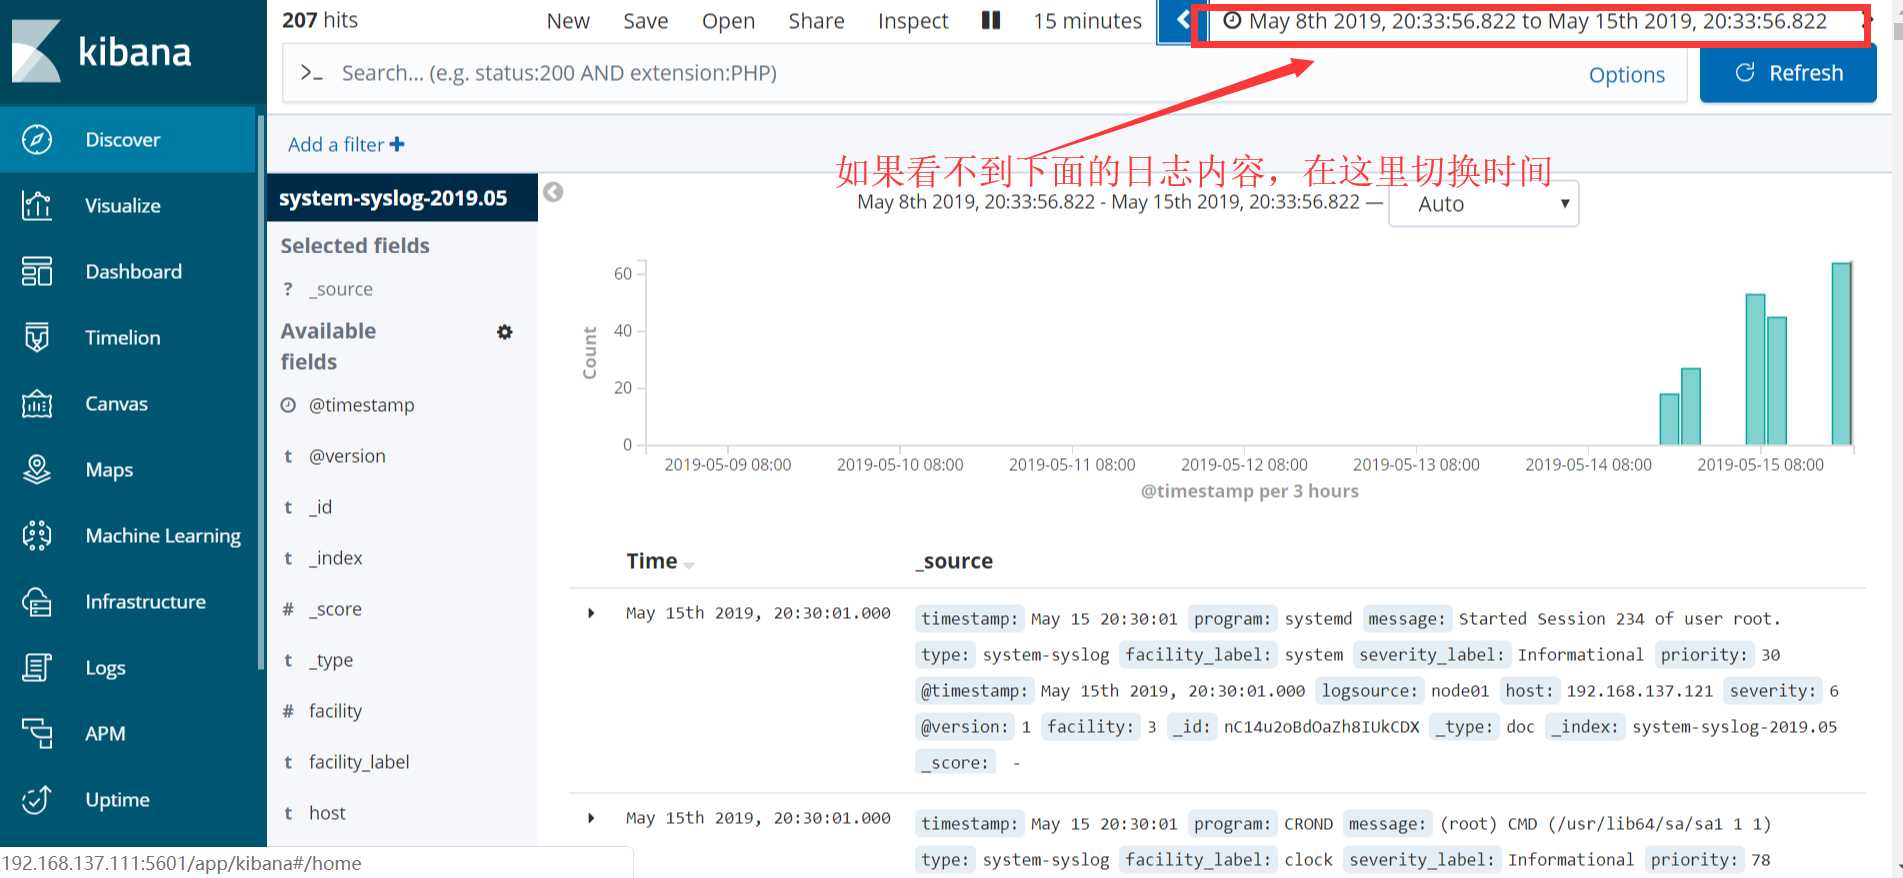
如果以上的数据始终不显示,则在浏览器访问es服务器看反馈信息:
http://192.168.137.111:9200/system-syslog-2019.05/_search?q=*
如下,这是正常返回信息的情况,如果有问题的话是会返回error的:

如果es服务器正常返回信息,但是 “Discover” 页面却依旧显示无法查找到日志信息的话,就使用另一种方式,进入设置删除掉索引:
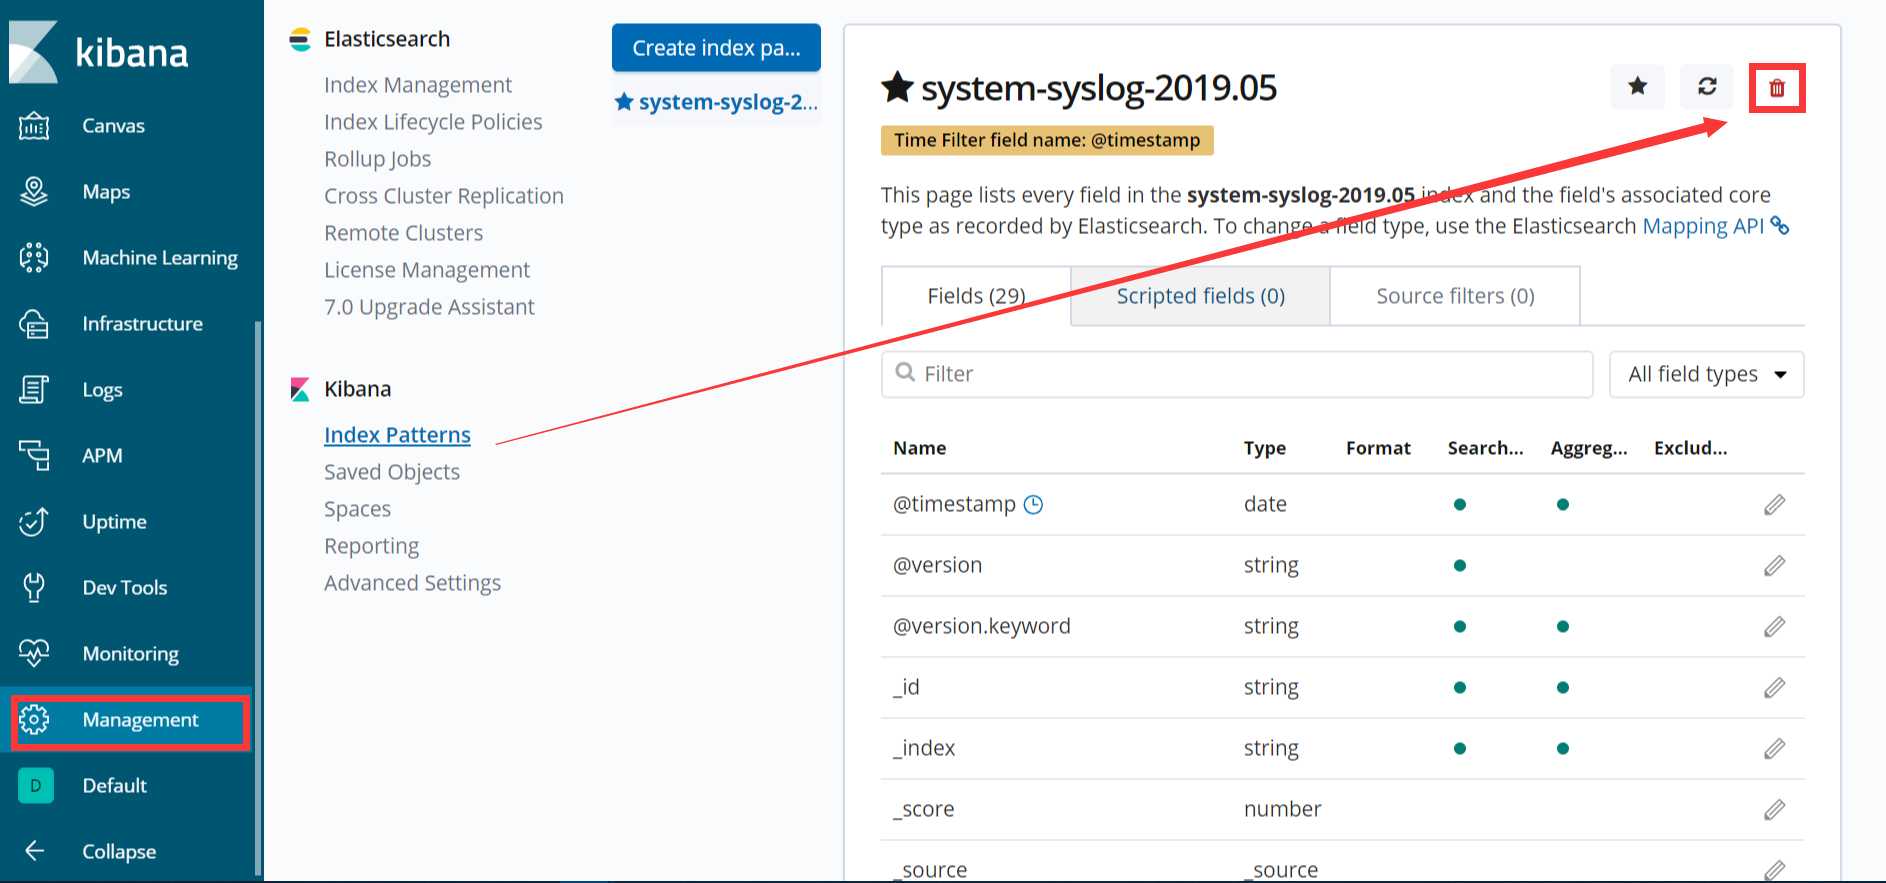
然后重新添加,不过添加的第二步不能再选择@timetimestampe了,但是这种方式只能看到数据,看不到柱状图

其实这里显示的日志数据就是 /var/log/messages 文件里的数据,因为logstash里配置的就是收集messages 文件里的数据。
以上这就是如何使用logstash收集系统日志,输出到es服务器上,并在kibana的页面上进行查看。
收集nginx日志
和收集syslog一样,首先需要编辑配置文件,这一步在logstash服务器上完成:
[[email protected] ~]# vim /etc/logstash/conf.d/nginx.conf  #增加如下内容
input {
  file {  # 指定一个文件作为输入源
    path => "/tmp/elk_access.log"  # 指定文件的路径
    start_position => "beginning"  # 指定何时开始收集
    type => "nginx"  # 定义日志类型,可自定义
  }
}
filter {  # 配置过滤器
    grok {
        match => { "message" => "%{IPORHOST:http_host} %{IPORHOST:clientip} - %{USERNAME:remote_user} \\[%{HTTPDATE:timestamp}\\] \\"(?:%{WORD:http_verb} %{NOTSPACE:http_request}(?: HTTP/%{NUMBER:http_version})?|%{DATA:raw_http_request})\\" %{NUMBER:response} (?:%{NUMBER:bytes_read}|-) %{QS:referrer} %{QS:agent} %{QS:xforwardedfor} %{NUMBER:request_time:float}"}  # 定义日志的输出格式
    }
    geoip {
        source => "clientip"
    }
}
output {
    stdout { codec => rubydebug }
    elasticsearch {
        hosts => ["192.168.137.111:9200"]
        index => "nginx-test-%{+YYYY.MM.dd}"
  }
}
同样的编辑完配置文件之后,还需要检测配置文件是否有错:
[[email protected] ~]# cd /usr/share/logstash/bin
[[email protected] bin]# ./logstash  --path.settings /etc/logstash/ -f /etc/logstash/conf.d/nginx.conf --config.test_and_exit
Sending Logstash logs to /var/log/logstash which is now configured via log4j2.properties
[2019-05-15T20:48:30,317][WARN ][logstash.config.source.multilocal] Ignoring the ‘pipelines.yml‘ file because modules or command line options are specified
Configuration OK
[2019-05-15T20:48:41,768][INFO ][logstash.runner          ] Using config.test_and_exit mode. Config Validation Result: OK. Exiting Logstash
检查完毕之后,进入你的nginx虚拟主机配置文件所在的目录中,新建一个虚拟主机配置文件:
[[email protected] ~]# vim /usr/local/nginx/vhost/elk.conf

server {
      listen 80;
      server_name elk.test.com;

      location / {
          proxy_pass      http://192.168.137.111:5601;
          proxy_set_header Host   $host;
          proxy_set_header X-Real-IP      $remote_addr;
          proxy_set_header X-Forwarded-For $proxy_add_x_forwarded_for;
      }

      access_log  /tmp/elk_access.log main2;
配置nginx的主配置文件,因为需要配置日志格式,在 log_format combined_realip 那一行的下面增加以下内容:
[[email protected] ~]# vim /usr/local/nginx/conf/nginx.conf
   log_format main2 ‘$http_host $remote_addr - $remote_user [$time_local] "$request" ‘
                      ‘$status $body_bytes_sent "$http_referer" ‘
                      ‘"$http_user_agent" "$upstream_addr" $request_time‘;
测试配置文件正确性,并重新加载
[[email protected] ~]# /usr/local/nginx/sbin/nginx -t
nginx: the configuration file /usr/local/nginx/conf/nginx.conf syntax is ok
nginx: configuration file /usr/local/nginx/conf/nginx.conf test is successful
[[email protected] ~]# /usr/local/nginx/sbin/nginx -s reload
由于我们需要在windows下通过浏览器访问我们配置的 elk.test.com 这个域名,所以需要在windows下编辑它的hosts文件增加以下内容:
192.168.137.121 elk.test.com
这时在浏览器上就可以通过这个域名进行访问了:
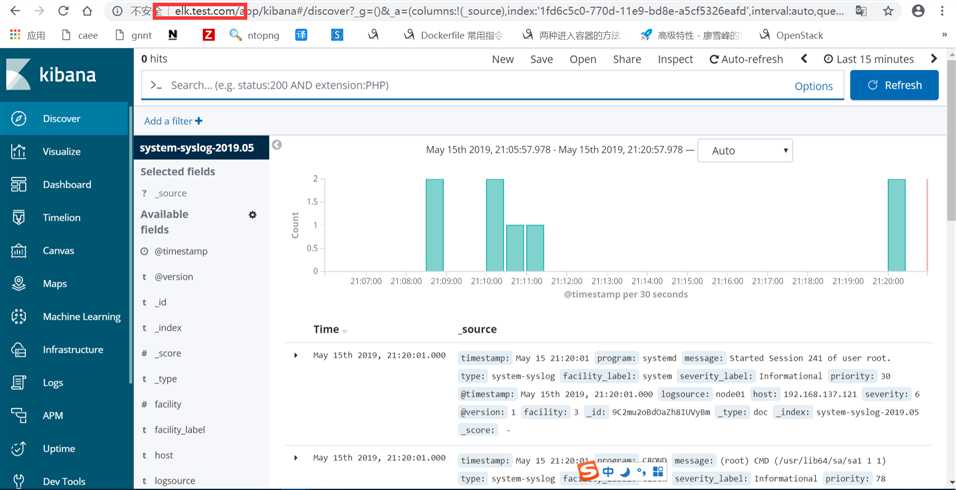
访问成功后,查看生成的日志文件:
[[email protected] ~]# ls /tmp/elk_access.log
/tmp/elk_access.log
[[email protected] ~]#  wc -l !$
 wc -l /tmp/elk_access.log
65 /tmp/elk_access.log
如上,可以看到,nginx的访问日志已经生成了。
重启logstash服务,生成日志的索引:
systemctl restart logstash
重启完成后,在es服务器上检查是否有nginx-test开头的索引生成:
[[email protected] ~]# curl ‘192.168.137.111:9200/_cat/indices?v‘
health status index                   uuid                   pri rep docs.count docs.deleted store.size pri.store.size
green  open   system-syslog-2019.05   m2FXb2vnSjGypq7fjAustw   5   1        363            0        1mb        446.9kb
green  open   .kibana_1               GNnfFYCNTIKswb9d8GtyOw   1   1         19            2    187.9kb         93.9kb
green  open   .kibana_task_manager    0jagFWxpRJu4fNB33LLK3A   1   1          2            0     19.4kb         12.6kb
green  open   kibana_sample_data_logs HMh9pWdpQEqZ2MBxxs-I3A   1   1      14005            0     22.8mb           11mb
green  open   nginx-test-2019.05.15   UL1_Uz6RSXaCm3rFugiaZg   5   1         65            0    220.2kb        110.1kb
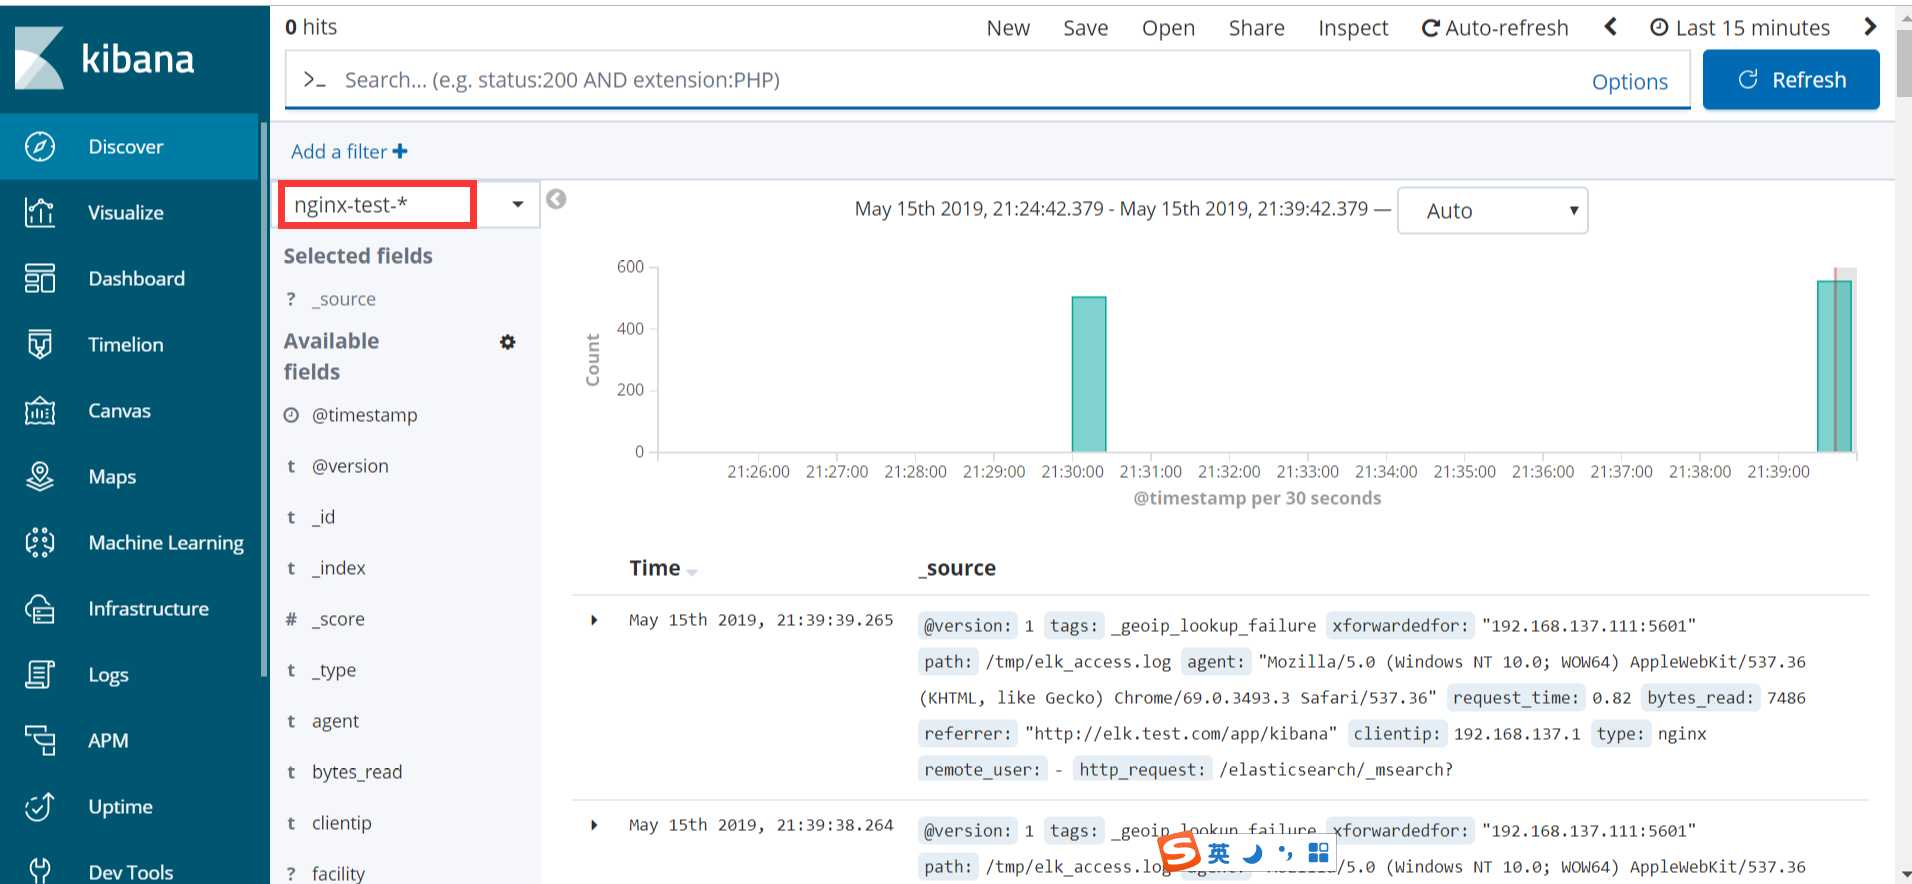
可以看到,nginx-test索引已经生成了,那么这时就可以到kibana上配置该索引:

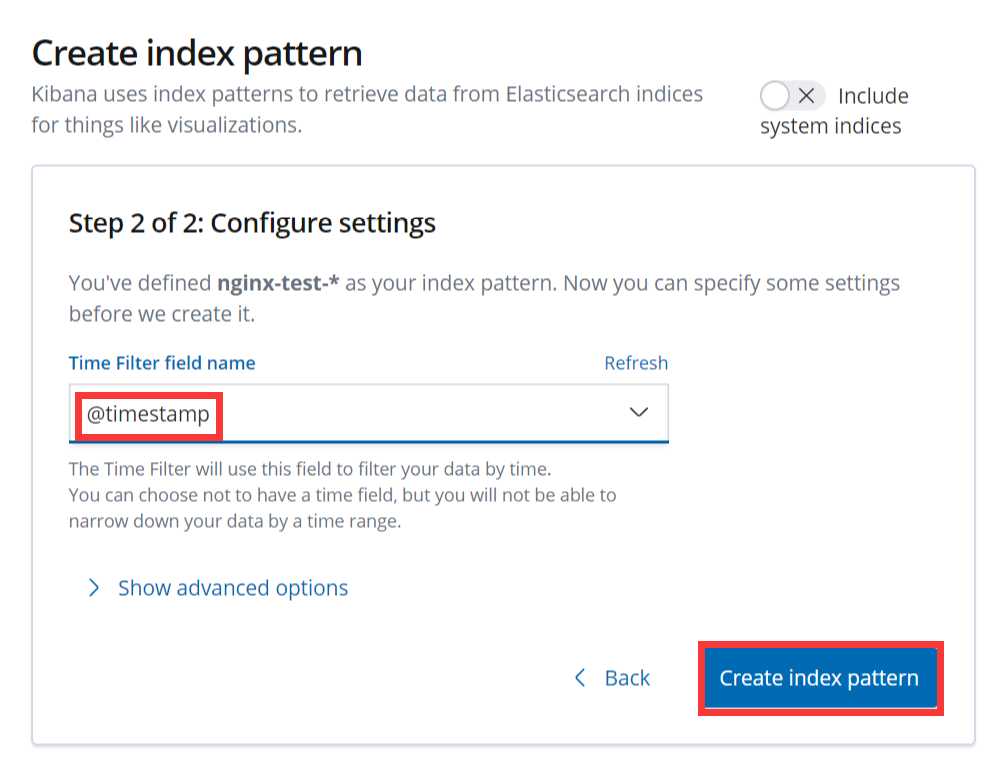
配置完成之后就可以在 “Discover” 里进行查看nginx的访问日志数据了:
使用beats采集日志
之前也介绍过beats是ELK体系中新增的一个工具,它属于一个轻量的日志采集器,以上我们使用的日志采集工具是logstash,但是logstash占用的资源比较大,没有beats轻量,所以官方也推荐使用beats来作为日志采集工具。而且beats可扩展,支持自定义构建。
官方介绍:https://www.elastic.co/cn/products/beats
在 192.168.137.122 上安装filebeat,filebeat是beats体系中用于收集日志信息的工具:
[[email protected] ~]# cd /tools/
[[email protected] tools]# wget wget https://artifacts.elastic.co/downloads/beats/filebeat/filebeat-6.7.2-x86_64.rpm
[[email protected] tools]# rpm -ivh  filebeat-6.7.2-x86_64.rpm
安装完成之后编辑配置文件:
[[email protected] ~]# vim /etc/filebeat/filebeat.yml  # 增加或者更改为以下内容
filebeat.prospectors:
- type: log
   #enabled: false 这一句要注释掉
   paths:
      - /var/log/messages  # 指定需要收集的日志文件的路径

#output.elasticsearch:  # 先将这几句注释掉
  # Array of hosts to connect to.
#  hosts: ["localhost:9200"]

output.console:  # 指定在终端上输出日志信息
  enable: true
配置完成之后,执行以下命令,看看是否有在终端中打印日志数据,有打印则代表filebeat能够正常收集日志数据:
[[email protected] ~]# /usr/share/filebeat/bin/filebeat -c /etc/filebeat/filebeat.yml
以上的配置只是为了测试filebeat能否正常收集日志数据,接下来我们需要再次修改配置文件,将filebeat作为一个服务启动:
[[email protected] ~]# vim /etc/filebeat/filebeat.yml
#output.console:  把这两句注释掉
#  enable: true

# 把这两句的注释去掉
output.elasticsearch:
  # Array of hosts to connect to.
  hosts: ["192.168.137.111:9200"]  # 并配置es服务器的ip地址
修改完成后就可以启动filebeat服务了:
[[email protected] ~]# systemctl restart filebeat
[[email protected] ~]# systemctl status filebeat
● filebeat.service - Filebeat sends log files to Logstash or directly to Elasticsearch.
   Loaded: loaded (/usr/lib/systemd/system/filebeat.service; disabled; vendor preset: disabled)
   Active: active (running) since Thu 2019-05-16 08:51:51 CST; 6s ago
     Docs: https://www.elastic.co/products/beats/filebeat
 Main PID: 60846 (filebeat)
    Tasks: 10
   Memory: 19.8M
   CGroup: /system.slice/filebeat.service
           └─60846 /usr/share/filebeat/bin/filebeat -c /etc/filebeat/filebeat.yml -path.home /usr/share/filebeat -path.config /etc/filebeat -path.data /va...

May 16 08:51:51 node02 systemd[1]: Started Filebeat sends log files to Logstash or directly to Elasticsearch..
[[email protected] ~]#  ps axu |grep filebeat
root      60846  2.3  0.7 330248 30844 ?        Ssl  08:51   0:00 /usr/share/filebeat/bin/filebeat -c /etc/filebeat/filebeat.yml -path.home /usr/share/filebeat -path.config /etc/filebeat -path.data /var/lib/filebeat -path.logs /var/log/filebeat
root      60858  0.0  0.0 112636   980 pts/2    S+   08:52   0:00 grep --color=auto filebeat
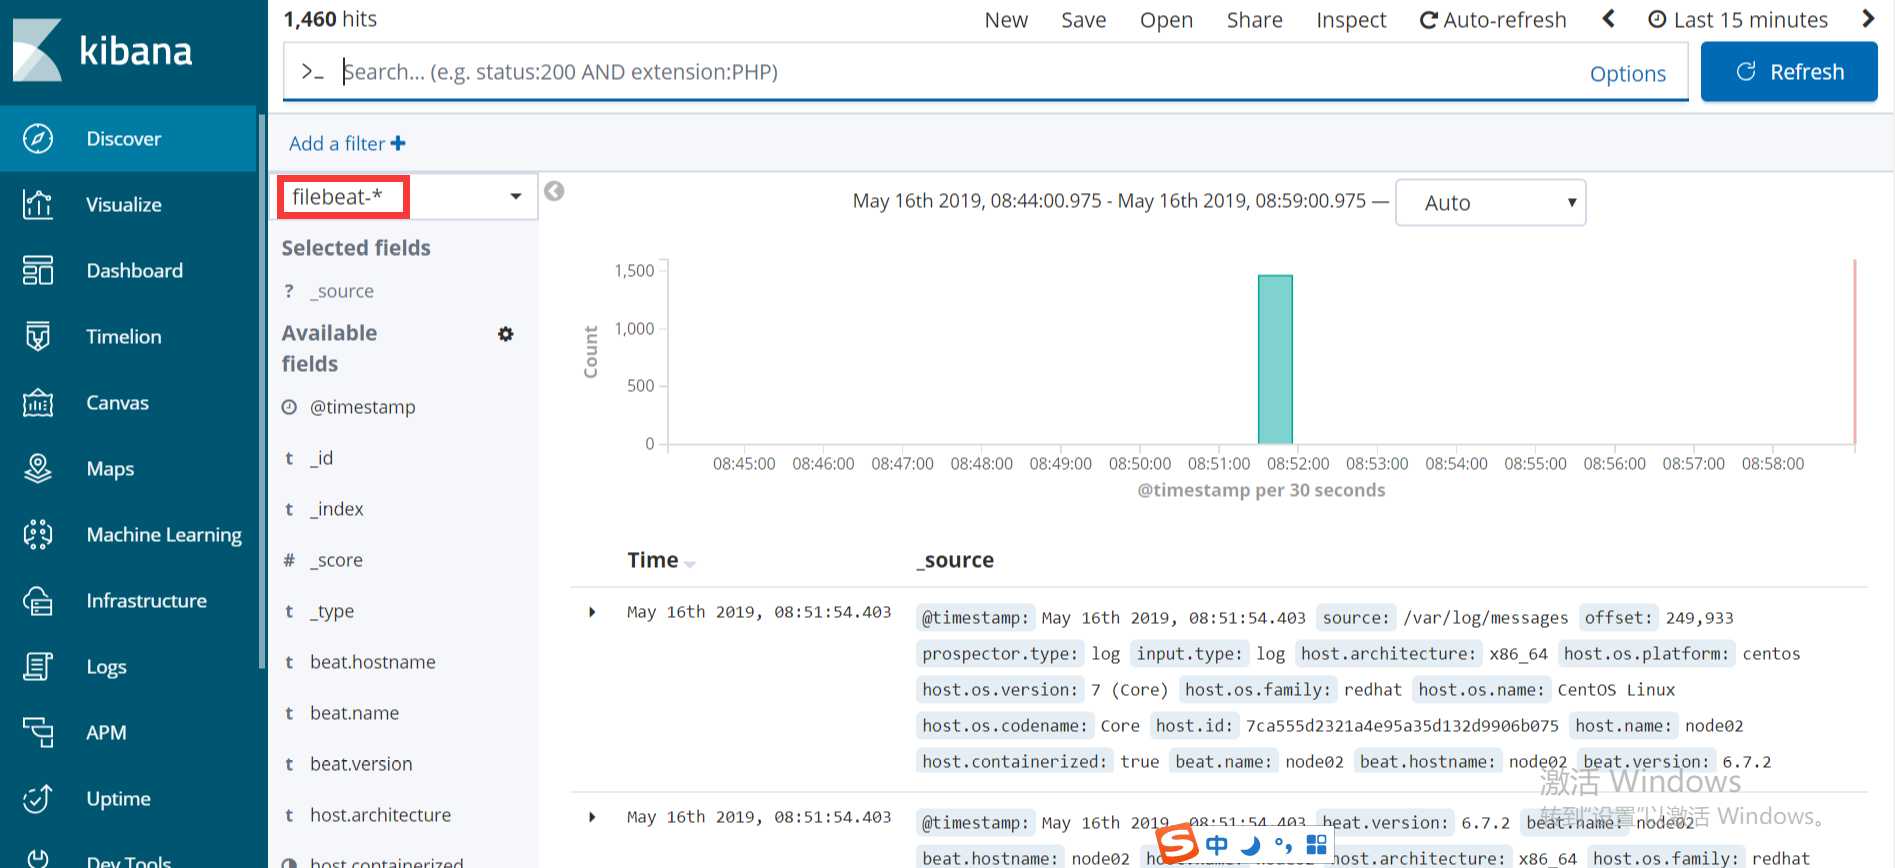
启动成功后,到es服务器上查看索引,可以看到新增了一个以filebeat-6.7.2开头的索引,这就代表filesbeat和es能够正常通信了:
[[email protected] ~]# curl ‘192.168.137.111:9200/_cat/indices?v‘
es服务器能够正常获取到索引后,就可以到kibana上配置这个索引了:
[[email protected] ~]# curl ‘192.168.137.111:9200/_cat/indices?v‘
health status index                     uuid                   pri rep docs.count docs.deleted store.size pri.store.size
green  open   system-syslog-2019.05     m2FXb2vnSjGypq7fjAustw   5   1       7275            0        4mb            2mb
green  open   filebeat-6.7.2-2019.05.16 zWsvMu47SRazGgTgGyEPQQ   3   1       1460            0    781.7kb        386.4kb
green  open   .kibana_task_manager      0jagFWxpRJu4fNB33LLK3A   1   1          2            0     39.3kb         25.4kb
green  open   nginx-test-2019.05.15     UL1_Uz6RSXaCm3rFugiaZg   5   1       3925            0      1.7mb        977.7kb
green  open   nginx-test-2019.05.16     gW1FpJaSRXa5Y95TOigigw   5   1       3064            0      1.3mb        771.6kb
green  open   .kibana_1                 GNnfFYCNTIKswb9d8GtyOw   1   1         20            2    207.2kb        103.6kb
green  open   kibana_sample_data_logs   HMh9pWdpQEqZ2MBxxs-I3A   1   1      14005            0     22.8mb           11mb
以上这就是如何使用filebeat进行日志的数据收集,可以看到配置起来比logstash要简单,而且占用资源还少。
扩展部分
集中式日志分析平台 - ELK Stack - 安全解决方案 X-Pack:
http://www.jianshu.com/p/a49d93212eca
https://www.elastic.co/subscriptions
Elastic stack演进:
基于kafka和elasticsearch,linkedin构建实时日志分析系统:
elastic stack 使用redis作为日志缓冲:
ELK+Filebeat+Kafka+ZooKeeper 构建海量日志分析平台:
关于elk+zookeeper+kafka 运维集中日志管理:
以上是关于ELK的主要内容,如果未能解决你的问题,请参考以下文章
