简单搭建OSPF,RIP,NSSA,外部路由汇总网络拓扑
Posted
tags:
篇首语:本文由小常识网(cha138.com)小编为大家整理,主要介绍了简单搭建OSPF,RIP,NSSA,外部路由汇总网络拓扑相关的知识,希望对你有一定的参考价值。
今天简单来搭建一个网络拓扑,简单做一个小小的实验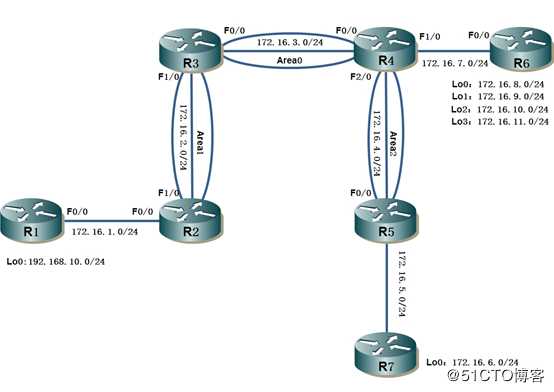
- 推荐步骤:
- 根据拓扑图设备配置IP地址
- 配置OSPF将不同的网络发布到不同的OSPF区域
3.R2访问R1的Lo0配置静态路由,在R2配置路由重分发
4.R5访问R7的Lo0配置默认路由重新发布默认路由
5.R4和R6上配置RIP
6.在R4上配置重新发布RIP和OSPF
7.R4配置外部路由汇总
8.将Area2区域配置为NSSA区域看其他OSPF区域路由表的变化
9.全网互通
- 实验步骤:
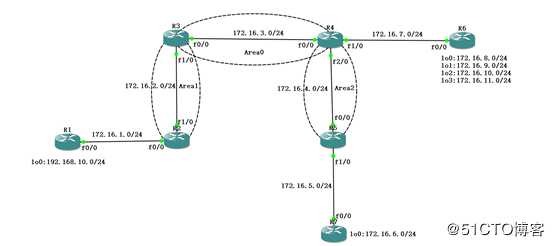
- 根据拓扑图设备配置IP地址
1)在R1配置0/0接口和loop back 0接口IP地址
R1(config)#interface fastEthernet 0/0
R1(config-if)#ip address 172.16.1.1 255.255.255.0
R1(config-if)#no shutdown
R1(config-if)#exit
R1(config)#interface loopback 0
R1(config-if)#ip address 192.168.10.1 255.255.255.0
R1(config-if)#exit
2)Show ip inter b查看R1两个IP是否配置成功
3)R2进入0/0和1/0接口配置IP地址
R2(config)#interface fastEthernet 0/0
R2(config-if)#ip address 172.16.1.2 255.255.255.0
R2(config-if)#no shutdown
R2(config-if)#exit
R2(config)#interface fastEthernet 1/0
R2(config-if)#ip address 172.16.2.1 255.255.255.0
R2(config-if)#no shutdown
R2(config-if)#exit
4)Show ip inter b查看R2的两个IP是否配置成功
5)R3进入1/0和0/0接口配置IP地址
R3(config)#interface fastEthernet 1/0
R3(config-if)#ip address 172.16.2.2 255.255.255.0
R3(config-if)#no shutdown
R3(config-if)#exit
R3(config)#interface fastEthernet 0/0
R3(config-if)#ip address 172.16.3.1 255.255.255.0
R3(config-if)#no shutdown
R3(config-if)#exit
6)Show ip inter b查看R3两个IP是否配置成功
7)R4进入0/0 1/0 2/0配置IP地址
R4(config)#interface fastEthernet 0/0
R4(config-if)#ip address 172.16.3.2 255.255.255.0
R4(config-if)#no shutdown
R4(config-if)#exit
R4(config)#interface fastEthernet 1/0
R4(config-if)#ip address 172.16.7.1 255.255.255.0
R4(config-if)#no shutdown
R4(config-if)#exit
R4(config)#interface fastEthernet 2/0
R4(config-if)#ip address 172.16.4.1 255.255.255.0
R4(config-if)#no shutdown
8)Show ip inter b查看R4两个IP是否配置成功
9)R5进入0/0和1/0接口配置R5两个IP地址
R5(config)#interface fastEthernet 0/0
R5(config-if)#ip address 172.16.4.2 255.255.255.0
R5(config-if)#no shutdown
R5(config-if)#exit
R5(config)#interface fastEthernet 1/0
R5(config-if)#ip address 172.16.5.1 255.255.255.0
R5(config-if)#no shutdown
10)Show ip inter b查看R5两个IP是否配置成功
11)R6进入0/0和loopback0 1 2 3接口配置IP地址
R6(config)#interface fastEthernet 0/0
R6(config-if)#ip address 172.16.7.2 255.255.255.0
R6(config-if)#no shutdown
R6(config-if)#exit
R6(config)#interface loopback 0
R6(config-if)#ip address 172.16.8.1 255.255.255.0
R6(config-if)#exit
R6(config)#interface loopback 1
R6(config-if)#ip address 172.16.9.1 255.255.255.0
R6(config-if)#exit
R6(config)#interface loopback 2
R6(config-if)#ip address 172.16.10.1 255.255.255.0
R6(config-if)#exit
R6(config)#interface loopback 3
R6(config-if)#ip address 172.16.11.1 255.255.255.0
R6(config-if)#exit
12)Show ip inter b查看IP是否配置成功
13)R7进入0/0接口和loop back0配置IP地址
R7(config)#interface fastEthernet 0/0
R7(config-if)#ip address 172.16.5.2 255.255.255.0
R7(config-if)#no shutdown
R7(config-if)#exit
R7(config)#interface loopback 0
R7(config-if)#ip address 172.16.6.1 255.255.255.0
R7(config-if)#exit
14)Show ip inter b查看IP是否配置成功
- 配置OSPF将不同的网络发布到不同的OSPF区域
1)R2启动OSPF进程宣告直连网络
R2(config)#router ospf 1
R2(config-router)#network 172.16.2.0 0.0.0.255 area 1
R2(config-router)#exit
2)R3启动OSPF进程宣告直连网络
R3(config)#router ospf 1
R3(config-router)#network 172.16.2.0 0.0.0.255 area 1
R3(config-router)#network 172.16.3.0 0.0.0.255 area 0
R3(config-router)#exit
3)R4启动OSPF进程宣告直连网络
R4(config)#router ospf 1
R4(config-router)#network 172.16.3.0 0.0.0.255 area 0
R4(config-router)#network 172.16.4.0 0.0.0.255 area 2
R4(config-router)#exit
4)R5启动OSPF进程宣告直连网络
R5(config)#router ospf 1
R5(config-router)#network 172.16.4.0 0.0.0.255 area 2
R5(config-router)#exit
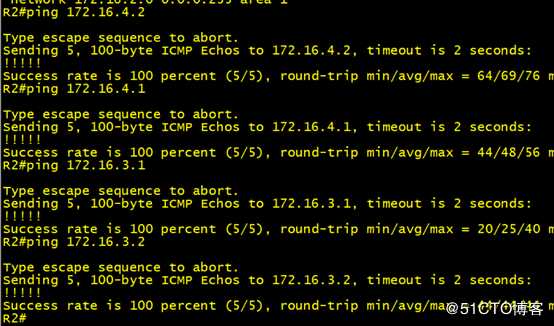
5)用ping其他网段,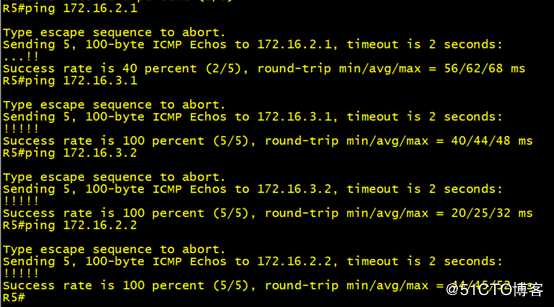
3.R2访问R1的Lo0配置静态路由,在R2配置路由重分发
1)R2配置静态路由下一跳地址为172.16.1.1
R1配置默认路由下一跳地址为172.16.1.2
R2(config)#ip route 192.168.10.0 255.255.255.0 172.16.1.1
R1(config)#ip route 0.0.0.0 0.0.0.0 172.16.1.2
R2(config)#exit
2)重新分发直连和静态
R2(config)#router ospf 1
R2(config-router)#redistribute connected subnets
R2(config-router)#redistribute static subnets
R2(config-router)#exit
3)PingR1的loop back 0接口
4.R5访问R7的Lo0配置默认路由重新发布默认路由
1)R5配置默认下一跳地址为172.16.5.2
R7配置默认下一跳地址为172.16.5.1
R5(config)#ip route 0.0.0.0 0.0.0.0 172.16.5.2
R7(config)#ip route 0.0.0.0 0.0.0.0 172.16.5.1
2)重新分发直连和默认路由
R5(config)#router ospf 1
R5(config-router)#redistribute connected subnets
R5(config-router)#default-information originate
R5(config-router)#exit
3)PingR3的loop back 0接口
5.R4和R6上配置RIP
1)R4启动RIP进程,宣告直连
R4(config)#router rip
R4(config-router)#network 172.16.7.0
2)R6启动RIP进程,宣告直连网络
R6(config)#router rip
R6(config-router)#network 172.16.7.0
R6(config-router)#network 172.16.8.0
R6(config-router)#network 172.16.9.0
R6(config-router)#network 172.16.10.0
R6(config-router)#network 172.16.11.0
R6(config-router)#exit
6.在R4上配置重新发布RIP和OSPF
1)路由重分发RIP发布到ospf中
R4(config)#router ospf 1
R4(config-router)#redistribute rip subnets
R4(config-router)#exit
2)路由重分发OSPF发布到RIP中
R4(config)#router rip
R4(config-router)#redistribute ospf 1 metric 10
R4(config-router)#exit
3)ping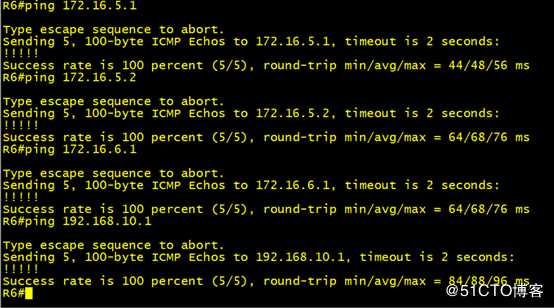
7.R4配置外部路由汇总
R4(config)#router ospf 1
R4(config-router)#summary-address 172.16.0.0 255.255.240.0
R4(config-router)#exit
8.将Area2区域配置为NSSA区域看其他OSPF区域路由表的变化
1)Area 2配置为NSSA区域
R4(config)#router ospf 1
R4(config-router)#area 2 nssa
R5(config)#router ospf 1
R5(config-router)#area 2 nssa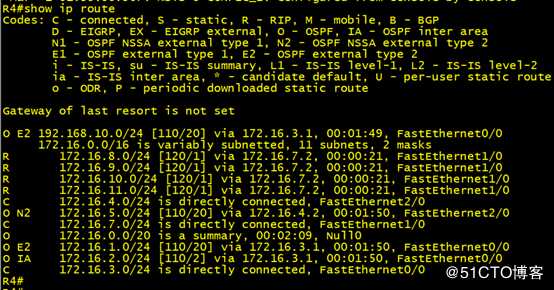
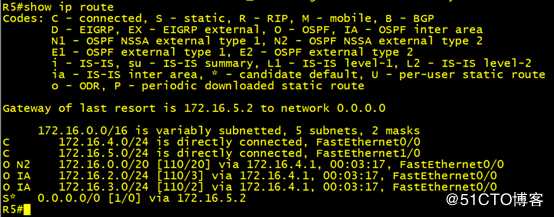
9.全网互通
1)在任何一个路由器上ping都是互通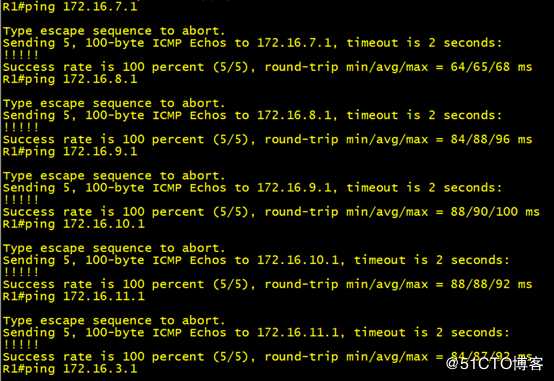
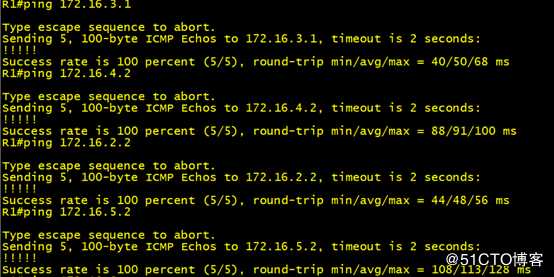
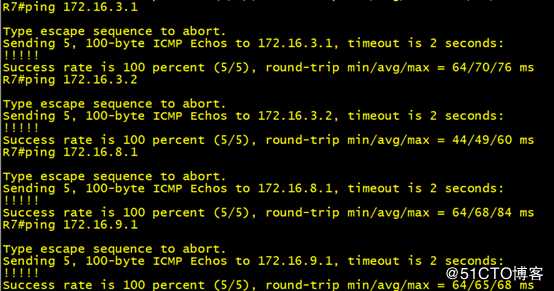
- 根据拓扑图设备配置IP地址
以上是关于简单搭建OSPF,RIP,NSSA,外部路由汇总网络拓扑的主要内容,如果未能解决你的问题,请参考以下文章