网络编程
Posted xfbb
tags:
篇首语:本文由小常识网(cha138.com)小编为大家整理,主要介绍了网络编程相关的知识,希望对你有一定的参考价值。
1 网络概念
把多台计算机通过物理线路连接起来,就形成了网络。目的在于交换数据和共享信息。
1.1 网络通信的三要素
【1】IP地址:唯一标识网络上的每一台计算机。两台计算机之间通信的必备有素
【2】端口号:计算机中应用的标号(代表一个应用程序)
0-1024系统使用或保留端口
常见端口:http:80 stmp: 25 ftp:21
有效端口0-65536,开发者可以的端口是1025-65536之间。一些第三方引用如mysql:3306 oracle:1251。
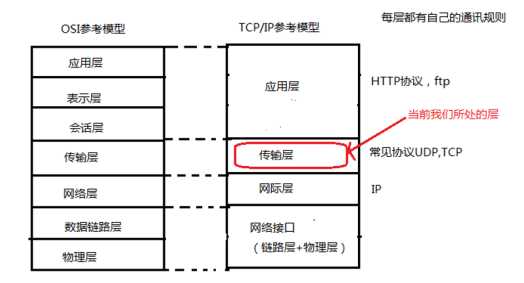
【3】通信协议:通信的规则 TCP,UDP
1.2 网络通信模型(B)


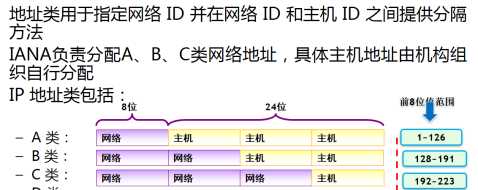
特殊IP
- 0.0.0.0:本机
- 127.0.0.1:本机回环地址,用于本机测试
- 255.255.255.255:当前子网,一般用于向当前子网广播信息
1.3 InetAddress
InetAddress 表示IP地址。
 1 public class Test01 {
 2     public static void main(String[] args) {
 3         // 获取本机IP地址
 4         InetAddress ip1;
 5         try {
 6             ip1 = InetAddress.getLocalHost();
 7             // USER-20180113BT/192.168.2.56
 8             System.out.println(ip1.toString());
 9
10             // 获取主机名称
11             System.out.println(ip1.getHostName());
12             System.out.println(ip1.getHostAddress());
13
14         } catch (UnknownHostException e) {
15             e.printStackTrace();
16         }
17     }
18 }
2. TCP 编程
TCP编程中,如果要完成通信,通信双方必须要创建socket,通过socket完成通信。
TCP通信步骤
[1] 服务器启动ServerSocket作为通信的Server端,等待客户端链入。
[2] 客户端创建Socket作为通信的Client端
[3] Client端链入Server端后建立可靠的、双向的、持续性的、点对点的通讯连接,即可通信。
案例:完成一次单向通信。
服务器端
 1 package cn.sxt01.net01;
 2
 3 import java.io.IOException;
 4 import java.io.OutputStream;
 5 import java.net.ServerSocket;
 6 import java.net.Socket;
 7
 8 public class Server01 {
 9     public static void main(String[] args) {
10
11         System.out.println("服务器启动...");
12
13         // 【1】创建server socket
14         ServerSocket serverSocket = null;
15         Socket clientSocket = null;
16         try {
17
18             serverSocket = new ServerSocket(8000);
19             // 【2】等待客户端的链入->阻塞式函数->监听8000端口,看是否有client链入
20             clientSocket = serverSocket.accept();
21
22             System.out.println(clientSocket.getInetAddress().getHostAddress()+"链入!");
23
24             // 【3】给客户端主动发信息
25             OutputStream out = clientSocket.getOutputStream();
26
27             String msg = "hello 兄弟";
28             byte[] buf = msg.getBytes("UTF-8");
29             out.write(buf);
30             clientSocket.shutdownOutput();
31
32             out.close();
33
34
35         } catch (IOException e) {
36             e.printStackTrace();
37         }
38     }
39 }
客户端
 1 package cn.sxt02.net01;
 2
 3 import java.io.IOException;
 4 import java.io.InputStream;
 5 import java.net.Socket;
 6
 7 public class Client01 {
 8     public static void main(String[] args) {
 9         System.out.println("客户端运行...");
10
11         // 【1】创建客户端socket
12         Socket socket = null;
13         try {
14             socket = new Socket("192.168.2.56", 8000);
15
16             // 【2】接收来自服务器的消息
17             InputStream in = socket.getInputStream();
18             byte[] buf = new byte[1024];
19             int len = in.read(buf);
20
21             String msg = new String(buf, 0, len, "UTF-8");
22             System.out.println(msg);
23
24         } catch (IOException e) {
25             e.printStackTrace();
26         }
27     }
28 }
双向通信
客户端
 1 import java.io.IOException;
 2 import java.io.InputStream;
 3 import java.io.OutputStream;
 4 import java.io.OutputStreamWriter;
 5 import java.net.ServerSocket;
 6 import java.net.Socket;
 7
 8 public class ClientSocket {
 9     public static void main(String[] args) {
10
11         System.out.println("客户端启动...");
12
13
14         Socket socket=null;
15         try {
16              socket= new Socket("127.0.0.1", 8000);//与服务器建立连接,端口号为8000
17             //接受服务器发送的信息
18              InputStream in=socket.getInputStream();
19              byte[] buf =new byte[1024];
20              int len;
21              len=in.read(buf);
22              String string = new String(buf, 0, len,"UTF-8");
23              System.out.println(string);
24              socket.shutdownInput();
25
26             //给服务器发信息
27              OutputStream out = socket.getOutputStream();
28              String string2 = "来了大哥";
29              byte[] buf2 = string2.getBytes("UTF-8");
30              out.write(buf2);
31              socket.shutdownOutput();
32
33
34              out.close();
35              in.close();
36
37
38
39         } catch (IOException e) {
40
41             e.printStackTrace();
42         }
43
44
45
46
47
48     }
49
50 }
服务端
 1 import java.io.IOException;
 2 import java.io.InputStream;
 3 import java.io.OutputStream;
 4 import java.net.ServerSocket;
 5 import java.net.Socket;
 6
 7 public class Server {
 8     public static void main(String[] args){
 9         System.out.println("服务器启动...");
10         //[1]创建serversocket
11         ServerSocket serversocket=null;
12         Socket clientsocket =null;
13         try {
14             serversocket = new ServerSocket(8000);
15             //[2]等待客户端连接
16             clientsocket = serversocket.accept();//clientsocket为连接进来的客户端
17             System.out.println(clientsocket.getInetAddress().getHostAddress()+"连入");
18         } catch (IOException e) {
19
20             e.printStackTrace();
21         }
22
23
24         try {
25             //[3]给客户端发信息
26             OutputStream out = clientsocket.getOutputStream();
27             String string = "Hello 老弟";
28             byte[] buf = string.getBytes("UTF-8");
29             out.write(buf);
30             clientsocket.shutdownOutput();//告诉客户端信息已经传完
31
32             //[4]接受客户端发送的信息
33             InputStream in =clientsocket.getInputStream();
34             byte[] buf2 = new byte[1024];
35             int len;
36             len=in.read(buf2);
37             String string2=new String(buf2,0,len,"UTF-8");
38
39             System.out.println(string2);
40             clientsocket.shutdownInput();
41
42
43             in.close();
44             out.close();
45
46         } catch (IOException e) {
47
48             e.printStackTrace();
49         }
50
51
52
53
54     }
55
56 }
需求:请上传张图片到服务器,并显示上传进程。
客户端
 1 import java.io.File;
 2 import java.io.FileInputStream;
 3 import java.io.IOException;
 4 import java.io.OutputStream;
 5 import java.net.Socket;
 6 /*[1]先将图片从文件读取到客户端程序
     【2】将图片从客户端程序写入服务端程序
     【3】服务端将图片写入目的地文件*/
 7 public class ImgClient {
 8     public static void main(String[] args) throws IOException {
 9         File file = new File("F:\\\\javatest\\\\logo.png");
10
11         Socket socket=new Socket("127.0.0.1",8888);
12
13         long totallImg = file.length();
14         long sendLen=0;
15         float progress = 0.0f;
16
17         FileInputStream in=new FileInputStream(file);
18         byte[] buf=new byte[1024];
19         int len;
20
21         OutputStream out=socket.getOutputStream();
22
23
24         while ((len=in.read(buf))!=-1) {
25             out.write(buf,0,len);
26             sendLen+=len;
27             progress =sendLen*1.0f/totallImg;
28             System.out.println("上传进度"+progress);
29
30
31         }
32
33         System.out.println("上传成功");
34         socket.shutdownOutput();
35         in.close();
36
37
38
39
40     }
41
42 }
服务端
 1 import java.io.File;
 2 import java.io.FileOutputStream;
 3 import java.io.IOException;
 4 import java.io.InputStream;
 5 import java.io.OutputStream;
 6 import java.net.ServerSocket;
 7 import java.net.Socket;
 8
 9 public class ImgServer {
10     public static void main(String[] args) throws IOException {
11         System.out.println("启动服务器...");
12         ServerSocket serverSocket = new ServerSocket(8888);
13         Socket socketclient=serverSocket.accept();
14
15         //接收
16         InputStream in=socketclient.getInputStream();
17         byte[] buf=new byte[1024];
18         int len;
19
20         File file=new File("logo.png");
21         FileOutputStream out=new FileOutputStream(file);
22
23         while ((len=in.read(buf))!=-1) {
24               out.write(buf,0,len);
25
26
27         }
28         socketclient.shutdownInput();
29         out.close();
30
31
32
33
34     }
35
36 }
3. UDP 编程
UDP编程中,如果要完成通信,通信双方必须要创建DatagramSocket,通过DatagramSocket完成通信。
数据报包用来实现无连接包投递服务。每条报文仅根据该包中包含的信息从一台机器路由到另一台机器
UDP步骤:
[1] 创建一个DatagramSocket用于表示发送端,通过send方法发送数据报
[2] 创建一个DatagramSocket用于表示接收端,通过receive方法发送数据报
需求:完成一次单向的UDP通信。
发送端
 1 public static void main(String[] args) {
 2
 3         // 发送端:主动发送信息
 4         System.out.println("发送端开始发送信息...");
 5         // 【1】创建socket并指定发送数据的端口
 6         DatagramSocket socket = null;
 7         try {
 8             socket = new DatagramSocket(8000);
 9
10             // 【2】创建数据报包
11             String msg = "hello B";
12             byte[] buf = msg.getBytes("UTF-8");
13             DatagramPacket dp = new DatagramPacket(buf, buf.length, InetAddress.getLocalHost(), 9000);
14
15             // 【3】发送
16             socket.send(dp);
17
18             // 【4】关闭
19             socket.close();
20         } catch (SocketException e) {
21             e.printStackTrace();
22         } catch (UnsupportedEncodingException e) {
23             e.printStackTrace();
24         } catch (UnknownHostException e) {
25             e.printStackTrace();
26         } catch (IOException e) {
27             e.printStackTrace();
28         }
29     }
接收端
 1 public static void main(String[] args) {
 2
 3         // 发送端:主动发送信息
 4         System.out.println("发送端开始发送信息...");
 5         // 【1】创建socket并指定发送数据的端口
 6         DatagramSocket socket = null;
 7         try {
 8             socket = new DatagramSocket(8000);
 9
10             // 【2】创建数据报包
11             String msg = "hello B";
12             byte[] buf = msg.getBytes("UTF-8");
13             DatagramPacket dp = new DatagramPacket(buf, buf.length, InetAddress.getLocalHost(), 9000);
14
15             // 【3】发送
16             socket.send(dp);
17
18             // 【4】关闭
19             socket.close();
20         } catch (SocketException e) {
21             e.printStackTrace();
22         } catch (UnsupportedEncodingException e) {
23             e.printStackTrace();
24         } catch (UnknownHostException e) {
25             e.printStackTrace();
26         } catch (IOException e) {
27             e.printStackTrace();
28         }
29     }
需求:实现双向通信
发送端
 1 public static void main(String[] args) {
 2
 3         // 发送端:主动发送信息
 4         System.out.println("发送端开始发送信息...");
 5         Scanner sc = new Scanner(System.in);
 6         // 【1】创建socket并指定发送数据的端口
 7         DatagramSocket socket = null;
 8         try {
 9             socket = new DatagramSocket(8000);
10
11             for(;;) {
12                 System.out.print("A说:");
13                 String msg = sc.nextLine();
14                 byte[] buf = msg.getBytes("UTF-8");
15                 DatagramPacket dp = new DatagramPacket(buf, buf.length, InetAddress.getLocalHost(), 9000);
16
17                 // 【3】发送
18                 socket.send(dp);
19
20
21                 // 接收消息
22                 byte[] revBuf = new byte[1024];
23                 DatagramPacket revDp = new DatagramPacket(revBuf,revBuf.length);
24                 socket.receive(revDp);
25                 String revStr = new String(revBuf, 0, revDp.getLength(), "UTF-8");
26                 System.out.println(dp.getAddress().getHostName()+":"+revStr);
27             }
28
29         } catch (SocketException e) {
30             e.printStackTrace();
31         } catch (UnsupportedEncodingException e) {
32             e.printStackTrace();
33         } catch (UnknownHostException e) {
34             e.printStackTrace();
35         } catch (IOException e) {
36             e.printStackTrace();
37         }finally {
38             // 【4】关闭
39             socket.close();
40         }
41     }
接收端
 1     public static void main(String[] args) {
 2         // 接收端:接收信息
 3         System.out.println("启动接收端...");
 4         Scanner sc = new Scanner(System.in);
 5         // 【1】创建一个 DatagramSocket
 6         DatagramSocket socket = null;
 7
 8         try {
 9             socket = new DatagramSocket(9000);
10
11             for(;;) {
12                 // 接收信息
13                 byte[] buf = new byte[1024];
14                 DatagramPacket dp = new DatagramPacket(buf, buf.length);
15                 socket.receive(dp);
16                 String msg = new String(buf, 0, dp.getLength(), "UTF-8");
17                 System.out.println(dp.getAddress().getHostName()+":"+msg);
18
19                 // 发送信息
20                 System.out.println("B说:");
21                 String sendMsg = sc.nextLine();
22                 byte[] sendBuf = sendMsg.getBytes("UTF-8");
23                 DatagramPacket sendDp = new DatagramPacket(sendBuf, 0, sendBuf.length, dp.getAddress(), dp.getPort());
24                 socket.send(sendDp);
25             }
26
27         } catch (SocketException e) {
28             e.printStackTrace();
29         } catch (IOException e) {
30             e.printStackTrace();
31         }finally {
32             socket.close();
33         }
34     }
以上是关于网络编程的主要内容,如果未能解决你的问题,请参考以下文章