Spring 源码分析之AbstractApplicationContext源码分析
Posted kmsfan
tags:
篇首语:本文由小常识网(cha138.com)小编为大家整理,主要介绍了Spring 源码分析之AbstractApplicationContext源码分析相关的知识,希望对你有一定的参考价值。
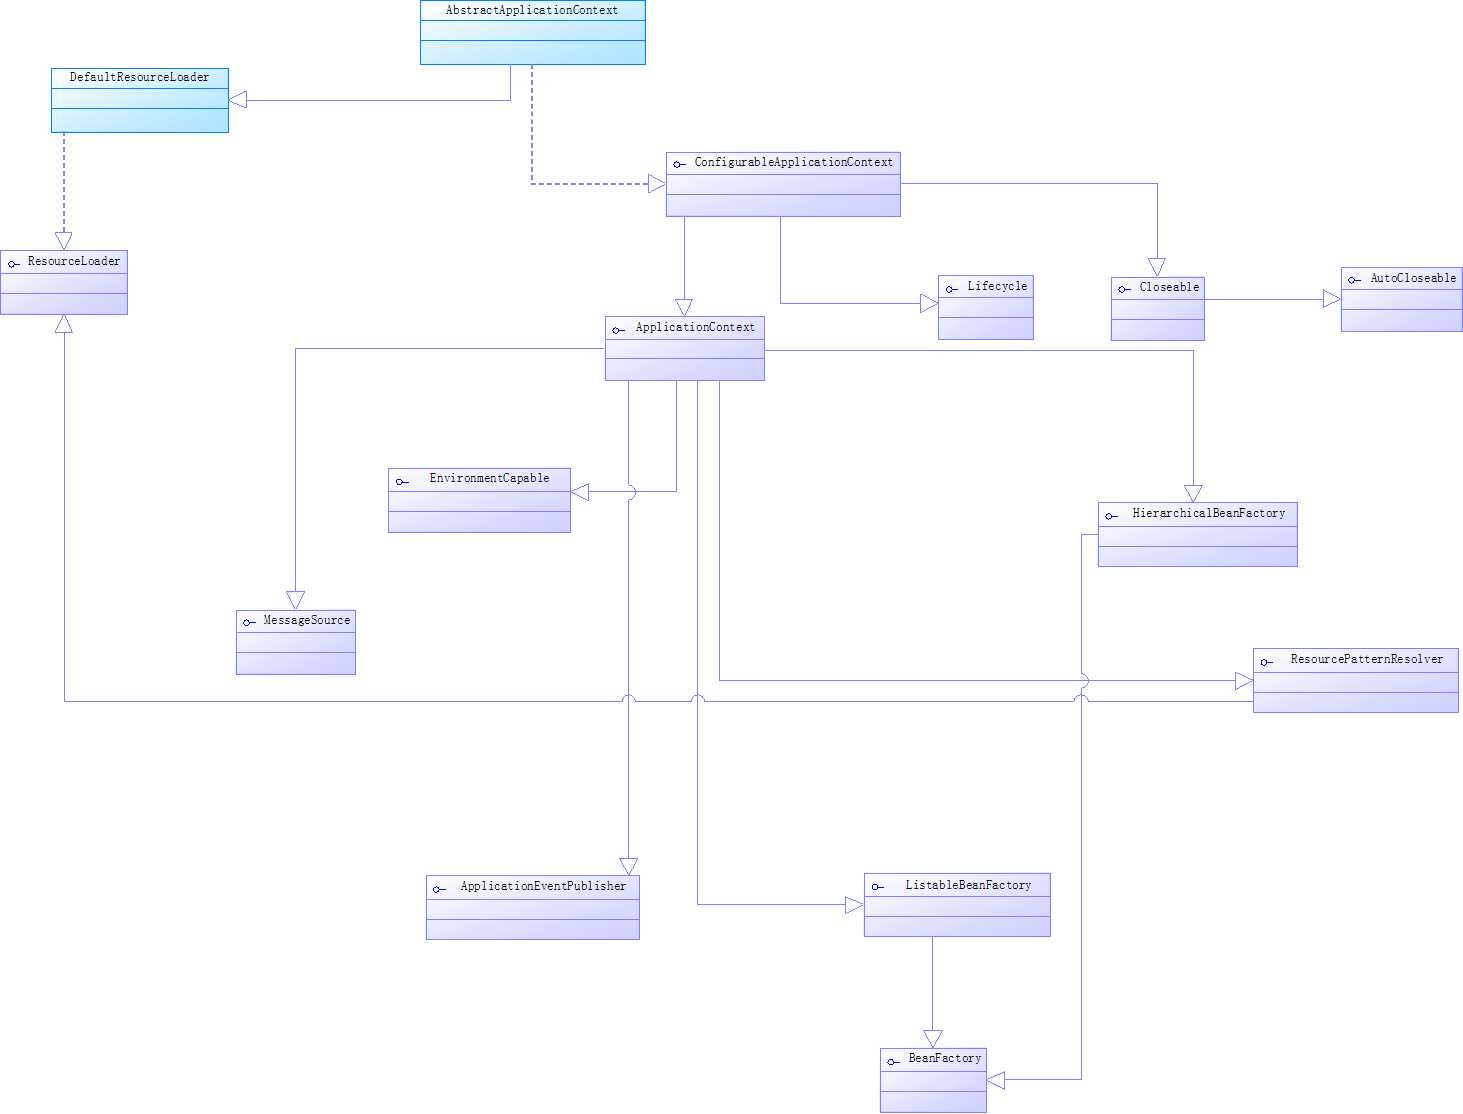
首先我觉得分析ApplicationContext必须从它的实现类开始进行分析,AbstractApplicationContext我觉得是一个不错的选择,那我们就从这里开始逐一分析吧,首先我自己手画了一张图,作为索引吧,其中蓝色的为类,紫色的为接口,箭头 指向的方向是父类或者父接口。

因为里面接口和方法过多,所以不做展示,下面具体来进行代码分析。首先我们来看看这句话,MESSAGE_SOURCE_BEAN_NAME。
public static final String MESSAGE_SOURCE_BEAN_NAME = "messageSource";
它这句话翻译成中文就是消息资源的bean的一个name,我们暂时把它看成一个普通的beanName,我们来看看有哪些地方引用到了这个属性,首先在initMessageSource方法里面有引用到,我把这些地方标红显示了。
protected void initMessageSource() {
		ConfigurableListableBeanFactory beanFactory = getBeanFactory();
		if (beanFactory.containsLocalBean(MESSAGE_SOURCE_BEAN_NAME)) {
			this.messageSource = beanFactory.getBean(MESSAGE_SOURCE_BEAN_NAME, MessageSource.class);
			// Make MessageSource aware of parent MessageSource.
			if (this.parent != null && this.messageSource instanceof HierarchicalMessageSource) {
				HierarchicalMessageSource hms = (HierarchicalMessageSource) this.messageSource;
				if (hms.getParentMessageSource() == null) {
					// Only set parent context as parent MessageSource if no parent MessageSource
					// registered already.
					hms.setParentMessageSource(getInternalParentMessageSource());
				}
			}
			if (logger.isTraceEnabled()) {
				logger.trace("Using MessageSource [" + this.messageSource + "]");
			}
		}
		else {
			// Use empty MessageSource to be able to accept getMessage calls.
			DelegatingMessageSource dms = new DelegatingMessageSource();
			dms.setParentMessageSource(getInternalParentMessageSource());
			this.messageSource = dms;
			beanFactory.registerSingleton(MESSAGE_SOURCE_BEAN_NAME, this.messageSource);
			if (logger.isTraceEnabled()) {
				logger.trace("No ‘" + MESSAGE_SOURCE_BEAN_NAME + "‘ bean, using [" + this.messageSource + "]");
			}
		}
	}
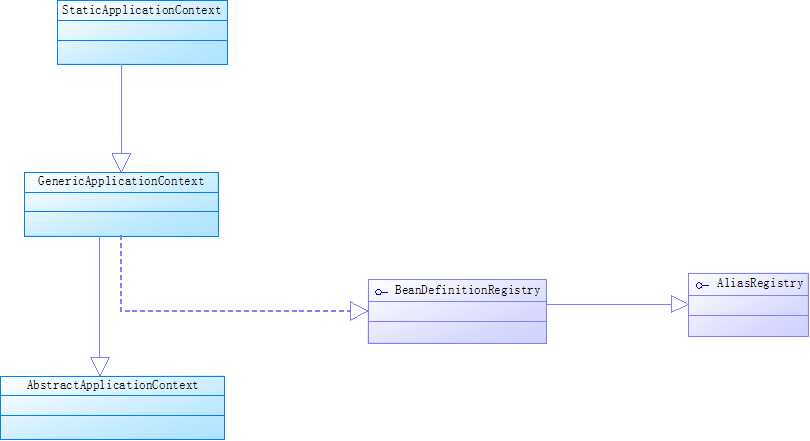
还有一个显示的地方就是在StaticApplicationContext类中的构造器当中有使用到。下面是StaticApplicationContext的类结构图:

	public StaticApplicationContext(@Nullable ApplicationContext parent) throws BeansException {
		super(parent);

		// Initialize and register a StaticMessageSource.
		this.staticMessageSource = new StaticMessageSource();
		getBeanFactory().registerSingleton(MESSAGE_SOURCE_BEAN_NAME, this.staticMessageSource);
	}
我们下面再来看一下AbstractApplicationContext这个类的一些Fields,并且来理清一下对象和对象之间的依赖关系,首先是parent -ApplicationContext,我们找到是一个叫做getParent()的方法对这个私有的属性进行了调用,然后又发现了getParentBeanFactory方法也对其进行了间接调用,因为BeanFactory是ApplicationContext的父接口,如下图:

private ApplicationContext parent;
public ApplicationContext getParent() {
   return this.parent;
}
public BeanFactory getParentBeanFactory() {
   return getParent();
}
在这个类中还有一个属性是environment,这个environment在这里也有getter和setter方法,唯一需要注意的是如果调用getEnvironment()方法在environment为空的情况下会创建一个StandardEnvironment对象。
private ConfigurableEnvironment environment;
public ConfigurableEnvironment getEnvironment() {
   if (this.environment == null) {
      this.environment = createEnvironment();
   }
   return this.environment;
}
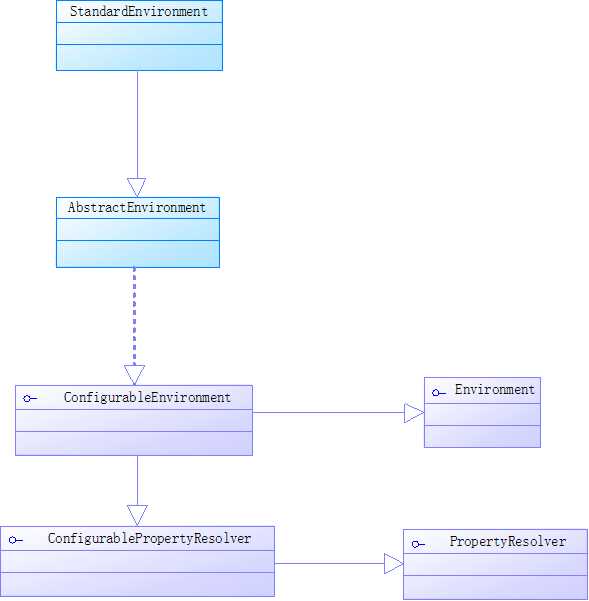
StandardEnvironment类继承了抽象的AbstractEnvironment,它的类结构图如下所示:

还有一个比较重要的属性就是beanFactoryPostProcessors,这事一个ArrayList的数组,Doc当中给出的解释是当onRefresh的时候有用到。我找到了3个方法引用到了这个属性,下面都已标红。
private final List<BeanFactoryPostProcessor> beanFactoryPostProcessors = new ArrayList<>();
public void addBeanFactoryPostProcessor(BeanFactoryPostProcessor postProcessor) {
   Assert.notNull(postProcessor, "BeanFactoryPostProcessor must not be null");
   this.beanFactoryPostProcessors.add(postProcessor);
}
public List<BeanFactoryPostProcessor> getBeanFactoryPostProcessors() {
   return this.beanFactoryPostProcessors;
}
protected void invokeBeanFactoryPostProcessors(ConfigurableListableBeanFactory beanFactory) {
   PostProcessorRegistrationDelegate.invokeBeanFactoryPostProcessors(beanFactory, getBeanFactoryPostProcessors());

   // Detect a LoadTimeWeaver and prepare for weaving, if found in the meantime
   // (e.g. through an @Bean method registered by ConfigurationClassPostProcessor)
   if (beanFactory.getTempClassLoader() == null && beanFactory.containsBean(LOAD_TIME_WEAVER_BEAN_NAME)) {
      beanFactory.addBeanPostProcessor(new LoadTimeWeaverAwareProcessor(beanFactory));
      beanFactory.setTempClassLoader(new ContextTypeMatchClassLoader(beanFactory.getBeanClassLoader()));
   }
}
往下面看还有一个属性active,它是线程安全的,用到了CAS技术。它常常和closed这个属性一起使用,我们发现,在如下3个地方有组合引用,我已用相应的颜色标识出来。
- prepareRefresh
- doClose
- assertBeanFactoryActive
private final AtomicBoolean active = new AtomicBoolean();
private final AtomicBoolean closed = new AtomicBoolean();
protected void prepareRefresh() {
   // Switch to active.
   this.startupDate = System.currentTimeMillis();
   this.closed.set(false);
   this.active.set(true);
   ....................
   ....................
}
protected void doClose() {
   // Check whether an actual close attempt is necessary...
   if (this.active.get() && this.closed.compareAndSet(false, true)) {
      if (logger.isDebugEnabled()) {
         logger.debug("Closing " + this);
      }
    ........................
    ........................
   //Switch to inactive.
   this.active.set(false);
}
protected void assertBeanFactoryActive() {
   if (!this.active.get()) {
      if (this.closed.get()) {
         throw new IllegalStateException(getDisplayName() + " has been closed already");
      }
      else {
         throw new IllegalStateException(getDisplayName() + " has not been refreshed yet");
      }
   }
}
我们继续往下看,有一个startupShutdownMonitor的属性,字面意思上面理解就是启动关闭监视器,属性在这个类当中的命名表示了它所发挥的作用,我们来看一下有哪些方法引用到了这个属性。大家不知道发现没有,还有一个“很像”的属性在这里就是shutdownHook,这个和startupShutdownMonitor是配合在一起使用的。shudownHook在这里是一个线程类型的属性。
private final Object startupShutdownMonitor = new Object();
private Thread shutdownHook;
public void refresh() throws BeansException, IllegalStateException {
   synchronized (this.startupShutdownMonitor) {......
}......
}
public void registerShutdownHook() {
   if (this.shutdownHook == null) {
      // No shutdown hook registered yet.
      this.shutdownHook = new Thread() {
         @Override
         public void run() {
            synchronized (startupShutdownMonitor) {
               doClose();
            }
         }
      };
      Runtime.getRuntime().addShutdownHook(this.shutdownHook);
   }
}
public void close() {
   synchronized (this.startupShutdownMonitor) {
      doClose();
      // If we registered a JVM shutdown hook, we don‘t need it anymore now:
      // We‘ve already explicitly closed the context.
      if (this.shutdownHook != null) {
         try {
            Runtime.getRuntime().removeShutdownHook(this.shutdownHook);
         }
         catch (IllegalStateException ex) {
            // ignore - VM is already shutting down
         }
      }
   }
}
既然shutdownHook和startupShutdownMonitor一起使用,那么它们之间的关系我们得分析一下,hook顾名思义钩子,说简单点这个就是一个钩子,也算是一个扩展点。我们来仔细分析一下它的几个方法,首先是registerShutdownHook方法:这个方法有一句话特别重要,就是Runtime.getRuntime().addShutdownHook(this.shutdownHook);它实际上在系统层面上把钩子线程添加到了JVM虚拟机。在钩子运行的时候,就会执行doClose方法关闭并销毁applicationContext。需要注意的一点是明白registerShutdownHook方法和close方法的不同点,在close方法中如果发现已经调用registerShutdownHook在JVM层面上注册了钩子,那么就调用Runtime.getRuntime().removeShutdownHook(this.shutdownHook)移除此钩子,另外这个close的实现来自于closable接口的父接口AutoClosable接口方法,而registerShutdownHook则在PropertyResolver当中被定义。
public void registerShutdownHook() {
		if (this.shutdownHook == null) {
			// No shutdown hook registered yet.
			this.shutdownHook = new Thread() {
				@Override
				public void run() {
					synchronized (startupShutdownMonitor) {
						doClose();
					}
				}
			};
			Runtime.getRuntime().addShutdownHook(this.shutdownHook);
		}
	}
public void close() {
   synchronized (this.startupShutdownMonitor) {
      doClose();
      // If we registered a JVM shutdown hook, we don‘t need it anymore now:
      // We‘ve already explicitly closed the context.
      if (this.shutdownHook != null) {
         try {
            Runtime.getRuntime().removeShutdownHook(this.shutdownHook);
         }
         catch (IllegalStateException ex) {
            // ignore - VM is already shutting down
         }
      }
   }
}
时间不早了,今天就写到这里吧。
以上是关于Spring 源码分析之AbstractApplicationContext源码分析的主要内容,如果未能解决你的问题,请参考以下文章