spring security 学习二
Posted nxzblogs
tags:
篇首语:本文由小常识网(cha138.com)小编为大家整理,主要介绍了spring security 学习二相关的知识,希望对你有一定的参考价值。
doc:https://docs.spring.io/spring-security/site/docs/
基于表单的认证(个性化认证流程):
一、自定义登录页面
1、在securityConfigy配置类中的config方法中添加调用链方法
    @Override
    protected void configure(HttpSecurity http) throws Exception {

        http.formLogin()//指定是表单登录
                .loginPage("/cus_login.html")//登录页面
                .and()
                .authorizeRequests()//授权
                .anyRequest()//任何请求
                .authenticated();//都需要身份认证
    }
2、同时在resources/resources下创建一个html文件

<!DOCTYPE html>
<html lang="en">
<head>
    <meta charset="UTF-8">
    <title>Title</title>
</head>
<body>

自定义登录页面
</body>
</html>
/3、配置好之后,启动项目,访问localhost:9999/h api
浏览器后报错:,重定向到登录页面次数太多

4、为什么出现这种情况:
因为在securityconfigy配置类中指定了一个loginPage,但是在方法链中,有表明:任何请求都需要认证
.anyRequest()//任何请求
                .authenticated();//都需要身份认证
处理:在anyRequest方法前和authorizeRequests方法后添加antMatchers匹配规则,指定登录页面允许访问
.authorizeRequests()//授权
                .antMatchers("/cus_login.html").permitAll()
配置完成后再次访问localhost:9999/h :,即可跳转至自定义的登录页面

5、完善登录页面
//在usernamePasswordAuthenticationFilter中处理的action为/login,请求方式是post
 public UsernamePasswordAuthenticationFilter() {
        super(new AntPathRequestMatcher("/login", "POST"));
    }
<!DOCTYPE html>
<html lang="en">
<head>
    <meta charset="UTF-8">
    <title>Title</title>
</head>
<body>
自定义登录页面
<form action="/authentication/form" method="POST">
    <table>
        <tr>
            <td>用户名:</td>
            <td><input type="text" name="username"></td>
        </tr>
        <tr>
            <td>密码:</td>
            <td><input type="text" name="password"></td>
        </tr>
        <tr>
            <td>
                <button type="submit">登录</button>
            </td>
        </tr>
    </table>
</form>
</body>
</html>
因为在登录页面中设定的action为“/authentication/form”,所以在securityConfig配置类的方法链中添加loginProcessingUrl方法
    @Override
    protected void configure(HttpSecurity http) throws Exception {

        http.formLogin()//指定是表单登录
                .loginPage("/cus_login.html")//登录页面
                .loginProcessingUrl("/authentication/form")
                .and()
                .authorizeRequests()//授权
                .antMatchers("/cus_login.html").permitAll()
                .anyRequest()//任何请求
                .authenticated();//都需要身份认证
    }
重启项目:访问localhost:9999/h
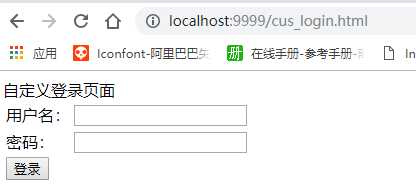
显示为自定义的页面。
csrf().disable();//跨站防护不适用

6、将loginPage(/cus_login.html) html页面改为一个controller代码
①新建一个controller
@RestController
public class LoginSecurityController {

    @RequestMapping("/authentication/require")
    public String requireAuthentication(HttpServletRequest request, HttpServletResponse response) {


        return null;
    }
}
②修改securityconfig配置类中的config中的方法调用链中的loginPage
    @Override
    protected void configure(HttpSecurity http) throws Exception {

        http.formLogin()//指定是表单登录
                .loginPage("/authentication/require")//登录页面
                .loginProcessingUrl("/authentication/form")
                .and()
                .authorizeRequests()//授权
                .antMatchers("/authentication/require").permitAll()
                .anyRequest()//任何请求
                .authenticated()//都需要身份认证
                .and()
                .csrf().disable();//跨站防护不适用
    }
二、自定义登录成功的处理
实现AuthenticationSucessHandler接口
三、自定义登录失败的处理
实现AuthenticationFailureHandler接口
四、源码学习
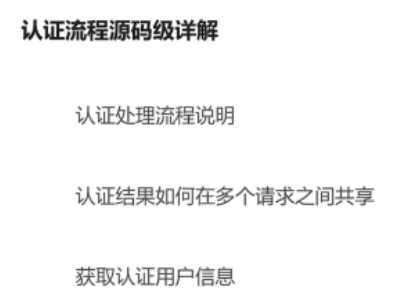
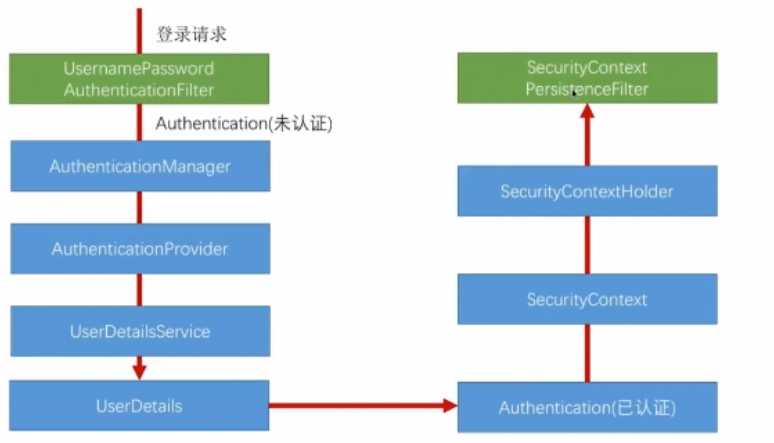
1、认证流程说明
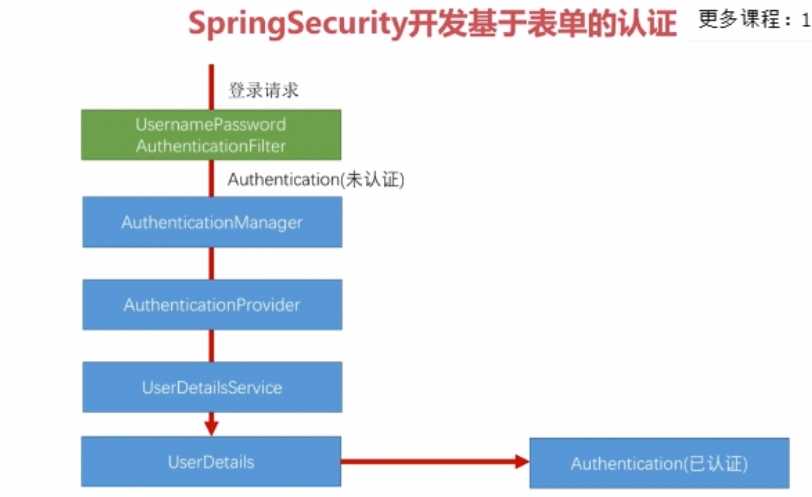
登录请求进来是,会先到UsernamePasswordAuthentication类的,其实最先走的是它的父类AbstractAuthenticationProcessingFilter.java,在父类中会走attemptAuthentication方法,父类没有实现,因此会走子类的方法,当认证成功后,会走到最后successFulAuthentication方法
public void doFilter(ServletRequest req, ServletResponse res, FilterChain chain)
            throws IOException, ServletException {

     。。。。
     。。。。
        Authentication authResult;

        try {
            authResult = attemptAuthentication(request, response);
            if (authResult == null) {
                // return immediately as subclass has indicated that it hasn‘t completed
                // authentication
                return;
            }
            sessionStrategy.onAuthentication(authResult, request, response);
        }
    。。。。
    。。。。
        // Authentication success
        if (continueChainBeforeSuccessfulAuthentication) {
            chain.doFilter(request, response);
        }

        successfulAuthentication(request, response, chain, authResult);
    }
attemptAuthentication方法(子类usernamepasswordAuthenticationFilter.java)
    public Authentication attemptAuthentication(HttpServletRequest request,
            HttpServletResponse response) throws AuthenticationException {
        if (postOnly && !request.getMethod().equals("POST")) {
            throw new AuthenticationServiceException(
                    "Authentication method not supported: " + request.getMethod());
        }

        String username = obtainUsername(request);
        String password = obtainPassword(request);
    。。。。
    。。。。
        username = username.trim();
    //这个UsernamepasswordAuthenticationToken其实就是封装了username 和password信息
        UsernamePasswordAuthenticationToken authRequest = new UsernamePasswordAuthenticationToken(
                username, password);

        // 这个setDetails会把请求的一些信息设置到authRequest对象中
        setDetails(request, authRequest);

        return this.getAuthenticationManager().authenticate(authRequest);
    }
上边那个this.getAuthenticationManager() 会获取一个authenticationManager类
作用:收集相关的provider,当请求到的时候,循环判断是否支持当前的provider类型
public interface AuthenticationManager {
  //authenticate认证方法,交给实现类实现
    Authentication authenticate(Authentication var1) throws AuthenticationException;
}
他的实现类(用的就是ProviderManger类),不同的provider支持的Authentication是不同的
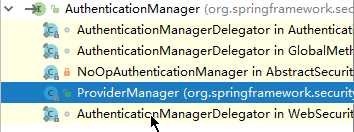
例如:UsernamePasswordAuthenticationToken类型的Authentication时,provider就是DaoAuthenticationProvider,
   public Authentication authenticate(Authentication authentication) throws AuthenticationException {
        Class<? extends Authentication> toTest = authentication.getClass();
        AuthenticationException lastException = null;
        AuthenticationException parentException = null;
        Authentication result = null;
        Authentication parentResult = null;
        boolean debug = logger.isDebugEnabled();
        Iterator var8 = this.getProviders().iterator();

        while(var8.hasNext()) {
            AuthenticationProvider provider = (AuthenticationProvider)var8.next();
            if (provider.supports(toTest)) {
                if (debug) {
                    logger.debug("Authentication attempt using " + provider.getClass().getName());
                }

                try {
                    result = provider.authenticate(authentication);
                    if (result != null) {
                        this.copyDetails(authentication, result);
                        break;
                    }
                } catch (AccountStatusException var13) {
                    this.prepareException(var13, authentication);
                    throw var13;
                } catch (InternalAuthenticationServiceException var14) {
                    this.prepareException(var14, authentication);
                    throw var14;
                } catch (AuthenticationException var15) {
                    lastException = var15;
                }
            }
        }

      。。。。。
    }
上边那个标红的provider.authenticate方法会走到DaoAuthenticationProvider对象的父类对象的authticate方法,
public Authentication authenticate(Authentication authentication) throws AuthenticationException {
        Assert.isInstanceOf(UsernamePasswordAuthenticationToken.class, authentication, () -> {
            return this.messages.getMessage("AbstractUserDetailsAuthenticationProvider.onlySupports", "Only UsernamePasswordAuthenticationToken is supported");
        });
        String username = authentication.getPrincipal() == null ? "NONE_PROVIDED" : authentication.getName();
        boolean cacheWasUsed = true;
        UserDetails user = this.userCache.getUserFromCache(username);
        if (user == null) {
            cacheWasUsed = false;

            try {
         //这块会进入子类DaoAuthenticationPrivoder
                user = this.retrieveUser(username, (UsernamePasswordAuthenticationToken)authentication);
            } catch (UsernameNotFoundException var6) {
                this.logger.debug("User ‘" + username + "‘ not found");
                if (this.hideUserNotFoundExceptions) {
                    throw new BadCredentialsException(this.messages.getMessage("AbstractUserDetailsAuthenticationProvider.badCredentials", "Bad credentials"));
                }

                throw var6;
            }

            Assert.notNull(user, "retrieveUser returned null - a violation of the interface contract");
        }

        try {
       //校验是否锁定。。(userdetails里边的几个返回值)
            this.preAuthenticationChecks.check(user);
       //校验密码是否匹配
            this.additionalAuthenticationChecks(user, (UsernamePasswordAuthenticationToken)authentication);
        } catch (AuthenticationException var7) {
            if (!cacheWasUsed) {
                throw var7;
            }

            cacheWasUsed = false;
            user = this.retrieveUser(username, (UsernamePasswordAuthenticationToken)authentication)
       this.preAuthenticationChecks.check(user);
            this.additionalAuthenticationChecks(user, (UsernamePasswordAuthenticationToken)authentication);
        }
     //后置查询
        this.postAuthenticationChecks.check(user);
        if (!cacheWasUsed) {
            this.userCache.putUserInCache(user);
        }

        Object principalToReturn = user;
        if (this.forcePrincipalAsString) {
            principalToReturn = user.getUsername();
        }

        return this.createSuccessAuthentication(principalToReturn, authentication, user);
    }
子类DapAuthenticationPrivoder类的
    protected final UserDetails retrieveUser(String username, UsernamePasswordAuthenticationToken authentication) throws AuthenticationException {
        this.prepareTimingAttackProtection();

        try {
       //这一块就是调用自定义得人UserDetailsService类
            UserDetails loadedUser = this.getUserDetailsService().loadUserByUsername(username);
            if (loadedUser == null) {
                throw new InternalAuthenticationServiceException("UserDetailsService returned null, which is an interface contract violation");
            } else {
                return loadedUser;
            }
        } catch (UsernameNotFoundException var4) {
            this.mitigateAgainstTimingAttack(authentication);
            throw var4;
        } catch (InternalAuthenticationServiceException var5) {
            throw var5;
        } catch (Exception var6) {
            throw new InternalAuthenticationServiceException(var6.getMessage(), var6);
        }
    }
进入自定义的CusUserDetailsService
public class MyUserDetailsService implements UserDetailsService {
    @Override
    public UserDetails loadUserByUsername(String s) throws UsernameNotFoundException {
        //根据username查找用户信息,在这,先手动写一个user信息
        log.info("查找用户信息{}", s);

        BCryptPasswordEncoder encoder = new BCryptPasswordEncoder();
        String password = encoder.encode("password");

        //user前两个参数是进行认证的,第三个参数是当前用户所拥有的权限,security回根据授权代码进行验证
        return new User(s, password, true, true, true, true,
                AuthorityUtils.commaSeparatedStringToAuthorityList("admin"));
//        AuthorityUtils.commaSeparatedStringToAuthorityList 这个方法是将一个字符一“,” 分割开
    }
}
以上是关于spring security 学习二的主要内容,如果未能解决你的问题,请参考以下文章
