浅谈Android中layout_weight
Posted
tags:
篇首语:本文由小常识网(cha138.com)小编为大家整理,主要介绍了浅谈Android中layout_weight相关的知识,希望对你有一定的参考价值。
引言
在开发android过程中,我们经常需要对界面进行按比例进行布局,我们一般都会使用layout_属性来进行设置。今天这篇文章我们就来简单介绍下layout_weight的使用和布局原理。随着做项目经验的积累,该篇博文可能会时时更新。
LinearLayout下使用layout_weight
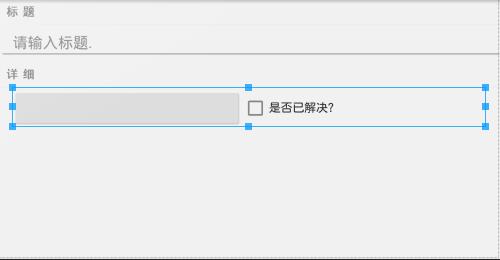
今天我们先来介绍下在LinearLayout下使用layout_weight的问题。假设我们需要实现例如一下这样的效果:

我们来看这时候的布局样式设置:
 1 <!--调整横屏时的布局 -->
 2     <LinearLayout
 3         android:orientation="horizontal"
 4         android:layout_width="match_parent"
 5         android:layout_height="wrap_content"
 6         android:layout_marginLeft="16dp"
 7         android:layout_marginRight="16dp">
 8
 9         <Button
10             android:layout_width="wrap_content"
11             android:layout_height="wrap_content"
12             android:id="@+id/crime_date"
13             android:layout_weight="1"/>
14
15         <CheckBox
16             android:layout_width="wrap_content"
17             android:layout_height="wrap_content"
18             android:text="@string/crime_solved_label"
19             android:id="@+id/crime_solved"
20             android:layout_weight="1"/>
21     </LinearLayout>
我们看到在布局样式文件中,我们看到Button的layout_weight是1,CheckBox的layout_weight是1.这到底是什么意思呢?我们下面来进行详细介绍。
layout_weight属性告诉LinearLayout如何进行子组件的布置安排。我们看到Button的layout_weight的数值和CheckBox的layout_weight数值是一样的,但是这不代表它们在屏幕上占据相同的宽度。其实在计算子组件的宽度时,LinearLayout使用的是layout_width个layout_weight的混合值。我们来看详细的步骤:
第一步:LinearLayout查看layout_width属性值(竖直方位则查看layout_height属性值)。 Button和CheckBox组件的layout_width属性值都设置为wrap_content,因此它们获得的空间大小仅够绘制自身。
如图所示:

第二步:LinearLayout根据layout_weight属性值进行额外空间的分配。如图所示:

在布局中, Button和CheckBox组件拥有相同的layout_weight属性值,因此它们均分了同样大小的额外空间。如将Button组件的weight值设置为2,那么它将获得2/3的额外空间,CheckBox组件则获得剩余的1/3。我们来看一下效果:

如想让LinearLayout分配完全相同的宽度给各自的视图,该如何处理呢?很简单,只需设置各组件的layout_width属性值为0dp以避开第一步的空间分配就可以了,这样LinearLayout就会只考虑使用layout_weight属性值来完成所需的空间分配了。
如图所示:

以上是关于浅谈Android中layout_weight的主要内容,如果未能解决你的问题,请参考以下文章