u-boot-1.1.6实现自定义命令
Posted 053179hu
tags:
篇首语:本文由小常识网(cha138.com)小编为大家整理,主要介绍了u-boot-1.1.6实现自定义命令相关的知识,希望对你有一定的参考价值。
学习目标:
1、了解u-boot-1.1.6中命令的实现机制
2、掌握如何在u-boot-1.1.6中添加自定义命令
1、命令的实现机制
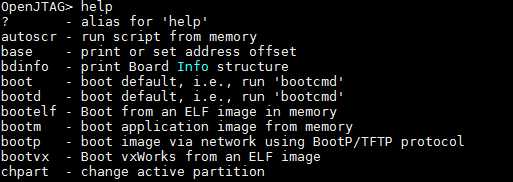
uboot运行在命令行解析模式时,在串口终端输入uboot命令,按下回车后,系统将执行命令的相应操作。以help命令为例,当输入help命令,并按下回车时,串口终端打印当前uboot支持的所有命令的帮助信息,如下图所示(图片仅截取部分):

到这里我们应该很好奇uboot的命令是如何实现的呢?想要知道命令如何实现,最简单的办法就是在uboot工程中搜索“help”关键词。通过查找在common/command.c源码文件中找到了uboot命令的定义:
U_BOOT_CMD(
    help,    CFG_MAXARGS,    1,    do_help,
     "help    - print online help\\n",
     "[command ...]\\n"
     "    - show help information (for ‘command‘)\\n"
     "‘help‘ prints online help for the monitor commands.\\n\\n"
     "Without arguments, it prints a short usage message for all commands.\\n\\n"
     "To get detailed help information for specific commands you can type\\n"
  "‘help‘ with one or more command names as arguments.\\n"
);
这里我们并不知道U_BOOT_CMD是什么,还需再进行查找。通过进一步查找,可以发现U_BOOT_CMD是一个宏,这个宏在include/command.h头文件中定义,U_BOOT_CMD宏的原型如下:
#define Struct_Section  __attribute__ ((unused,section (".u_boot_cmd")))

#ifdef  CFG_LONGHELP

#define U_BOOT_CMD(name,maxargs,rep,cmd,usage,help) \\
cmd_tbl_t __u_boot_cmd_##name Struct_Section = {#name, maxargs, rep, cmd, usage, help}

#else    /* no long help info */

#define U_BOOT_CMD(name,maxargs,rep,cmd,usage,help) \\
cmd_tbl_t __u_boot_cmd_##name Struct_Section = {#name, maxargs, rep, cmd, usage}

#endif    /* CFG_LONGHELP */
这里采用条件编译的方式,如果宏CFG_LONGHELP被定义,#ifdef 到#else之间的语句被编译,否者#else到#endif之间的语句被编译。这里我们假设宏CFG_LONGHELP(表示是否支持长的帮助信息)在其他处被定义,按照#ifdef和#else之间的宏定义格式将上述的help命令实现U_BOOT_CMD(help,....)展开,展开后的形式如下:
cmd_tbl_t __u_boot_cmd_help __attribute__ ((unused,section (".u_boot_cmd"))) = {help, CFG_MAXARGS, 1, do_help,
    "help    - print online help\\n",
  "[command ...]\\n"
     "    - show help information (for ‘command‘)\\n"
     "‘help‘ prints online help for the monitor commands.\\n\\n"
     "Without arguments, it prints a short usage message for all commands.\\n\\n"
     "To get detailed help information for specific commands you can type\\n"
     "‘help‘ with one or more command names as arguments.\\n"
}
将help命令实现U_BOOT_CMD(help,....)展开,可以看出其实U_BOOT_CMD(help,....)就是定义了一个cmd_tbl_t类型的结构体变量,变量名为__u_boot_cmd_help,比较特别的是这个变量被强加了__attribute__属性,编译器在进行链接时,将该变量放在了名为".u_boot_cmd"自定义段的地址中。下面来看cmd_tbl_t结构体的声明形式:
struct cmd_tbl_s {
    char        *name;        /* Command Name            */
    int        maxargs;    /* maximum number of arguments    */
    int        repeatable;    /* autorepeat allowed?        */
                    /* Implementation function    */
    int        (*cmd)(struct cmd_tbl_s *, int, int, char *[]);
    char        *usage;        /* Usage message    (short)    */
#ifdef    CFG_LONGHELP
    char        *help;        /* Help  message    (long)    */
#endif
#ifdef CONFIG_AUTO_COMPLETE
    /* do auto completion on the arguments */
    int        (*complete)(int argc, char *argv[], char last_char, int maxv, char *cmdv[]);
#endif
};

typedef struct cmd_tbl_s    cmd_tbl_t;
name:命令的名称(很重要)
maxargs :命令所支持的最大参数
repeatable :命令是否可重复
cmd:回调函数,执行命令便是调用该回调函数
usage:对应短的帮助信息
help :对应长的帮助信息
那么这些定义的命令是如何被调用呢?通过再次查找我们找到了最底层的命令查找函数find_cmd,其源码如下:
cmd_tbl_t *find_cmd (const char *cmd)
{
    cmd_tbl_t *cmdtp;
    cmd_tbl_t *cmdtp_temp = &__u_boot_cmd_start;    /*Init value */
    const char *p;
    int len;
    int n_found = 0;

    /*
     * Some commands allow length modifiers (like "cp.b");
     * compare command name only until first dot.
     */
    len = ((p = strchr(cmd, ‘.‘)) == NULL) ? strlen (cmd) : (p - cmd);

    for (cmdtp = &__u_boot_cmd_start;
         cmdtp != &__u_boot_cmd_end;
         cmdtp++) {
        if (strncmp (cmd, cmdtp->name, len) == 0) {
            if (len == strlen (cmdtp->name))
                return cmdtp;    /* full match */

            cmdtp_temp = cmdtp;    /* abbreviated command ? */
            n_found++;
        }
    }
    if (n_found == 1) {            /* exactly one match */
        return cmdtp_temp;
    }

    return NULL;    /* not found or ambiguous command */
}
通过find_cmd命令我们可以大概猜测出uboot命令实现机制:
- uboot进入命令行解析模式时,首先会等待命令的输入,当使用者输入命令,按下回车,uboot开始解析命令行,找到命令的名称和命令的参数。然后它会通过层层调用,调用find_cmd函数,并将命令的名称作为参数传递给find_cmd函数。
- find_cmd函数对uboot自定义的存放命令相关变量的".u_boot_cmd"段进行遍历,逐个将命令变量的名称和传入的函数参数名称相互比较。如果两者名称比较匹配,则返回指向该变量初始地址的指针变量cmdtp_temp;如果未匹配成功,返回空。
- 上层函数紧接着根据find_cmd函数返回结果执行不同调用,如果返回cmdtp_temp非空,则调用该命令的回调函数,否则,打印找不到相应命令的信息。
2、添加自定义命令
通过上面的一步步分析,我们知道了uboot命令的实现机制,现在就动手添加一个简单的自定义命令custom。自定义命令实现功能:执行该命令打印“This is a custom command”语句。
①在uboot根目录下common文件夹中新建一个名为cmd_custom.c的文件,添加文件内容如下:
#include <common.h>
#include <command.h>

/*
 *No utility functions, only for testing
 */
int do_custom (cmd_tbl_t * cmdtp, int flag, int argc, char *argv[])
{
    printf("This is a custom command\\n");
    printf("argc = %d\\n", argc);
}

U_BOOT_CMD(
    custom,    CFG_MAXARGS, 1,    do_custom,
     "User-defined functions\\n",
    "User-defined functions, the function is implemented in the cmd_custon.c file\\n"
);
②将代码上传服务器,修改uboot根目录下的Makefile文件,将cmd_custom.o添加到Makefile中COBJS变量里
③执行make命令,重新编译uboot
④烧写新的uboot到flash中
⑤进入uboot命令行解析模式,执行custom命令,结果如下图所示:

⑥执行help custom命令打印custom命令行长的帮助信息

根据执行结果来看,添加自定义命令成功!
以上是关于u-boot-1.1.6实现自定义命令的主要内容,如果未能解决你的问题,请参考以下文章