[tomcat]源码简析 异步/非阻塞和请求构成
Posted mianteno
tags:
篇首语:本文由小常识网(cha138.com)小编为大家整理,主要介绍了[tomcat]源码简析 异步/非阻塞和请求构成相关的知识,希望对你有一定的参考价值。
提出疑惑
SpringFramework5.0又新增加了一个功能Webflux(响应式编程),是一个典型非阻塞异步的框架。
我们知道servlet3.0实现异步(AsyncContext),servlet3.1又提出了非阻塞IO。对此我一直有两点疑惑:
1.tomcat8底层已经默认使用NIO了,不是已经是IO非阻塞了吗,怎么又说servlet3.1解决了非阻塞。
2.关于异步,如果开发者在serlvet中开一个业务线程来实现,也算异步,为什么3.0还提供了一个组件来解决,那么这种方式和开发者自己开个线程去执行在表现上又有什么差异,该组件在tomcat底层又是如何流转的。
另外,
3.从一个请求过来,到开发者实现一个HttpServlet的接口,方法入口的HttpServletRequest是怎么创建出来的,也是一个黑盒。
本文旨在从tomcat源码的角度来解决上述三个问题。
整体认识
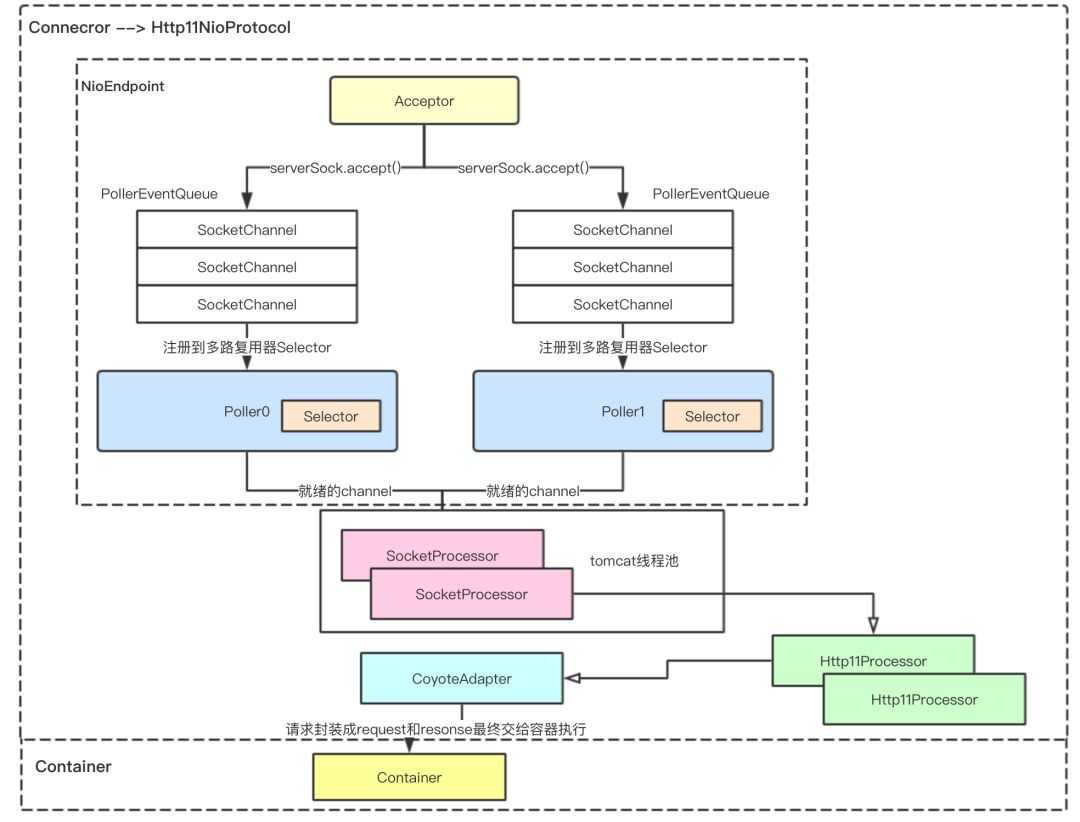
首先从下面这张图开始:

tomcat源码的版本是8.5.38。
所以按照默认的协议处理器Http11NioProtocol来说明。
在Connector组件中创建了Http11NioProtocol组件,Http11NioProtocol默认持有NioEndpoint。
NioEndpoint中,默认开启一个Acceptor,两个Poller,以及tomcat的线程池。
-
Acceptor主要负责服务器端监听客户端的连接,每接收一个客户端连接就轮询一个Poller组件,添加到Poller组件的事件队列中。
-
Poller组件持有多路复用器selector,poller组件不停从自身的事件队列中将事件取出注册到自身的多路复用器上,同时多路复用器会不停的轮询检查是否有通道准备就绪,准备就绪的通道就可以扔给tomcat线程池处理了。
-
线程池,注意tomcat的线程池并没有直接用jdk中提供的,而是自己重新写了一个(主要的区别点在于在构造线程池的时候的,默认开启了corePoolSize个没有指定firstTask的线程,而我们知道jdk的线程池是向线程池中添加任务的时候才开始开启线程的)。
corePoolSize: conf/server.xml/connector中定义的min(minSpareThreads,maxThreads),不指定默认为10个
1Math.min(getMinSpareThreadsInternal(), getMaxThreads());
maximumPoolSize: conf/server.xml/connector中定义的maxThreads,默认为200。
1getMaxThreads()
就绪的通道(可读SocketEvent.OPEN_READ,可写SocketEvent.OPEN_READ)会被封装成SocketProcessor任务扔给tomcat线程池去处理。每个通道对应一个Http11processor,然后交个CoyotoAdapter去执行,最终交给容器去执行。
细化一个就绪的通道在线程池中的处理
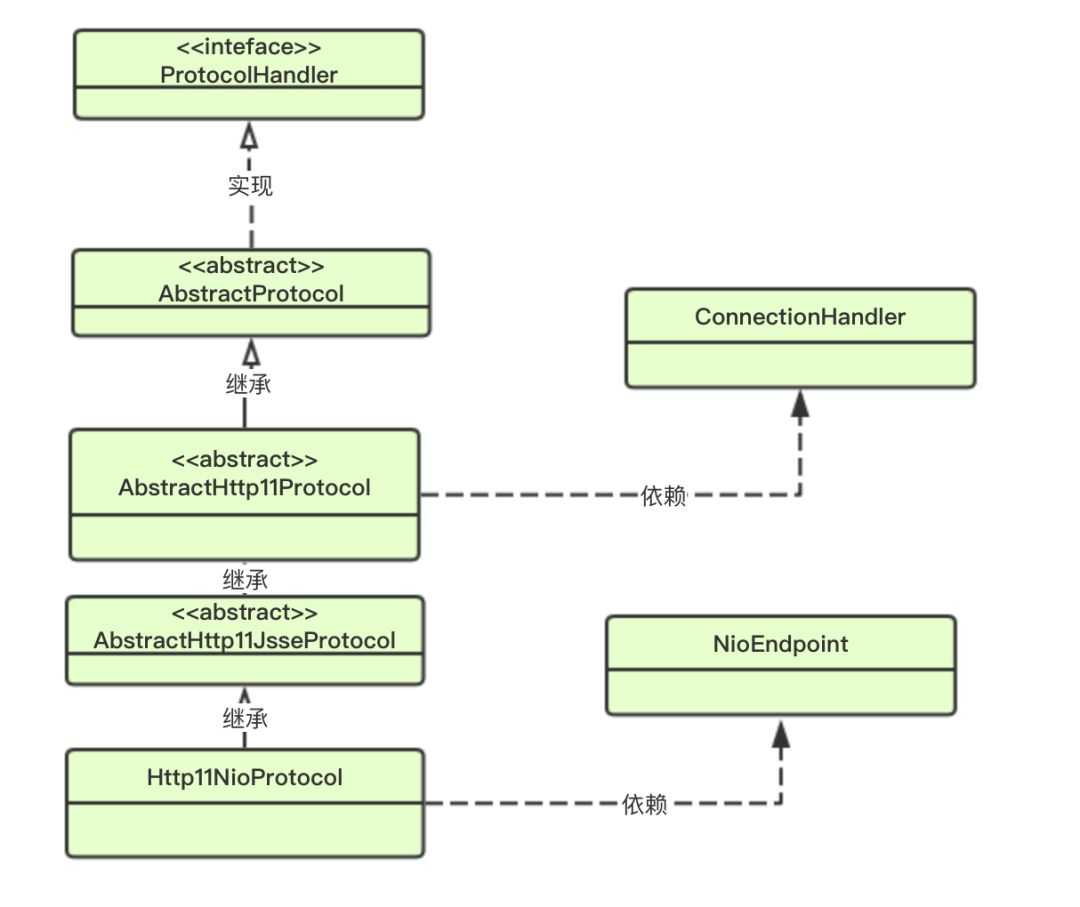
在conf/server.xml中指明了协议,创建协议处理器Http11NioProtocol,其中持有NioEndpoint和ConnectionHandler。结构如下:

每个就绪的socketChannel会交给ConnectionHandler处理,在connectionHandler会被每一个socket分配一个Http11Processor处理器。
 1// ConnectionHandler
 2                if (processor == null) {
 3                    processor = getProtocol().createProcessor();
 4                    register(processor);
 5                }
 6
 7                processor.setSslSupport(
 8                        wrapper.getSslSupport(getProtocol().getClientCertProvider()));
 9                // 缓存一个socket的处理器
10                connections.put(socket, processor);
代码解读:
这里为什么要缓存一下socket的处理器,一次请求后socket会从connections中移除。那什么场景下会从connections中获取处理器。个人理解主要有两个场景
1.每个socket实际上都有一个缓冲区,当缓冲区满了以后,会通知多路复用器通道OPEN_READ就绪了,当一次请求消息内容很大的时候,可能会触发多次的OPEN_READ就绪,那么对于这些而言是用同一个Http11Processor来处理的。
2.预告一下用于异步的情况,一旦开启了异步,当超时or组件asyncContext.complete通知完成的时候,会重新将通道任务(TIMEOUT OR OEPN_READ)提交到线程池中去执行,这种场景也是用同一个Http11Processor来执行的。
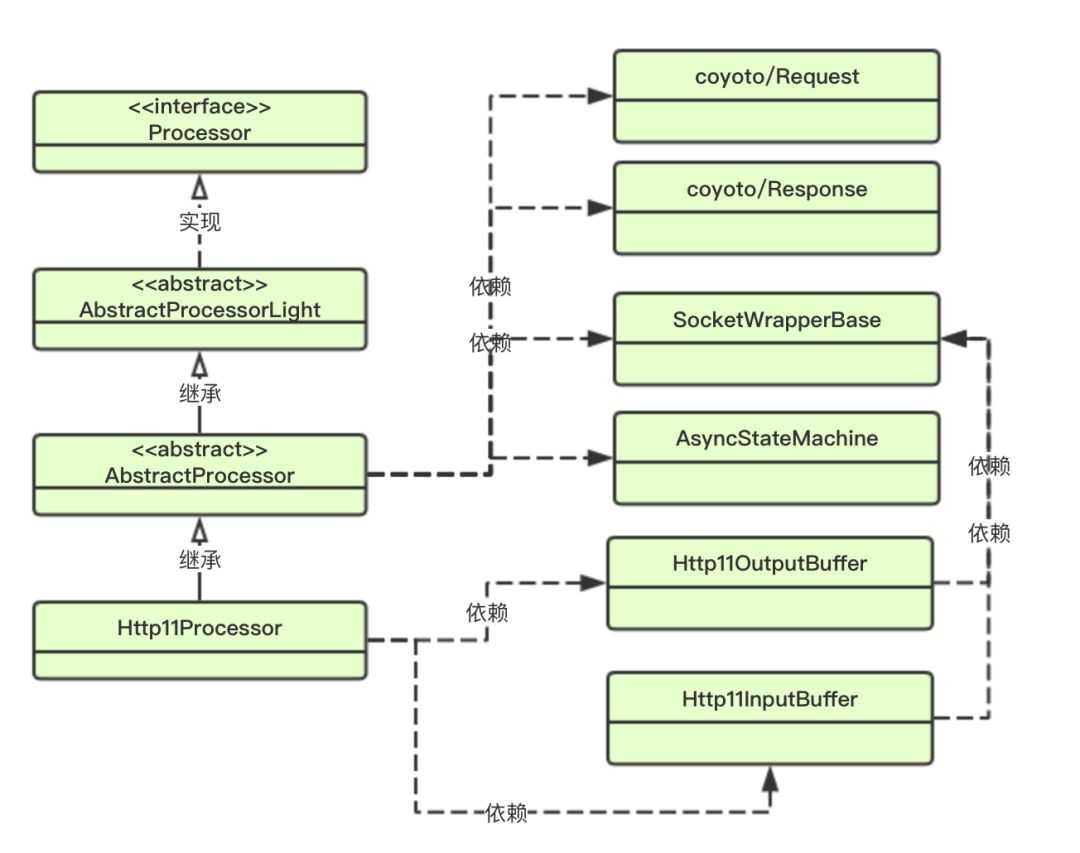
创建Http11Processor,结构如下:

创建一个Http11Processor
-
默认创建一个输入缓冲装置Http11InputBuffer和输出缓冲装置Http11OutputBuffer(默认的大小是8k+),
-
默认创建一个coyoto/Request和coyoteRespons(这里是最终开发者实现HttpServlet的方法入口参数吗?显然不是,后续会接触到conector/Request和connector/Respone,以及RequetFacade和ResponseFacade,它们分别是在什么阶段被创建的?它们之间有无关联?)
-
状态机AsyncStateMachine,主要用于servlet开启异步的场景
-
SocketWrapperBase是就绪通道的封装类。
封装好的就绪通道SocketWrapperBase交给Http11Processor处理。
 1    @Override
 2    public SocketState service(SocketWrapperBase<?> socketWrapper)
 3        throws IOException {
 4
 5        RequestInfo rp = request.getRequestProcessor();
 6        rp.setStage(org.apache.coyote.Constants.STAGE_PARSE);
 7
 8        // Setting up the I/O
 9        setSocketWrapper(socketWrapper);
10        inputBuffer.init(socketWrapper);
11        outputBuffer.init(socketWrapper);
12
13        // Flags
14        keepAlive = true;
15        openSocket = false;
16        readComplete = true;
17        boolean keptAlive = false;
18        SendfileState sendfileState = SendfileState.DONE;
19
20        while (!getErrorState().isError() && keepAlive && !isAsync() && upgradeToken == null &&
21                sendfileState == SendfileState.DONE && !endpoint.isPaused()) {
22
23            // Parsing the request header
24            try {
25                // 第一步: 解读 bytebuffer中的第一行,将method queryString requestURL protocl 都设置到request中
26                if (!inputBuffer.parseRequestLine(keptAlive)) {
27                    if (inputBuffer.getParsingRequestLinePhase() == -1) {
28                        return SocketState.UPGRADING;
29                    } else if (handleIncompleteRequestLineRead()) {
30                        break;
31                    }
32                }
33
34                if (endpoint.isPaused()) {
35                    // 503 - Service unavailable
36                    response.setStatus(503);
37                    setErrorState(ErrorState.CLOSE_CLEAN, null);
38                } else {
39                    keptAlive = true;
40                    // Set this every time in case limit has been changed via JMX
41                    request.getMimeHeaders().setLimit(endpoint.getMaxHeaderCount());
42                    // 第二步解读除了 headers中的 key-value对
43                    if (!inputBuffer.parseHeaders()) {
44                        // We‘ve read part of the request, don‘t recycle it
45                        // instead associate it with the socket
46                        openSocket = true;
47                        readComplete = false;
48                        break;
49                    }
50                    if (!disableUploadTimeout) {
51                        socketWrapper.setReadTimeout(connectionUploadTimeout);
52                    }
53                }
54            } catch (IOException e) {
55               // 代码略去
56            } catch (Throwable t) {
57               // 代码略去
58            }
59
60
61            // 客户端发送http请求消息中,有 upgrade,代表请求升级协议
62            if (foundUpgrade) {
63                // Check the protocol
64                // 代码略去
65            }
66
67            if (!getErrorState().isError()) {
68                // Setting up filters, and parse some request headers
69                rp.setStage(org.apache.coyote.Constants.STAGE_PREPARE);
70                try {
71                    // 第三部 从host中解读出了 serverName 和 serverPort
72                    prepareRequest();
73                } catch (Throwable t) {
74                  // 代码略去
75                }
76            }
77
78            // Process the request in the adapter
79            if (!getErrorState().isError()) {
80                try {
81                    rp.setStage(org.apache.coyote.Constants.STAGE_SERVICE);
82                    // ???
83                    // coyoteRequest coyoteResponse
84                    getAdapter().service(request, response);
代码解读:
输入缓冲装置Http11InputBuffer是持有封装好的通道SocketWrapper的,通过输入缓冲装置解读socket的消息行和消息头。
-
parseRequestLine ==> 将消息行中的method,queryString,requestURL,protocol解析出来,同时设置到coyoto/Request中去。用parsingRequestLinePhase来标识上次解析到的地方,我们之前说过一次请求的消息足够大的话,可能会通道就绪好几次,对于这同一个socket用这个字段来标识上次解析到的地方,下次从前次解析到的地方继续解析。
-
parseHeaders ==> 将消息头的中的内容解析出来key-value设置到coyotoRequest中
-
将构造好的coyotoRequest和coyotoResponse作为参数传递个CoyotoAdapter来执行。
请求消息行和消息头大概是什么样子的?
1GET /MyTestServlet?mmm=dongg&nnn=dnong HTTP/1.1 <== 消息行
2Host: 127.0.0.1:8080      <== 以下均为消息头
3User-Agent: Mozilla/5.0 (Macintosh; Intel Mac OS X 10.13; rv:56.0) Gecko/20100101 Firefox/56.0
4Accept: */*
5Accept-Language: zh-CN,zh;q=0.8,en-US;q=0.5,en;q=0.3
6Accept-Encoding: gzip, deflate
7Connection: keep-alive
至此,大概的执行是这样的:

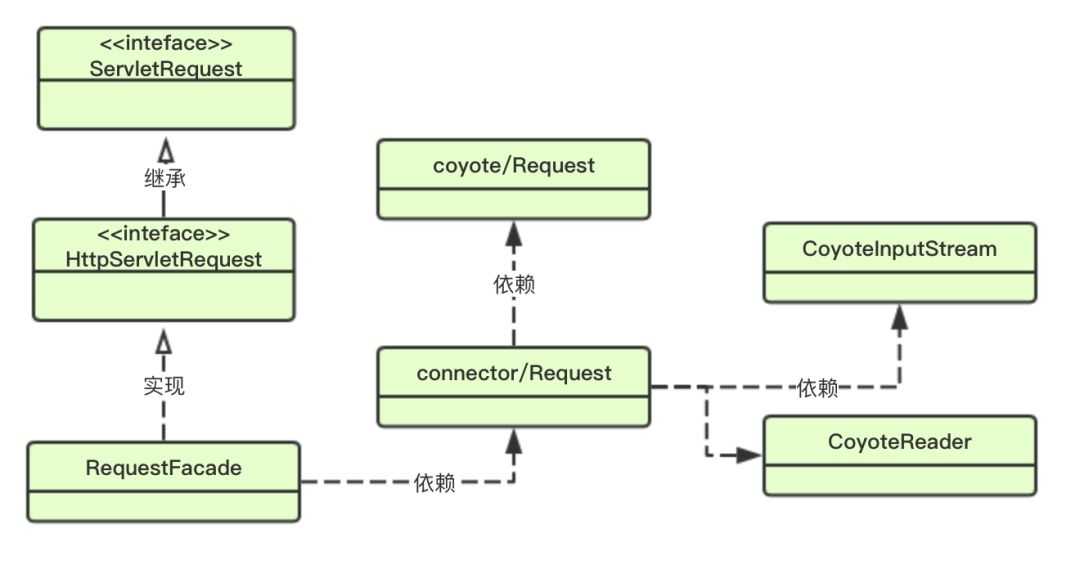
现在我们再来看一下Requet的结构:

至此,我们大概解决了疑惑中的问题③。
开发者实现HttpServlet的入口参数实际是RequestFacade,内部的各个方法实际上是持有的connector/Request的封装; connector/Request是对coyote/Request的封装,coyote/Request封装了最底层的套接字通信字节数组。一个对象一传到底不行吗?主要是从安全角度考虑的,只给下一个组件暴露它需要的数据。
到目前为止,我们还丝毫没有提到过异步组件AsyncContext。
首先来看用户自定义的servlet是如何开启异步的。
1        // ① 开启异步组件
2        AsyncContext asyncCtx = request.startAsync();
3        // ② 添加AsyncListener的监听器,当超时/完成/出错会回调这里面的方法
4        asyncCtx.addListener(new AppAsyncListener());
5        // ③ 设置超时时间
6        asyncCtx.setTimeout(2000);
7
8        // ④ 该业务线程中执行完毕,主动通知组件 asyncContext.complete();
9        executor.execute(new AsyncRequestProcessor(asyncCtx));
开启异步tomcat源码:
 1// connector/Request
 2    public AsyncContext startAsync(ServletRequest request,
 3            ServletResponse response) {
 4        if (!isAsyncSupported()) {
 5            IllegalStateException ise =
 6                    new IllegalStateException(sm.getString("request.asyncNotSupported"));
 7            log.warn(sm.getString("coyoteRequest.noAsync",
 8                    StringUtils.join(getNonAsyncClassNames())), ise);
 9            throw ise;
10        }
11
12        // connectorRequest 中创建 asyncContext
13        if (asyncContext == null) {
14            asyncContext = new AsyncContextImpl(this);
15        }
16        // 将状态机的状态从DISPATCHED --> STARTING
17        asyncContext.setStarted(getContext(), request, response,
18                request==getRequest() && response==getResponse().getResponse());
19        // 设置超时时间 默认时间为30s
20        asyncContext.setTimeout(getConnector().getAsyncTimeout());
21
22        return asyncContext;
23    }
代码解析:
创建异步组件AyncContext的实例。
状态机的初始状态是AsyncState.DISPATCHED,通过setStarted将状态机的状态更新成STARTING。同时记录当前时间为异步开启时间(lastAsyncStart)。
在connector启动的时候,会开启一个异步超时线程,用于处理所有异步servlet的超时。
 1// AbstractProtocol
 2    @Override
 3    public void start() throws Exception {
 4        // 执行 EndPoint的start方法
 5        endpoint.start();
 6
 7        // Start async timeout thread
 8        asyncTimeout = new AsyncTimeout();
 9        Thread timeoutThread = new Thread(asyncTimeout, getNameInternal() + "-AsyncTimeout");
10        int priority = endpoint.getThreadPriority();
11        if (priority < Thread.MIN_PRIORITY || priority > Thread.MAX_PRIORITY) {
12            priority = Thread.NORM_PRIORITY;
13        }
14        timeoutThread.setPriority(priority);
15        timeoutThread.setDaemon(true);
16        timeoutThread.start();
17    }
18 protected class AsyncTimeout implements Runnable {
19
20        private volatile boolean asyncTimeoutRunning = true;
21
22        /**
23         * The background thread that checks async requests and fires the
24         * timeout if there has been no activity.
25         */
26        @Override
27        public void run() {
28
29            // Loop until we receive a shutdown command
30            while (asyncTimeoutRunning) {
31                try {
32                    Thread.sleep(1000);
33                } catch (InterruptedException e) {
34                    // Ignore
35                }
36                long now = System.currentTimeMillis();
37                // waitingProcessors中是 请求是异步时,会将自身的Http11Processor加进来
38                for (Processor processor : waitingProcessors) {
39                   processor.timeoutAsync(now);
40                }
41
42                // Loop if endpoint is paused
43                while (endpoint.isPaused() && asyncTimeoutRunning) {
44                    try {
45                        Thread.sleep(1000);
46                    } catch (InterruptedException e) {
47                        // Ignore
48                    }
49                }
50            }
51        }
代码解析:
connector开启的时候,会默认启动一个异步超时线程,该线程while(true),遍历异步servelt请求对应的Http11Processor(waitingProcessors),用当前时间和异步开启时间的差值和开发者设置的超时时间比较,如果已经超时了,则将封装的socket通道socketWrapper以TIMEOUT的事件类型重新提交到tomcat线程池中,最终会执行CoyotoAdapter中的以下代码:
 1    public boolean asyncDispatch(org.apache.coyote.Request req, org.apache.coyote.Response res,
 2            SocketEvent status) throws Exception {
 3        try {
 4            if (!request.isAsync()) {
 5                response.setSuspended(false);
 6            }
 7
 8            // ??? 触发asyncContext中异步监听器的超时方法
 9            if (status==SocketEvent.TIMEOUT) {
10                if (!asyncConImpl.timeout()) {
11                    asyncConImpl.setErrorState(null, false);
12                }
13            }
14     // 代码略
15            // 这里返回complete的结果
16            if (!request.isAsync()) {
17                request.finishRequest();
18                response.finishResponse();
19            }
代码解析:
会触发开发者在自定义的servlet添加的异步监听器AsyncListener的超时方法,同时结束响应。
一旦startAsync开启了异步,用户自定义的servlet的service的代码即使执行完毕,此时request.isAsync(true)是不会结束响应的,但此时tomcat线程已经释放了,等到超时了or用户通知asyncContext.complete的场合,会重新将socket通道提交到tomcat线程池,会回调用户添加的异步监听器的超时or完成方法,同时结束响应请求。
1// Http11OutputBuffer
2        public void end() throws IOException {
3            // 真正结束响应的请求
4            socketWrapper.flush(true);
5        }
tomcat线程返还给线程池,代码欣赏:
 1// jdk ThreadPoolExecutor
 2final void runWorker(Worker w) {
 3        Thread wt = Thread.currentThread();
 4        Runnable task = w.firstTask;
 5        w.firstTask = null;
 6        w.unlock(); // allow interrupts
 7        boolean completedAbruptly = true;
 8        try {
 9            while (task != null || (task = getTask()) != null) {
10                // 对于同一个线程,拿到任务后,抢到锁
11                w.lock();
12                // 代码略
13                try {
14                    beforeExecute(wt, task);
15                    Throwable thrown = null;
16                    try {
17                        // 执行任务
18                        task.run();
19                    } catch (RuntimeException x) {
20                        thrown = x; throw x;
21                    } catch (Error x) {
22                        thrown = x; throw x;
23                    } catch (Throwable x) {
24                        thrown = x; throw new Error(x);
25                    } finally {
26                        afterExecute(task, thrown);
27                    }
28                } finally {
29                    task = null;
30                    w.completedTasks++;
31                    // 释放锁
32                    w.unlock();
33                }
34            }
35            completedAbruptly = false;
36        } finally {
37            processWorkerExit(w, completedAbruptly);
38        }
39    }
代码解析:
当一个tomcat中的一个线程从队列中获取到任务,首先抢锁(CAS set state=1),然后执行任务,任务走完,释放锁。如果在任务执行期间,该线程想尝试执行队列中的其他任务,由于没有锁,只能阻塞等待。
异步实现大致的步骤如下是这样的:
① 一个请求过来被封装成SocketProcessor任务交给tomcat线程池
② 最终执行开发者自定义的servlet,开启异步+设置了超时时间+设置了异步监听器+将asyncContext交给业务线程池,servlvet的service方法执行完毕,则tomcat线程得到释放,由于此时根据状态机的状态判定是异步的,是不会结束响应。
③ 这个时间段业务线程去执行比较耗时的业务,完全不占用tomcat的线程
④ 当超时 or 业务线程池中执行完毕(用户asyncContext.complete通知执行完毕),会重新将socket通道封装类扔进tomcat线程池,会触发用户的异步监听器的钩子函数,根据状态机的状态判定非异步了,则结束响应。
⑤ 客户端拿到响应结果。
至此解决了疑惑中的问题②。
现在我们假设一种场景,开发者在自定义的servlet中开启了一个线程来执行业务,但是由于响应结果是依赖该业务的输出结果的,那么必须在在自定义的serlvet中阻塞等待业务线程的输出,这个期间tomcat的线程是始终得不到释放的。但是如果我们改用tomcat的开启异步,情况就完全不一样了,在业务线程执行期间,tomcat线程已经释放了,可以去执行其他请求了。等到业务线程执行完毕,同步输出响应结果。是不是很棒!
现在还剩下一个疑惑,就是IO非阻塞的问题。
由于在Http11Processor中已经利用输入缓冲装置将消息行和消息头解析到request对象中了,在开发者自定义的servlet中request.getInputStream().read实际是在读取消息body。
来看tomcat的源码:
 1// RequestFacade
 2    public ServletInputStream getInputStream() throws IOException {
 3
 4        if (request == null) {
 5            throw new IllegalStateException(
 6                            sm.getString("requestFacade.nullRequest"));
 7        }
 8
 9        return request.getInputStream();
10    }
11// connector/Request
12    public ServletInputStream getInputStream() throws IOException {
13
14        if (usingReader) {
15            throw new IllegalStateException
16                (sm.getString("coyoteRequest.getInputStream.ise"));
17        }
18
19        usingInputStream = true;
20        if (inputStream == null) {
21            inputStream = new CoyoteInputStream(inputBuffer);
22        }
23        return inputStream;
24    }
25// InputBuffer
26public int read(byte[] b, int off, int len) throws IOException {
27        if (closed) {
28            throw new IOException(sm.getString("inputBuffer.streamClosed"));
29        }
30
31        if (checkByteBufferEof()) {
32            return -1;
33        }
34        int n = Math.min(len, bb.remaining());
35        bb.get(b, off, n);
36        return n;
37    }
38// checkByteBufferEof方法最终调用的是
39public int doRead(ApplicationBufferHandler handler) throws IOException {
40
41            if (byteBuffer.position() >= byteBuffer.limit()) {
42                // The application is reading the HTTP request body which is
43                // always a blocking operation.
44                if (!fill(true))
45                    return -1;
46            }
47
48            int length = byteBuffer.remaining();
49            handler.setByteBuffer(byteBuffer.duplicate());
50            byteBuffer.position(byteBuffer.limit());
51
52            return length;
53        }
代码解析:
requst.getInputStream == CoyoteInputStream(持有默认的InputBuffer).read
== 默认的InputBuffer(持有coyote/Requet, byteBuffer).read == byteBuffer.read
最终落到InputBuffer中的byteBuffer.read,那么byteBuffer是从哪边设置。
InputBuffer中的checkByteBufferEof方法 最终会调用 coyote/Request/Http11InpubBuffer/SocketInputBuffer.doRead方法
将其中的缓冲区设置到InputBuffer中的byteBuffer中。
即,request.getInputStream().read= coyote/Request中的输入缓冲装置.read。消息body IO 阻塞读。
至此明白了疑惑中的问题①。
tomcat中NIO解决的IO阻塞是针对消息行和消息头而言的,对于消息体的读取仍然是IO阻塞的。
那么servlet3.1又是如何解决这个问题的呢。
1        // ① 开启异步
2        AsyncContext actx = request.startAsync();
3
4        // ② 设置超时时间
5        actx.setTimeout(30*3000);
6
7        ServletInputStream in = request.getInputStream();
8        // ③ 添加 ReadListener的监听器
9        in.setReadListener(new MyReadListener(in,actx));
来欣赏tomcat中如何解决这问题的。
 1\\\\ CoyoteAdapter
 2            if (request.isAsync()) {
 3                async = true;
 4                ReadListener readListener = req.getReadListener();
 5                if (readListener != null && request.isFinished()) {
 6                    // Possible the all data may have been read during service()
 7                    // method so this needs to be checked here
 8                    ClassLoader oldCL = null;
 9                    try {
10                        oldCL = request.getContext().bind(false, null);
11                        if (req.sendAllDataReadEvent()) {
12                            req.getReadListener().onAllDataRead();
13                        }
14                    } finally {
15                        request.getContext().unbind(false, oldCL);
16                    }
17                }
代码解析:
在开启了异步的场合,当Has all of the request body been read的场合,则触发开发者添加的读取监听器ReadListener中的onAllDataRead方法。
以上。
以上是关于[tomcat]源码简析 异步/非阻塞和请求构成的主要内容,如果未能解决你的问题,请参考以下文章