在web项目中搭建一个spring mvc + spring + mybatis的环境
Posted 明天会更好
tags:
篇首语:本文由小常识网(cha138.com)小编为大家整理,主要介绍了在web项目中搭建一个spring mvc + spring + mybatis的环境相关的知识,希望对你有一定的参考价值。
介绍:本文中示范搭建一个ssm环境的框架:使用流程就是客户端通过http请求访问指定的接口,然后由服务器接受到请求处理完成后将结果返回。
本项目请求流程细节介绍:由客户端请求到指定的接口,这个接口是个jsp的页面,在jsp页面中会自动请求jsp中指定的接口,请求到达comcat服务器后由spring mvc提供的DispatchServlet类进行接受,然后将请求交给HandierMapping接口的实现类去解析当前请求的所有参数,再交给HandlerAdaper接口的实现类去将所有参数和对象(如:Request, Response)封装后,再调用具体的后台逻辑中的controller接口。当controller接口执行完毕后会将结果返回给调用者(因为这里直接请求后台的是jsp所以会返回给jsp),然后由jsp将结果进行美化后展示给浏览器展现出来。本项目中前端展示用jsp来展示的,其实也可以用前后分离的方式,将后端的处理结果直接响应给前端,然后前端接受到后直接自己专门用专业的前端技术处理结果,然后展示给客户端即可。
*jsp处理简介:jsp其实也就是servlet,因为tomcat中有一个servlet会将jsp文件读取过来然后自动生成对应的java代码,其中的标签就用字符串描述以IO流方式输出打印到浏览器。
上代码:
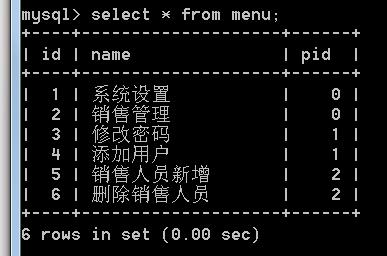
数据库:

1.web.xml
<?xml version="1.0" encoding="UTF-8"?>
<web-app version="3.0" xmlns="http://java.sun.com/xml/ns/javaee"
    xmlns:xsi="http://www.w3.org/2001/XMLSchema-instance"
    xsi:schemaLocation="http://java.sun.com/xml/ns/javaee
    http://java.sun.com/xml/ns/javaee/web-app_3_0.xsd">
    <!-- 配置上下文参数:就是配置spring的xml路径 -->
    <context-param>
        <param-name>contextConfigLocation</param-name>
        <param-value>classpath:applicationContext.xml</param-value>
    </context-param>

    <!-- 配置监听器 -->
    <listener>
        <listener-class>org.springframework.web.context.ContextLoaderListener</listener-class>
    </listener>

    <!-- 配置spring前端控制器,用于接受所有的http请求的一个servlet -->
    <servlet>
        <servlet-name>springmvc</servlet-name>
        <servlet-class>org.springframework.web.servlet.DispatcherServlet</servlet-class>
        <init-param>
            <param-name>contextConfigLocation</param-name>
            <param-value>classpath:springmvc.xml</param-value>
        </init-param>
        <!-- 添加自启动,在加载这个在服务器刚开始加载这个文件的时候就将此Servlet实例化了,如果不加,则等到真正调用
        时才会实例化 -->
        <load-on-startup>1</load-on-startup>
    </servlet>
    <!-- 配置访问名叫springmvc的这个servlet时:除过一点jsp结尾的请求会被过滤外,其他请求皆会接受 -->
    <servlet-mapping>
        <servlet-name>springmvc</servlet-name>
        <url-pattern>/</url-pattern>
    </servlet-mapping>

    <!-- 配置字符编码过滤器:当前只对post请求有效,其他请求没试过,get请求不行 -->
    <filter>
        <filter-name>encoding</filter-name>
        <filter-class>org.springframework.web.filter.CharacterEncodingFilter</filter-class>
        <init-param>
            <param-name>encoding</param-name>
            <param-value>utf-8</param-value>
        </init-param>
    </filter>
    <!-- 配置将哪些路径请求编码,这里配置的是所有 -->
    <filter-mapping>
        <filter-name>encoding</filter-name>
        <url-pattern>/*</url-pattern>
    </filter-mapping>
    <!-- 修改Tomcat默认首页的jsp文件,此处配置了aa.jsp,那么如果直接访问http://localhost:8080/ssm/单独只有斜杠
    的话就会直接走首页的jsp,此处已经将默认的index.jsp换为aa.jsp -->
    <welcome-file-list>
        <welcome-file>aa.jsp</welcome-file>
    </welcome-file-list>
</web-app>
2.applicationContext.xml
<?xml version="1.0" encoding="UTF-8"?>
<beans xmlns="http://www.springframework.org/schema/beans"
    xmlns:xsi="http://www.w3.org/2001/XMLSchema-instance"
    xmlns:aop="http://www.springframework.org/schema/aop"
    xmlns:tx="http://www.springframework.org/schema/tx"
    xmlns:context="http://www.springframework.org/schema/context"
    xsi:schemaLocation="http://www.springframework.org/schema/beans
        http://www.springframework.org/schema/beans/spring-beans.xsd
        http://www.springframework.org/schema/aop
        http://www.springframework.org/schema/aop/spring-aop.xsd
        http://www.springframework.org/schema/context
        http://www.springframework.org/schema/context/spring-context.xsd
        http://www.springframework.org/schema/tx
        http://www.springframework.org/schema/tx/spring-tx.xsd" default-autowire="byName">
    <!-- 扫描注解:但凡是此包下的类都会扫描,然后将其加载到spring的容器中,此时启动完成后spring的容器中就有此对象了 -->
    <context:component-scan base-package="com.mr.li.service.impl"></context:component-scan>
    <!-- 加载属性文件 -->
    <context:property-placeholder location="classpath:db.properties"/>
    <!-- 配置读取数据源 -->
    <bean id="dataSource" class="org.springframework.jdbc.datasource.DriverManagerDataSource">
        <property name="driverClassName" value="${jdbc.driver}"></property>
        <property name="url" value="${jdbc.url}"></property>
        <property name="username" value="${jdbc.username}"></property>
        <property name="password" value="${jdbc.password}"></property>
    </bean>
    <!-- SqlSessionFactory -->
    <bean id="factory" class="org.mybatis.spring.SqlSessionFactoryBean">
        <property name="dataSource" ref="dataSource"></property>
        <property name="typeAliasesPackage" value="com.mr.li.pojo"></property>
    </bean>
    <!-- 扫描器 -->
    <bean class="org.mybatis.spring.mapper.MapperScannerConfigurer">
        <property name="basePackage" value="com.mr.li.mapper"></property>
        <property name="sqlSessionFactoryBeanName" value="factory"></property>
    </bean>
    <!-- 事务管理器 -->
    <bean id="txManage" class="org.springframework.jdbc.datasource.DataSourceTransactionManager">
        <property name="dataSource" ref="dataSource"></property>
    </bean>
    <!-- 声明式事务 -->
    <tx:advice id="txAdvice" transaction-manager="txManage">
        <tx:attributes>
            <tx:method name="ins*"/>
            <tx:method name="del*"/>
            <tx:method name="upd*"/>
            <tx:method name="*" read-only="true"/>
        </tx:attributes>
    </tx:advice>
    <!-- 配置aop -->
    <aop:config>
        <aop:pointcut expression="execution(* com.mr.li.service.impl.*.*(..))" id="mypoint"/>
        <aop:advisor advice-ref="txAdvice" pointcut-ref="mypoint"/>
    </aop:config>
</beans>
3.db.properties:数据库参数properties文件
jdbc.driver=com.mysql.jdbc.Driver
jdbc.url = jdbc:mysql://localhost:3306/test
jdbc.username = root
jdbc.password = 123456
4.springmvc.xml
<?xml version="1.0" encoding="UTF-8"?>
<beans xmlns="http://www.springframework.org/schema/beans"
    xmlns:xsi="http://www.w3.org/2001/XMLSchema-instance"
    xmlns:mvc="http://www.springframework.org/schema/mvc"
    xmlns:context="http://www.springframework.org/schema/context"
    xsi:schemaLocation="http://www.springframework.org/schema/beans
        http://www.springframework.org/schema/beans/spring-beans.xsd
        http://www.springframework.org/schema/context
        http://www.springframework.org/schema/context/spring-context.xsd
        http://www.springframework.org/schema/mvc
        http://www.springframework.org/schema/mvc/spring-mvc.xsd">
    <!-- 扫描直接,只扫描controller包 -->
    <context:component-scan base-package="com.mr.li.controller"></context:component-scan>
    <!-- 注解驱动,注册HandlerMapping和HandlerAdapter -->
    <mvc:annotation-driven></mvc:annotation-driven>
    <!-- 设置静态资源 -->
    <mvc:resources location="/js/" mapping="/js/**"></mvc:resources>
    <mvc:resources location="/css/" mapping="/css/**"></mvc:resources>
    <mvc:resources location="/images/" mapping="/images/**"></mvc:resources>
    <!-- 视图解析器 -->
    <bean id="viewResolver" class="org.springframework.web.servlet.view.InternalResourceViewResolver">
        <property name="prefix" value="/"></property>
        <property name="suffix" value=".jsp"></property>
    </bean>
</beans>
5.MenuMapper.java:相当于Dao层,java映射类(映射到mapper.xml中,而mapper.xml映射在spring的xml就是applicationContext.xml中有调用,调用处:id="factory")
package com.mr.li.mapper;
/**
 * 相当于dao的Service
 * @author Administrator
 *
 */

import java.util.List;

import com.mr.li.pojo.Menu;

public interface MenuMapper {

    /**
     * 根据pid获得菜单对象
     * @param pid
     * @return
     */
    List<Menu> selectByPid(int pid);
}
6.MenuMapper.xml:映射xml
<?xml version="1.0" encoding="UTF-8"?>
<!DOCTYPE mapper
  PUBLIC "-//mybatis.org//DTD Mapper 3.0//EN"
  "http://mybatis.org/dtd/mybatis-3-mapper.dtd">
<mapper namespace="com.mr.li.mapper.MenuMapper">
    <resultMap type="menu" id="mymap">
        <id property="id" column="id"/>
        <collection property="children" select="com.mr.li.mapper.MenuMapper.selectByPid" column="id"></collection>
    </resultMap>
    <select id="selectByPid" parameterType="int" resultMap="mymap">
        select * from menu where pid=#{0}
    </select>
</mapper>
7.MenuController.java:客户端要访问的哪个接口
package com.mr.li.controller;

import java.util.List;

import javax.annotation.Resource;

import org.springframework.stereotype.Controller;
import org.springframework.web.bind.annotation.RequestMapping;
import org.springframework.web.bind.annotation.ResponseBody;

import com.mr.li.pojo.Menu;
import com.mr.li.service.MenuService;

@Controller
public class MenuController {

    @Resource
    private MenuService menuServiceImpl;

    @RequestMapping("show")
    @ResponseBody
    public List<Menu> show(){
        return menuServiceImpl.show();
    }

    @RequestMapping("show1")
    @ResponseBody
    public String show1(){
        return "hello world";
    }

}
8.Menu.java 实体类
package com.mr.li.pojo;

import java.util.List;

public class Menu {

    private int id;
    private String name;
    private int pid;
    private List<Menu> children;
    public int getId() {
        return id;
    }
    public void setId(int id) {
        this.id = id;
    }
    public String getName() {
        return name;
    }
    public void setName(String name) {
        this.name = name;
    }
    public int getPid() {
        return pid;
    }
    public void setPid(int pid) {
        this.pid = pid;
    }
    public List<Menu> getChildren() {
        return children;
    }
    public void setChildren(List<Menu> children) {
        this.children = children;
    }
}
9.service
package com.mr.li.service;

import java.util.List;

import com.mr.li.pojo.Menu;

public interface MenuService {

    /**
     * 查看所有菜单
     * @return
     */
    List<Menu> show();
}
10.serviceImpl
package com.mr.li.service.impl;

import java.util.List;

import javax.annotation.Resource;

import org.springframework.stereotype.Service;

import com.mr.li.mapper.MenuMapper;
import com.mr.li.pojo.Menu;
import com.mr.li.service.MenuService;

@Service
public class MenuServiceImpl implements MenuService{

    @Resource
    private MenuMapper menuMapper;

    @Override
    public List<Menu> show() {
        return menuMapper.selectByPid(0);
    }

}
11.默认请求页面:aa.jsp
<%@ page language="java" contentType="text/html; charset=UTF-8"
    pageEncoding="UTF-8"%>
<!DOCTYPE html PUBLIC "-//W3C//DTD HTML 4.01 Transitional//EN" "http://www.w3.org/TR/html4/loose.dtd">
<html>
<head>
<meta http-equiv="Content-Type" content="text/html; charset=UTF-8">
<title>Insert title here</title>
<script type="text/javascript" src="js/jquery-1.7.2.js"></script>
<script type="text/javascript">
$(function(){
    $.post("show",function(data){
        var result ="";
        for(var i=0;i<data.length;i++){
            result+="<dl>";
            result+="<dt style=\'cursor:pointer\'>"+data[i].name+"</dt>";
            for(var j=0;j<data[i].children.length;j++){
                result+="<dd>"+data[i].children[j].name+"</dd>";
            }
            result+="</dl>";
        }
        $("body").html(result);
    });

    //对所有父菜单添加点击事件
    //live("事件名,多个事件使用空格分割",function(){})
    $("dt").live("click",function(){
        //slow normal fast 数值
        $(this).siblings().slideToggle(1000);
    });

})
</script>
</head>
<body>

</body>
</html>
12.jquery-1.7.2:贴不了,自己导入,这不是重点:只要前端收到请求就好
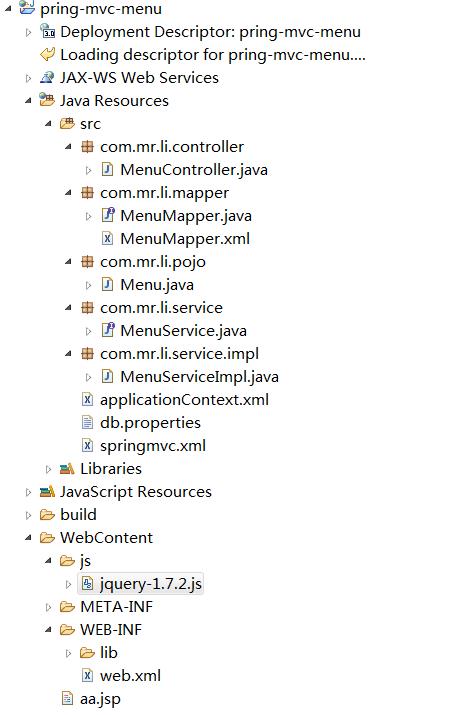
项目页面分布:

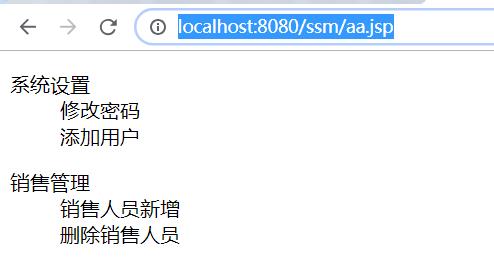
请求的url:http://localhost:8080/ssm/aa.jsp

以上是关于在web项目中搭建一个spring mvc + spring + mybatis的环境的主要内容,如果未能解决你的问题,请参考以下文章