线性布局LinearLayout的那些事儿
Posted MakeYourChance
tags:
篇首语:本文由小常识网(cha138.com)小编为大家整理,主要介绍了线性布局LinearLayout的那些事儿相关的知识,希望对你有一定的参考价值。
(一)LinearLayout常用属性
1. orientation —–布局组件中的排列方式,有水平(horizontal),垂直(vertical 默认);
2. gravity——-控制组件所包含的子元素的对齐方式,可多个组合,如:(left | buttom);
3. layout_gravity——-控制该组件在父容器中的对齐方式;
4. layout_width——–布局的宽度,通常不直接写数字,用wrap_content(组实际大小),match_parent填满父容器;
5. layout_height——-布局的高度 ,参数同上;
6. id—-为该组件设置一个资源ID, 在java中可以通过findViewByID(id)找到该组件;
7. background ——为该组件设置一个背景图片,或者直接用颜色覆盖;
注意:gravity和layout_gravity的区别
android:gravity与android:layout_gravity。
他们的区别在于:android:gravity用于设置View组件的对齐方式,而android:layout_gravity用于设置Container(容器)组件的对齐方式
(二)android:layout_weight权重的描述 (用于屏幕适配的问题)
概述
layout_weight 用于给一个线性布局中的诸多视图的重要度赋值。 所有的视图都有一个layout_weight值,默认为零,意思是需要显示 多大的视图就占据多大的屏幕空 间。
若赋一个高于零的值,则将父视图中的可用空间分割,分割大小具体取决于每一个视图的layout_weight 值以及该值在当前屏幕布局的整体 layout_weight值和在其它视图屏幕布局的layout_weight值中所占的比率而定。layout_weight属性详解
1)最简单的使用方法:
如图:

代码如下:
<?xml version="1.0" encoding="utf-8"?>
<LinearLayout xmlns:android="http://schemas.android.com/apk/res/android"
    android:id="@+id/linearlayout"
    android:layout_width="match_parent"
    android:layout_height="match_parent"
    android:orientation="horizontal" >

    <!-- weight属性详解 -->

    <LinearLayout
        android:layout_width="0dp"
        android:layout_height="match_parent"
        android:layout_weight="1"
        android:background="#ADFF2F" >
    </LinearLayout>

    <LinearLayout
        android:layout_width="0dp"
        android:layout_height="match_parent"
        android:layout_weight="2"
        android:background="#DA70D6" >
    </LinearLayout>

</LinearLayout>
说明:就跟开始的概述中说的那样,手机屏幕中的layout_width (or layout_height)的默认值为0dp,即需要显示多大的视图就占据多大的屏幕空间。那么,当你设置layout_weight的权重属性后,视图(View)将按照该比例来进行分配LinearLayout基于的空白空间,当然,权重也会受到LinearLayout布局的影响,比如:水平,垂直;
2)难道我的layout_width or layout_height必须设置为0dp才可使用weight权重吗?答案当然是否定的!
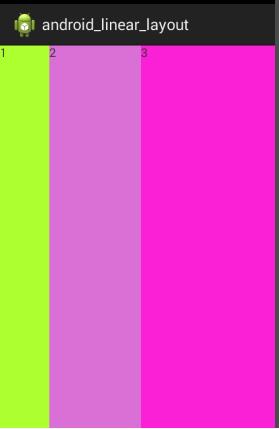
No.1 :当我的layout_width or layout_height的值均为wrap_content ,布局为水平(当你将布局改为垂直时试试,是不是看不到“3”了,下面我会告诉你~~);
如图:
代码如下:
<?xml version="1.0" encoding="utf-8"?>
<LinearLayout xmlns:android="http://schemas.android.com/apk/res/android"
    android:id="@+id/linearlayout"
    android:layout_width="match_parent"
    android:layout_height="match_parent"
    android:orientation="horizontal" >

    <!-- weight属性详解 -->

    <TextView
        android:layout_width="wrap_content"
        android:layout_height="match_parent"
        android:layout_weight="1"
        android:background="#ADFF2F"
        android:text="1" >
    </TextView>

    <TextView
        android:layout_width="wrap_content"
        android:layout_height="match_parent"
        android:layout_weight="2"
        android:background="#DA70D6"
        android:text="2" >
    </TextView>

    <TextView
        android:layout_width="wrap_content"
        android:layout_height="match_parent"
        android:layout_weight="3"
        android:background="#FA20D6"
        android:text="3" >
    </TextView>

</LinearLayout>
No.2 :当将上面代码中的layout_width or layout_height的值均为match_parent时,同样是水平布局时,如下图:
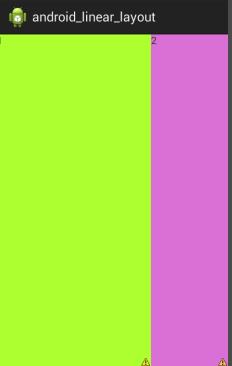
纳尼?老3去哪里了?我明明是1:2:3的权重呀~怎么变成2:1:0了?
说明:网上给出了一种一种解释
1)每个都是match_parent ,可是屏幕只有一个,那么,可供分配的空间就变成了这样,1-3=-2*match_parent ;
2)依次所占的比例为:1/6 ,2/6,3/6
3)
先到先得,分给1的空间:1-2*(1/6 )=2/3match_parent;
分给2的空间:1-2*(2/6 )=(1/3)match_parent;
分给3的空间:1-2*(3/6 )=0 match_parent;
4)所以,1占2份,2占1份,3什么也没有,也就会出现上面的View了;
No3: 如何在Java代码中设置我的Weight权重呢?
SetLayoutParams(new LayoutParams(LayoutParams.FILL_PARENT ,
LayoutParams.WRAP_PARENT , **3**));//就是那个“3”呀!
3)如何为LinearLayout 设置分割线?
对于这种线我们通常有俩种做法:
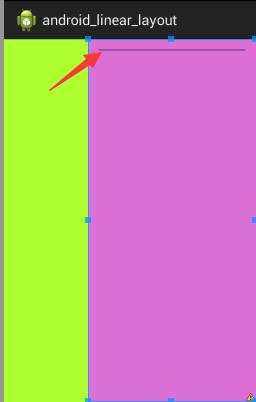
No1:我们可以在布局中直接添加一个View,这个View的作用仅仅是显示一条黑线,非常简单,如下图:
代码如下:
<?xml version="1.0" encoding="utf-8"?>
<LinearLayout xmlns:android="http://schemas.android.com/apk/res/android"
    android:id="@+id/linearlayout"
    android:layout_width="match_parent"
    android:layout_height="match_parent"
    android:orientation="horizontal" >

    <!-- weight属性详解 -->

    <LinearLayout
        android:layout_width="0dp"
        android:layout_height="match_parent"
        android:layout_weight="1"
        android:background="#ADFF2F" >
    </LinearLayout>

    <LinearLayout
        android:layout_width="0dp"
        android:layout_height="match_parent"
        android:layout_weight="2"
        android:background="#DA70D6" >

        <View
            android:layout_width="match_parent"
            android:layout_height="1px"
            android:background="#000000" />
    </LinearLayout>

</LinearLayout>
注:当然,background属性也可以是一张黑线图片;
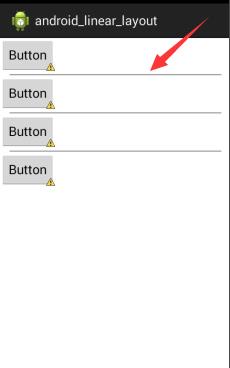
No2: 使用LinearLayout的divider属性也同样可以实现,直接设置LinearLayout的分割线,你需要准备一条黑线图片;
像这样:
代码如下:
<?xml version="1.0" encoding="utf-8"?>
<LinearLayout xmlns:android="http://schemas.android.com/apk/res/android"
    android:layout_width="match_parent"
    android:layout_height="match_parent"
    android:divider="@drawable/henxian"
    android:dividerPadding="10dp"
    android:orientation="vertical"
    android:showDividers="middle" >

<!--android:divider="@drawable/henxian"用来设置作为分割线的图片-->

<!--android:dividerPadding="10dp" 用来设置分割线的padding-->

<!-- android:showDividers="middle"用来设置分割线的位置,none(无) ,begining(开始) ,end(结束) ,middle(每个组件之间) -->

    <Button
        android:id="@+id/button1"
        android:layout_width="wrap_content"
        android:layout_height="wrap_content"
        android:text="Button" />

    <Button
        android:id="@+id/button2"
        android:layout_width="wrap_content"
        android:layout_height="wrap_content"
        android:text="Button" />

    <Button
        android:id="@+id/button3"
        android:layout_width="wrap_content"
        android:layout_height="wrap_content"
        android:text="Button" />

    <Button
        android:id="@+id/button4"
        android:layout_width="wrap_content"
        android:layout_height="wrap_content"
        android:text="Button" />

</LinearLayout>
(三)LinearLayout的简单用法:
如下图:
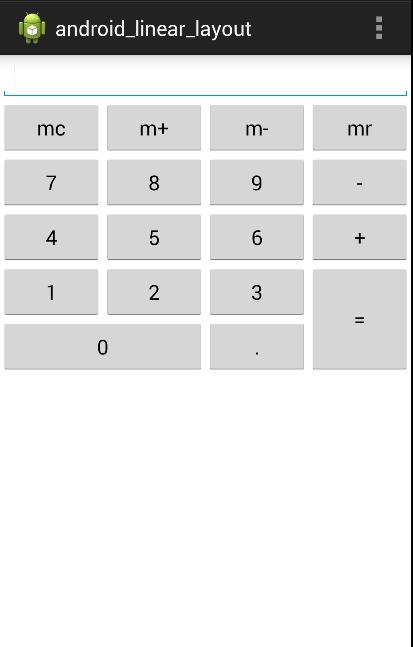
实现代码:
<LinearLayout xmlns:android="http://schemas.android.com/apk/res/android"
    xmlns:tools="http://schemas.android.com/tools"
    android:layout_width="match_parent"
    android:layout_height="match_parent"
    android:background="#FFFFFF"
    android:orientation="vertical"
    tools:context="com.example.android_linear_layout.MainActivity" >

    <LinearLayout
        android:layout_width="match_parent"
        android:layout_height="wrap_content"
        android:orientation="horizontal" >

        <EditText
            android:id="@+id/msg"
            android:layout_width="match_parent"
            android:layout_height="wrap_content" />
    </LinearLayout>
    <!-- 布局可以嵌套布局 -->

    <LinearLayout
        android:layout_width="match_parent"
        android:layout_height="wrap_content"
        android:orientation="horizontal" >

        <Button
            android:layout_width="match_parent"
            android:layout_height="wrap_content"
            android:layout_weight="1"
            android:text="mc" />

        <Button
            android:layout_width="match_parent"
            android:layout_height="wrap_content"
            android:layout_weight="1"
            android:text="m+" />

        <Button
            android:layout_width="match_parent"
            android:layout_height="wrap_content"
            android:layout_weight="1"
            android:text="m-" />

        <Button
            android:layout_width="match_parent"
            android:layout_height="wrap_content"
            android:layout_weight="1"
            android:text="mr" />
    </LinearLayout>

    <LinearLayout
        android:layout_width="match_parent"
        android:layout_height="wrap_content"
        android:orientation="horizontal" >

        <Button
            android:layout_width="match_parent"
            android:layout_height="wrap_content"
            android:layout_weight="1"
            android:text="7" />

        <Button
            android:layout_width="match_parent"
            android:layout_height="wrap_content"
            android:layout_weight="1"
            android:text="8" />

        <Button
            android:layout_width="match_parent"
            android:layout_height="wrap_content"
            android:layout_weight="1"
            android:text="9" />

        <Button
            android:layout_width="match_parent"
            android:layout_height="wrap_content"
            android:layout_weight="1"
            android:text="-" />
    </LinearLayout>

    <LinearLayout
        android:layout_width="match_parent"
        android:layout_height="wrap_content"
        android:orientation="horizontal" >

        <Button
            android:layout_width="match_parent"
            android:layout_height="wrap_content"
            android:layout_weight="1"
            android:text="4" />

        <Button
            android:layout_width="match_parent"
            android:layout_height="wrap_content"
            android:layout_weight="1"
            android:text="5" />

        <Button
            android:layout_width="match_parent"
            android:layout_height="wrap_content"
            android:layout_weight="1"
            android:text="6" />

        <Button
            android:layout_width="match_parent"
            android:layout_height="wrap_content"
            android:layout_weight="1"
            android:text="+" />
    </LinearLayout>

    <LinearLayout
        android:layout_width="match_parent"
        android:layout_height="wrap_content"
        android:orientation="horizontal" >

        <LinearLayout
            android:layout_width="wrap_content"
            android:layout_height="wrap_content"
            android:layout_weight="3"
            android:orientation="vertical" >

            <LinearLayout
                android:layout_width="match_parent"
                android:layout_height="wrap_content"
                android:orientation="horizontal" >

                <Button
                    android:layout_width="match_parent"
                    android:layout_height="wrap_content"
                    android:layout_weight="1"
                    android:text="1" />

                <Button
                    android:layout_width="match_parent"
                    android:layout_height="wrap_content"
                    android:layout_weight="1"
                    android:text="2" />

                <Button
                    android:layout_width="match_parent"
                    android:layout_height="wrap_content"
                    android:layout_weight="1"
                    android:text="3" />
            </LinearLayout>

            <LinearLayout
                android:layout_width="match_parent"
                android:layout_height="wrap_content"
                android:orientation="horizontal" >

                <Button
                    android:layout_width="0px"
                    android:layout_height="wrap_content"
                    android:layout_weight="2"
                    android:text="0" />

                <Button
                    android:layout_width="0px"
                    android:layout_height="wrap_content"
                    android:layout_weight="1"
                    android:text="." />
            </LinearLayout>
        </LinearLayout>

        <LinearLayout
            android:layout_width="wrap_content"
            android:layout_height="match_parent"
            android:layout_weight="1"
            android:orientation="horizontal" >

            <Button
                android:layout_width="match_parent"
                android:layout_height="match_parent"
                android:layout_weight="1"
                android:text="=" />
        </LinearLayout>
    </LinearLayout>
</LinearLayout>
注:

以上是关于线性布局LinearLayout的那些事儿的主要内容,如果未能解决你的问题,请参考以下文章