Libgdx之Table 表格排版
Posted zqiang_55
tags:
篇首语:本文由小常识网(cha138.com)小编为大家整理,主要介绍了Libgdx之Table 表格排版相关的知识,希望对你有一定的参考价值。
做游戏的时候一般都会有一个菜单屏,里面有各种选项如:静音、调节声音大小、帮助、游戏介绍。这时候我们就需要对各个按钮或者演员来排序,Table就是一个能很好帮助我们进行排序的工具。
Table extends WidgetGroup 我们可以知道Table继承自Group,我们进行排序的时候也可以赋予简单的动作,如做一个Button切换的动画等等。
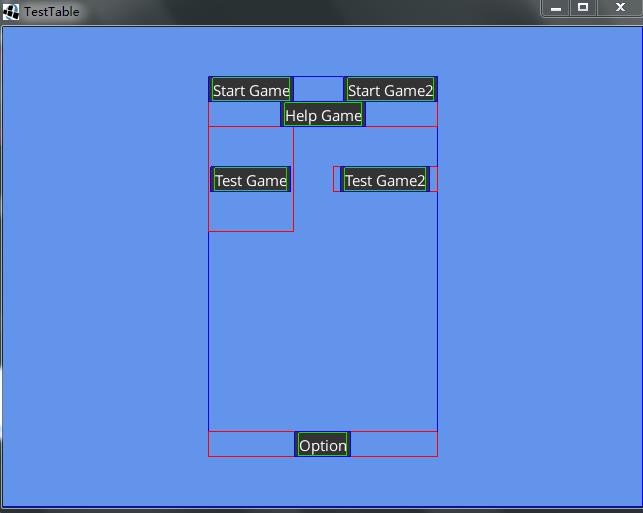
当用tabel.add(T actor)方法时返回一个Cell,cell里面定义了各种属性来进行操作,可以调整单元格和单元格之间的距离,也可以调整单元格和单元格里面按钮(Actor)的距离。详情请看下面的demo
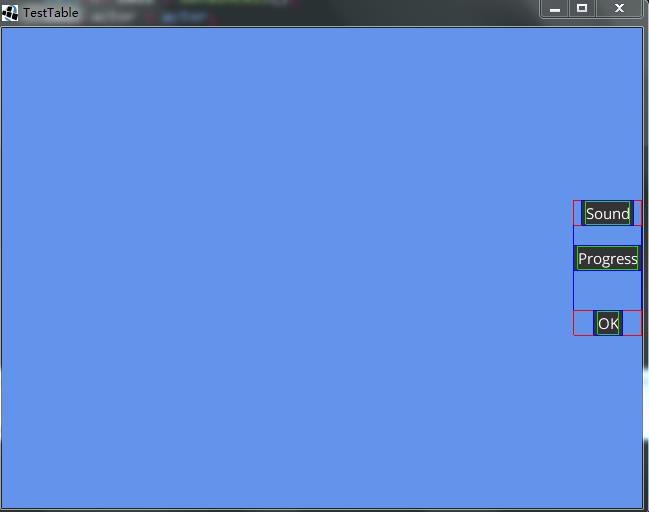
点击Options按钮时游戏菜单隐藏,显示选项菜单,点击选项菜单里面的OK按钮时显示游戏菜单,代码如下:
 Stage stage;
    Skin skin;

    Table menu;
    Table options;

    float x, y;
    @Override
    public void create() {
        stage = new Stage();
        stage.setDebugAll(true);
        Gdx.input.setInputProcessor(stage);

        skin = new Skin(Gdx.files.internal("uiskin.json"));

        menu = new Table();

        options = new Table();
        stage.addActor(menu);
        stage.addActor(options);

        // Table的坐标是默认从屏幕左下角开始的, 调试中的蓝框就是Table
        // 如果设置下面属性那么居中显示
        menu.setFillParent(true);
        TextButton tbStart = new TextButton("Start Game", skin);
        TextButton tbStart2 = new TextButton("Start Game2", skin);
        menu.add(tbStart); // 将开始按钮添加到menu Table中,方法返回cell
        menu.add(tbStart2).padLeft(50);// 此时2个并排显示 , 离左边的Button 50个像素
        menu.row();  // 在Table中新建一行
        TextButton helpTB = new TextButton("Help Game", skin);
        //menu.add(helpTB).expandX();  // 将帮助菜单的cell沿X轴展开
        menu.add(helpTB).colspan(2);   // 将2个Cell合并,并居中显示
        menu.row();
        // Space是单元格里的按钮和单元格之间的距离   Pad是单元格与单元格之间的距离
        TextButton testTB = new TextButton("Test Game", skin);
        menu.add(testTB);  // 这个bottom只是针对cell而言
        TextButton testTB2 = new TextButton("Test Game2", skin);
        menu.add(testTB2).space(40);
        menu.row();
        TextButton optionTB = new TextButton("Option", skin);
        optionTB.addListener(new ChangeListener() {

            @Override
            public void changed(ChangeEvent event, Actor actor) {
                showOptionMenu(true);
            }
        });
//      menu.add(optionTB).padBottom(10); // 距离底部的Tabel 10个像素
        menu.add(optionTB).colspan(2).padTop(200);   // 距离上一个Cell的距离是200个像素

        // Table会根据你填充元素自动扩展
        Gdx.app.log("TAG", "menu table p w:" + menu.getPrefWidth() + " p h:" + menu.getPrefHeight());
        Gdx.app.log("TAG", "menu table w:" + menu.getWidth() + " h:" + menu.getHeight());

        TextButton soundTB = new TextButton("Sound", skin);
        options.add(soundTB);
        options.row();
        TextButton progressTB = new TextButton("Progress", skin);
        options.add(progressTB).padTop(20);
        options.row();
        TextButton  okTB = new TextButton("OK", skin);
        okTB.addListener(new ClickListener() {

            @Override
            public void clicked(InputEvent event, float x, float y) {
                showOptionMenu(false);
            }

        });
        options.add(okTB).padTop(40);
        options.setVisible(true);
        options.setSize(options.getPrefWidth(), options.getPrefHeight());
        x = stage.getWidth() - options.getWidth();
        y = stage.getHeight() / 2 - options.getHeight() / 2;
        options.setPosition(stage.getWidth() + 10f, y);
        options.setVisible(false);
    }

    @Override
    public void render() {
        Gdx.gl.glClearColor(0.39f, 0.58f, 0.92f, 1.0f);
        Gdx.gl.glClear(GL20.GL_COLOR_BUFFER_BIT);

        stage.act();
        stage.draw();
    }

    @Override
    public void dispose() {
        stage.dispose();
        skin.dispose();
    }

    @Override
    public void resize(int width, int height) {
        stage.getViewport().update(width, height);
    }

    private void showOptionMenu(boolean show) {
        if (show) {
            menu.setVisible(!show);
            options.setVisible(show);
            options.addAction(Actions.moveTo(x, y, 0.3f, Interpolation.swingOut));
        } else {
            menu.setVisible(!show);
            options.setVisible(show);
            options.setPosition(stage.getWidth() + 10f, y);
        }
    }

以上是关于Libgdx之Table 表格排版的主要内容,如果未能解决你的问题,请参考以下文章