一个引导页的实现
Posted 奇遇yms
tags:
篇首语:本文由小常识网(cha138.com)小编为大家整理,主要介绍了一个引导页的实现相关的知识,希望对你有一定的参考价值。
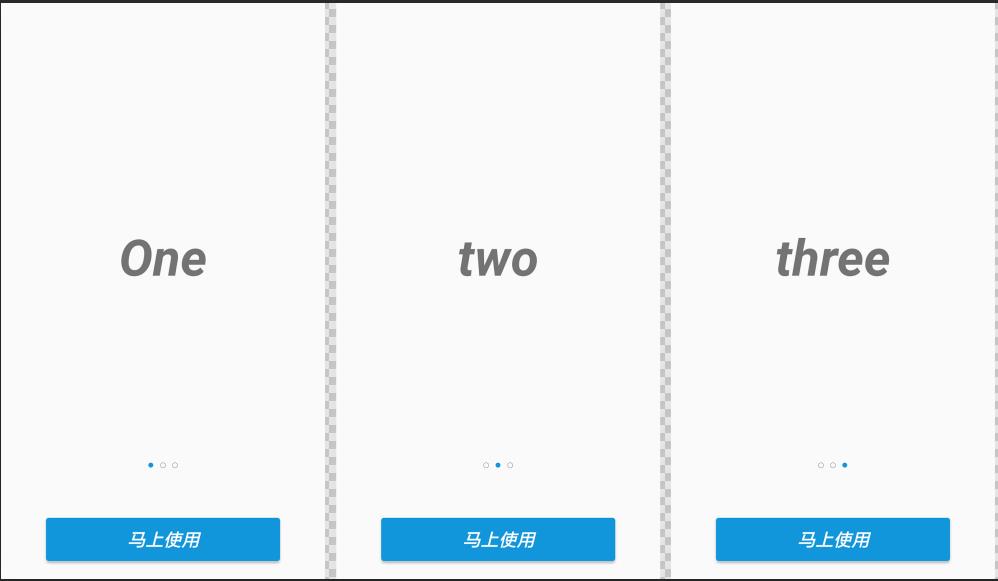
写了一个引导页,首先看看效果吧。

这个实现的方法是上面是3个Fragment切换,中间是显示的点指示器,最下面是进入到下一个Activity的按钮。
3个Fragment的创建就不在详细说了,基本没啥东西。
Fragment的Adapter如下:
public class GuideFragmetAdapter extends FragmentPagerAdapter {
    public List<Fragment> mFragmentList;

    public GuideFragmetAdapter(FragmentManager fm, List<Fragment> fragmentList) {
        super(fm);
        mFragmentList=fragmentList;
    }

    @Override
    public Fragment getItem(int position) {

        return mFragmentList==null?null:mFragmentList.get(position);
    }

    @Override
    public int getCount() {
        return mFragmentList==null?0:mFragmentList.size();
    }
}
下面是GuideActivity的布局
<?xml version="1.0" encoding="utf-8"?>
<LinearLayout xmlns:android="http://schemas.android.com/apk/res/android"
    android:id="@+id/activity_guide1"
    android:orientation="vertical"
    android:layout_width="match_parent"
    android:layout_height="match_parent">
    <RelativeLayout
        android:id="@+id/activity_guide"
        android:layout_width="match_parent"
        android:layout_height="0dp"
        android:layout_weight="1">
        <android.support.v4.view.ViewPager
            android:id="@+id/vp_guide"
            android:layout_width="match_parent"
            android:layout_height="match_parent">
            <requestFocus />
        </android.support.v4.view.ViewPager>
        <LinearLayout
            android:id="@+id/ll_indicator"
            android:layout_width="wrap_content"
            android:layout_height="wrap_content"
            android:orientation="horizontal"
            android:layout_alignParentBottom="true"
            android:layout_centerHorizontal="true"
            android:gravity="center"
            android:layout_marginBottom="45dip"
            >
        </LinearLayout>
    </RelativeLayout>
    <Button
        android:id="@+id/btn_ready_use"
        android:layout_width="match_parent"
        android:layout_height="wrap_content"
        android:layout_alignParentBottom="true"
        android:layout_marginRight="50dp"
        android:layout_marginLeft="50dp"
        android:layout_marginBottom="20dp"
        android:layout_marginTop="10dp"
        android:background="@drawable/guide_ready_use"
        android:textColor="@color/color_white"
        android:textSize="@dimen/sp_eighteen"
        android:text="马上使用"/>
</LinearLayout>
dotselector.xml的代码
<?xml version="1.0" encoding="utf-8"?>
<selector xmlns:android="http://schemas.android.com/apk/res/android" >
    <item android:drawable="@drawable/ic_guide_selected" android:state_selected="true"/>
    <item android:drawable="@drawable/ic_guide_unselected" android:state_selected="false"/>
</selector>
ic_guide_selected.xml的代码
<vector android:height="24dp" android:viewportHeight="1024.0"
    android:viewportWidth="1024.0" android:width="24dp" xmlns:android="http://schemas.android.com/apk/res/android">
    <path android:fillColor="#1296db" android:pathData="M480,480m-416,0a6.5,6.5 0,1 0,832 0,6.5 6.5,0 1,0 -832,0Z"/>
</vector>
ic_guide_unselected.xml的代码
<vector android:height="24dp" android:viewportHeight="1024.0"
    android:viewportWidth="1024.0" android:width="24dp" xmlns:android="http://schemas.android.com/apk/res/android">
    <path android:fillColor="#FF000000" android:pathData="M510.8,960c-60.5,0 -119.2,-11.9 -174.5,-35.2 -53.4,-22.6 -101.3,-54.9 -142.5,-96 -41.2,-41.2 -73.5,-89.1 -96,-142.5 -23.4,-55.3 -35.2,-114 -35.2,-174.5 0,-60.5 11.9,-119.2 35.2,-174.5 22.6,-53.4 54.9,-101.3 96,-142.5 41.2,-41.2 89.1,-73.5 142.5,-96 55.3,-23.4 114,-35.2 174.5,-35.2 60.5,0 119.2,11.9 174.5,35.2 53.4,22.6 101.3,54.9 142.5,96 41.2,41.2 73.5,89.1 96,142.5 23.4,55.3 35.2,114 35.2,174.5 0,60.5 -11.9,119.2 -35.2,174.5 -22.6,53.4 -54.9,101.3 -96,142.5 -41.2,41.2 -89.1,73.5 -142.5,96C630,948.1 571.3,960 510.8,960zM510.8,94.3c-56.4,0 -111,11 -162.5,32.8 -49.7,21 -94.4,51.1 -132.7,89.5 -38.3,38.3 -68.5,83 -89.5,132.7 -21.8,51.5 -32.8,106.1 -32.8,162.5 0,56.4 11,111 32.8,162.5 21,49.7 51.1,94.4 89.5,132.7 38.3,38.3 83,68.5 132.7,89.5 51.5,21.8 106.1,32.8 162.5,32.8s111,-11 162.5,-32.8c49.7,-21 94.4,-51.1 132.7,-89.5 38.3,-38.3 68.5,-83 89.5,-132.7 21.8,-51.5 32.8,-106.1 32.8,-162.5 0,-56.4 -11,-111 -32.8,-162.5 -21,-49.7 -51.1,-94.4 -89.5,-132.7 -38.3,-38.3 -83,-68.5 -132.7,-89.5C621.8,105.3 567.1,94.3 510.8,94.3z"/>
</vector>
GuideActivity里面的代码:
public class GuideActivity extends AppCompatActivity implements View.OnClickListener{
    private ViewPager mVpGuide;
    private List<Fragment> fragmentList;
    private LinearLayout mLlIndicator;
    private ImageView[] dotViews;//小圆点

    @Override
    protected void onCreate(Bundle savedInstanceState) {
        super.onCreate(savedInstanceState);
        setContentView(R.layout.activity_guide);
        initView();

        fragmentList=new ArrayList<Fragment>();
        fragmentList.add(new GuideOneFragment());
        fragmentList.add(new GuideTwoFragment());
        fragmentList.add(new GuideThreeFragment());
        mVpGuide.setAdapter(new GuideFragmetAdapter(getSupportFragmentManager(),fragmentList));
        mVpGuide.setCurrentItem(0);
        mVpGuide.setOnPageChangeListener(new MyPagerChangeListener());

        setIndicator();
    }

    private void initView() {
        mVpGuide=findViewById(R.id.vp_guide);
        findViewById(R.id.btn_ready_use).setOnClickListener(this);
        mLlIndicator=findViewById(R.id.ll_indicator);
    }
    private void setIndicator(){
        LinearLayout.LayoutParams mParams = new LinearLayout.LayoutParams(20, 20);
        mParams.setMargins(10, 0, 10,0);//设置小圆点左右之间的间隔
        dotViews = new ImageView[fragmentList.size()];
        //判断小圆点的数量,从0开始,0表示第一个
        for(int i = 0; i < fragmentList.size(); i++)
        {
            ImageView imageView = new ImageView(this);
            imageView.setLayoutParams(mParams);
            imageView.setImageResource(R.drawable.dot_selector);
            if(i== 0)
            {
                imageView.setSelected(true);//默认启动时,选中第一个小圆点
            }
            else {
                imageView.setSelected(false);
            }
            dotViews[i] = imageView;//得到每个小圆点的引用,用于滑动页面时,(onPageSelected方法中)更改它们的状态。
            mLlIndicator.addView(imageView);//添加到布局里面显示
        }

    }
    @Override
    public void onClick(View v) {
        switch (v.getId()){
            case R.id.btn_ready_use:
                Intent intent = new Intent(GuideActivity.this, LoginActivity.class);
                startActivity(intent);
                finish();
                break;
        }
    }
    /**
     * 设置一个ViewPager的侦听事件,当左右滑动ViewPager时菜单栏被选中状态跟着改变
     */
    public class MyPagerChangeListener implements ViewPager.OnPageChangeListener {

        @Override
        public void onPageScrollStateChanged(int arg0) {
        }

        @Override
        public void onPageScrolled(int arg0, float arg1, int arg2) {
        }

        @Override
        public void onPageSelected(int arg0) {
            switch (arg0) {
                case 0:
                    dotViews[0].setSelected(true);
                    dotViews[1].setSelected(false);
                    dotViews[2].setSelected(false);
                    break;
                case 1:
                    dotViews[0].setSelected(false);
                    dotViews[1].setSelected(true);
                    dotViews[2].setSelected(false);
                    break;
                case 2:
                    dotViews[0].setSelected(false);
                    dotViews[1].setSelected(false);
                    dotViews[2].setSelected(true);
                    break;
            }
        }
    }
}
以上是关于一个引导页的实现的主要内容,如果未能解决你的问题,请参考以下文章