Storm实时日志分析实战
Posted
tags:
篇首语:本文由小常识网(cha138.com)小编为大家整理,主要介绍了Storm实时日志分析实战相关的知识,希望对你有一定的参考价值。
项目背景
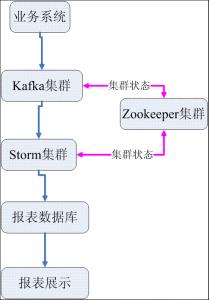
最近公司做一个项目,用户需要对网站访问者的广告点击/浏览记录进行实时统计分析,分析结果存入数据库,输出报表。我们采用了Kafka+Storm+Zookeeper的解决方案。之前没有接触过,经过一段时间的研究,最终完成了项目。接下来的内容我将介绍我们的解决方案。供大家参考。我们的系统结构如下:
总体结构介绍
业务系统把点击/浏览广告业务日志统一按规定的格式发送到Kafka集群中,不同的业务日志可以分别发送给Kafka不同的主题。Storm集群中运行了我们的实时统计拓扑,该统计拓扑分别从Kafka的不同主题中获取广告业务日志并进行实时统计汇总,最后把汇总的报表结果写入报表数据库,供报表系统进行报表展示。在Kafka集群与Storm集群运行过程中,需要通过Zookeeper集群进行协调与集群状态维护。例如Kafka集群中的每个分片的状态,Storm集群中存在哪些有效节点。日志统计分析的状态等。Kafka集群、Storm集群、Zookeeper集群分别采用3台服务器。
环境准备
为了保证集群的稳定,要求Zookeeper集群、Kafka集群、Storm集群分别部署在不同的主机上,集群之间不要公用主机。每个集群采用单数个机器。推荐Zookeeper集群、Kafka集群、Storm集群分别采用3台独立的机器。本文档的配置环境如下,操作系统为redhat 5.5:
环境表:
| ip | 主机名 | 软件 |
| 192.168.1.101 | Zookeeper101 | zookeeper-3.4.6.tar.gz,supervisord |
| 192.168.1.102 | Zookeeper102 | zookeeper-3.4.6.tar.gz,supervisord |
| 192.168.1.103 | Zookeeper103 | zookeeper-3.4.6.tar.gz,supervisord |
| 192.168.1.104 | Kafka104 | kafka_2.9.2-0.8.1.tgz,supervisord |
| 192.168.1.105 | Kafka105 | kafka_2.9.2-0.8.1.tgz,supervisord |
| 192.168.1.106 | Kafka106 | kafka_2.9.2-0.8.1.tgz,supervisord |
| 192.168.1.107 | Storm107 | apache-storm-0.9.1-incubating.tar.gz,supervisord |
| 192.168.1.108 | Storm108 | apache-storm-0.9.1-incubating.tar.gz,supervisord |
| 192.168.1.109 | Storm109 | apache-storm-0.9.1-incubating.tar.gz,supervisord |
Java环境
请在每个机器上部署好Java环境,推荐1.6的JDK。
修改主机名
为了保证部署的顺利,请务必修改每一台主机的主机名(参考上面的"环境表"),这样会避免很多莫名其妙的问题,修改方式如下:
- [[email protected] ~]# vi /etc/sysconfig/network
- NETWORKING=yes
- NETWORKING_IPV6=no
- HOSTNAME=Zookeeper101
修改之后请保存,并重新启动机器。使用如下命令查看是否修改成功:
- [[email protected] ~]# hostname
- Zookeeper101
修改hosts
为了保证各个主机之间可以通过主机名进行访问,需要修改每一台主机的hosts文件,修改方式如下:
- [[email protected] ~]# vi /etc/hosts
- # Do not remove the following line, or various programs
- # that require network functionality will fail.
- 127.0.0.1 localhost.localdomain localhost
- 192.168.1.101 Zookeeper101
- 192.168.1.102 Zookeeper101
- 192.168.1.103 Zookeeper101
- 192.168.1.104 kafka104
- 192.168.1.105 kafka105
- 192.168.1.106 kafka106
- 192.168.1.107 Storm107
- 192.168.1.108 Storm108
- 192.168.1.109 Storm109
部署Zookeeper
部署
解压Zookeeper-3.4.6.tar.gz软件包到主机Zookeeper101,Zookeeper102,Zookeeper103的某个目录下,如:/root/v300r003b01,解压后得到文件夹"Zookeeper-3.4.6"。修改"/root/v300r003b01/Zookeeper-3.4.6/conf/zoo.cfg"配置文件。如下:
- # The number of milliseconds of each tick
- tickTime=2000
- # The number of ticks that the initial
- # synchronization phase can take
- initLimit=20
- # The number of ticks that can pass between
- # sending a request and getting an acknowledgement
- syncLimit=10
- # the directory where the snapshot is stored.
- # do not use /tmp for storage, /tmp here is just
- # example sakes.
- dataDir=/root/v300r003b01/zookeeper-3.4.6/data
- # the port at which the clients will connect
- clientPort=2181
- # the maximum number of client connections.
- # increase this if you need to handle more clients
- #maxClientCnxns=60
- #
- # Be sure to read the maintenance section of the
- # administrator guide before turning on autopurge.
- #
- # http://zookeeper.apache.org/doc/current/zookeeperAdmin.html#sc_maintenance
- #
- # The number of snapshots to retain in dataDir
- #autopurge.snapRetainCount=3
- # Purge task interval in hours
- # Set to "0" to disable auto purge feature
- #autopurge.purgeInterval=1
- server.1=Zookeeper101:2888:3888
- server.2=Zookeeper102:2888:3888
- server.3=Zookeeper103:2888:3888
参数说明:
dataDir:指定Zookeeper在哪里保存集群状态。
server.*=xxxx:配置为Zookeeper集群中的每个主机。1、2、3等为Zookeeper主机的唯一ID。我们需要在每台Zookeeper主机的dataDir目录中新建一个名为myid(如:/root/v300r003b01/zookeeper-3.4.6/data/myid)的文件,里面写上该Zookeeper主机的ID,如Zookeeper101的myid文件中为1,Zookeeper102的myid文件中为2,Zookeeper103的myid文件中为3.
注意:
请把该配置文件(/root/v300r003b01/zookeeper-3.4.6/conf/zoo.cfg)复制到每台Zookeeper主机的相同目录下。dataDir不要配置到/tmp目录中,因为这个目录在重启后可能会发生错误。如果各个Zookeeper主机的dataDir不存在,请创建一个。
基本操作
启动Zookeeper
- [[email protected] bin]# /root/v300r003b01/zookeeper-3.4.6/bin/zkServer.sh start
- JMX enabled by default
- Using config: /root/v300r003b01/zookeeper-3.4.6/bin/../conf/zoo.cfg
- Starting zookeeper … STARTED
查看Zookeeper状态
- [[email protected] bin]# /root/v300r003b01/zookeeper-3.4.6/bin/zkServer.sh status
注:按照这种配置,正常输出应该有两个Zookeeper主机为“fowller”,一个Zookeeper主机为"leader"
停止Zookeeper
请直接使用kill -9命令杀掉进程。
部署Kafka
部署
解压"Kafka_2.9.2-0.8.1.tgz"到kafka集群中的每台主机的某个目录下(如:/root/v300r003b01),解压后得到文件夹"Kafka_2.9.2-0.8.1"
分别修改集群中每台Kafka主机的Kafka配置文件(/root/v300r003b01/kafka_2.9.2-0.8.1/config/server.properties),配置项修改如下:
| 配置项名 | 参考值 | 说明 |
| broker.id | 104 | 每台kafka主机的唯一ID,如:104、105、106 |
| host.name | Kafka104 | 如:Kafka104、Kafka105、Kafka106 |
| log.dirs | /root/v300r003b01/kafka_2.9.2-0.8.1/kafka-logs | Kafka保存数据的目录,不要配置到/tmp目录下 |
| num.partitions | 2 | 每个主题的分片个数,配置为2即可 |
| zookeeper.connect | zookeeper101:2181,zookeeper102:2181,zookeeper103:2181 | Zookeeper连接串,多个zookeeper主机之间以逗号分隔,kafka需要通过zookeeper进行状态协调 |
基本操作
启动Kafka集群
分别在每个Kafka主机上运行如下命令:
- [[email protected] bin]# /root/v300r003b01/kafka_2.9.2-0.8.1/bin/kafka-server-start.sh /root/v300r003b01/kafka_2.9.2-0.8.1/config/server.properties
创建Kafka主题
在Kafka集群中国的任何一台主机运行如下命令:
- [[email protected] bin]# /root/v300r003b01/kafka_2.9.2-0.8.1/bin/kafka-topics.sh –zookeeper Zookeeper101:2181,Zookeeper102:2181,Zookeeper103:2181 –replication-factor 2 –partitions 3 –create –topic vas
参数说明如下:
| 参数名 | 参考值 | 说明 |
| –zookeeper | Zookeeper101:2181,Zookeeper102:2181,Zookeeper103:2181 | Zookeeper连接串,多个zookeeper主机之间以逗号分隔 |
| –replication-factor | 2 | 数据的副本个数,2个即可 |
| –partitions | 3 | 主题分片个数,3即可 |
| –create –topic | test_topic | 主题名字,如vas、vod |
查看Kafka集群状态
在Kafka集群中的任何一台主机运行如下命令:
- [[email protected] bin]# /root/v300r003b01/kafka_2.9.2-0.8.1/bin/kafka-topics.sh –zookeeper Zookeeper101:2181,Zookeeper102:2181,Zookeeper103:2181 –describe
输出如下:

该输出为test_topic主题的细节信息。解释如下:
红圈从左到右分别编号:1,2,3,4。
1号红圈说明了test_topic有3个分片,分片id为0,1,2
2号红圈说明了每个分片的leader(领导)broker id,这里都为1号broker,我们配置Kafka的时候配置了broker.id,这个配置项制定了每个Kafka broker的id。
3号红圈说明了每个分片的副本个数及其说在的broker的broker id。可以看出每个分片都有3个副本,需要分别存放到broker id为1、2、3的主机上。
4号红圈说明了该分片当前处于可用状态的broker的broker id。正常应该与3号红圈中的一致。
Kafka测试工具
Kafka集群部署好之后,在Kafka的安装目录下有工具可以对Kafka进行测试。
启动Kafka消息生产者发送消息
- [[email protected] bin]# /root/v300r003b01/kafka_2.9.2-0.8.1/bin/kafka-console-producer.sh –broker-list Kafka104:9092,Kafka105:9092,Kafka106:9092 –topic test_topic
输入任何字符回车即可向Kafka发送消息。
启动Kafka消息消费者接收消息
- [[email protected] bin]# /root/v300r003b01/kafka_2.9.2-0.8.1/bin/kafka-console-consumer.sh –zookeeper Zookeeper101:2181,Zookeeper102:2181,Zookeeper103:2181 –from-beginning –topic test_topic
停止Kafka
请直接使用kill命令杀掉进程。
部署Storm
部署
解压“apache-storm-0.9.1-incubating.tar.gz”到Storm集群中的每台主的某个目录下(如:/root/v300r003b01),解压后得到文件夹”apache-storm-0.9.1-incubating”。
分别修改集群中每台Storm主机的配置文件(/root/v300r003b01/apache-storm-0.9.1-incubating/conf/storm.yaml),配置项修改如下:
- # Licensed to the Apache Software Foundation (ASF) under one
- # or more contributor license agreements. See the NOTICE file
- # distributed with this work for additional information
- # regarding copyright ownership. The ASF licenses this file
- # to you under the Apache License, Version 2.0 (the
- # "License"); you may not use this file except in compliance
- # with the License. You may obtain a copy of the License at
- #
- # http://www.apache.org/licenses/LICENSE-2.0
- #
- # Unless required by applicable law or agreed to in writing, software
- # distributed under the License is distributed on an "AS IS" BASIS,
- # WITHOUT WARRANTIES OR CONDITIONS OF ANY KIND, either express or implied.
- # See the License for the specific language governing permissions and
- # limitations under the License.
- ########### These MUST be filled in for a storm configuration
- storm.zookeeper.servers:
- - "Zookeeper101"
- - "Zookeeper102"
- - "Zookeeper103"
- storm.local.dir: "/root/v300r003b01/apache-storm-0.9.1-incubating/local"
- #
- nimbus.host: "Storm107"
- #
- #
- # ##### These may optionally be filled in:
- #
- ## List of custom serializations
- # topology.kryo.register:
- # - org.mycompany.MyType
- # - org.mycompany.MyType2: org.mycompany.MyType2Serializer
- #
- ## List of custom kryo decorators
- # topology.kryo.decorators:
- # - org.mycompany.MyDecorator
- #
- ## Locations of the drpc servers
- # drpc.servers:
- # - "server1"
- # - "server2"
- ## Metrics Consumers
- # topology.metrics.consumer.register:
- # - class: "backtype.storm.metrics.LoggingMetricsConsumer"
- # parallelism.hint: 1
- # - class: "org.mycompany.MyMetricsConsumer"
- # parallelism.hint: 1
- # argument:
- # - endpoint: "metrics-collector.mycompany.org"
- storm.messaging.transport: "backtype.storm.messaging.netty.Context"
- storm.messaging.netty.server_worker_threads: 1
- storm.messaging.netty.client_worker_threads: 1
- storm.messaging.netty.max_retries: 1000
- storm.messaging.netty.max_wait_ms: 1000
- storm.messaging.netty.min_wait_ms: 100
- supervisor.slots.ports:
- - 6700
- - 6701
- - 6702
- - 6703
storm.zookeeper.servers:配置zookeeper连接串,storm需要zookeeper协调集群状态。
storm.local.dir: 配置storm的数据保存目录,没有就创建一个,注意不要配置为/tmp目录。
nimbus.host:配置storm集群的主机,该主机负责提交实时统计代码及实时计算任务的分配。
supervisor.slots.ports:配置该主机可以启动多少个worker。Worker越多,实时运算集群给该主机分配的任务越多,一般配置为cpu核的个数即可。数字为worker的端口号。
基本操作
启动Storm的nimbus进程
在nimbus主机上(Storm107)运行如下命令,启动nimbus:
- [[email protected] bin]#/root/v300r003b01/apache-storm-0.9.1-incubating/bin/storm nimbus
启动Storm的UI进程
- [[email protected] bin]#/root/v300r003b01/apache-storm-0.9.1-incubating/bin/storm ui
启动Storm的Supervisor进程
在nimbus主机上(Storm107)运行如下命令,启动nimbus:
- [[email protected] bin]#/root/v300r003b01/apache-storm-0.9.1-incubating/bin/storm supervisor
提交实时统计代码到Storm集群
向配置人员获取adp_topology-1.0-jar-with-dependenciees.jar实时统计软件包,上传到nimbus进程所在主机上,使用如下命令提交实时统计代码:
- [[email protected] bin]#/root/v300r003b01/apache-storm-0.9.1-incubating/bin/storm jar /root/adp_topology-1.0-jar-with-dependencies.jar statistic.topology.StatisticTopology my_topology Zookeeper101:2181,Zookeeper102:2181,Zookeeper103:2181 172.16.135.210 root coship vas_topic vod_topic remote
上面空格分开的蓝色部分需要根据情况进行修改,解释如下:
/root/adp_topology-1.0-jar-with-dependencies.jar:请配置对路径
my_topology:本次提交的实时统计包名字,一般保持一致
Zookeeper101:2181,Zookeeper102:2181,Zookeeper103:2181:zookeeper连接串,实时统计代码需要zookeeper维护状态信息。
172.16.135.210:OAS数据库主机IP
Root:OAS数据库用户名
Coship:OAS数据库密码
vas_topic:vas点击/浏览业务日志存放的主题名称
vod_topic:vod点击/浏览业务日志存放的主题名称
Remote:以分布式运行模式提交,如果是local则以本机运行模式提交。仅供测试时使用
查看Storm集群状态
浏览器打开Storm UI所在的服务器(http://192.168.1.107:8080),显示Storm集群及实时统计代码的运行状态如下:
图中蓝色圈从上到下分别编号为:1、2、3
1号圈解释
| 字段名 | 说明 |
| version | Storm的版本 |
| Nimbus uptime | 集群上线运行时间 |
| supervisors | 集群中supervisor进程的个数,我们使用…./storm spervisor启动的。 |
| Used slots | 集群中被使用的slots个数。 |
| Free slots | 集群中空闲的slots个数 |
| Total slots | 集群中总的slots个数,我们在storm.yaml文件的supervisor.slots.ports配置项指定了每一台的slots个数。 |
| executors | 这个可以说是线程数,可以不管 |
可见1号圈主要描述的是整个Storm集群的状态。
2号圈解释
| 字段名 | 说明 |
| name | 实时统计拓扑的名字,我们的实时统计拓扑会有两个,vod和vas的。 |
| id | 实时统计拓扑的storm内部Id |
| status | 实时统计拓扑的状态,正常应该是Active |
| uptime | 实时统计拓扑的上线运行时间。 |
| Num works | 实时统计拓扑使用的works个数,可以认为works个数与slots个数相等 |
| Num executors |
可见2号圈主要描述了Storm集群中运行的拓扑的状态,一个集群可以运行多个拓扑,处理vod、vas实时统计拓扑以外,如果需要,也可以运行其他的拓扑。
3号圈解释
| 字段名 | 说明 |
| id | 实时统计拓扑的名字,我们的实时统计拓扑会有两个,vod和vas的。 |
| Host | 实时统计拓扑的storm内部Id |
| status | 实时统计拓扑的状态,正常应该是Active |
| uptime | 实时统计拓扑的上线运行时间。 |
| Num works | 实时统计拓扑使用的works个数,可以认为works个数与slots个数相等 |
| Num executors | 实时统计拓扑使用的线程数 |
停止实时统计代码的执行
如果要停止某个拓扑的执行,可以执行如下命令:
- [[email protected] bin]#/root/v300r003b01/apache-storm-0.9.1-incubating/bin/storm kill my_topology_vas
my_topology_vas:要停止的拓扑的名字,参考Storm UI页面中看到的拓扑的名称。
停止Storm进程
直接使用kill命令结束进程即可。
守护模式部署
在生产环境下,我们不应该手动启动或停止Zookeeper、Kafka、Storm等进程,这些集群在设置上已经保证了集群中的某台主机出现故障时,不会影响功能。但一个集群中同时多台主机出现故障时,则会有问题。所以我们需要部署守护进程,当某个进程异常退出时,守护进程会自动重新启动该进程。当某台主机重启时,相应的进程也会自动重启。
我们采用Supervisor作为我们的守护进程,下面描述了该如何部署Supervisor并配置其监控我们集群中的服务。
安装软件
首先安装软件包:Python-meld3-0.6.3-1.el5.x86_64.rpm,然后再安装软件包:Supervisor-2.1-3.el5.noarch.rpm。注意Zookeeper集群、Kafka集群、Storm集群的每一台机器都需要安装。
配置监控Zookeeper
如果Zookeeper进程已经手动启动,请首先把Zookeeper进程kill掉。
我们需要到Zookeeper集群中的每台主机上,运行如下命令:
- [[email protected] jre-1.6.0-openjdk]# which java
- /usr/bin/java
- [[email protected] jre-1.6.0-openjdk]# echo $PATH
- /usr/kerberos/sbin:/usr/kerberos/bin:/usr/local/sbin:/usr/local/bin:/sbin:/bin:/usr/sbin:/usr/bin:/root/bin
确保java程序所在的路径在PATH环境变量中。
修改/root/v300r003b01/zookeeper-3.4.6/bin/zkServer.sh文件,如下:
- #!/usr/bin/env bash
- export PATH=/usr/kerberos/sbin:/usr/kerberos/bin:/usr/local/sbin:/usr/local/bin:/sbin:/bin:/usr/sbin:/usr/bin:/root/bin
- # Licensed to the Apache Software Foundation (ASF) under one or more
- # contributor license agreements. See the NOTICE file distributed with
- # this work for additional information regarding copyright ownership.
- # The ASF licenses this file to You under the Apache License, Version 2.0
- # (the "License"); you may not use this file except in compliance with
- # the License. You may obtain a copy of the License at
- #
- # http://www.apache.org/licenses/LICENSE-2.0
- #
- # Unless required by applicable law or agreed to in writing, software
- # distributed under the License is distributed on an "AS IS" BASIS,
- # WITHOUT WARRANTIES OR CONDITIONS OF ANY KIND, either express or implied.
- # See the License for the specific language governing permissions and
- # limitations under the License.
- #
- # If this scripted is run out of /usr/bin or some other system bin directory
- # it should be linked to and not copied. Things like java jar files are found
- # relative to the canonical path of this script.
- #
- # See the following page for extensive details on setting
- # up the JVM to accept JMX remote management:
- # http://java.sun.com/javase/6/docs/technotes/guides/management/agent.html
- # by default we allow local JMX connections
- if [ "x$JMXLOCALONLY" = "x" ]
- then
- JMXLOCALONLY=false
- fi
- if [ "x$JMXDISABLE" = "x" ]
- then
把其中的PATH值与我们echo $PATH的值保持一致。注意可能不是每一台主机都一样,请对每一台主机单独设置。
在Zookeeper集群的主机上,修改Supervisor的配置文件[[email protected] bin]#vim /etc/supervisord.conf,在最后面增加如下,注意根据环境修改:
- [program:zookeeper]
- ;command= ; the program (relative uses PATH, can take args)
- command=/root/v300r003b01/zookeeper-3.4.6/bin/zkServer.sh start-foreground
- ;priority= ; the relative start priority (default 999)
- ;autostart=true ; start at supervisord start (default: true)
- ;autorestart=true ; retstart at unexpected quit (default: true)
- ;startsecs=10 ; number of secs prog must stay running (def. 10)
- ;startretries=3 ; max # of serial start failures (default 3)
- ;exitcodes=0,2 ; ‘expected‘ exit codes for process (default 0,2)
- ;stopsignal=KILL ; signal used to kill process (default TERM)
- ;stopwaitsecs=10 ; max num secs to wait before SIGKILL (default 10)
- ;user=root ; setuid to this UNIX account to run the program
- ;log_stdout=true ; if true, log program stdout (default true)
- ;log_stderr=true ; if true, log program stderr (def false)
- logfile=/var/log/supervisord-zookeeper.log ; child log path, use NONE for none; default AUTO
- ;logfile_maxbytes=1MB ; max # logfile bytes b4 rotation (default 50MB)
- ;logfile_backups=10 ; # of logfile backups (default 10)
执行如下命令,启动Supervisord服务:
- [[email protected] ~]# service supervisord start
查看Zookeeper进程是否自动启动,记住Zookeeper进程id
- [[email protected] ~]# ps -ef | grep zoo
重新启动Supervisor服务
- [[email protected] ~]# service supervisord restart
查看Zookeeper进程是否再次启动,本次的进程id应该与上次的不一样
- [[email protected] ~]# ps -ef | grep zoo
最后配置Supervisor开机自动启动
- [[email protected] ~]# chkconfig –level 345 supervisord on
重启服务器测试是否开机自动启动了Zookeeper进程
配置监控Kafka
如果Kafka进程已经手动启动,请首先把Kafka进程kill掉。
我们需要到Kafka集群中的每台主机上,运行如下命令:
- [[email protected] jre-1.6.0-openjdk]# which java
- /usr/bin/java
- [[email protected] jre-1.6.0-openjdk]# echo $PATH
- /usr/kerberos/sbin:/usr/kerberos/bin:/usr/local/sbin:/usr/local/bin:/sbin:/bin:/usr/sbin:/usr/bin:/root/bin
确保java程序所在路径在PATH环境变量中。
修改/root/v300r003b01/kafka_2.9.2-0.8.1/bin/kafka-server-start.sh文件,如下:
- #!/bin/bash
- # Licensed to the Apache Software Foundation (ASF) under one or more
- # contributor license agreements. See the NOTICE file distributed with
- # this work for additional information regarding copyright ownership.
- # The ASF licenses this file to You under the Apache License, Version 2.0
- # (the "License"); you may not use this file except in compliance with
- # the License. You may obtain a copy of the License at
- #
- # http://www.apache.org/licenses/LICENSE-2.0
- #
- # Unless required by applicable law or agreed to in writing, software
- # distributed under the License is distributed on an "AS IS" BASIS,
- # WITHOUT WARRANTIES OR CONDITIONS OF ANY KIND, either express or implied.
- # See the License for the specific language governing permissions and
- # limitations under the License.
- export PATH=/usr/kerberos/sbin:/usr/kerberos/bin:/usr/local/sbin:/usr/local/bin:/sbin:/bin:/usr/sbin:/usr/bin:/root/bin
- if [ $# -lt 1 ];
- then
- echo "USAGE: $0 [-daemon] server.properties"
- exit 1
- fi
- base_dir=$(dirname $0)
- export KAFKA_LOG4J_OPTS="-Dlog4j.configuration=file:$base_dir/../config/log4j.properties"
- export KAFKA_HEAP_OPTS="-Xmx1G -Xms1G"
- EXTRA_ARGS="-name kafkaServer -loggc"
把其中的PATH值与我们echo $PATH的值保持一致。注意可能不是每一台主机都一样,请对每台主机单独设置。
在kafka集群的主机上,修改supervisor的配置文件[[email protected] bin]# vi /etc/supervisord.conf,最后面增加如下,注意根据环境修改:
- [program:kafka]
- ;command= ; the program (relative uses PATH, can take args)
- command=/root/v300r003b01/kafka_2.9.2-0.8.1/bin/kafka-server-start.sh /root/v300r003b01/kafka_2.9.2-0.8.1/config/server.properties
- ;priority= ; the relative start priority (default 999)
以上是关于Storm实时日志分析实战的主要内容,如果未能解决你的问题,请参考以下文章