centos7自动化安装
Posted
tags:
篇首语:本文由小常识网(cha138.com)小编为大家整理,主要介绍了centos7自动化安装相关的知识,希望对你有一定的参考价值。
1、pxe简介
PXE(Pre-boot Execution Environment,预启动执行环境)是由Intel公司开发的最新技术,工作于Client/Server的网络模式,支持工作站通过网络从远端服务器下载映像,并由此支持通过网络启动操作系统,在启动过程中,终端要求服务器分配IP地址,再用TFTP(trivial file transfer protocol)或MTFTP(multicast trivial file transfer protocol)协议下载一个启动软件包到本机内存中执行,
由这个启动软件包完成终端基本软件设置,从而引导预先安装在服务器中的终端操作系统。
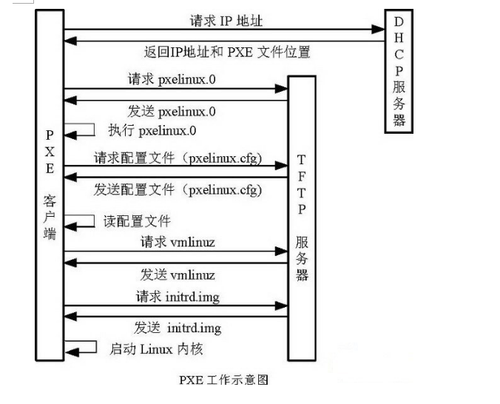
2、pxe工作流程
1. PXE Client 从自己的PXE网卡启动,向本网络中的DHCP服务器索取IP;
2. DHCP 服务器返回分配给客户机的IP 以及PXE文件的放置位置(该文件一般是放在一台TFTP服务器上)
3. PXE Client 向本网络中的TFTP服务器索取pxelinux.0 文件;
4. PXE Client 取得pxelinux.0 文件后之执行该文件;
5. 根据pxelinux.0 的执行结果,通过TFTP服务器加载内核和文件系统 ;
6. 进入安装画面, 此时可以通过选择HTTP、FTP、NFS 方式之一进行安装;
3、实验环境
实验环境:VMware Workstation 10
系统平台:CentOS7
网络模式:桥接
DHCP / TFTP /FTP IP:172.16.15.10
搭建本地yum源
[[email protected] ~]# cat /etc/yum.repos.d/CentOS7-Base.repo
[base]
name=base
baseurl=file:///mnt
enabled=1
gpcheck=0
gpgkey=file:///mnt/RPM-GPG-KEY-CentOS-7
安装相关的软件
ftp tftp dhcp
4、配置tftp如下
service tftp
{
socket_type = dgram
protocol = udp
wait = yes
user = root
server = /usr/sbin/in.tftpd
server_args = -s /var/lib/tftpboot
disable = no
per_source = 11
cps = 100 2
flags = IPv4
}
[[email protected] ~]# ln -s /var/lib/tftpboot/ /
[[email protected] ~]# systemctl start tftp.socket
[[email protected] ~]# systemctl start tftp.service 启动tftp
[[email protected] localhost tftpboot]#cd /tftpboot
[[email protected] localhost tftpboot]# cp /usr/share/syslinux/pxelinux.0 .
[[email protected] localhost tftpboot]# cp /mnt/cdrom/images/pxeboot/* .
[[email protected] localhost tftpboot]# mkdir pxelinux.cfg
[[email protected] localhost tftpboot]# cp /mnt/cdrom/isolinux/isolinux.cfg pxelinux.cfg/defult
注意如果没有pxelinux.0文件 安装syslinux即可
[[email protected] tftpboot]# vi pxelinux.cfg/default
default 7.0
prompt 1
timeout 60000
display boot.msg
F1 boot.msg
F2 options.msg
F3 general.msg
F4 param.msg
F5 rescue.msg
label 7.0 自定义标签
kernel vmlinuz
append ks=ftp://172.16.15.10/ks.cfg initrd=initrd.img 采用ftp引导,也可以是http,nfs等
label text
kernel vmlinuz
append initrd=initrd.img text
label ks
kernel vmlinuz
append ks initrd=initrd.img
label local
localboot 1
label memtest86
kernel memtest
append
5、ftp相关
[[email protected] tftpboot]# cd /var/ftp/
[[email protected] ftp]# cp -ar /mnt/* . 将镜像内容全部复制到ftp根目录下面
6、配置dhcp
[[email protected] ftp]# cat /etc/dhcp/dhcpd.conf
# see /usr/share/doc/dhcp*/dhcpd.conf.example
next-server 172.16.15.10;
filename "pxelinux.0";
allow booting;
allow bootp;
subnet 172.16.15.0 netmask 255.255.255.0{
option routers 172.16.15.254;
range dynamic-bootp 172.16.15.100 172.16.15.200;
}
7、编辑ks.cfg文件如下
[[email protected] ftp]# cat ks.cfg
# platform=x86, AMD64, or Intel EM64T
# Use text mode install
text
# Use graphical install
#graphical
# Install OS instead of upgrade
install
# Use CDROM media
#cdrom
# Use NFS installation media
#nfs --server=172.16.15.10 --dir=/centosinstall
# Use HTTP installation media
# url --url http://192.168.0.100:7000/tftpboot
# Use FTP installation media
#url --url ftp://<username>:<password>@<server>/<dir>
url --url ftp://172.16.15.10/
# System language
lang en_US.UTF-8
# System keyboard
keyboard us
# Network information
#network --bootproto=dhcp --device=eth0 --hostname example.sz.com --onboot=on
#network --bootproto=dhcp --device=eth0 --hostname vmserver1.sz.com --onboot=on
#network --bootproto=dhcp --device=enp130s0f0 --hostname martin --onboot=on
network --bootproto=dhcp --hostname martin --onboot=on
#Root password
rootpw 123456
#firewall --enabled --ssh
firewall --disable
# System authorization information
authconfig --useshadow --enablemd5
# SELinux configuration
selinux --disabled
# System timezone
timezone Asia/Shanghai
# System bootloader configuration
bootloader --location=mbr
# Partition clearing information
#clearpart --all --initlabel --drives=sda
#part /boot --fstype ext3 --size=100 --ondisk=sda
#part pv.01 --size=4096 --grow --ondisk=sda
#volgroup VolGroup00 --pesize=32768 pv.01
#logvol / --fstype=ext3 --name=LogVol00 --vgname=VolGroup00 --size=1024 --grow
#logvol swap --fstype swap --name=LogVol01 --vgname=VolGroup00 --size=512
# Partition clearing information
clearpart --all --initlabel
# Soft RAID1 partitioning information
part swap --fstype="swap" --ondisk=sda --size=4096
part raid.01 --fstype="raid" --grow --ondisk=sda --size=1
part swap --fstype="swap" --ondisk=sdb --size=4096
part raid.02 --fstype="raid" --grow --ondisk=sdb --size=1
raid / --device=md0 --fstype="ext4" --level=1 raid.01 raid.02
# Reboot after installation
reboot
# Do not configure the X Window System; if to configure it, uncomment following line
skipx
# X Window System configuration information
#xconfig --defaultdesktop=GNOME --depth=32 --resolution=1024x768
%packages
@ additional-devel
@ base
@ core
@ debugging
@ gnome-desktop
@ development
@ mariadb
@ emacs
@ web-server
@ network-file-system-client
@ java-platform
@ platform-devel
@ php
expect
iptraf-ng
libaio-devel
libpcap-devel
lksctp-tools
lrzsz
nasm
net-snmp-utils
php-mysql
php-pear
php-soap
system-config-kickstart
# Add these system perfomance enhanced tools
vsftpd
logwatch
postfix
nmap-ncat
nmap
ftp
lsscsi
# Update the sysstat version from 9.0.4 to 10.1.6
sysstat
%end
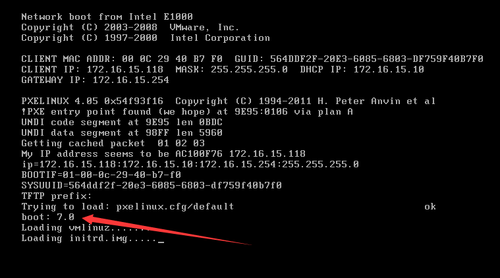
8、开启客户端安装,进入pxe引导模式
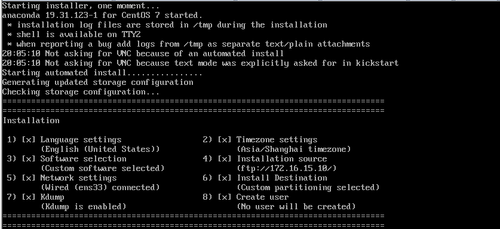
可以看到给客户端分配的IP地址是 172.16.15.118,输入7.0开始自动化安装
下次有机会我们在介绍cobbler自动化安装操作系统
本文出自 “martin” 博客,谢绝转载!
以上是关于centos7自动化安装的主要内容,如果未能解决你的问题,请参考以下文章
自动化运维之CentOS7下PXE+Kickstart+DHCP+TFTP+HTTP无人值守安装系统


