mogilefs分布式文件系统搭建详解
Posted
tags:
篇首语:本文由小常识网(cha138.com)小编为大家整理,主要介绍了mogilefs分布式文件系统搭建详解相关的知识,希望对你有一定的参考价值。
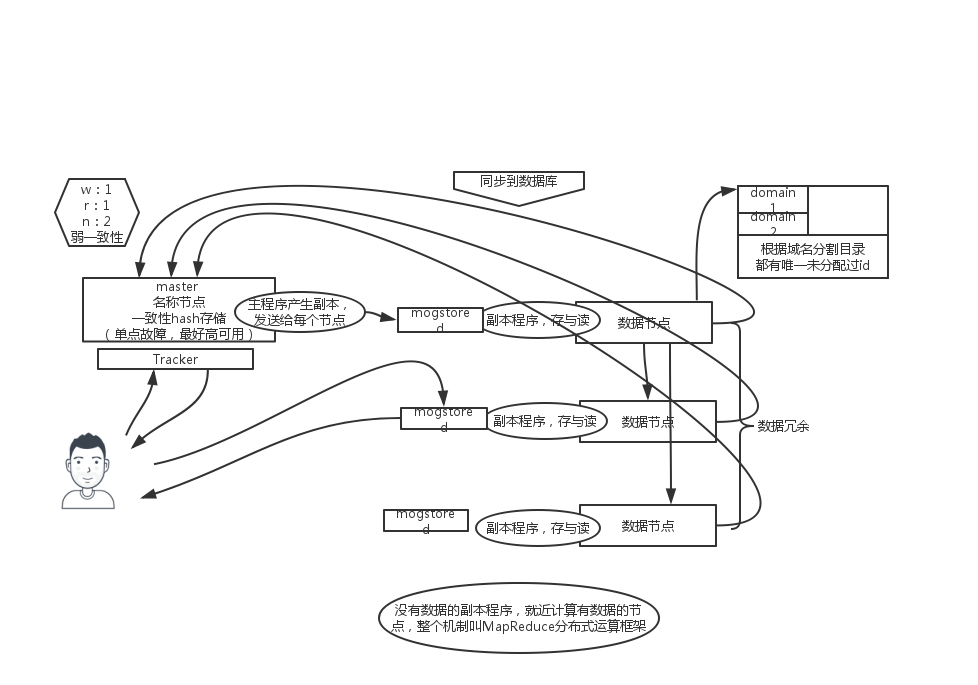
MogileFS是一套开源的分布式存储软件,适用于存储海量小文件。由tracker,mogstore,database三个部分组成。
Tracker:它通过数据库来保存元数据信息,包括站点domain、class、host等;主要功能包括监控后端Storage节点,及指示Storage节点完成数据的添加、删除、查询,及节点之间数据的复制等。
mogstored 实际存储数据的位置,默认监听在7500端口,接受客户端的文件存储请求。
database:用来做数据key value 映射,可用mysql,还保存节点设置的全局信息
MogileFS工作流程图:
实验环境 tracker节点martin
storage 节点 martin lucia
部署Tracker Nodes
[[email protected] ~]# yum -y install make gcc unzip perl-DBD-MySQL perl perl-CPAN perl-YAML perl-Time-HiRes

cpan
          install MogileFS::Server
          install MogileFS::Utils

----------------------------------------------------------------------
---- Unsatisfied dependencies detected during ----
----   DORMANDO/MogileFS-Server-2.72.tar.gz   ----
    MogileFS::Client [requires]
    Sys::Syscall [requires]
    Perlbal [requires]
    Test::More [requires]
    Net::Netmask [requires]
    Danga::Socket [requires]
    IO::AIO [requires]

---- Unsatisfied dependencies detected during ----
----   DORMANDO/MogileFS-Client-1.17.tar.gz   ----
    IO::WrapTie [requires]
    Test::More [requires]
---- Unsatisfied dependencies detected during ----
----       DORMANDO/Perlbal-1.80.tar.gz       ----
    Danga::Socket [requires]
    BSD::Resource [requires]
---- Unsatisfied dependencies detected during ----
----        MLEHMANN/IO-AIO-4.34.tar.gz       ----
    Canary::Stability [build_requires]
  DORMANDO/MogileFS-Server-2.72.tar.gz
  /usr/bin/make install  -- OK
#Sys::Syscall的0.25版本 数据副本只能保存一份   需要降级到0.23

[[email protected] ~]# wget http://mirrors.ustc.edu.cn/CPAN/authors/id/B/BR/BRADFITZ/Sys-Syscall-0.23.tar.gz
[[email protected] ~]# tar xf Sys-Syscall-0.23.tar.gz
[[email protected] ~]# cd Sys-Syscall-0.23
[[email protected] Sys-Syscall-0.23]# perl Makefile.PL
[[email protected] Sys-Syscall-0.23]# make && make install
初始化数据库:
mysql> create database mogilefs;
Query OK, 1 row affected (0.02 sec)

mysql> grant all on mogilefs.* to ‘mogilefs‘@‘192.168.*.*‘ identified by ‘222222‘;
Query OK, 0 rows affected (0.01 sec)

mysql> flush privileges;
Query OK, 0 rows affected (0.01 sec)
[[email protected] ~]# mogdbsetup --dbhost=192.168.1.222 --dbname=mogilefs --dbuser=mogilefs --dbpass=222222 --dbrootpass=123321
mysql> show tables;
+----------------------+
| Tables_in_mogilefs   |
+----------------------+
| checksum             |
| class                |
| device               |
| domain               |
| file                 |
| file_on              |
| file_on_corrupt      |
| file_to_delete       |
| file_to_delete2      |
| file_to_delete_later |
| file_to_queue        |
| file_to_replicate    |
| fsck_log             |
| host                 |
| server_settings      |
| tempfile             |
| unreachable_fids     |
+----------------------+
添加启动用户:(只能以普通用户)
[[email protected] ~]# useradd -r mogilefs
配置文件:
[[email protected] Sys-Syscall-0.23]# mkdir /etc/mogilefs
[[email protected] Sys-Syscall-0.23]# cd /etc/mogilefs
[[email protected] mogilefs]# vim mogilefsd.conf
daemonize = 1               #是否在后台以守护进程运行
pidfile = /var/run/mogilefsd/mogilefsd.pid
db_dsn = DBI:mysql:mogilefs:host=localhost;port=3306;mysql_connect_timeout=5   #连接数据库的信息
db_user = mogilefs          #数据库上的用户名
db_pass = mogilefs          #用户名对应的密码
listen = 0.0.0.0:7001       #监听的地址和端口
conf_port = 7001            #配置接口
query_jobs = 10             #用于查询的进程数 可调大  看需求
delete_jobs = 1             #用于删除操作的进程数 可调大  看需求
replicate_jobs = 5          #用于复制的进程数 可调大  看需求
reaper_jobs = 1             #用于回收资源的进程数 可调大  看需求
运行时目录:
[[email protected] mogilefs]# mkdir /var/run/mogilefsd
[[email protected] mogilefs]# chown -R mogilefs /var/run/mogilefsd
启动脚本:
[[email protected] mogilefs]# su - mogilefs -c "mogilefsd -c /etc/mogilefs/mogilefsd.conf --daemon"
[[email protected] mogilefs]# ss -lntup|grep 7001
tcp    LISTEN     0      128                    *:7001                  *:*      users:(("mogilefsd",41047,6))
部署Storage Nodes
yum -y install make gcc unzip perl perl-CPAN perl-YAML perl-Time-HiRes  perl-DBD-MySQL

cpan
              install MogileFS::Server    #其中依赖自动解决
              install MogileFS::Utils
#Sys::Syscall的0.25版本 数据副本只能保存一份   需要降级到0.23

[[email protected] ~]# wget http://mirrors.ustc.edu.cn/CPAN/authors/id/B/BR/BRADFITZ/Sys-Syscall-0.23.tar.gz
[[email protected] ~]# tar xf Sys-Syscall-0.23.tar.gz
[[email protected] ~]# cd Sys-Syscall-0.23
[[email protected] Sys-Syscall-0.23]# perl Makefile.PL
[[email protected] Sys-Syscall-0.23]# make && make install
if /etc/mogilefs/ not exist
[[email protected] ~]# mkdir /etc/mogilefs/
if user mogilefs not exist
[[email protected] ~]# useradd -r mogilefs
[[email protected] mogilefs]# vim /etc/mogilefs/mogstored.conf
maxconns = 10000   #最大并发连接数
httplisten = 0.0.0.0:7500   #http监听的地址
mgmtlisten = 0.0.0.0:7501   #管理接口监听地址
docroot =/mydata/mogilefs/data    #用于存储的目录
[[email protected] mogilefs]# mkdir /mydata/mogilefs/data -p
[[email protected] mogilefs]# chown -R mogilefs.mogilefs /mydata/mogilefs/
启动脚本:
[[email protected] mogilefs]# su - mogilefs -c "mogstored -c /etc/mogilefs/mogstored.conf --daemon"

[[email protected] mogilefs]# ss -lntup |grep 7500
tcp    LISTEN     0      128                    *:7500                  *:*      users:(("mogstored",41190,4))

[[email protected] mogilefs]# ss -lntup |grep 7501
tcp    LISTEN     0      128                    *:7501                  *:*      users:(("mogstored",41190,9))
Tracker Nodes
[[email protected] mogilefs]# mogadm  --trackers=192.168.1.222:7001 check

Checking trackers...
  192.168.1.222:7001 ... OK
Checking hosts...
No devices found on tracker(s).
[[email protected] mogilefs]# mogadm check
Checking trackers...
  127.0.0.1:7001 ... OK

Checking hosts...
No devices found on tracker(s).
[[email protected] ~]# mogstats -h
Usage:
    mogstats --db_dsn="DBI:mysql:mfs:host=mfshost" --db_user="mfs"
             --db_pass="mfs" --verbose --stats="devices,files"
    mogstats --stats="all"
    mogstats [all options in ~/.mogilefs.conf]

valid stats: all, delete-queue, devices, domains, fids, files, general-queues, replication, replication-queue
为trackers添加mysql信息
[[email protected] ~]# vim .mogilefs.conf   #家目录下

--db_dsn="DBI:mysql:mogilefs:host=192.168.1.222"
--db_user="mogilefs"
--db_pass="222222"
--verbose
--stats="devices,files"
添加主机 node1 node2:
[[email protected] ~]# mogadm  --trackers=192.168.1.222:7001 host add node1 --ip=192.168.1.222 --status=alive
[[email protected] ~]# mogadm  --trackers=192.168.1.222:7001 host add node2 --ip=192.168.1.223 --status=alive
查看添加主机:
[[email protected] ~]# mogadm  --trackers=192.168.1.222:7001 host list
node1 [1]: alive
  IP:       192.168.1.222:7500
node2 [2]: alive
  IP:       192.168.1.223:7500
为节点添加设备 列出设备:
[[email protected] ~]# mogadm  --trackers=192.168.1.222:7001  device add node1 001   #001 设备id  不可重用
[[email protected] ~]# mogadm  --trackers=192.168.1.222:7001  device add node2 002

[[email protected] ~]# mogadm  --trackers=192.168.1.222:7001  device list
node1 [1]: alive
                    used(G)    free(G)   total(G)  weight(%)
   dev1:   alive      0.000      0.000      0.000        100
node2 [2]: alive
                    used(G)    free(G)   total(G)  weight(%)
   dev2:   alive      0.000      0.000      0.000        100
创建对应设备dev
[[email protected] ~]# cd /mydata/mogilefs/data
[[email protected] data]# mkdir dev1
[[email protected] data]# chown -R mogilefs.mogilefs dev1/

[[email protected] ~]# cd /mydata/mogilefs/data/
[[email protected] data]# mkdir dev2
[[email protected] data]# chown -R mogilefs.mogilefs dev2/
创建domain:
[[email protected] ~]# mogadm --trackers=martin:7001 domain add files

[[email protected] ~]# mogadm --trackers=martin:7001 domain list
domain               class                mindevcount   replpolicy   hashtype   #默认最小副本个数2
-------------------- -------------------- ------------- ------------ -------
 files                default                   2        MultipleHosts() NONE
上传文件
[[email protected] ~]# mogupload  --trackers=martin:7001 --domain=files --key=‘/install.log‘ --file=‘install.log‘
[[email protected] ~]# moglistkeys --trackers=martin:7001 --domain=files
/install.log
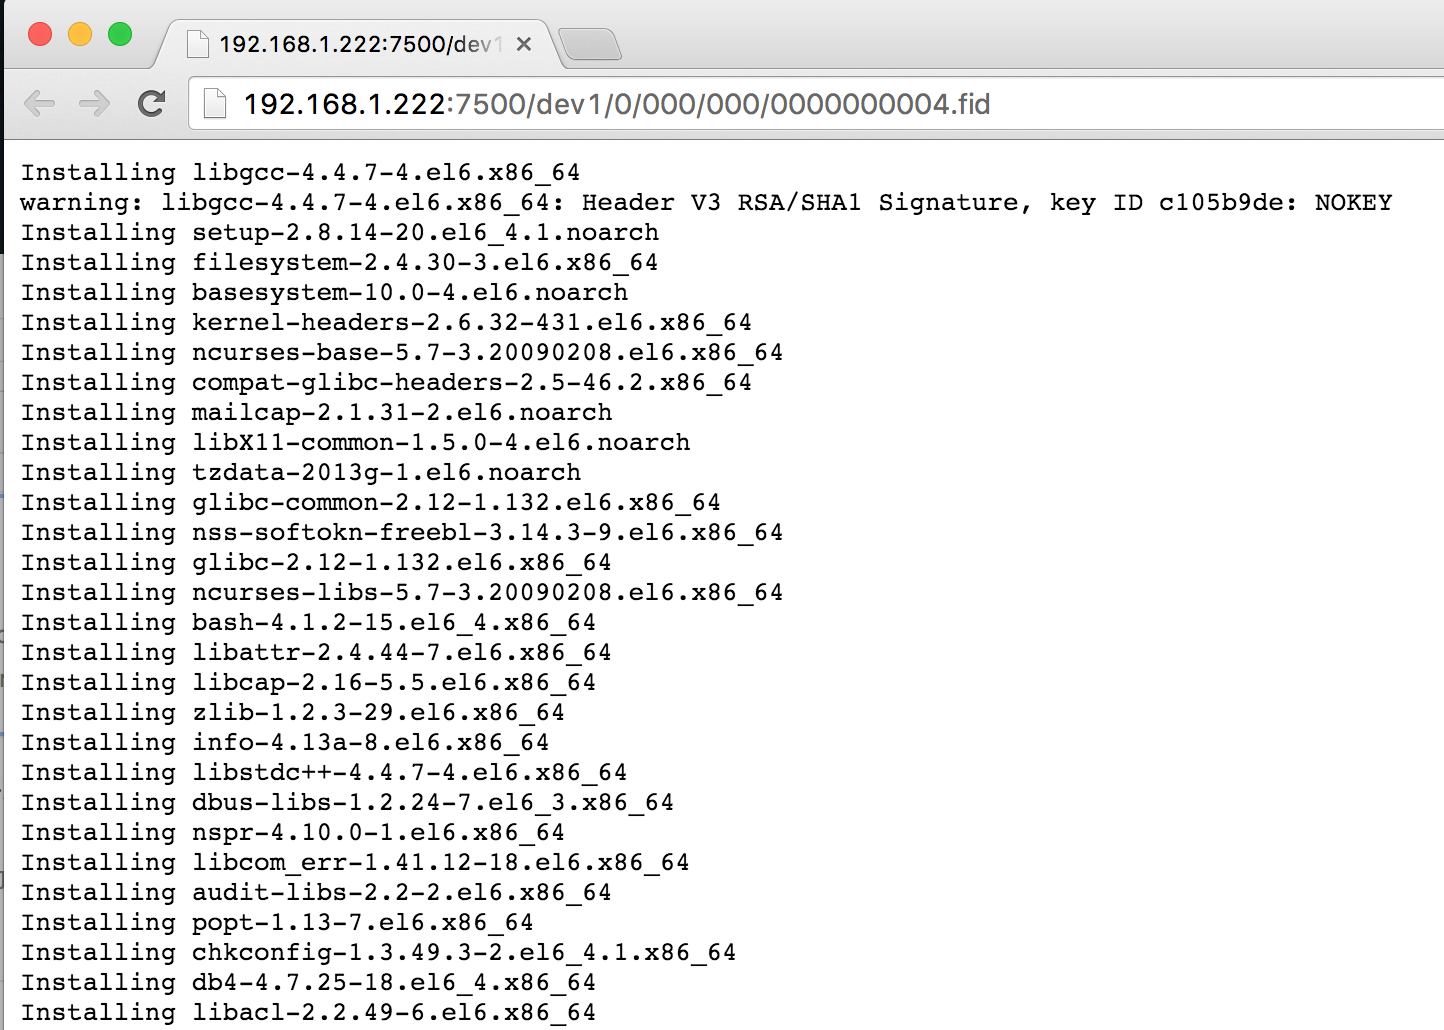
[[email protected] Sys-Syscall-0.23]# mogfileinfo --trackers=martin:7001 --domain=files --key=‘/install.log‘
- file: /install.log
     class:              default
  devcount:                    2
    domain:                files
       fid:                    4
       key:         /install.log
    length:                21712
 - http://192.168.1.223:7500/dev2/0/000/000/0000000004.fid
 - http://192.168.1.222:7500/dev1/0/000/000/0000000004.fid
存储节点下线设置
[[email protected] Sys-Syscall-0.23]# mogadm --trackers=192.168.1.222:7001 host mark node2 down

[[email protected] Sys-Syscall-0.23]# mogadm --trackers=192.168.1.222:7001 host mark node2 down
[[email protected] Sys-Syscall-0.23]# mogadm --trackers=192.168.1.222:7001 host list
node1 [1]: alive
  IP:       192.168.1.222:7500
node2 [2]: down
  IP:       192.168.1.223:7500

[[email protected] Sys-Syscall-0.23]# mogadm --trackers=192.168.1.222:7001 device list
node1 [1]: alive
                    used(G)    free(G)   total(G)  weight(%)
   dev1:   alive      0.375      2.428      2.803        100

node2 [2]: down
                    used(G)    free(G)   total(G)  weight(%)
   dev2:   alive      0.239      2.563      2.803        100
上线:
[[email protected] Sys-Syscall-0.23]# mogadm --trackers=192.168.1.222:7001 host mark node2 alive
class设置:
[[email protected] mogilefs]# mogadm --trackers=martin:7001 class add files class0 --mindevcount=2
[[email protected] mogilefs]# mogadm --trackers=martin:7001 class list
 domain               class                mindevcount   replpolicy   hashtype
-------------------- -------------------- ------------- ------------ -------
 files                class0                    2        MultipleHosts() NONE
 files                default                   2        MultipleHosts() NONE
结合nginx实现反向代理:
nginx_mogilefs_module-1.0.4下载地址:http://grid.net.ru/nginx/mogilefs.en.html
[[email protected] nginx-1.6.3]# ./configure --prefix=/usr/local/nginx1.6.3 --error-log-path=/var/log/nginx/error.log --http-log-path=/var/log/nginx/access.log --pid-path=/var/run/nginx/nginx.pid --lock-path=/var/lock/nginx.lock --with-http_ssl_module --with-http_flv_module --with-http_stub_status_module --with-http_gzip_static_module --http-client-body-temp-path=/var/tmp/nginx/client/ --http-proxy-temp-path=/var/tmp/nginx/proxy/ --http-fastcgi-temp-path=/var/tmp/nginx/fcgi/ --http-uwsgi-temp-path=/var/tmp/nginx/uwsgi --http-scgi-temp-path=/var/tmp/nginx/scgi --with-pcre --user=nginx --group=nginx --add-module=/tools/nginx_mogilefs_module-1.0.4 |tee /tmp/nginx.out
[[email protected] extra]# vim /usr/local/nginx/conf/nginx.conf
#添加
 upstream trackers {
     server martin:7001 weight=1;
     server lucia:7001  weight=1;
    }


[[email protected] extra]# vim /usr/local/nginx/conf/extra/demo.conf
#添加
        location /file {
                mogilefs_tracker trackers;
#               mogilefs_tracker 192.168.1.222:7001;
                mogilefs_domain files;
                mogilefs_pass {
                        proxy_pass $mogilefs_path;
                        proxy_hide_header Content-Type;
                        proxy_buffering off;
                }
        }
上传图片:
[[email protected] ~]# mogupload --trackers=martin:7001 --domain=files --key=‘/kuli.png‘ --file=‘kuli.png‘
over
以上是关于mogilefs分布式文件系统搭建详解的主要内容,如果未能解决你的问题,请参考以下文章


