springMVC第一课--配置文件
Posted
tags:
篇首语:本文由小常识网(cha138.com)小编为大家整理,主要介绍了springMVC第一课--配置文件相关的知识,希望对你有一定的参考价值。
刚学springMVC,记录下学习过程,供以后查阅。
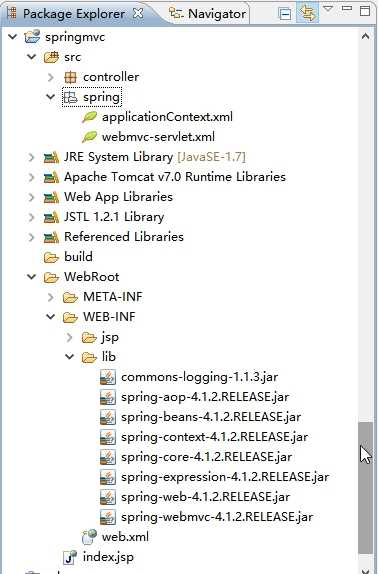
1,新建一个web工程。(其他按常规来)
如下:添加applicationContext.xml,webmvc-servlet.xml,和lib下的jar包。

2,修改web.xml:
 1 <?xml version="1.0" encoding="UTF-8"?>
 2 <web-app xmlns:xsi="http://www.w3.org/2001/XMLSchema-instance" xmlns="http://java.sun.com/xml/ns/javaee" xmlns:web="http://java.sun.com/xml/ns/javaee/web-app_2_5.xsd" xsi:schemaLocation="http://java.sun.com/xml/ns/javaee http://java.sun.com/xml/ns/javaee/web-app_3_0.xsd" id="WebApp_ID" version="3.0">
 3   <display-name>springmvc</display-name>
 4   <context-param>
 5       <param-name>contextConfigLocation</param-name>
 6       <param-value>classpath:/spring/applicationContext.xml</param-value>
 7   </context-param>
 8   <listener>
 9       <listener-class>org.springframework.web.context.ContextLoaderListener</listener-class>
10   </listener>
11   <servlet>
12       <servlet-name>webmvc</servlet-name>
13       <servlet-class>org.springframework.web.servlet.DispatcherServlet</servlet-class>
14       <init-param>
15           <param-name>contextConfigLocation</param-name>
16           <param-value>classpath:spring/webmvc-servlet.xml</param-value>
17       </init-param>
18   </servlet>
19   <servlet-mapping>
20       <servlet-name>webmvc</servlet-name>
21       <url-pattern>/</url-pattern>
22   </servlet-mapping>
23   <welcome-file-list>
24     <welcome-file>index.jsp</welcome-file>
25   </welcome-file-list>
26 </web-app>
2,修改applicationContext.xml如下:
 1 <?xml version="1.0" encoding="UTF-8"?>
 2
 3 <beans xmlns="http://www.springframework.org/schema/beans"
 4     xmlns:xsi="http://www.w3.org/2001/XMLSchema-instance" xmlns:aop="http://www.springframework.org/schema/aop"
 5     xmlns:context="http://www.springframework.org/schema/context"
 6     xsi:schemaLocation="http://www.springframework.org/schema/beans http://www.springframework.org/schema/beans/spring-beans.xsd
 7             http://www.springframework.org/schema/aop  http://www.springframework.org/schema/aop/spring-aop.xsd
 8             http://www.springframework.org/schema/context  http://www.springframework.org/schema/context/spring-context.xsd">
 9     <!-- 排除springMVC Controller重复扫描 -->
10     <context:component-scan base-package="controller">
11         <context:exclude-filter type="annotation" expression="org.springframework.stereotype.Controller"/>
12     </context:component-scan>
13
14 </beans>
3,修改webmvc-servlet.xml如下:
 1 <?xml version="1.0" encoding="UTF-8"?>
 2 <beans xmlns="http://www.springframework.org/schema/beans"
 3     xmlns:xsi="http://www.w3.org/2001/XMLSchema-instance" xmlns:p="http://www.springframework.org/schema/p"
 4     xmlns:context="http://www.springframework.org/schema/context"
 5     xmlns:mvc="http://www.springframework.org/schema/mvc"
 6     xsi:schemaLocation="http://www.springframework.org/schema/beans
 7                         http://www.springframework.org/schema/beans/spring-beans.xsd
 8                         http://www.springframework.org/schema/context
 9                         http://www.springframework.org/schema/context/spring-context.xsd
10                         http://www.springframework.org/schema/mvc
11                         http://www.springframework.org/schema/mvc/spring-mvc.xsd">
12        <!-- 自动扫描该包,使SpringMVC认为包下用了@controller注解的类是控制器 -->
13        <!-- 扫描业务组件,让spring不扫描带有@Service注解的类(留在root-context.xml中扫描@Service注解的类),防止事务失效 -->
14        <mvc:annotation-driven/>
15        <context:component-scan base-package="controller">
16                <context:exclude-filter type="annotation" expression="org.springframework.stereotype.Service"/>
17        </context:component-scan>
18        <!-- 启动SpringMVC的注解功能,完成请求和注解POJO的映射 -->
19        <bean class="org.springframework.web.servlet.mvc.annotation.AnnotationMethodHandlerAdapter"/>
20            <!-- 定义跳转的文件的前后缀 ,视图模式配置 -->
21        <bean class="org.springframework.web.servlet.view.InternalResourceViewResolver">
22            <property name="prefix" value="/WEB-INF/jsp/" />
23         <property name="suffix" value=".jsp" />
24        </bean>
25
26 </beans>
4,在controller包下新建一个controller类。
核心代码如下:
1 @Controller
2 public class MainController {
3     @RequestMapping("index")
4     public Object index(){
5         System.out.println("test");
6         return "first";
7     }
5,部署项目到tomcat,并在浏览器输入:
http://localhost:8080/springmvc/index

6,至此,springMVC全部配置完成。
以上是关于springMVC第一课--配置文件的主要内容,如果未能解决你的问题,请参考以下文章