Spring MVC HelloWorld
Posted
tags:
篇首语:本文由小常识网(cha138.com)小编为大家整理,主要介绍了Spring MVC HelloWorld相关的知识,希望对你有一定的参考价值。
我使用Maven + Idea 开始了Spring MVC的学习之路,Hello World教程参照:http://www.programcreek.com/2014/02/spring-mvc-helloworld-using-maven-in-eclipse/
1 首先使用Maven脚手架生成一个基于maven 的web 框架
在命令行使用命令生成项目结构框架: mvn archetype:generate -DgroupId=com.mmj.app -DartifactId=helloworld
-DarchetypeArtifactId=maven-archetype-webapp -DinteractiveMode=false
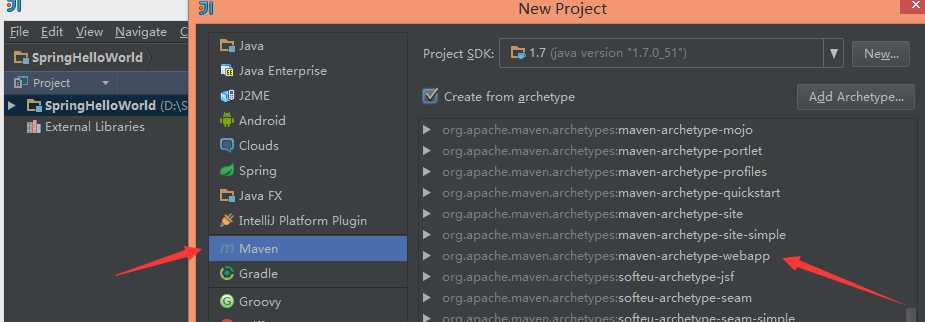
或者使用IDEA生成 File -> New Project ->Maven ->Create from archetype :maven-archetype-webapp:
生成的项目目录结构是这样的。
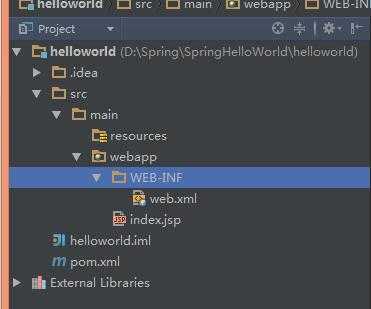
2 开始进入SpringMVC helloworld的编码阶段。
Step1 : 添加Spring依赖,在pom.xml中增加如下依赖:
主要是spring-core / spring-web / spring-webmvc

 1 <project xmlns="http://maven.apache.org/POM/4.0.0" xmlns:xsi="http://www.w3.org/2001/XMLSchema-instance"
 2     xsi:schemaLocation="http://maven.apache.org/POM/4.0.0 http://maven.apache.org/maven-v4_0_0.xsd">
 3     <modelVersion>4.0.0</modelVersion>
 4     <groupId>com.programcreek</groupId>
 5     <artifactId>HelloWorld</artifactId>
 6     <packaging>war</packaging>
 7     <version>0.0.1-SNAPSHOT</version>
 8     <name>HelloWorld Maven Webapp</name>
 9     <url>http://maven.apache.org</url>
10
11     <properties>
12         <spring.version>4.0.1.RELEASE</spring.version>
13     </properties>
14     <dependencies>
15         <dependency>
16             <groupId>junit</groupId>
17             <artifactId>junit</artifactId>
18             <version>3.8.1</version>
19             <scope>test</scope>
20         </dependency>
21         <!-- Spring dependencies -->
22         <dependency>
23             <groupId>org.springframework</groupId>
24             <artifactId>spring-core</artifactId>
25             <version>${spring.version}</version>
26         </dependency>
27
28         <dependency>
29             <groupId>org.springframework</groupId>
30             <artifactId>spring-web</artifactId>
31             <version>${spring.version}</version>
32         </dependency>
33
34         <dependency>
35             <groupId>org.springframework</groupId>
36             <artifactId>spring-webmvc</artifactId>
37             <version>${spring.version}</version>
38         </dependency>
39
40     </dependencies>
41
42
43     <build>
44         <finalName>HelloWorld</finalName>
45     </build>
46 </project>
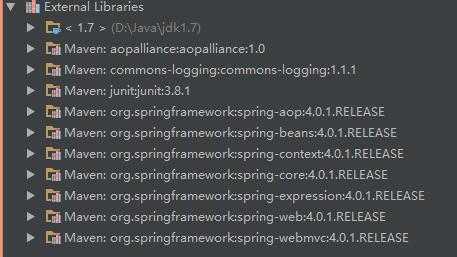
使用mvn install 命令添加依赖后项目的Library如下图所示:
Step2 : 修改web.xml ,添加servlet(DispatcherServlet)和listener(ContextLoaderListener)

<web-app xmlns:xsi="http://www.w3.org/2001/XMLSchema-instance" xmlns="http://java.sun.com/xml/ns/javaee" xsi:schemaLocation="http://java.sun.com/xml/ns/javaee http://java.sun.com/xml/ns/javaee/web-app_3_0.xsd" id="WebApp_ID" version="3.0">
  <display-name>Archetype Created Web Application</display-name>
  <servlet>
      <servlet-name>dispatcher</servlet-name>
      <servlet-class>org.springframework.web.servlet.DispatcherServlet</servlet-class>
      <load-on-startup>1</load-on-startup>
  </servlet>
  <servlet-mapping>
      <servlet-name>dispatcher</servlet-name>
      <url-pattern>/</url-pattern>
  </servlet-mapping>
  <context-param>
      <param-name>contextConfigLocation</param-name>
      <param-value>/WEB-INF/dispatcher-servlet.xml</param-value>
  </context-param>
  <listener>
      <listener-class>org.springframework.web.context.ContextLoaderListener</listener-class>
  </listener>
</web-app>
Step3: 在和web.xml的相同目录下增加dispatcher-servlet.xml

<beans xmlns="http://www.springframework.org/schema/beans"
       xmlns:context="http://www.springframework.org/schema/context"
       xmlns:xsi="http://www.w3.org/2001/XMLSchema-instance"
       xsi:schemaLocation="
http://www.springframework.org/schema/beans
http://www.springframework.org/schema/beans/spring-beans-3.0.xsd
http://www.springframework.org/schema/context
http://www.springframework.org/schema/context/spring-context-3.0.xsd">

    <context:component-scan base-package="com.controller" />

    <bean
            class="org.springframework.web.servlet.view.InternalResourceViewResolver">
        <property name="prefix">
            <value>/WEB-INF/views/</value>
        </property>
        <property name="suffix">
            <value>.jsp</value>
        </property>
    </bean>
</beans>
Step4: 创建Spring Controller 和 View
controller:

package com.controller;

import org.springframework.stereotype.Controller;
import org.springframework.web.bind.annotation.RequestMapping;
import org.springframework.web.bind.annotation.RequestParam;
import org.springframework.web.servlet.ModelAndView;

/**
 * Created by mamingjiang on 2016/6/5.
 */
@Controller
public class HelloController {

    private String message = "Welcome to Spring MVC !";

    @RequestMapping("/hello")
    public ModelAndView getMessage(@RequestParam(value = "name",required = false,defaultValue = "World") String name){
        ModelAndView mv = new ModelAndView("helloworld");
        mv.addObject("name",name);
        mv.addObject("message",message);
        return mv;
    }
}
jsp:

 1 <%@ page language="java" contentType="text/html; charset=ISO-8859-1" pageEncoding="ISO-8859-1"%>
 2 <!DOCTYPE html PUBLIC "-//W3C//DTD HTML 4.01 Transitional//EN" "http://www.w3.org/TR/html4/loose.dtd">
 3 <html>
 4 <head>
 5     <meta http-equiv="Content-Type" content="text/html; charset=ISO-8859-1">
 6     <title>Spring 4 MVC -HelloWorld</title>
 7 </head>
 8 <body>
 9 <center>
10     <h2>Hello World</h2>
11     <h2>
12         ${message} ${name}
13     </h2>
14 </center>
15 </body>
16 </html>
Step5: 运行tomcat
在Idea中配置tomcat 如下图: 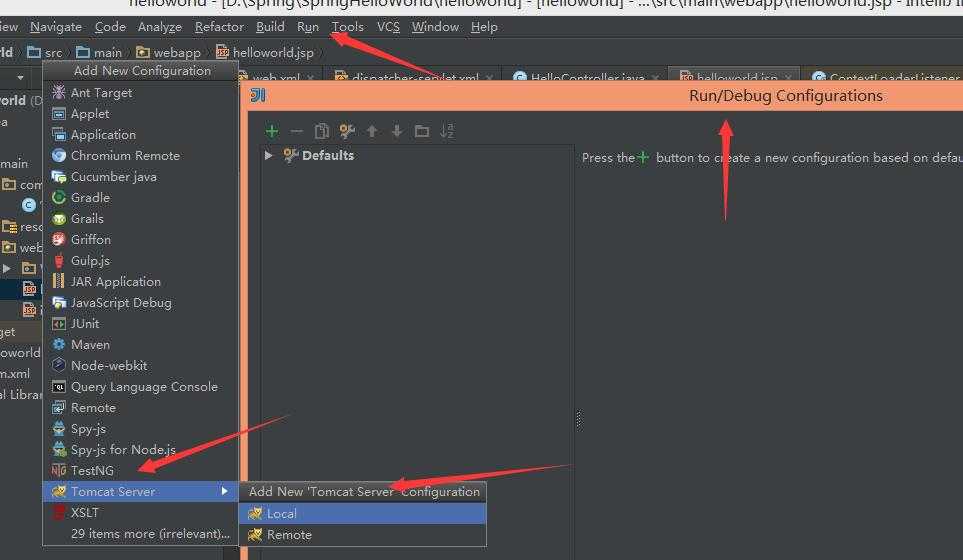
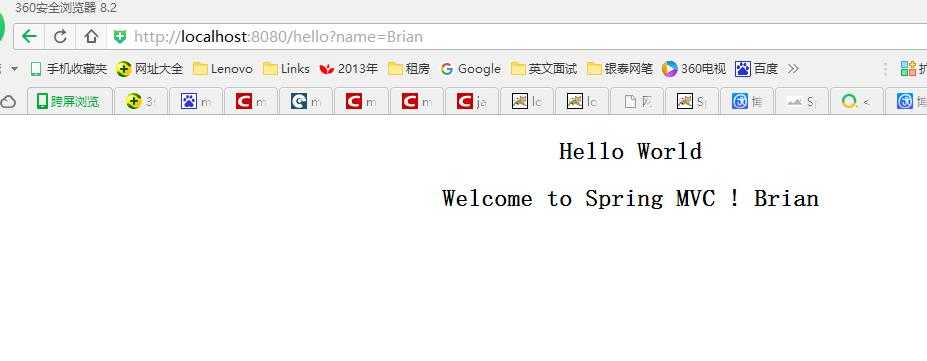
效果图:
以上是关于Spring MVC HelloWorld的主要内容,如果未能解决你的问题,请参考以下文章
