02Android用户界面优化之Android Fragment
Posted
tags:
篇首语:本文由小常识网(cha138.com)小编为大家整理,主要介绍了02Android用户界面优化之Android Fragment相关的知识,希望对你有一定的参考价值。
一、使用Fragment
1.androidManifest.xml文件
<?xml version="1.0" encoding="utf-8"?>
<manifest xmlns:android="http://schemas.android.com/apk/res/android"
    package="com.example.shiyanshi.learningfragment">

    <application
        android:allowBackup="true"
        android:icon="@mipmap/ic_launcher"
        android:label="@string/app_name"
        android:supportsRtl="true"
        android:theme="@style/AppTheme">
        <activity
            android:name=".MainActivity"
            android:label="@string/app_name"
            android:theme="@style/AppTheme.NoActionBar">
            <intent-filter>
                <action android:name="android.intent.action.MAIN" />

                <category android:name="android.intent.category.LAUNCHER" />
            </intent-filter>
        </activity>
    </application>

</manifest>
2.布局文件
(1)activity_main.xml
其中放置的是一个帧布局的布局容器,其id为container
<?xml version="1.0" encoding="utf-8"?>
<FrameLayout xmlns:android="http://schemas.android.com/apk/res/android"
    android:layout_width="match_parent" android:layout_height="match_parent"
    android:id="@+id/container">
</FrameLayout>
(2)fragment_main.xml
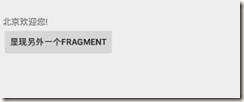
主fargment布局文件,里面放置的按钮用于弹出另外一个fragment
<LinearLayout xmlns:android="http://schemas.android.com/apk/res/android"
    xmlns:tools="http://schemas.android.com/tools"
    android:layout_width="match_parent"
    android:layout_height="match_parent"
    android:paddingBottom="@dimen/activity_vertical_margin"
    android:paddingLeft="@dimen/activity_horizontal_margin"
    android:paddingRight="@dimen/activity_horizontal_margin"
    android:paddingTop="@dimen/activity_vertical_margin"
    android:orientation="vertical"
    tools:context="com.example.shiyanshi.learningfragment.MainActivityFragment"
    tools:showIn="@layout/activity_main">

    <TextView
        android:layout_width="wrap_content"
        android:layout_height="wrap_content"
        android:text="北京欢迎您!" />

    <Button
        android:layout_width="wrap_content"
        android:layout_height="wrap_content"
        android:id="@+id/btnShowFragmentAnother"
        android:text="显现另外一个Fragment"/>

</LinearLayout>
(3)fragment_another.xml
从fragment布局文件,里面的按钮用于支持返回到上一个fragment界面
<?xml version="1.0" encoding="utf-8"?>
<LinearLayout xmlns:android="http://schemas.android.com/apk/res/android"
    android:orientation="vertical" android:layout_width="match_parent"
    android:layout_height="match_parent"
    android:id="@+id/fragmentAnother">


    <TextView
        android:layout_width="wrap_content"
        android:layout_height="wrap_content"
        android:text="这是另外一个Fragment"/>

    <Button
        android:layout_width="wrap_content"
        android:layout_height="wrap_content"
        android:id="@+id/btnBackOperation"
        android:text="后退操作"/>

</LinearLayout>
3.Java源文件
(1)MainActivity.java
package com.example.shiyanshi.learningfragment;

import android.os.Bundle;
import android.support.design.widget.FloatingActionButton;
import android.support.design.widget.Snackbar;
import android.support.v7.app.AppCompatActivity;
import android.support.v7.widget.Toolbar;
import android.view.View;
import android.view.Menu;
import android.view.MenuItem;

public class MainActivity extends AppCompatActivity {

    @Override
    protected void onCreate(Bundle savedInstanceState) {
        super.onCreate(savedInstanceState);
        setContentView(R.layout.activity_main);
if(savedInstanceState==null){
getSupportFragmentManager()
.beginTransaction()
.add(R.id.container,new MainActivityFragment()) //add的第一个参数是布局容器,第二个参数是主Fragment的类
.commit();
    }


}
}
(2)MainActivityFragment.java
package com.example.shiyanshi.learningfragment;
import android.support.v4.app.Fragment;
import android.os.Bundle;
import android.view.LayoutInflater;
import android.view.View;
import android.view.ViewGroup;

/**
 * A placeholder fragment containing a simple view.
 */
public class MainActivityFragment extends
Fragment
{ //注意其继承的是
import android.support.v4.app.Fragment
中的Fragment
    public MainActivityFragment() {
    }

    @Override
    public View onCreateView(LayoutInflater inflater, ViewGroup container,
                             Bundle savedInstanceState) {
View rootView=inflater.inflate(R.layout.fragment_main, container, false); //第一个参数:主fragment的布局文件,第二个:布局容器,第三个为布尔型attachToRoot
rootView.findViewById(R.id.btnShowFragmentAnother).setOnClickListener(new View.OnClickListener() {
@Override
public void onClick(View v) {
getFragmentManager().beginTransaction()
.addToBackStack(null) //加入后退栈,使其支持后退的功能
.replace(R.id.container,new AnotherFragment())
.commit();
}
});
        return rootView;
    }
}
(3)AnotherFragment.java
package com.example.shiyanshi.learningfragment;

import android.os.Bundle;
import android.support.annotation.Nullable;
import android.support.v4.app.Fragment;
import android.view.LayoutInflater;
import android.view.View;
import android.view.ViewGroup;

/**
 * Created by shiyanshi on 2016/1/25.
 */
public class AnotherFragment extends
Fragment
 {
    @Nullable
    @Override
    public View onCreateView(final LayoutInflater inflater, ViewGroup container, Bundle savedInstanceState) {
View view = inflater.inflate(R.layout.fragment_another,container,false);
view.findViewById(R.id.btnBackOperation).setOnClickListener(new View.OnClickListener() {
@Override
public void onClick(View v) {
getFragmentManager().popBackStack();
}
});
        return view;
    }
}
4.界面显示效果
二、Fragment的生命周期
以上是关于02Android用户界面优化之Android Fragment的主要内容,如果未能解决你的问题,请参考以下文章

