OpenCV 之 边缘检测
Posted 飞鸢逐浪
tags:
篇首语:本文由小常识网(cha138.com)小编为大家整理,主要介绍了OpenCV 之 边缘检测相关的知识,希望对你有一定的参考价值。
1 图像边缘
上一篇 OpenCV 之 图像平滑 中,提到的图像平滑,从信号处理的角度来看,实际上是一种“低通滤波器”。
本篇中,图像的边缘,通常都是 像素值变化剧烈 的区域 (“高频”),故可将边缘检测视为一种 “高通滤波器”。
实际中,对应像素值变化剧烈的情况如下:
1) 深度的不连续 (物体处在不同的物平面上)
2) 表面方向的不连续 (例如,正方体的不同的两个面)
3) 物体材料不同 (光的反射系数也不同)
4) 场景中光照不同 (例如,有树荫的路面)
目前边缘检测的算法,大多是依赖于图像的微分。例如,Sobel 是求图像一阶导, Laplace 是求图像二阶导

2 索贝尔算子 (Sobel)
2.1 计算过程
假定输入图像矩阵为 I,卷积核大小为 3x3,则水平一阶导数 $G_x$ 和垂直一阶导数 $G_y$ 分别为:
$\\quad G_x = \\begin{bmatrix} -1 & 0 & 1 \\\\ -2 & 0 & 2 \\\\ -1 & 0 & 1 \\\\ \\end{bmatrix} * I \\qquad G_y = \\begin{bmatrix} -1 & -2 & -1 \\\\ 0 & 0 & 0 \\\\ 1 & 2 & 1 \\\\ \\end{bmatrix} * I $
则输出图像矩阵 $G$ 为:
$\\quad G = \\sqrt{G_{x}^2 + G_{y}^2 } \\qquad \\text{或简化为} \\qquad G = |G_x| + |G_y| $
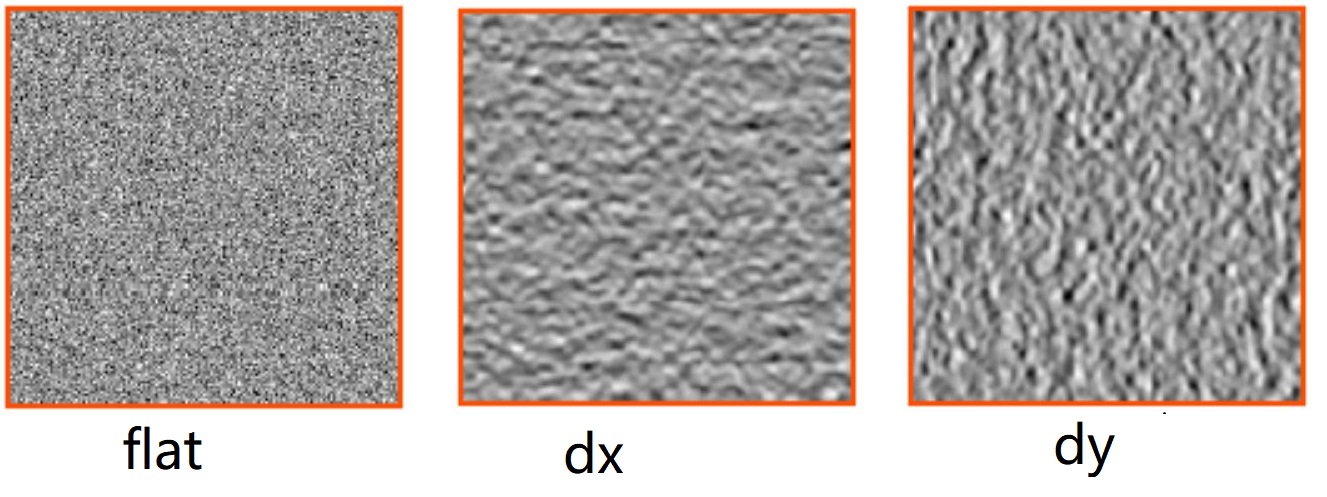
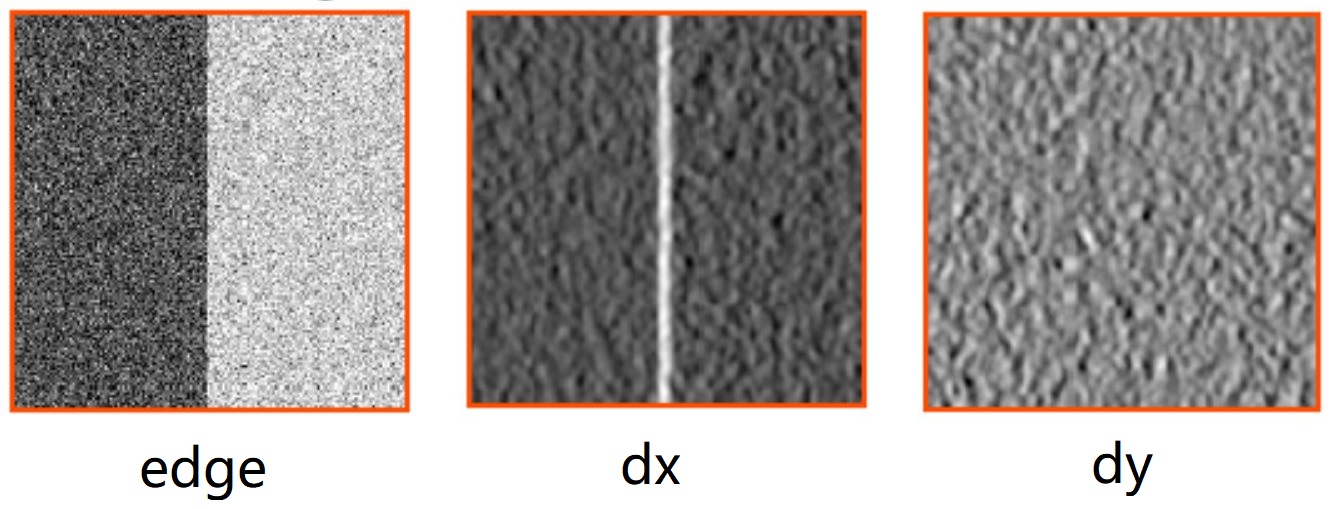
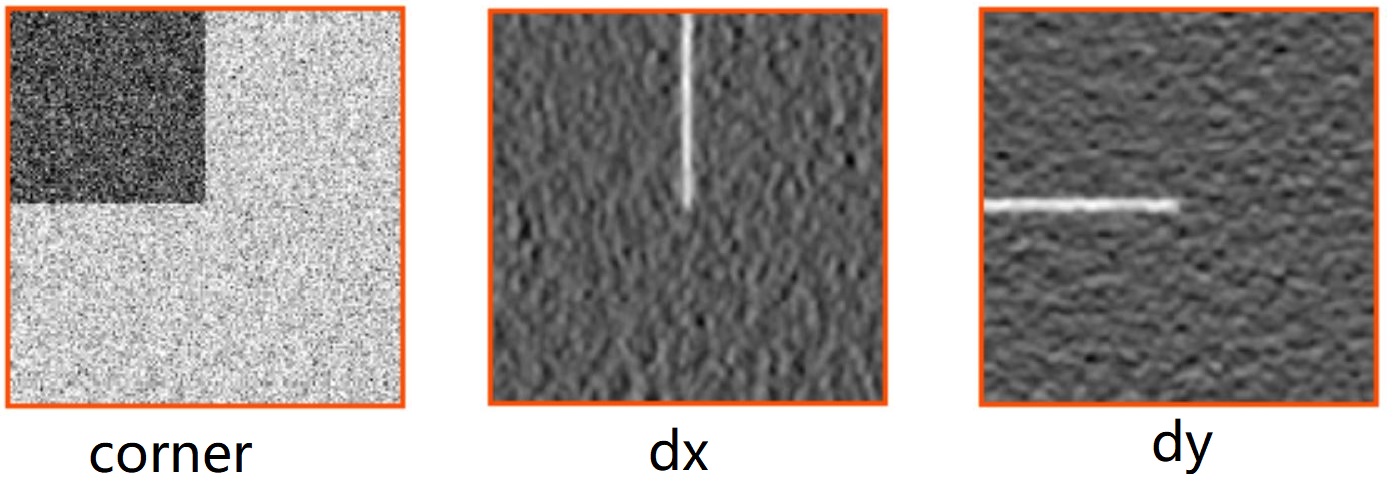
分别对无特征的图像 (flat)、带边缘的图像 (edge)、带角点的图像 (corner)求一阶导,dx 和 dy 如下所示:


2.2 Sobel 函数
OpenCV 中,Sobel 函数:
void  Sobel  (
    InputArray   src,   // 输入图像
    OutputArray  dst,   // 输出图像
    int      ddepth,    // 输出图像深度,-1 表示等于 src.depth()
    int      dx,        // 水平方向的阶数
    int      dy,        // 垂直方向的阶数
    int     ksize = 3,    // 卷积核的大小,常取 1, 3, 5, 7 等奇数
    double  scale = 1,    // 缩放因子,应用于计算结果
    double  delta = 0,    // 增量数值,应用于计算结果
    int borderType = BORDER_DEFAULT // 边界处理模式
)
dx 和 dy 表示阶数,一般取 0 或 1,但不超过 2;scale = 1,表示计算结果不缩放;delat = 0,表示计算结果无增量。
2.2 Scharr 卷积核
当卷积核大小为 3x3 时,使用 sobel 卷积核来计算并不是很精确,此时常用 Scharr 卷积核来代替,如下:
$\\quad K_x = \\begin{bmatrix} -3 & 0 & 3 \\\\ -10 & 0 & 10 \\\\ -3 & 0 & 3 \\\\ \\end{bmatrix}\\qquad K_y = \\begin{bmatrix} -3 & -10 & -3 \\\\ 0 & 0 & 0 \\\\ 3 & 10 & 3 \\\\ \\end{bmatrix} $
而 Scharr 函数,本质上就是令 ksize = 3 且使用 Scharr 卷积核的 Sobel 函数。
void cv::Scharr (
    InputArray  src,
    OutputArray  dst,
    int      ddepth,
    int      dx,
    int      dy,
    double  scale = 1,
    double  delta = 0,
    int     borderType = BORDER_DEFAULT
)
对于 Scharr 函数,要求 dx 和 dy 都 >= 0 且 dx + dy == 1,假如 dx 和 dy 都设为 1,则会抛出异常。
因此,对于 Sobel 和 Scharr 函数,通常各自求其 x 和 y 方向的导数,然后通过加权来进行边缘检测。
// Gradient X
Scharr( src_gray, grad_x, ddepth, 1, 0, scale, delta, BORDER_DEFAULT );
convertScaleAbs( grad_x, abs_grad_x );

// Gradient Y
Scharr( src_gray, grad_y, ddepth, 0, 1, scale, delta, BORDER_DEFAULT );
convertScaleAbs( grad_y, abs_grad_y );

// Total Gradient (approximate)
addWeighted( abs_grad_x, 0.5, abs_grad_y, 0.5, 0, grad );
3 拉普拉斯算子 (Laplace)
索贝尔算子 (Sobel) 和拉普拉斯算子 (Laplace) 都是用来对图像进行边缘检测的,不同之处在于,前者是求一阶导,后者是求二阶导。
$\\quad Laplace(f) = \\frac{\\partial^2f}{\\partial x^2} + \\frac{\\partial^2f}{\\partial y^2} = f(x+1, y) + f(x-1, y) + f(x, y+1) + f(x, y-1) - 4f(x, y)$
OpenCV 中对应的函数为 Laplacian
void    Laplacian (
    InputArray     src,
    OutputArray    dst,
    int       ddepth,
    int       ksize = 1,
    double    scale = 1,
    double    delta = 0,
    int       borderType = BORDER_DEFAULT
)
4 Canny 算子
Canny 算子,在一阶微分的基础上,增加了非最大值抑制和双阈值检测,是边缘检测算子中最常用的一种,常被其它算子作为标准算子来进行优劣比较。
4.1 算法步骤
1) 用高斯滤波器对输入图像做平滑处理 (大小为 5x5 的高斯核)
$\\quad K = \\frac{1}{159} \\begin{bmatrix} 2 & 4 & 5 & 4 & 2 \\\\ 4 & 9 & 12 & 9 & 4 \\\\ 5 & 12 & 15 & 12 & 5 \\\\ 4 & 9 & 12 & 9 & 4 \\\\ 2 & 4 & 5 & 4 & 2 \\end{bmatrix}$
2) 计算图像的梯度强度和角度方向 ( x 和 y 方向上的卷积核)
$\\quad K_x = \\begin{bmatrix} -1 & 0 & 1 \\\\ -2 & 0 & 2 \\\\ -1 & 0 & 1 \\\\ \\end{bmatrix} \\qquad K_y = \\begin{bmatrix} -1 & -2 & -1 \\\\ 0 & 0 & 0 \\\\ 1 & 2 & 1 \\\\ \\end{bmatrix} $
$\\quad G = \\sqrt{G_{x}^2 + G_{y}^2 } \\qquad \\theta = \\arctan(\\dfrac{ G_y }{ G_x }) $
角度方向近似为四个可能值,即 0, 45, 90, 135
3) 对图像的梯度强度进行非极大抑制
可看做边缘细化:只有候选边缘点被保留,其余的点被移除
4) 利用双阈值检测和连接边缘
若候选边缘点大于上阈值,则被保留;小于下阈值,则被舍弃;处于二者之间,须视其所连接的像素点,大于上阈值则被保留,反之舍弃
4.2 Canny 函数
OpenCV 中的 Canny 函数如下:
void cv::Canny (
    InputArray    image,    // 输入图像 (8位)
    OutputArray   edges,    // 输出图像 (单通道,8位)
    double      threshold1,  // 下阈值
    double      threshold2,  // 上阈值
    int         apertureSize = 3,
    bool        L2gradient = false
)
一般 上阈值 / 下阈值 = 2 ~ 3
L2gradient 默认 flase,表示图像梯度强度的计算采用近似形式;若为 true,则表示采用更精确的形式。
5 代码示例
5.1 OpenCV 示例
Sobel 或 Scharr 示例中,使用 addWeighted 函数,来加权合成 x 和 y 方向上各自的一阶导数

#include "opencv2/imgproc/imgproc.hpp"
#include "opencv2/imgcodecs.hpp"
#include "opencv2/highgui/highgui.hpp"
#include <stdlib.h>
#include <stdio.h>

using namespace cv;

int main( int, char** argv )
{

  Mat src, src_gray;
  Mat grad;
  const char* window_name = "Sobel Demo - Simple Edge Detector";
  int scale = 1;
  int delta = 0;
  int ddepth = CV_16S;

  /// Load an image
  src = imread( argv[1] );

  if( src.empty() )
    { return -1; }

  GaussianBlur( src, src, Size(3,3), 0, 0, BORDER_DEFAULT );

  /// Convert it to gray
  cvtColor( src, src_gray, COLOR_RGB2GRAY );

  /// Create window
  namedWindow( window_name, WINDOW_AUTOSIZE );

  /// Generate grad_x and grad_y
  Mat grad_x, grad_y;
  Mat abs_grad_x, abs_grad_y;

  /// Gradient X
  //Scharr( src_gray, grad_x, ddepth, 1, 0, scale, delta, BORDER_DEFAULT );
  Sobel( src_gray, grad_x, ddepth, 1, 0, 3, scale, delta, BORDER_DEFAULT );
  convertScaleAbs( grad_x, abs_grad_x );

  /// Gradient Y
  //Scharr( src_gray, grad_y, ddepth, 0, 1, scale, delta, BORDER_DEFAULT );
  Sobel( src_gray, grad_y, ddepth, 0, 1, 3, scale, delta, BORDER_DEFAULT );
  convertScaleAbs( grad_y, abs_grad_y );

  /// Total Gradient (approximate)
  addWeighted( abs_grad_x, 0.5, abs_grad_y, 0.5, 0, grad );

  imshow( window_name, grad );

  waitKey(0);

  return 0;
}
Laplacian 示例中,利用了高斯滤波函数来降低噪声

#include "opencv2/imgproc/imgproc.hpp"
#include "opencv2/imgcodecs.hpp"
#include "opencv2/highgui/highgui.hpp"

using namespace cv;

int main( int, char** argv )
{
  Mat src, src_gray, dst;
  int kernel_size = 3;
  int scale = 1;
  int delta = 0;
  int ddepth = CV_16S;
  const char* window_name = "Laplace Demo";

  // 读图
  src = imread("camera1.bmp");
  if( src.empty())
      return -1;

  // 高斯滤波
  GaussianBlur( src, src, Size(3,3), 0, 0, BORDER_DEFAULT );

  // 灰度图
  cvtColor( src, src_gray, COLOR_RGB2GRAY );

  // 窗体
  namedWindow( window_name, WINDOW_AUTOSIZE );

  // Laplace 函数
  Mat abs_dst;
  Laplacian( src_gray, dst, ddepth, kernel_size, scale, delta, BORDER_DEFAULT );
  convertScaleAbs( dst, abs_dst );

  // 显示
  imshow( window_name, abs_dst );

  waitKey(0);
}
在 Canny 函数之前,也需要 blur 函数,来进行降噪处理

#include "opencv2/imgproc/imgproc.hpp"
#include "opencv2/imgcodecs.hpp"
#include "opencv2/highgui/highgui.hpp"
#include <stdlib.h>
#include <stdio.h>

using namespace cv;

/// Global variables

Mat src, src_gray;
Mat dst, detected_edges;

int edgeThresh = 1;
int lowThreshold;
int const max_lowThreshold = 100;
int ratio = 3;
int kernel_size = 3;
const char* window_name = "Edge Map";

/**
 * @function CannyThreshold
 * @brief Trackbar callback - Canny thresholds input with a ratio 1:3
 */
static void CannyThreshold(int, void*)
{
    /// Reduce noise with a kernel 3x3
    blur( src_gray, detected_edges, Size(3,3) );

    /// Canny detector
    Canny( detected_edges, detected_edges, lowThreshold, lowThreshold*ratio, kernel_size );

    /// Using Canny\'s output as a mask, we display our result
    dst = Scalar::all(0);

    src.copyTo( dst, detected_edges);
    imshow( window_name, dst );
}


int main( int, char** argv )
{
  /// Load an image
  src = imread( argv[1] );

  if( src.empty() )
    { return -1; }

  /// Create a matrix of the same type and size as src (for dst)
  dst.create( src.size(), src.type() );

  /// Convert the image to grayscale
  cvtColor( src, src_gray, COLOR_BGR2GRAY );

  /// Create a window
  namedWindow( window_name, WINDOW_AUTOSIZE );

  /// Create a Trackbar for user to enter threshold
  createTrackbar( "Min Threshold:", window_name, &lowThreshold, max_lowThreshold, CannyThreshold );

  /// Show the image
  CannyThreshold(0, 0);

  /// Wait until user exit program by pressing a key
  waitKey(0);

  return 0;
}
5.2 简单对比
在进行 Sobel,Laplacian 和 Canny 边缘检测之前,统一调用 GaussianBlur 来降低图像噪声
#include "opencv2/imgproc/imgproc.hpp"
#include "opencv2/highgui/highgui.hpp"

using namespace std;
using namespace cv;

int main()
{
    Mat src, src_gray, dst;

    src = imread("bird.jpg");
    if(src.empty())
        return -1;

    imshow("Original", src);

    Mat grad_x, grad_y, abs_grad_x, abs_grad_y;

    GaussianBlur(src, src, Size(3,3),0);
    cvtColor(src,src_gray,COLOR_BGR2GRAY);

    Sobel(src_gray, grad_x,CV_16S,0,1);        // use CV_16S to avoid overflow
    convertScaleAbs( grad_x, abs_grad_x );
    Sobel(src_gray, grad_y,CV_16S,1,0);        // use CV_16S to avoid overflow
    convertScaleAbs( grad_y, abs_grad_y );
    addWeighted( abs_grad_x, 0.5, abs_grad_y, 0.5, 0, dst );
    imshow("Sobel", dst);

    Laplacian(src_gray,dst,-1,3);
    imshow("Laplace", dst);

    Canny(src_gray,dst,100,300);
    imshow("Canny",dst);

    waitKey(0);
}
三种边缘检测的效果图如下:

参考资料
<Learning OpenCV_2nd>
<OpenCV Tutorials> imgproc module
以上是关于OpenCV 之 边缘检测的主要内容,如果未能解决你的问题,请参考以下文章
