设计模式(12)----- 命令设计模式(升级----一个开关控制多条命令)
Posted qingruihappy
tags:
篇首语:本文由小常识网(cha138.com)小编为大家整理,主要介绍了设计模式(12)----- 命令设计模式(升级----一个开关控制多条命令)相关的知识,希望对你有一定的参考价值。
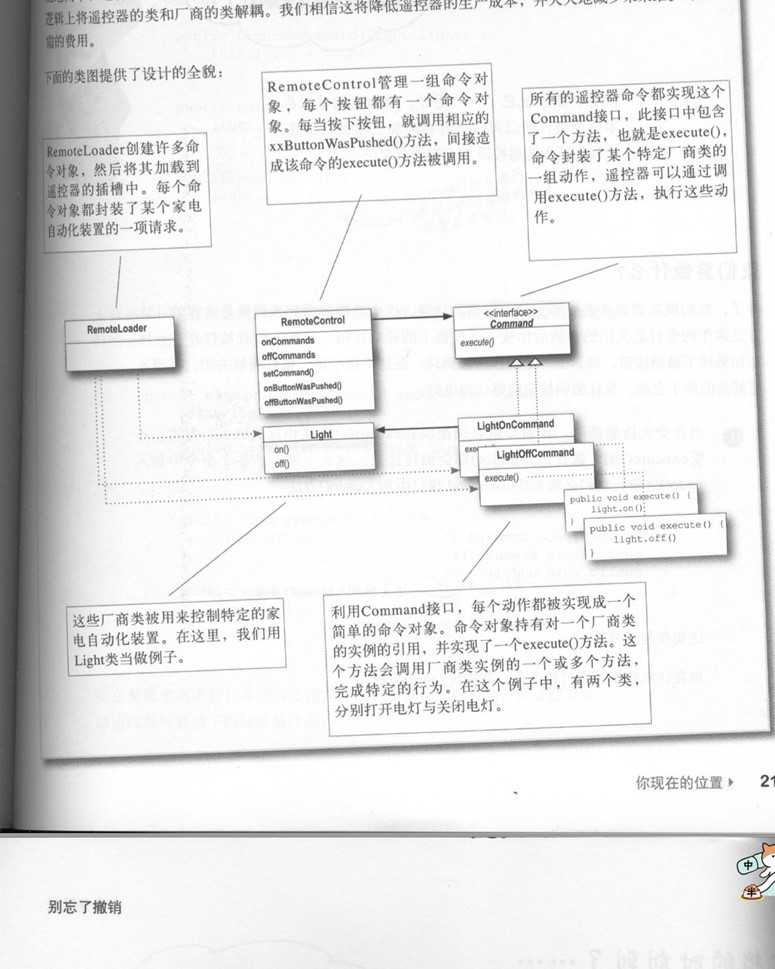
我们先来看张类图

RemoteControl类修改一下
public class RemoteControl { Command[] onCommands;
Command[] offCommands;
public RemoteControl() {
onCommands = new Command[7]; offCommands = new Command[7];
Command noCommand = new NoCommand();
for (int i = 0; i < 7; i++) {
onCommands[i] = noCommand;
offCommands[i] = noCommand;
}
}
public void setCommand(int slot, Command onCommand, Command offCommand)
{
onCommands[slot] = onCommand;
offCommands[slot] = offCommand; }
public void onButtonWasPushed(int slot) {
onCommands[slot].execute(); }
public void offButtonWasPushed(int slot) {
offCommands[slot].execute();
}
public String toString() {
StringBuffer stringBuff = new StringBuffer();
stringBuff.append(" ------ Remote Control ------- ");
for (int i = 0; i < onCommands.length; i++) {
stringBuff.append("[slot " + i + "] " + onCommands[i].getClass().getName()
+ " "
+ offCommands[i].getClass().getName() + " ");
}
return stringBuff.toString();
}
}
在开关中加了一个数组
Command[] onCommands; Command[] offCommands;
两个开关一个开的数组和一个关的数组
public void setCommand(int slot, Command onCommand, Command offCommand) {
onCommands[slot] = onCommand;
offCommands[slot] = offCommand;
}
public void onButtonWasPushed(int slot) {
onCommands[slot].execute();
}
public void offButtonWasPushed(int slot) {
offCommands[slot].execute();
}
在设置的时候一个命令控制开一个命令控制关就可以了没有命令对象的方法NoCommand
这条命令对象是一个空方法的实现
public class NoCommand implements Command {
public void execute() { }
}
Command代码不变
public interface Command {
public void execute();
}
LightOnCommand控制命令对象
public class LightOnCommand implements Command { Light light;
public LightOnCommand(Light light) {
this.light = light;
}
public void execute() {
light.on();
}
}
LightOffCommand控制命令对象
public class LightOffCommand implements Command { Light light;
} | public LightOffCommand(Light light) { this.light = light; } public void execute() { light.off(); } |
具体实现类Light
public class Light {
String location = "";
public Light(String location) {
this.location = location;
}
public void on() {
System.out.println(location + " light is on");
}
public void off() {
System.out.println(location + " light is off");
}
}
cd关闭开关StereoOffCommand
public class StereoOffCommand implements Command {
Stereo stereo;
public StereoOffCommand(Stereo stereo) {
this.stereo = stereo;
}
public void execute() {
stereo.off();
}
}
cd打开开关StereoOnWithCDCommand
public class StereoOnWithCDCommand implements Command {
Stereo stereo;
} | public StereoOnWithCDCommand(Stereo stereo) { this.stereo = stereo; } public void execute() { stereo.on(); stereo.setCD(); stereo.setVolume(11); } |
具体实现类cd Stereo
public class Stereo { String location; public Stereo(String location) { this.location = location; } public void on() { System.out.println(location + " stereo is on"); } public void off() { System.out.println(location + " stereo is off"); } public void setCD() { System.out.println(location + " stereo is set for CD input"); } public void setDVD() { System.out.println(location + " stereo is set for DVD input"); } public void setRadio() { System.out.println(location + " stereo is set for Radio"); } public void setVolume(int volume) { // code to set the volume // valid range: 1-11 (after all 11 is better than 10, right?) System.out.println(location + " Stereo volume set to " + volume); } } |
test测试Test
package com.DesignPatterns.ae.command2;
/**
*
- @author qingruihappy
- @data 2018年9月28日 下午10:43:45
- @说明:
*
- 一:开关==遥控器==调用者
*
- 二:怎么用一个开关控制多个一组控件,每个控件中还可能有不同的操作。
- 一个开关控制多个控件,就是在开关中加入数组(或集合),每个控件有不同的操作,有多少个操作就假如多少个数组
*
- 三,假如一个按钮按下去会有多个操作的话(比如下面例子中的cd的例子,按下开键会触发
1,打开开关2,设置成cd模式3,默认声音是11.),
- 那直接在命令的excute方法中调用实例类的三个方法就行了。
*
- 四:并不是每一个按钮都会设置功能的,如说说现在7个按钮,现在4567号按钮我现在还没想好用在什么地方怎么办呢,那我们预期的是设置成不触发任何方法的按钮
- 怎么办呢?
- 现在就是写一个命令对象(NoCommand),同样实现Command但是它的方法是空的,当我们在实例化开关对象(RemoteControl)的时候我们先让数组里面的
- 元素都默认是这个空对象,假如后面不是空对象的话就会覆盖,假如是空对象的话就不会覆盖了,就是空方法。
*
- 五:到这里我们就更能深刻的理解接口的作用了,就是定义一个规范,让调用者和被调用者都实现这个接口,从而各干各的事情,互不干涉,但是又可以通过
- 这个接口达到联系的效果。
- 我们再来看看之前自己理解的回调函数的韵味:
- 回调函数既然是让系统调用的,所以你就必须按照系统给定的原型来实现程序
- 场景:A去调用B,其中A把一些参数穿给了B,B进行了自己的业务逻辑处理之后把返回的结果返给A,但是B怎么返给A呢,就需要B去调用A里的
- 方法,但是B怎么知道A里面有什么方法呢,因为这一般都是两个程序员的事情,这个时候就需要定义规范了,定义一个接口,B通过这个接口去调用A
- 里面的方法,而A也必须实现这个接口,这个实现的方法就叫做回调函数,从这里的逻辑我们不难发现,当我们当A去调用B的时候最好把自己的表示符号传
- 过去,这个时候当B把处理完逻辑之后就可以通过标识符(对象实例)知道调用谁的(A)方法了。
- */
public class Test {
public static void main(String[] args) { RemoteControl remoteControl = new RemoteControl(); Light livingRoomLight = new Light("Living Room"); Light kitchenLight = new Light("Kitchen"); CeilingFan ceilingFan = new CeilingFan("Living Room"); GarageDoor garageDoor = new GarageDoor(""); Stereo stereo = new Stereo("Living Room"); LightOnCommand livingRoomLightOn = new LightOnCommand(livingRoomLight); LightOffCommand livingRoomLightOff = new LightOffCommand(livingRoomLight); LightOnCommand kitchenLightOn = new LightOnCommand(kitchenLight); LightOffCommand kitchenLightOff = new LightOffCommand(kitchenLight); CeilingFanOnCommand ceilingFanOn = new CeilingFanOnCommand(ceilingFan); CeilingFanOffCommand ceilingFanOff = new CeilingFanOffCommand(ceilingFan); GarageDoorUpCommand garageDoorUp = new GarageDoorUpCommand(garageDoor); GarageDoorDownCommand garageDoorDown = new GarageDoorDownCommand(garageDoor); StereoOnWithCDCommand stereoOnWithCD = new StereoOnWithCDCommand(stereo); StereoOffCommand stereoOff = new StereoOffCommand(stereo); remoteControl.setCommand(0, livingRoomLightOn, livingRoomLightOff); remoteControl.setCommand(1, kitchenLightOn, kitchenLightOff); remoteControl.setCommand(2, ceilingFanOn, ceilingFanOff); remoteControl.setCommand(3, stereoOnWithCD, stereoOff); System.out.println(remoteControl); remoteControl.onButtonWasPushed(0); remoteControl.offButtonWasPushed(0); remoteControl.onButtonWasPushed(1); remoteControl.offButtonWasPushed(1); remoteControl.onButtonWasPushed(2); remoteControl.offButtonWasPushed(2); remoteControl.onButtonWasPushed(3); |
remoteControl.offButtonWasPushed(3);
}
}
kk
以上是关于设计模式(12)----- 命令设计模式(升级----一个开关控制多条命令)的主要内容,如果未能解决你的问题,请参考以下文章