Linkit 7688 DUO 加入MQTT物联网协议
Posted JoStudio
tags:
篇首语:本文由小常识网(cha138.com)小编为大家整理,主要介绍了Linkit 7688 DUO 加入MQTT物联网协议相关的知识,希望对你有一定的参考价值。
Linkit 系列博文:
联发科Linkit 7688 (一) 上手及在Mac下搭建OpenWrt交叉编译环境,C语言编译Hello,World
联发科Linkit 7688 (二)GPIO基本操作与C语言编程
联发科Linkit 7688 DUO(三): 通过 Arduino 控制外设和传感器
Linkit 7688 DUO(四): 接上各种Arduino传感器和模块——基础篇
Linkit 7688 DUO(五) 接上各种Arduino传感器和模块—扩展篇
Linkit 7688 DUO(六) 加入MQTT物联网协议
本篇介绍 将 MQTT物联网协议加载到 Linkit 7688 DUO开发板上 ( 其中的源码和方法也适用于所有的Linux系统、也适合于Windows系统)
MQTT是IBM开发的一种物联网即时通信协议,该协议支持所有平台,几乎可以把所有联网物品、电脑APP、手机APP、网页等连接起来,让它们随时相互交换信息。
有了MQTT协议,Linkit 7688开发板就可以称得上物联网开发板了,可以实现很多场景,比如:手机远程控制、网页远程控制、服务器监测物体状态等等。
一、MQTT协议简介
1,MQTT是一种基于TCP的网络消息协议,用于发送和接收消息。
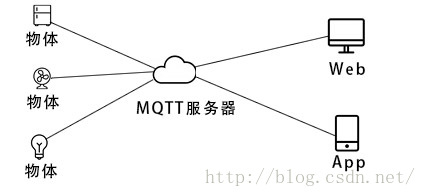
在一个MQTT网络中,有一个服务器和多个客户端。 每个客户端以TCP Socket与服务器连接,并保持为长连接。
客户端可以是一个联网物体、电脑软件、手机APP、甚至是网页。如下图:

2, 消息传输采取发布/订阅(publish/subscribe)模式。
客户端可以发布(publish)消息, 每个消息由一个主题(topic)和一个消息内容组成。比如:某温度传感器发布一个消息: topic = "sensor1/temperature", message="25“
客户端可以订阅(subscribe)一个或多个主题的消息。 当网络中有人发布了这些主题的消息,则客户端将收到这条消息。比如: 手机App订阅了 “sensor1/temperature"消息,则上述消息将被收到, 手机App就知道sensor1的温度值了。
由于客户端与服务器保持着Socket长连接,消息将立即实时推送到客户端,也就是说:PUSH到客户端。
MQTT服务器的主要作用是接收-转发:接收消息、判断哪些客户端订阅了该主题的消息,PUSH给相应客户端。
这种机制,可以实现一对一发送消息,也可以实现一对多发送消息(群发)。
应用场景举例:
场景1: 手机APP发布查温度的消息, 各个传感器装置收到消息后,发布温度消息。则手机就可以收集到各个传感器的温度。
场景2: 当火警传感器装置检测到起火后,发布消息。 则订阅了该类型消息的手机、电脑等均可立即收到火警。
3,MQTT的消息包传输数据量很小(固定长度的头部仅为 2 字节),能充分降低网络流量,非常适合于低带宽、不可靠连接、嵌入式设备。
同时非常适合于手机等移动通信环境,可以省流量、省电。因此,有人用MQTT作为手机PUSH使用。
4, 为保障消息有效率到达,MQTT定义了三种消息发布服务质量(Qos, Quality Of Service):
“至多一次”(At most once),开销最小,消息发布完全依赖底层 TCP/IP 网络,会发生消息丢失或重复。这一级别可用于如下情况,环境传感器数据,丢失一次读记录无所谓,因为不久后还会有第二次发送。
“至少一次”(At least once),确保消息到达,但消息重复可能会发生。
“只有一次”(Exactly once),确保消息到达一次。这一级别可用于如下情况,在计费系统中,消息重复或丢失会导致不正确的结果。常用于精确控制。
每一条消息都可以有自己的Qos定义。每一个客户端订阅某主题时,也可以指定Qos.
5, MQTT协议由IBM公司于1999年提出,经过多年发展已比较成熟,目前版本是3.1.1。服务器和客户端均有多个开源实现,支持各类操作系统和开发语言。
二、适合嵌入式设备的MQTT协议客户端(C语言实现)
对于Linkit 7688开发板,我选取 “Eclipse Paho C” 的MQTT 客户端开源代码库 。其主页在这:https://www.eclipse.org/paho/clients/c/
这个代码库是IBM公司提供的,Eclipse项目组维护的,可以称为官方的。
我的使用方式是: 将它作为一个函数库, 在Linkit 7688上编写C语言程序,实现MQTT消息收发。
这个库有一点点复杂,需要对协议比较了解。如果你要完全搞懂它,需要先读它的文档(http://www.eclipse.org/paho/files/mqttdoc/Cclient/index.html)
我们一般总是喜欢把复杂的事情简单化,因此,我对这个库进行了封装, 变成几个函数, 不需要懂太多就可以用.
库和例程在我的资源中下载: MQTT客户端Paho C代码
解压后,其中mqtt目录是Paho C所有的库文件( 原有的文件都没改,我增加了 mqtt_client.c , mqtt_client.h 两个文件),使用时将mqtt目录复制到你的项目文件夹中即可。
在使用前,需要有一个测试用的MQTT服务器, 我用的是 IBM提供的测试服务器: messagesight.demos.ibm.com, 端口是1883 (1883是MQTT的默认端口)
同时需要有一个测试用的MQTT客户端作为对端,我用的是IBM提供的网页版MQTT客户端:http://m2m.demos.ibm.com/mqttclient/
1, 在Linkit 7688上编一个发送MQTT消息的程序:
用Eclipse 建立一个交叉编译项目 ( 开发环境搭建请见:联发科Linkit 7688 (一) 上手及在Mac下搭建OpenWrt交叉编译环境,C语言编译Hello,World)
将mqtt目录复制到你的项目文件夹下。
创建一个 mqtt_publish.c文件, 编写主程序如下:
#include <stdio.h>
#include <stdlib.h>
#include <errno.h>
#include "mqtt/mqtt_client.h"//这个是我对mqtt_client封装后的头文件


int publish(int argc, char ** argv) {

	mqtt_client *m; //mqtt_client 对象指针
	int ret; //返回值
	char *host = "messagesight.demos.ibm.com:1883";//测试服务器
	char *topic = "test_topic"; //主题
	char *client_id = "clientid33883";//客户端ID; 对测试服务器,可以随便写
	char *username = NULL;//用户名,用于验证身份。对测试服务器,无。
	char *password = NULL;//密码,用于验证身份。对测试服务器,无。
	int Qos; //Quality of Service

	//create new mqtt client object
	m = mqtt_new(host, MQTT_PORT, client_id); //创建对象,MQTT_PORT = 1883
	if ( m == NULL ) {
		printf("mqtt client create failure, return  code = %d\\n", errno);
		return 1;
	} else {
		printf("mqtt client created\\n");
	}

	//connect to server
	ret = mqtt_connect(m, username, password); //连接服务器
	if (ret != MQTT_SUCCESS ) {
		printf("mqtt client connect failure, return code = %d\\n", ret);
		return 1;
	} else {
		printf("mqtt client connect\\n");
	}

	//publish message
	Qos = QOS_EXACTLY_ONCE; //Qos
	ret = mqtt_publish(m, topic, "hello from Linkit 7688", Qos);//发布消息
	printf("mqtt client publish,  return code = %d\\n", ret);

	mqtt_disconnect(m); //disconnect
	mqtt_delete(m);  //delete mqtt client object
	return 0;
}
主程序分为三个步骤:
1, 调用 mqtt_new()创建 客户端对象
2, 调用 mqtt_connect() 连接服务器
3, 调用 mqtt_publish() 发布消息
用Eclipse编译项目
如果出现错误提示:
undefined reference to `pthread_create’
undefined reference to `pthread_mutexattr_init’
这是因为没有在编译连接时包含pthread库, 解决办法: 需在GCC中添加 -lpthread 参数。
如果出现错误提示:
undefined reference to `dlclose’
undefined reference to `dlopen’
undefined reference to `dlsym
这是因为没有在编译连接时包含dl库, 解决办法: 需在GCC中添加 -ldl 参数
在eclipse中的操作是: 项目Property => C/C++ Build => Settings, 在"Tools Setting"页,选Cross GCC linker, 在 "Linker flags"编译框中填入: -lpthread -ldl
OK, 编译成功了。
用scp将 mqtt_publish 程序上传到 linkit 7688: scp mqtt_publish root@mylinkit.local:/root
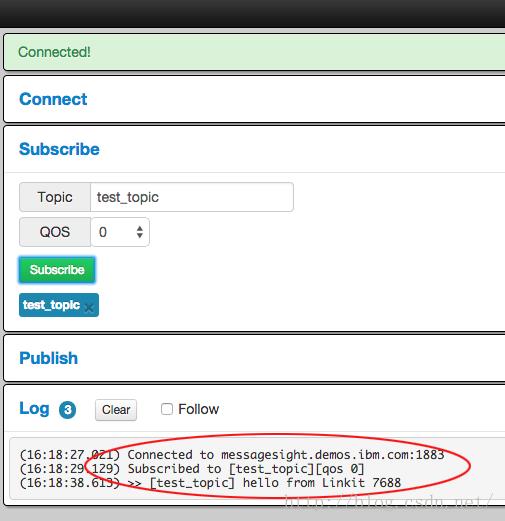
先准备接收消息的网页客户端: 用浏览器打开 http://m2m.demos.ibm.com/mqttclient/
在Connect栏中, 点Connect.
在Subscribe栏中,将topic设为 test_topic, 按subscribe
OK, 网页客户端准备好接收主题(topic)为 test_topic的消息了。
用SSH登录入Linkit 7688, 运行 mqtt_publish 程序。
运行结果, 显示mqtt 创建、连接、发布消息的过程, return code >=0 表示成功:
mqtt client created
mqtt client connect
mqtt client publish, return code = 1
这时,可以看到浏览器中的MQTT网页客户端收到了Linkit 7688发布的MQTT消息

成功了: Linkit 7688发布MQTT消息到服务器, 网页客户端实时收到服务器推送来的消息。
2, 在Linkit 7688上编一个接收MQTT消息的程序:
用Eclipse 建立一个交叉编译项目 ( 开发环境搭建请见:联发科Linkit 7688 (一) 上手及在Mac下搭建OpenWrt交叉编译环境,C语言编译Hello,World)
将mqtt目录复制到你的项目文件夹下。
创建一个 mqtt_subscribe.c文件, 编写主程序如下:
#include <stdio.h>
#include <stdlib.h>
#include <errno.h>
#include <signal.h>
#include "mqtt/mqtt_client.h"//这个是我对mqtt_client封装后的头文件

int running = 1;

void stop_running(int sig)
{
	signal(SIGINT, NULL);
	running = 0;
}


int main(int argc, char ** argv) {

	mqtt_client *m; //mqtt_client 对象指针
	int ret; //返回值
	char *host = "messagesight.demos.ibm.com:1883";//测试服务器
	char *topic = "test_topic"; //主题
	char *client_id = "clientid33883";//客户端ID; 对测试服务器,可以随便写
	char *username = NULL;//用户名,用于验证身份。对测试服务器,无。
	char *password = NULL;//密码,用于验证身份。对测试服务器,无。
	int Qos; //Quality of Service

	//create new mqtt client object
	m = mqtt_new(host, MQTT_PORT, client_id); //创建对象,MQTT_PORT = 1883
	if ( m == NULL ) {
		printf("mqtt client create failure, return  code = %d\\n", errno);
		return 1;
	} else {
		printf("mqtt client created\\n");
	}

	//connect to server
	ret = mqtt_connect(m, username, password); //连接服务器
	if (ret != MQTT_SUCCESS ) {
		printf("mqtt client connect failure, return code = %d\\n", ret);
		return 1;
	} else {
		printf("mqtt client connect\\n");
	}

	//subscribe
	Qos = QOS_EXACTLY_ONCE;
	ret = mqtt_subscribe(m, topic, Qos);//订阅消息
	printf("mqtt client subscribe %s,  return code = %d\\n", topic, ret);

	signal(SIGINT, stop_running);
	signal(SIGTERM, stop_running);

	printf("wait for message of topic: %s ...\\n", topic);

	//loop: waiting message, 循环
	while (running) {
		int timeout = 200;
		if ( mqtt_receive(m, timeout) == MQTT_SUCCESS ) { //recieve message,接收消息
			printf("received Topic=%s, Message=%s\\n", m->received_topic, m->received_message);
		}
		mqtt_sleep(200); //sleep a while
	}

	mqtt_disconnect(m); //disconnect
	printf("mqtt client disconnect");
	mqtt_delete(m);  //delete mqtt client object
	return 0;
}
主程序分为几个步骤:
1, 调用 mqtt_new()创建 客户端对象
2, 调用 mqtt_connect() 连接服务器
3, 调用 mqtt_subscribe() 订阅消息
4, 进入循环:不断用 mqtt_receive()检测有否新消息,如有,则打印出来。
用Eclipse编译项目 (记得必须在GCC中加入连接选项: -lpthread -ldl )
OK, 编译成功了。
用scp将 mqtt_subscribe 程序上传到 linkit 7688: scp mqtt_subscribe root@mylinkit.local:/root
用SSH登录入Linkit 7688, 运行 mqtt_subscribe 程序。则此时出现:
mqtt client created
mqtt client connect
mqtt client subscribe, return code = 0
wait for message of topic: test_topic ...
显示程序在等待消息到来
准备发送消息的网页客户端: 用浏览器打开 http://m2m.demos.ibm.com/mqttclient/
在Connect栏中, 点Connect.
在Publish栏中,将topic设为 test_topic, 将Message设为 “Say hello to linkit 7688” 按publish, 则发出一条MQTT消息。
这时, 看Linkit 7688 SSH客户端,可以看到,Linkit7688立即收到了这条MQTT消息
mqtt client created
mqtt client connect
mqtt client subscribe, return code = 0
wait for message of topic: test_topic ...
received Topic=test_topic, Message=Say hello to linkit 7688
成功了: Linkit 7688 实时收到了网页客户端发来的消息。
mqtt_subscribe 程序是死循环,一直在接收消息。 可按CTRL+C退出。
通用性: Eclipse Paho C 的 MQTT客户端代码,可以运行在Linux、Windows、Mac上。所以,上述的代码可以用于Linux、Windows、Mac操作系统,编写各种App。
对于android手机, Eclipse Paho另提供了Java的代码库。
以上是关于Linkit 7688 DUO 加入MQTT物联网协议的主要内容,如果未能解决你的问题,请参考以下文章