netty简介与入门
Posted
tags:
篇首语:本文由小常识网(cha138.com)小编为大家整理,主要介绍了netty简介与入门相关的知识,希望对你有一定的参考价值。
netty作为当前流行的java nio框架,已经成为在大型分布式系统中,用来达到高并发,高可用等性能要求的一种有效手段。目前netty已经支持udp,tcp,websocket,http1.1,https,ftp,smtp等通讯协议,并且支持自定义通讯协议。与此同时,netty也提供了丰富的通讯数据编码和解码器,方便开发者来实现不同的编码要求。
本文以及后续文章,将从一个开发者的视角从对netty的使用,性能调休,源码分析等方面逐一的介绍。由于笔者水平有限,难免见识短浅,权当抛砖引玉。
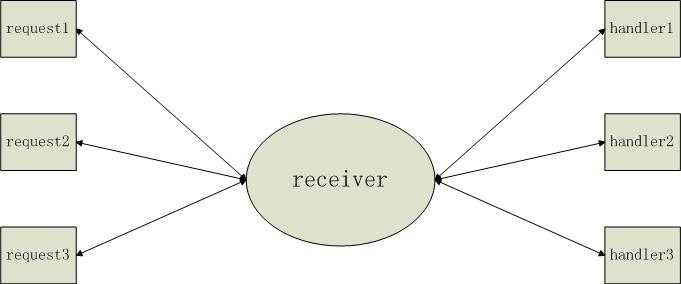
首先,介绍netty之前,不得不先介绍一下nio中的Reactor模式。维基百科中对此定义为:The reactor design pattern is an event handling pattern for handling service requests delivered concurrently to a service handler by one or more inputs. The service handler then demultiplexes the incoming requests and dispatches them synchronously to the associated request handlers。根据这个定义,Reactor是一个事件驱动的模式,其中有一个服务处理程序专门接收多个并发请求,并将这些请求分发到相应的请求处理器。

netty的设计者也是参考了这个Reactor模式,server端会创建一个专门的线程(池)来接收并发请求,并从工作线程池中选取可用的工作线程来处理不同的请求。这样做的好处是显而易见的,其中一个很重要的作用就是能将客户端的高并发的请求和服务端的处理能力解耦开来,这在高并发的系统设计中尤其重要,避免因为请求峰值导致系统不可用。同时,服务端的工作线程数能够得到控制,不会像传统的io模式那样不断的创建线程,导致系统内存急剧减少。netty中具体的处理方式我们在后文源码解析的时候再做详细的讨论。
以下我们结合一些简单的例子来接触下netty的开发。以下代码都是netty-4.1.0.Final版本的,不同版本可能会有不一样。实现的功能是浏览器访问http://127.0.0.1:8080/,显示helloworld。
创建http server端:
 1 public final class HttpHelloWorldServer {
 2
 3     static final int PORT = 8080;
 4
 5     public static void main(String[] args) throws Exception {
 6
 7         // Configure the server.
 8         EventLoopGroup bossGroup = new NioEventLoopGroup(1);  //创建boss线程group
 9         EventLoopGroup workerGroup = new NioEventLoopGroup();  //创建worker线程group
10         try {
11             ServerBootstrap b = new ServerBootstrap();         //创建server端启动引导程序
12             b.option(ChannelOption.SO_BACKLOG, 1024);
13             b.group(bossGroup, workerGroup)
14              .channel(NioserverSocketChannel.class)
15              .handler(new LoggingHandler(LogLevel.INFO))
16              .childHandler(new HttpHelloWorldServerInitializer());
17
18             Channel ch = b.bind(PORT).sync().channel();
19
20             System.err.println("Open your web browser and navigate to http://127.0.0.1:8080 ");
21
22             ch.closeFuture().sync();
23         } finally {
24             bossGroup.shutdownGracefully();
25             workerGroup.shutdownGracefully();
26         }
27     }
28 }
创建服务端的channel初始化类:
1 public class HttpHelloWorldServerInitializer extends ChannelInitializer<SocketChannel> {
2
3     @Override
4     public void initChannel(SocketChannel ch) {
5         ChannelPipeline p = ch.pipeline();
6         p.addLast(new HttpServerCodec());    //netty自带的http解码器
7         p.addLast(new HttpHelloWorldServerHandler());
8     }
9 }
创建http服务处理类:
 1 public class HttpHelloWorldServerHandler extends ChannelInboundHandlerAdapter {
 2     private static final byte[] CONTENT = { ‘H‘, ‘e‘, ‘l‘, ‘l‘, ‘o‘, ‘ ‘, ‘W‘, ‘o‘, ‘r‘, ‘l‘, ‘d‘ };
 3
 4     private static final AsciiString CONTENT_TYPE = new AsciiString("Content-Type");
 5     private static final AsciiString CONTENT_LENGTH = new AsciiString("Content-Length");
 6     private static final AsciiString CONNECTION = new AsciiString("Connection");
 7     private static final AsciiString KEEP_ALIVE = new AsciiString("keep-alive");
 8
 9     @Override
10     public void channelReadComplete(ChannelHandlerContext ctx) {
11         ctx.flush();
12     }
13
14     @Override
15     public void channelRead(ChannelHandlerContext ctx, Object msg) {
16         if (msg instanceof HttpRequest) {
17             HttpRequest req = (HttpRequest) msg;
18
19             if (HttpUtil.is100ContinueExpected(req)) {
20                 ctx.write(new DefaultFullHttpResponse(HTTP_1_1, CONTINUE));
21             }
22             boolean keepAlive = HttpUtil.isKeepAlive(req);
23             FullHttpResponse response = new DefaultFullHttpResponse(HTTP_1_1, OK, Unpooled.wrappedBuffer(CONTENT));
24             response.headers().set(CONTENT_TYPE, "text/plain");
25             response.headers().setInt(CONTENT_LENGTH, response.content().readableBytes());
26
27             if (!keepAlive) {
28                 ctx.write(response).addListener(ChannelFutureListener.CLOSE);
29             } else {
30                 response.headers().set(CONNECTION, KEEP_ALIVE);
31                 ctx.write(response);
32             }
33         }
34     }
35
36     @Override
37     public void exceptionCaught(ChannelHandlerContext ctx, Throwable cause) {
38         cause.printStackTrace();
39         ctx.close();
40     }
41 }
其中channelRead是当链接建立的时候触发的,参数msg是经过解码后的消息,这里由于设定了解码器HttpServerCodec,解码后的就是HttpRequest。
运行后的结果如下:

以上,一个简单的基于netty的http server端就这样创建完成了。
以上是关于netty简介与入门的主要内容,如果未能解决你的问题,请参考以下文章