13.垃圾邮件分类2
Posted chenhaowen-shuaishuaide
tags:
篇首语:本文由小常识网(cha138.com)小编为大家整理,主要介绍了13.垃圾邮件分类2相关的知识,希望对你有一定的参考价值。
1.读取
file_path = r‘D:DingDingmaincurrentdownloadSMSSpamCollection‘
sms = open(file_path, ‘r‘, encoding=‘utf-8‘)
sms_data = []
sms_label = []

csv_reader = csv.reader(sms, delimiter=‘	‘)
for line in csv_reader:
    sms_label.append(line[0])
    sms_data.append(preprocessing(line[1]))  # 对每封邮件做预处理
sms.close()
2.数据预处理
# 根据词性,生成还原参数 pos
def get_wordnet_pos(treebank_tag):
    if treebank_tag.startswith("J"):
        return nltk.corpus.wordnet.ADJ
    elif treebank_tag.startswith("V"):
        return nltk.corpus.wordnet.VERB
    elif treebank_tag.startswith("N"):
        return nltk.corpus.wordnet.NOUN
    elif treebank_tag.startswith("R"):
        return nltk.corpus.wordnet.ADV
    else:
        return nltk.corpus.wordnet.NOUN


# 预处理
def preprocessing(text):
    tokens = [word for sent in nltk.sent_tokenize(text) for word in nltk.word_tokenize(sent)]  # 分词
    stops = stopwords.words(‘english‘)  # 停用词
    tokens = [token for token in tokens if token not in stops]  # 去掉停用词
    tokens = [token.lower() for token in tokens if len(token) >= 3]

    tag = nltk.pos_tag(tokens)  # 词性标注
    imtzr = WordNetLemmatizer()
    tokens = [imtzr.lemmatize(token, pos=get_wordnet_pos(tag[i][1])) for i, token in enumerate(tokens)]  # 词性还原
    preprocessed_text = ‘‘.join(tokens)
    return preprocessed_text
3.数据划分—训练集和测试集数据划分
from sklearn.model_selection import train_test_split
x_train,x_test, y_train, y_test = train_test_split(data, target, test_size=0.2, random_state=0, stratify=y_train)
# 数据划分
from sklearn.model_selection import train_test_split

x_train, x_test, y_train, y_test = train_test_split(sms_data, sms_label, test_size=0.2, random_state=0,
                                                    stratify=sms_label)

print(‘原数据长度:‘, len(sms_data), ‘
训练数据长度:‘, len(x_train), ‘
测试数据长度:‘, len(x_test))

4.文本特征提取
sklearn.feature_extraction.text.CountVectorizer
sklearn.feature_extraction.text.TfidfVectorizer
from sklearn.feature_extraction.text import TfidfVectorizer
tfidf2 = TfidfVectorizer()
# 向量化
from sklearn.feature_extraction.text import TfidfVectorizer

tfidf2 = TfidfVectorizer()
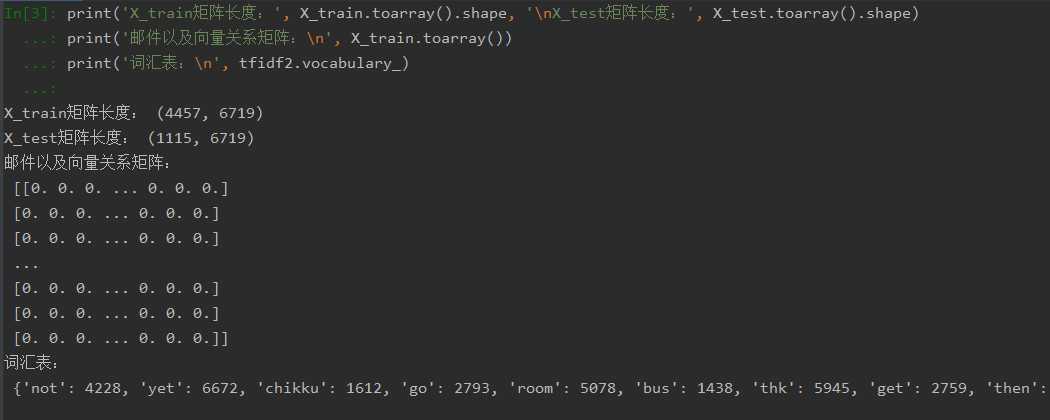
X_train = tfidf2.fit_transform(x_train)
X_test = tfidf2.transform(x_test)
print(‘X_train矩阵长度:‘, X_train.toarray().shape, ‘
X_test矩阵长度:‘, X_test.toarray().shape)
print(‘邮件以及向量关系矩阵:
‘, X_train.toarray())
print(‘词汇表:
‘, tfidf2.vocabulary_)
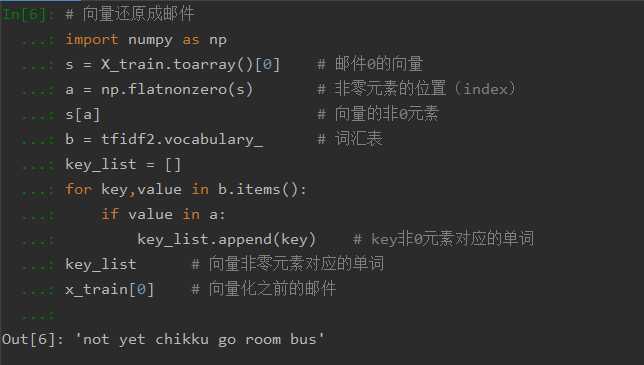
观察邮件与向量的关系

向量还原为邮件
# 向量还原成邮件
import numpy as np
s = X_train.toarray()[0]    # 邮件0的向量
a = np.flatnonzero(s)       # 非零元素的位置(index)
s[a]                        # 向量的非0元素
b = tfidf2.vocabulary_      # 词汇表
key_list = []
for key,value in b.items():
    if value in a:
        key_list.append(key)    # key非0元素对应的单词
key_list      # 向量非零元素对应的单词
x_train[0]    # 向量化之前的邮件

4.模型选择
from sklearn.naive_bayes import GaussianNB
from sklearn.naive_bayes import MultinomialNB
说明为什么选择这个模型?
# 模型构建
from sklearn.naive_bayes import MultinomialNB

mnb = MultinomialNB()
mnb.fit(X_train, y_train)      # 训练
y_mnb = mnb.predict(X_test)   # 预测结果
因为高斯分布模型适合于正态分布将特征连续型变量的值转换成离散型变量的值;而多项式分布模型则适合于文本分类问题,其中单词为特征,单词出现的次数为值,所以选择该模型比较合适。
5.模型评价:混淆矩阵,分类报告
from sklearn.metrics import confusion_matrix
confusion_matrix = confusion_matrix(y_test, y_predict)
说明混淆矩阵的含义
from sklearn.metrics import classification_report
说明准确率、精确率、召回率、F值分别代表的意义
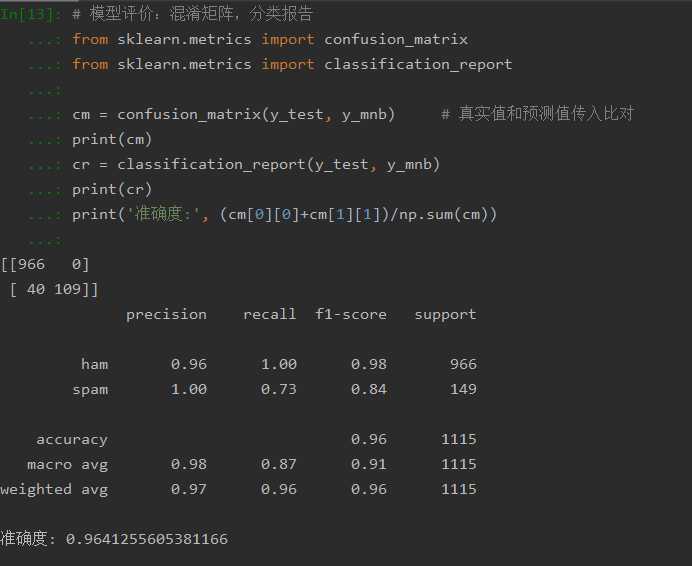
# 模型评价:混淆矩阵,分类报告
from sklearn.metrics import confusion_matrix
from sklearn.metrics import classification_report

cm = confusion_matrix(y_test, y_mnb)     # 真实值和预测值传入比对
print(cm)
cr = classification_report(y_test, y_mnb)
print(cr)
print(‘准确度:‘, (cm[0][0]+cm[1][1])/np.sum(cm))

混淆矩阵:【TP FN】
【FP TN】
TP(True Positive):真实为1,测试也为1
FP(False Negative):真实为0,测试为1
FN(False Positive):真实为1,测试也为0
TN(True Negative):真实为0,测试也为0
准确率:所有样本中预测正确与样本的比率
精确率:预测为正类0的准确率,即TP/(TP+FP)
召回率:真实为0预测为0的准确率
F值:衡量二分类模型精确度的一种指标,兼顾了精确率和召回率
6.比较与总结
如果用CountVectorizer进行文本特征生成,与TfidfVectorizer相比,效果如何?
答:CountVectorizer考虑的是词汇文本中出现的频率,而TfidfVectorizer还关注包含这个词汇的其他文本的数量,所以TfidfVectorizer更适合垃圾邮件的分类,它能够更加灵活的对邮件进行分类,更能够删减一些高频的词汇从而达到更好的效果。
以上是关于13.垃圾邮件分类2的主要内容,如果未能解决你的问题,请参考以下文章