STL之list介绍及实现(list接口模拟实现list)
Posted yumoz
tags:
篇首语:本文由小常识网(cha138.com)小编为大家整理,主要介绍了STL之list介绍及实现(list接口模拟实现list)相关的知识,希望对你有一定的参考价值。
文章目录
1 什么是list?
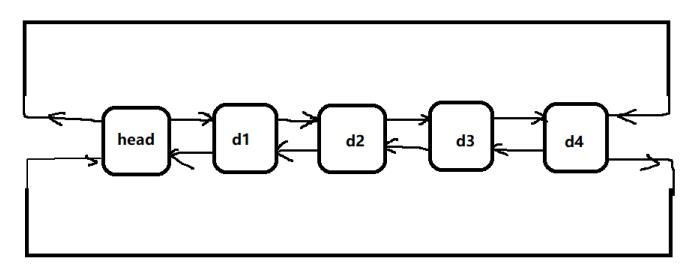
- list是可以在常数范围内在任意位置插图和删除的序列式容器,并且支持前后双向迭代。
- list的低层本质是双向链表结构,且其节点存储在互不相关的独立节点中,节点通过指针访问其前面和后面的元素。
- list在插入和删除时效率高于vector。
- list不支持随机访问,但vector支持随机访问。
简单的list结果如图:
list中有_prev指针、_next指针 分别指向当前节点的上一个元素和下一个元素。
1.1 模拟实现预备知识
先定义一个list节点类:
	//List节点类 (双向带头训练链表)
	template<class T>
	struct _list_node

		T _val;
		_list_node<T>* _next;
		_list_node<T>* _prev;

		_list_node(const T& val = T())
			:_val(val)
			, _prev(nullptr)
			, _next(nullptr)

	;
list实现部分:
	template<class T>
	class list

		typedef _list_node<T> node;
	public:
		typedef _list_iterartor<T, T&, T*> iterator;
		typedef _list_iterartor<T, const T&, const T*> const_iterator;

		//list模拟实现部分,在下文中有描述

	private:
		node* _head;
	;
2 list原型测试与实现
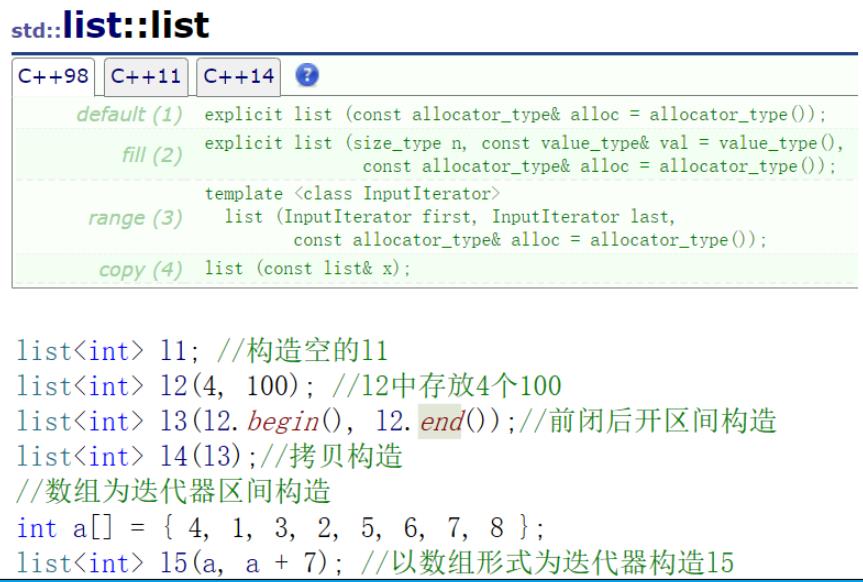
2.1 构造函数(拷贝构造,赋值构造,析构)
构造函数测试:
模拟实现代码:
//默认的
list()
//_head = new node(T());
_head = new node;
_head->_next = _head;
_head->_prev = _head;
// 拷贝构造 copy(lt)
list(const list<T>& lt)
_head = new node;
_head->_next = _head;
_head->_prev = _head;
for (const auto& e : lt) //& 避免值过大
push_back(e);
// 深拷贝 copy = lt1; 传统写法
/* list<T>& operator=(const list<T>& lt)
if (this != <)
clear();
for (const auto& e : lt)
push_back(e);
return *this;
*/
// copy = lt1; 现代写法
list<T>& operator=(list<T> lt)
swap(_head, lt._head);
return *this;
//析构
~list()
clear();
delete _head;
_head = nullptr;
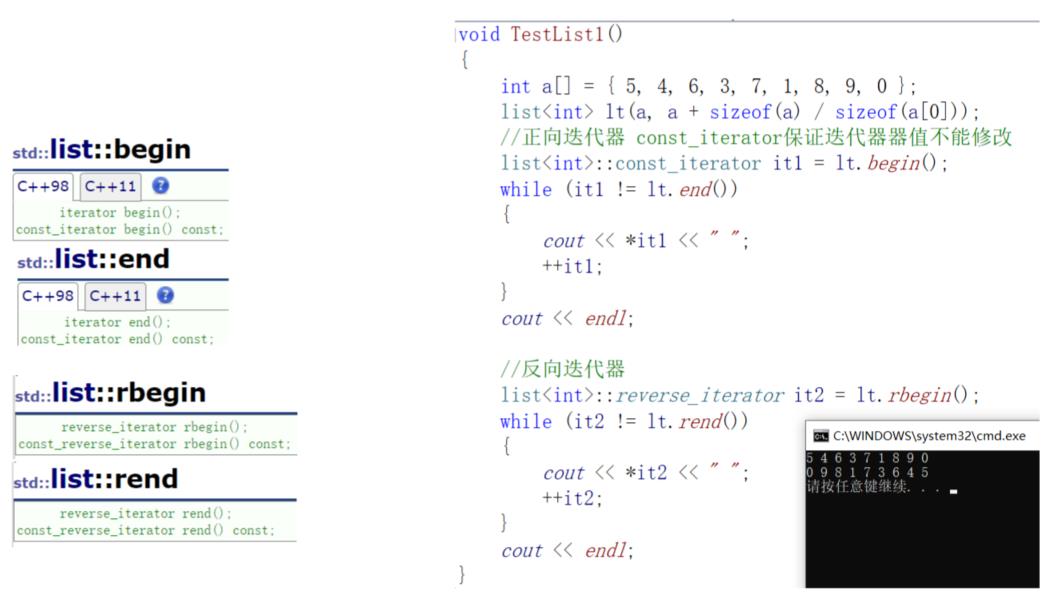
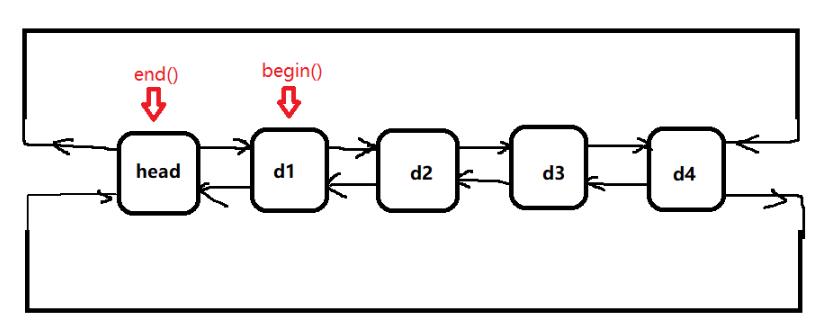
2.2 迭代器
将迭代器理解成为一个指针,该指针指向list中某个节点。
模拟实现:
参考代码:
		iterator begin()

			return iterator(_head->_next);


		const_iterator begin() const

			return const_iterator(_head->_next);


		iterator end()

			return iterator(_head);


		const_iterator end() const

			return const_iterator(_head);
2.3 capacity
list容器的容量测试:

capacity的部分实现代码:
(分析:当begin位置没有元素时,即begin()=end()时,list为空;关于求size,只需要使用迭代器依次迭代,并对size++,就可以实现size函数)
		bool empty()

			return begin() == end();


		size_t size()

			size_t sz = 0;
			iterator it = begin();
			while (it != end())

				++sz;
				++it;


			return sz;
2.4 modifiers
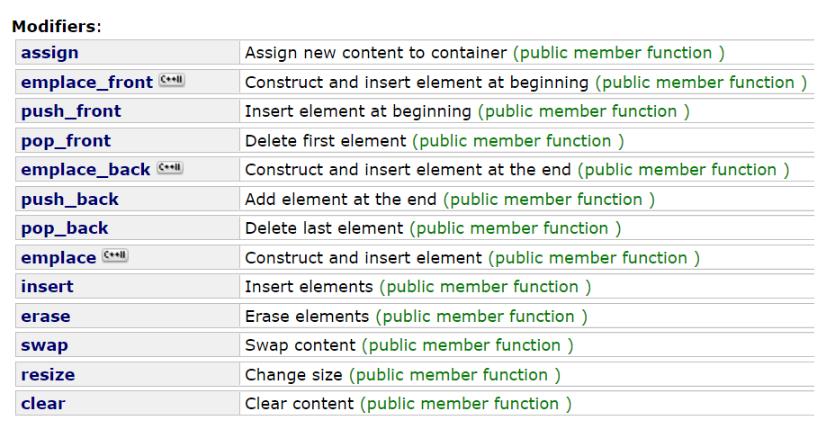
list容器的元素修改,有下图所示几种可能,我们分别进行分析。
2.4.1 assign

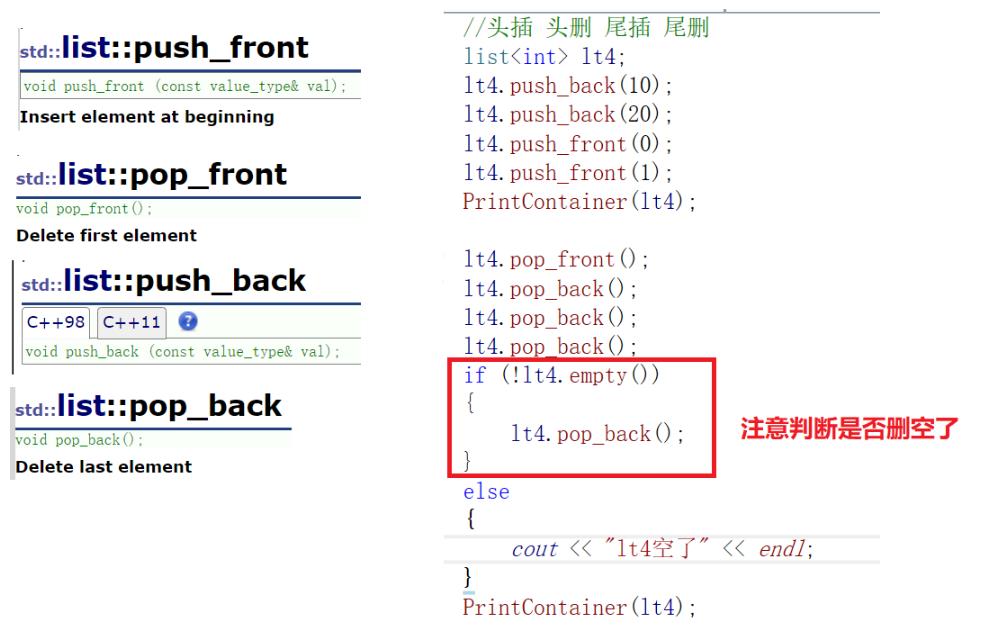
2.4.2 push_back/pop_back/push_front/pop_front
系统调用接口测试:
模拟实现代码:
备注:这里不做具体分析,因为下文已经对insert做了详细分析,这四个接口都可以根据insert接口来实现。
		void push_back(const T& x)

			//写法一
			//node *newnode = new node(x);//new一个新节点
			//node *tail = _head->_prev;//头指针的_prev指向尾
			//tail->_next = newnode;
			//newnode->_prev = tail;
			//newnode->_next = _head;
			//_head->_prev = newnode;

			//写法二
			insert(end(), x);//end()位置之前插入


		void push_front(const T& x)

			//写法一
			//node *newnode = new node(x);
			//node *next = _head->_next;
			//_head->_next = newnode;
			//newnode->_prev=_head;
			//newnode->_next = next;
			//next->_prev = newnode;

			//写法二
			insert(begin(), x);


		void pop_back()

			//写法一
			/*assert(!empty());
			node *popnode = _head->_prev;
			node *prev = popnode->_prev;
			_head->_prev;
			prev->_next = _head;*/

			//写法二
			erase(--end()); //end是哨兵位,--之后是最后一个


		void pop_front()

			//写法一
			/*assert(!empty());
			node *popnode = _head->_next;
			node *next = popnode->_next;
			_head->_next = next;
			next->_prev = _head;*/

			//写法二
			erase(begin());
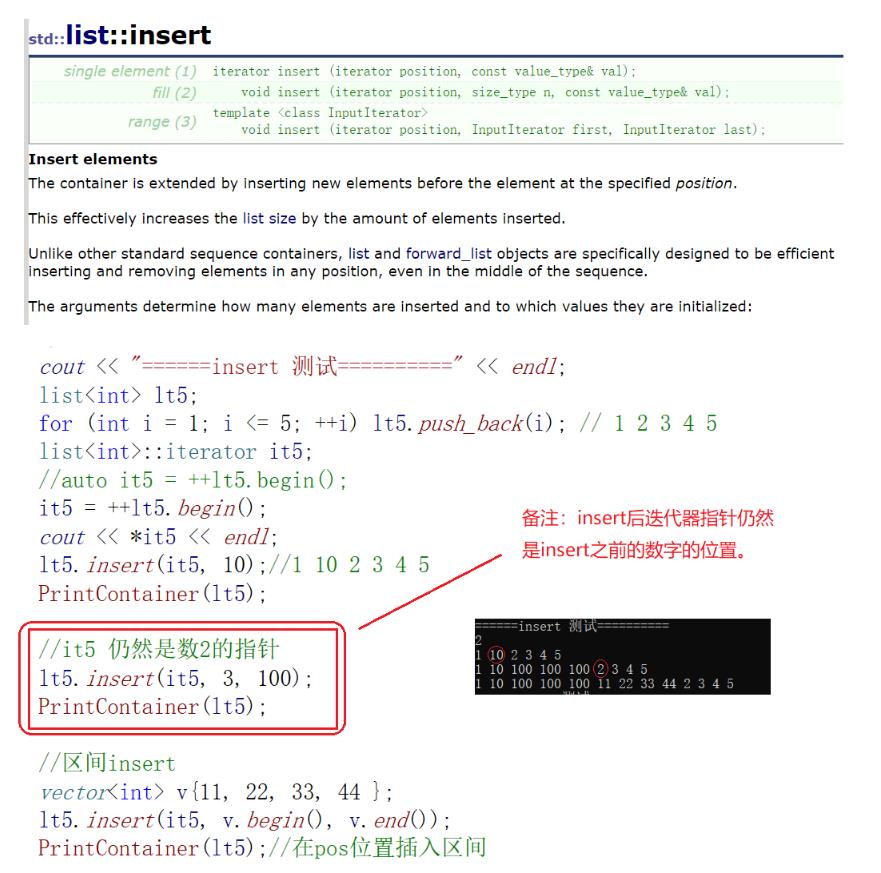
2.4.3 insert
insert接口测试:
insert模拟实现:
(注:这里只实现插入一个字符)

参考代码:
//插入
		void insert(iterator pos, const T& x)

			assert(pos._pnode);

			node* cur = pos._pnode;
			node* prev = cur->_prev;
			node* newnode = new node(x);

			// prev newnode cur
			prev->_next = newnode;
			newnode->_prev = prev;
			newnode->_next = cur;
			cur->_prev = newnode;
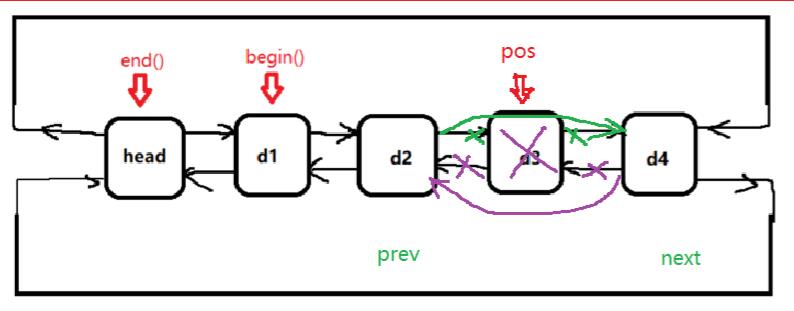
2.4.4 erase
erase接口测试:

模拟实现erase:
		iterator erase(iterator pos)

			assert(pos._pnode);
			assert(pos != end());

			node* prev = pos._pnode->_prev;
			node* next = pos._pnode->_next;

			delete pos._pnode;
			prev->_next = next;
			next->_prev = prev;
			//删除完成之后,迭代器指针指向下一个位置,故返回iterator(next)
			return iterator(next);//返回下一个位置迭代器
2.4.5 swap

2.4.6 resize
接口测试:
(模拟实现参考vector)

2.4.7 clear
clear接口测试:

模拟实现clear:

2.5 list 迭代器补充
上文中已经有了list的iterator,并能实现end,begin等操作。下面分析list迭代器必须有的几种能力:
有能力指向list的节点,并有能力进行正确的递增、递减、取值、成员存取等操作;
下面实现了:
- operator*
- operator->
- operator++(前置++,后置++)
- operator–(前置–,后置–)
- operator==
- operator!=
参考代码:
	//读者看到此处,肯定有所收获,那么思考下面这个模板定义语句作用???
	template<class T, class Ref, class Ptr>
	struct _list_iterartor

		typedef _list_node<T> node;
		typedef _list_iterartor<T, Ref, Ptr> self;
		node* _pnode;//迭代器内部必有一个普通指针,指向list的节点

		//迭代器
		_list_iterartor(node* pnode=nullptr)
			:_pnode(pnode)


		//const 迭代器
		_list_iterartor(const self& l)
			:_pnode(l._pnode)


		//T& operator*()
		Ref operator*()

			return _pnode->_val;


		//T* operator->()
		Ptr operator->()

			//return &(operator*());
			return &_pnode->_val;


		bool operator!=(const self& s) const

			return _pnode != s._pnode;


		bool operator==(const self& s) const

			return _pnode == s._pnode;


		// ++it -> it.operator++(&it)
		self& operator++()

			_pnode = _pnode->_next;
			return *this;


		// it++ -> it.operator++(&it, 0)
		self operator++(int)

			self tmp(*this);
			_pnode = _pnode->_next;
			return tmp;


		self& operator--()

			_pnode = _pnode->_prev;
			return *this;


		self operator--(int)

			self tmp(*this);
			_pnode = _pnode->_prev;
			return tmp;

	;
3 list迭代器失效
list迭代器失效,只会发生在erase函数中,不会发生在insert等操作。即插入才做不会导致list迭代器失效,只有在删除时才会失效。(并且失效的只是指向被删除节点的迭代器,其他迭代器不会受影响)。
下面一图看懂list迭代器失效:
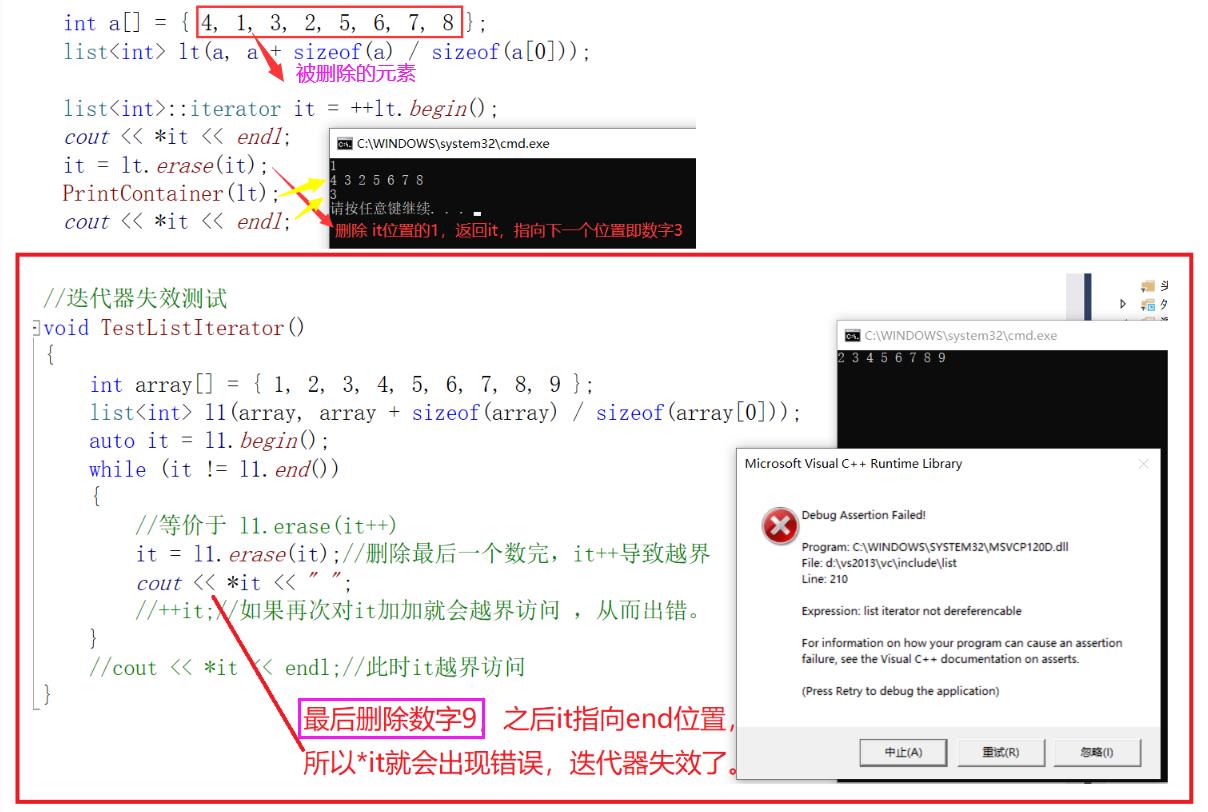
其实,迭代器失效无非就是其指针出现了问题,所以我们操作时,必须了解指针在什么位置,起什么作用,这样才会避免迭代器失效发生。
附赠思考
上文中给出了一个问题:
//读者看到此处,肯定有所收获,那么思考下面这个模板定义语句作用???
为甚需要三个(class T, class Ref, class Ptr)???
template<class T, class Ref, class Ptr>
struct _list_iterartor
typedef _list_node node;
typedef _list_iterartor<T, Ref, Ptr> self;
node* _pnode;//迭代器内部必有一个普通指针,指向list的节点
我摘取了部分,供读者思考,分享。
参考文献:
- <<STL源码剖析>>,侯捷
- www.cplusplus.com list库
- 文中图片来自www.cplusplus.com
以上是关于STL之list介绍及实现(list接口模拟实现list)的主要内容,如果未能解决你的问题,请参考以下文章