WPF自定义控件与样式(10)-进度控件ProcessBar自定义样
Posted ljdong7
tags:
篇首语:本文由小常识网(cha138.com)小编为大家整理,主要介绍了WPF自定义控件与样式(10)-进度控件ProcessBar自定义样相关的知识,希望对你有一定的参考价值。
一.前言
申明:WPF自定义控件与样式是一个系列文章,前后是有些关联的,但大多是按照由简到繁的顺序逐步发布的等,若有不明白的地方可以参考本系列前面的文章,文末附有部分文章链接。
本文主要内容:
- ProcessBar自定义标准样式;
- ProcessBar自定义环形进度样式;
二.ProcessBar标准样式
效果图:

ProcessBar的样式非常简单:
    <!--ProgressBar Style-->
    <Style TargetType="ProgressBar" x:Key="SimpleProgressBar">
        <Setter Property="Background" Value="{StaticResource ControlBorderBrush}" />
        <Setter Property="Maximum" Value="1" />
        <Setter Property="Value" Value="0" />
        <Setter Property="Height" Value="10" />
        <Setter Property="IsTabStop" Value="False" />
        <Setter Property="Foreground" Value="{StaticResource FocusBorderBrush}" />
        <Setter Property="SnapsToDevicePixels" Value="True" />
        <Setter Property="local:ControlAttachProperty.CornerRadius" Value="0" />
        <Setter Property="Template">
            <Setter.Value>
                <ControlTemplate TargetType="ProgressBar">
                    <Grid x:Name="Root" >
                        <Border x:Name="PART_Track" Background="{TemplateBinding Background}"
                                CornerRadius="{TemplateBinding local:ControlAttachProperty.CornerRadius}"
                                SnapsToDevicePixels="{TemplateBinding SnapsToDevicePixels}"/>
                        <Border  x:Name="PART_Indicator" HorizontalAlignment="Left" Background="{TemplateBinding Foreground}"
                                CornerRadius="{TemplateBinding local:ControlAttachProperty.CornerRadius}"
                                SnapsToDevicePixels="{TemplateBinding SnapsToDevicePixels}"/>
                    </Grid>
                    <ControlTemplate.Triggers>
                        <Trigger Property="Orientation" Value="Vertical">
                            <Setter Property="LayoutTransform" TargetName="Root" >
                                <Setter.Value>
                                    <RotateTransform Angle="-90" />
                                </Setter.Value>
                            </Setter>
                        </Trigger>
                    </ControlTemplate.Triggers>
                </ControlTemplate>
            </Setter.Value>
        </Setter>
    </Style>
使用示例:
<ProgressBar Margin="5" Value="{Binding Percent,Mode=OneWay}" Style="{StaticResource SimpleProgressBar}" x:Name="pro4"></ProgressBar>
<ProgressBar Margin="5" Value="{Binding Percent,Mode=OneWay}" Height="15" x:Name="pro5" Background="LightSteelBlue" Foreground="OrangeRed"
  Style="{StaticResource SimpleProgressBar}"></ProgressBar>
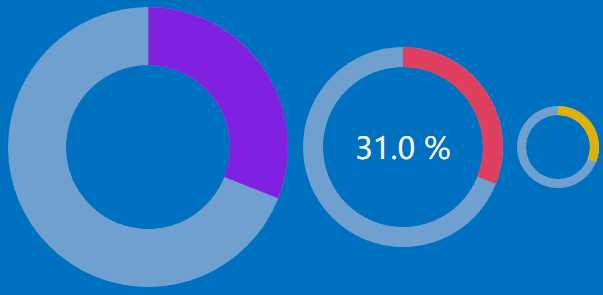
三.ProcessBar环形进度样式
效果图:

样式定义也比较简单:
   <!--注意:该样式的ProgressBar的最大值为1,,BorderThickness控制环的大小-->
   <!--ed需要引用:xmlns:ed="http://schemas.microsoft.com/expression/2010/drawing"-->

    <Style x:Key="LoopProcessBar" TargetType="{x:Type ProgressBar}">
        <Setter Property="Background" Value="#C1D1DE"/>
        <Setter Property="Margin" Value="5"/>
        <Setter Property="Width" Value="300"/>
        <Setter Property="Height" Value="300"/>
        <Setter Property="BorderBrush" Value="BlueViolet"/>
        <Setter Property="BorderThickness" Value="60"/>
        <Setter Property="Foreground" Value="{StaticResource TextForeground}"/>
        <Setter Property="Maximum" Value="1"/>
        <Setter Property="Minimum" Value="0"/>
        <Setter Property="Value" Value="0"/>
        <Setter Property="IsTabStop" Value="False"/>
        <Setter Property="IsHitTestVisible" Value="False"/>
        <Setter Property="Template">
            <Setter.Value>
                <ControlTemplate TargetType="{x:Type ProgressBar}">
                    <Viewbox Stretch="Uniform"  VerticalAlignment="Center" HorizontalAlignment="Center">
                        <Grid  Margin="{TemplateBinding Margin}" SnapsToDevicePixels="True" Width="{TemplateBinding Width}" Height="{TemplateBinding Height}" >
                            <!--背景环-->
                            <ed:Arc Margin="{TemplateBinding Margin}" Opacity="0.6" ArcThickness="{Binding Path=BorderThickness,RelativeSource={RelativeSource TemplatedParent},Mode=OneWay,Converter={x:Static local:XConverter.ThicknessToDoubleConverter}}"
                                    StartAngle="0" Fill="{TemplateBinding Background}" EndAngle="360" Stretch="None" x:Name="arcOuter" />
                            <!--值-环-->
                            <ed:Arc Margin="{TemplateBinding Margin}" x:Name="arcValue"