vue-router 源码解析最简版
Posted slightfly
tags:
篇首语:本文由小常识网(cha138.com)小编为大家整理,主要介绍了vue-router 源码解析最简版相关的知识,希望对你有一定的参考价值。
前端路由和后端路由
后端路由:
  输入url -> 请求发送到服务器 ->  服务器解析请求的路径 ->  拿到对应页面 ->  返回出去
前端路由:
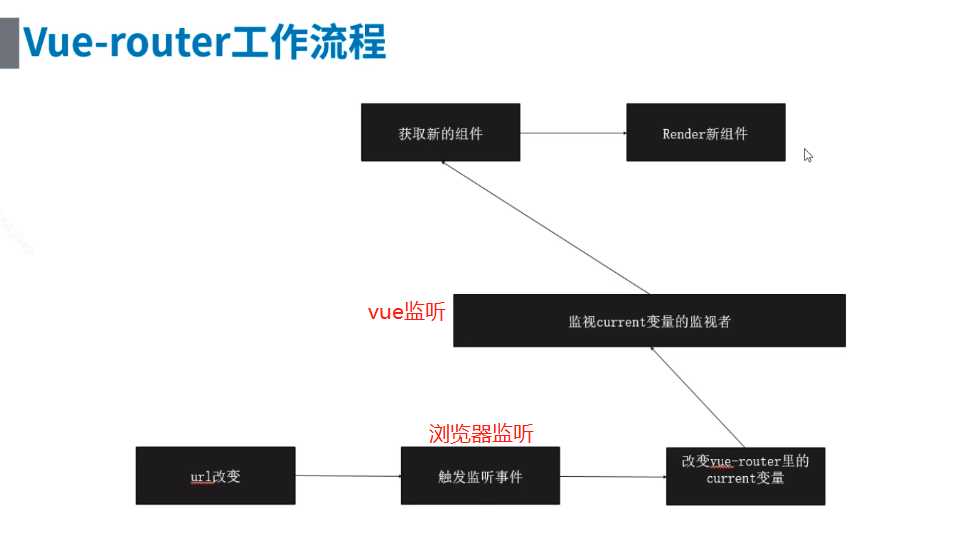
  输入url ->  js解析地址 ->  找到对应地址的页面 ->  执行页面生成的js ->  看到页面


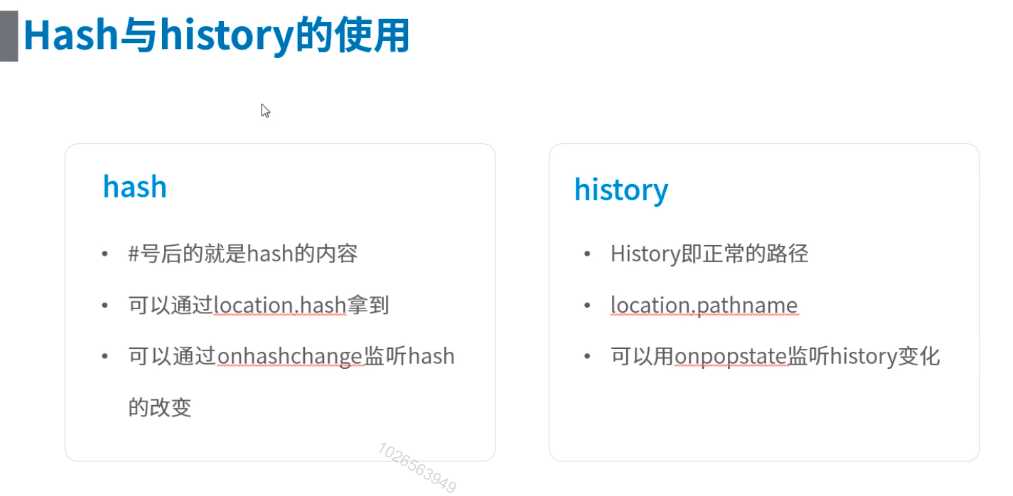
1、Hash 和 History

vue插件的基础知识 -- 如何检测vue外部的对象,插件等。。。
// The Vue build version to load with the `import` command
// (runtime-only or standalone) has been set in webpack.base.conf with an alias.
import Vue from ‘vue‘
import App from ‘./App‘
import router from ‘./router‘
import { create } from ‘domain‘

Vue.config.productionTip = false

var test = { //独立于vue外的对象
  testa: 1
}
setTimeout(() => { //独立于vue外的操作
  test.testa = 3333333;
}, 2000);

function f1(){
  console.log(‘f1-----------‘)
}

f1.install = function(vue){
  console.log(‘添加了install属性,,执行install中方法,,不再打印f1-----------‘)
  console.log(vue) //打印的是vue这个类,和import一样的类
  //全局混入vue实例
  console.log(vue.util); //vue一系列api
  vue.util.defineReactive(test, ‘testa‘);
  console.log(‘util.extend----‘, vue.util.extend);
  console.log(‘extend------‘, vue.extend)
  vue.mixin({
    data(){
      return {
        c: ‘this is mixin in c‘,
      }
    },
    //定义一些公共方法
    methods: {
      golableMethod(){
        console.log(‘调用了mixin混入的全局方法--golableMethod‘)
      }
    },
    beforeCreate: function(){ //为什么在beforeCreate中注入,,因为created时data已经生成,再注入已经晚了
      this.test = test //这样就可以监听vue外的对象
    },
    //最关键的还是混入生命周期
    created: function(){
      console.log(‘i am mixin混入的created‘) //打印了三个 i am mixin混入的created
      //1、new Vue({})   2、app.vue  3、HelloWorld.vue
      console.log(this) //this指的是当前组件
    }
  })
}
f1.c = function(){console.log(‘f1的c方法,,,‘)}
/**
 * vue.use() ---把给vue的东西执行一遍
 * 如果给的是个方法,那么他会直接执行这个方法
 * 如果给的给的东西里面有个install属性,那么会执行install
 * 为什么不直接调用要执行的方法,而要使用install, ==》因为install方法中可以传递vue参数,,
 */
Vue.use(f1)

/* eslint-disable no-new */
new Vue({
  el: ‘#app‘,
  router,
  components: { App },
  template: ‘<App/>‘
})

/**
 * vue的工具属性
 * vue.util = {
 *  warn: function(){},
 *  extend: function(){},
 *  mergeOptions: function(){},
 *  defineReactive: function(){}
 * }
 */
/**
 * vue.util.extend 和 vue.extend 区别
 * vue.util.extend --- 拷贝
 * vue.extend  ---  可以在任何地方拿到任何组件
 */
2、路由原理
class HistoryRoute{
    constructor(){
        this.current = null;
    }
}
class vueRouter {
    constructor(options){
        this.mode = options.mode || ‘hash‘;
        this.routes = options.routes || [];
        this.history = new HistoryRoute;
        this.routesMap = this.createMap(this.routes)
        this.init()
    }
    init(){
        if(this.mode == ‘hash‘){
            location.hash ? ‘‘ : location.hash = ‘/‘;
            window.addEventListener(‘load‘, ()=>{
                this.history.current = location.hash.slice(1);
            })
            window.addEventListener(‘hashchange‘, ()=>{
                this.history.current = location.hash.slice(1);
            })
        }else{
            location.pathname ? ‘‘ : location.pathname = ‘/‘;
            window.addEventListener(‘load‘, ()=>{
                this.history.current = location.pathname;
            })
            window.addEventListener(‘popstate‘, ()=>{
                this.history.current = location.pathname;
            })
        }
    }
    createMap(routes){
        return routes.reduce((memo, current)=>{
            memo[current.path] = current.component;
            return memo;
        },{})
    }
}
vueRouter.install = function(Vue){
    Vue.mixin({
        beforeCreate(){
            if(this.$options && this.$options.router){
                this._root = this;
                this._router = this.$options.router;
                Vue.util.defineReactive(this, ‘current‘, this._router.history)
            }else {
                this._root = this.$parent._root
            }
        }
    })
    Vue.component(‘router-view‘, {
        render(h){
            let current = this._self._root._router.history.current;
            console.log(current)
            let routesMap = this._self._root._router.routesMap;
            console.log(routesMap)
            return h(routesMap[current])
        }
    })
}
export default vueRouter
以上是关于vue-router 源码解析最简版的主要内容,如果未能解决你的问题,请参考以下文章