使用WSGIServer修改静态文件
Posted caibao666
tags:
篇首语:本文由小常识网(cha138.com)小编为大家整理,主要介绍了使用WSGIServer修改静态文件相关的知识,希望对你有一定的参考价值。
背景:公司水务项目要求提供一个以POST方法修改静态文件的接口,由于nginx已经关闭了对POST方法的支持,并且开启POST方法后也无法去修改静态文件,所以需要额外的一个api接口去修改,而python的WSGIServer正好适用
一、使nginx支持POST方法
1、下载nginx的tar包:http://nginx.org/download/nginx-1.15.9.tar.gz
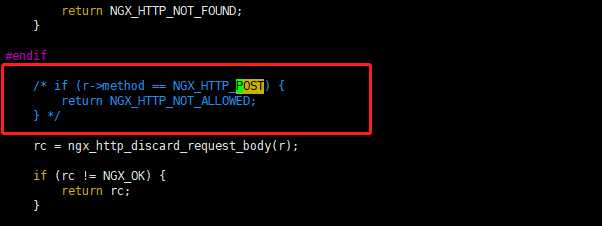
2、解压tar包后,修改src/http/modules/ngx_http_static_module.c文件,将文件中的NGINX_HTTP_POST选项,注释,如下图:

3、为nginx添加nginx-upload-module模块:
模块下载地址:https://github.com/winshining/nginx-upload-module
直接git conle https://github.com/winshining/nginx-upload-module即可
4、然后编译并安装nginx即可,下面为Dockerfile内容:
FROM ubuntu
ADD nginx-1.15.9.tar.gz nginx-upload-module.tar.gz /opt/
RUN apt update   && apt -y install python3.7 python3-pip libpcre3 libpcre3-dev zlib1g-dev openssl libssl-dev make gcc   && cd /opt/nginx-1.15.9   && ./configure --with-debug --prefix=/opt/nginx --sbin-path=/usr/bin/nginx --add-module=../nginx-upload-module --with-http_ssl_module   && make   && make install   && mkdir /opt/nginx/conf/conf.d   && rm -rf /opt/nginx-1.15.9 /opt/nginx-upload-module   && ln -s /usr/bin/python3.7  /usr/bin/python   && apt -y autoclean
COPY nginx.conf /opt/nginx/conf/
COPY water.conf /opt/nginx/conf/conf.d/
ADD ["upload.py", "/opt/"]
ENV PYTHONPATH="/usr/local/lib/python3.6/dist-packages:$PYTHONPATH"
RUN pip3 install flup-py3
EXPOSE 80 443
VOLUME /opt/openapi
CMD nginx && python /opt/upload.py
二、WSGIServer的脚本编写
1、编写upload.py脚本
#!/usr/bin/env python
# coding=utf-8

import os
from flup.server.fcgi import WSGIServer


def write_file(filename, file_body):
    if os.path.exists(filename):
        with open(filename, ‘w+‘, encoding=‘utf-8‘) as f:
            f.write(file_body)


def get_environ(environ):
    rquest_method = environ["REQUEST_METHOD"]
    str1 = "rquest_method:" + rquest_method + "
"
    query_string = environ["QUERY_STRING"]
    str1 += ",query_string:" + query_string + "
"
    request_uri = environ["REQUEST_URI"]
    str1 += ", request_uri:" + request_uri + "
"
    remote_addr = environ["REMOTE_ADDR"]
    str1 += ",remote_addr:" + remote_addr + "
"
    remote_port = environ["REMOTE_PORT"]
    str1 += ",remote_port:" + remote_port + "
"

    request_body_size = int(environ.get(‘CONTENT_LENGTH‘, 0))
    body = environ[‘wsgi.input‘].read(request_body_size)
    str_body = str(body, encoding="utf-8")
    str1 += ",body:" + str_body + "
"
    if len(str_body):
        file_uri = request_uri.replace(‘/upload‘, ‘/opt/openapi‘)
        write_file(file_uri, str_body)
    return str1


def webapp(environ, start_response):
    start_response(‘200 OK‘, [(‘Content-Type‘, ‘text/plain‘)])
    str2 = get_environ(environ)
    content = str2
    return [content]


if __name__ == ‘__main__‘:
    WSGIServer(webapp, multithreaded=True, multiprocess=False, bindAddress=(‘127.0.0.1‘, 10080)).run()
2、配置nginx的配置文件:
server {
    listen       80;
    server_name  dev-water.wavewisdom-bj.com;
    access_log  /opt/nginx/logs/water_access.log;
    error_log /opt/nginx/logs/water_error.log;

    location / {
        root   /usr/share/nginx/html;
        index  index.html index.htm;
    }

    location /openapi {
          alias /opt/openapi;
        add_header Content-Type application/json;
    }
    location /upload {
        include fastcgi_params;
        fastcgi_pass 127.0.0.1:10080;
    }

    error_page   500 502 503 504  /50x.html;
    location = /50x.html {
        root   /usr/share/nginx/html;
    }
}
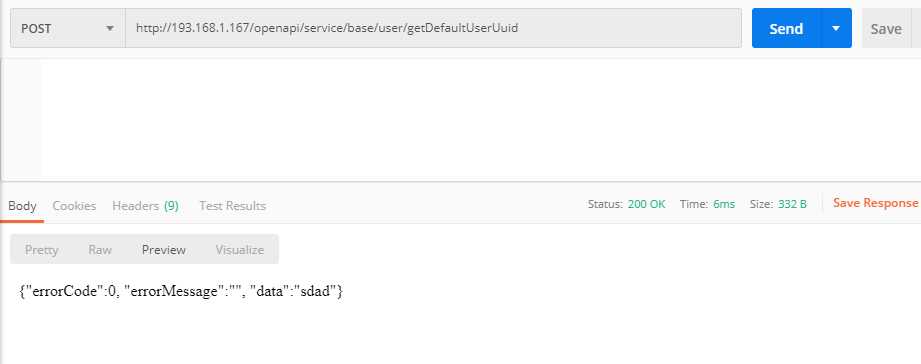
三、以上即为全部内容,然后进行post测试
1、post方法修改文件

2、获取文件

以上是关于使用WSGIServer修改静态文件的主要内容,如果未能解决你的问题,请参考以下文章