opencv学习记录之阈值处理
Posted miaorn
tags:
篇首语:本文由小常识网(cha138.com)小编为大家整理,主要介绍了opencv学习记录之阈值处理相关的知识,希望对你有一定的参考价值。
阈值处理是指将图像内高于一定值或者低于一定值的像素点进行处理
函数形式为:
retval ,dst = cv2.thresshold( src , thresh , maxval , type )
retval代表返回的阈值
dst代表阈值分割结果图像,与原始图像有相同的大小和类型
src代表要进行分割的图像,可以是多通道的
thresh代表要设定的阈值
maxval代表当type为THRESH_BINARY或者THRESH_BINARY_INV类型时,需要设定的最大值
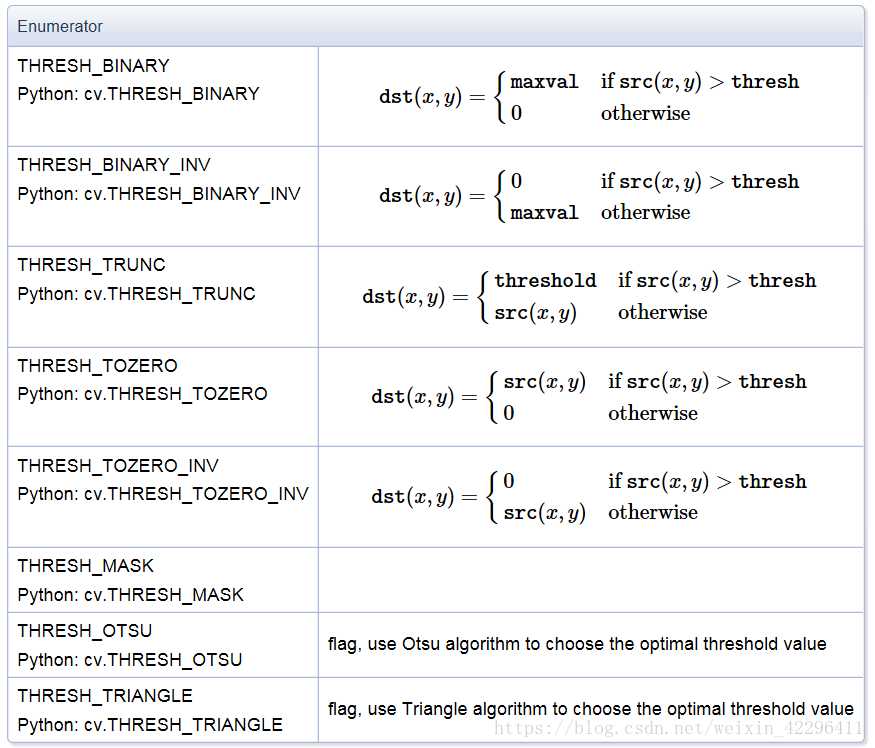
type代表阈值分割的类型
具体类型如下

二值化阈值处理(cv2.THRESH_BINARY)
处理之后图像为只有两个值的二值图像
对于8位灰度图像,将超过阈值thresh的值处理为最大值255,低于阈值的处理位0
1 import cv2
2 import numpy as np
3 img=np.random.randint(0,256,size=[4,5],dtype=np.uint8)
4 t,rst=cv2.threshold(img,127,255,cv2.THRESH_BINARY)
5 print("img=
",img)
6 print("t=",t)
7 print("rst=
",rst)
img=
 [[ 98 151  50 196 238]
 [ 45  64 225 227 204]
 [ 45  19  46 233  82]
 [122 103  64 182 218]]
t= 127.0
rst=
 [[  0 255   0 255 255]
 [  0   0 255 255 255]
 [  0   0   0 255   0]
 [  0   0   0 255 255]]
反二值化阈值处理(cv2.THRESH_BINARY_INV)
处理后的图像也是只有两个值的二值图像,
将灰度值大于阈值thresh的像素点,将其值处理为0,低于的处理为255
1 import cv2
2 import numpy as np
3 img=np.random.randint(0,256,size=[4,5],dtype=np.uint8)
4 t,rst=cv2.threshold(img,127,255,cv2.THRESH_BINARY_INV)
5 print("img=
",img)
6 print("t=",t)
7 print("rst=
",rst)
img=
 [[161 182 120 192 159]
 [ 64 197 108 242 182]
 [237 203   8 206  67]
 [ 31   7 190 226  22]]
t= 127.0
rst=
 [[  0   0 255   0   0]
 [255   0 255   0   0]
 [  0   0 255   0 255]
 [255 255   0   0 255]]
截断阈值化处理(cv2.THRESH_TRUNC)
对于像素值大于阈值thresh的值将其处理为阈值的值,小于阈值的值保持不变
import cv2
import numpy as np
img=np.random.randint(0,256,size=[4,5],dtype=np.uint8)
t,rst=cv2.threshold(img,127,255,cv2.THRESH_TRUNC)
print("img=
",img)
print("t=",t)
print("rst=
",rst)
img=
 [[ 31 121 210 126 117]
 [ 17 144  78  31 193]
 [ 91 143  27  58 103]
 [203 216 151 176  30]]
t= 127.0
rst=
 [[ 31 121 127 126 117]
 [ 17 127  78  31 127]
 [ 91 127  27  58 103]
 [127 127 127 127  30]]
超阈值零处理(cv2.THRESH_TOZERO_INV)
超阈值零处理会将图像中大于阈值的像素点的值处理为0,小于或等于该阈值的像素点的值保持不变
1 import cv2
2 import numpy as np
3 img=np.random.randint(0,256,size=[4,5],dtype=np.uint8)
4 t,rst=cv2.threshold(img,127,255,cv2.THRESH_TOZERO_INV)
5 print("img=
",img)
6 print("t=",t)
7 print("rst=
",rst)
img=
 [[209 180 150 127  21]
 [ 11 227   7 223 211]
 [218  84  90  32  61]
 [101 129 240  36 176]]
t= 127.0
rst=
 [[  0   0   0 127  21]
 [ 11   0   7   0   0]
 [  0  84  90  32  61]
 [101   0   0  36   0]]
低阈值值零处理(cv2.THRESH_TOZERO)
低阈值处理会将图像中小于或等于阈值的像素点的值处理为0,大于阈值的像素点的值保持不变
1 import cv2
2 import numpy as np
3 img=np.random.randint(0,256,size=[4,5],dtype=np.uint8)
4 t,rst=cv2.threshold(img,127,255,cv2.THRESH_TOZERO)
5 print("img=
",img)
6 print("t=",t)
7 print("rst=
",rst)
img=
 [[249  40  83  55 210]
 [195 144 246 163 230]
 [ 41 124  16 209   5]
 [ 48 177 190 118  75]]
t= 127.0
rst=
 [[249   0   0   0 210]
 [195 144 246 163 230]
 [  0   0   0 209   0]
 [  0 177 190   0   0]]
以上是关于opencv学习记录之阈值处理的主要内容,如果未能解决你的问题,请参考以下文章
OpenCV图像处理应用(面向Python)之阈值与平滑处理
youcans 的 OpenCV 例程200篇160. 图像处理之OTSU 方法
youcans 的 OpenCV 例程200篇160. 图像处理之OTSU 方法