WPF Demo511 控件共用事件
Posted
tags:
篇首语:本文由小常识网(cha138.com)小编为大家整理,主要介绍了WPF Demo511 控件共用事件相关的知识,希望对你有一定的参考价值。
路由事件:
1.路由事件一般使用的三种策略如下所示:
A.Bubble(冒泡模式):事件从自己激发一直传递到根元素;
B.Direct(直接模式):只有事件源才有机会相应事件(和传统事件一样);
C.Tunnel(隧道模式):事件从根元素传递到自己。
一般情况,WPF提供的输入事件都是以冒泡/隧道对实现的。隧道事件常常被称为Preview事件。
2.路由事件的注册方式
通过EventManager的RegisterRoutedEvent()函数向事件系统注册路由事件;
public static RoutedEvent RegisterRoutedEvent(string name, RoutingStrategy routingStrategy,
Type handlerType, Type ownerType);
参数解释:
第一个参数name表示事件在WPF事件系统中的名称;
第二个参数routingStrategy则标明了路由事件的路由原则;
第三个参数handlerType用来标明事件处理函数的类型;
第四个参数ownerType则用来标明拥有该路由事件的类型。
例如:
Control类注册MouseDoubleClick事件的代码如下:
public static readonly RoutedEvent MouseDoubleClickEvent =
EventManager.RegisterRoutedEvent("MouseDoubleClick", RoutingStrategy.Direct,
typeof(MouseButtonEventHandler), typeof(Control));
EventManager类还提供了一个RegisterClassHandler()函数,以为特定路由事件注册类处理程序。
该函数的原型如下:
public static void RegisterClassHandler(Type classType, RoutedEvent routedEvent,
Delegate handler, bool handledEventsToo);
第一个参数用来指定注册类处理函数的类型;
第二个参数则用来指定类处理函数所需要侦听的事件;
第三个参数则指明了类处理函数;
第四个参数设置为true则允许类处理函数能够处理被标记为已处理的路由事件。
3.创建自定义路由事件的步骤:
(1)声明并注册路由事件;
(2)为路由事件添加CLR事件包装;
(3)创建可以激发路由事件的方法。
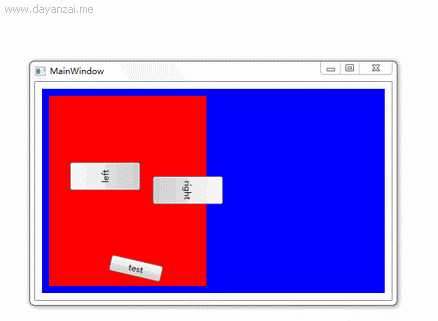
<Window x:Class="WPFDemos.MainWindow"
        xmlns="http://schemas.microsoft.com/winfx/2006/xaml/presentation"
        xmlns:x="http://schemas.microsoft.com/winfx/2006/xaml"
        Title="MainWindow" Height="350" Width="525">
    <Grid x:Name="GridRoot" >
        <Grid x:Name="gridA" Margin="10" Background="Blue">
            <Grid.ColumnDefinitions>
                <ColumnDefinition/>
                <ColumnDefinition/>
            </Grid.ColumnDefinitions>
            <Canvas x:Name="canvasLeft" Grid.Column="0" Background="Red" Margin="10">
                <Button x:Name="buttonLeft" Width="40" Height="100" Margin="30,135,357,76" Content="left">
                    <Button.RenderTransform>
                        <!--旋转度数-->
                        <RotateTransform Angle="270"/>
                    </Button.RenderTransform>
                </Button>
                <Canvas x:Name="canvasRight" Grid.Column="1" Background="Yellow" Margin="10">
                    <Button x:Name="buttonRight" HorizontalAlignment="Center" Content="right" Width="40" Height="100" Margin="138,105,325,106"  >
                        <Button.LayoutTransform >
                            <RotateTransform Angle="90"/>
                        </Button.LayoutTransform>
                    </Button>
                    <Button Content="test" Height="23" HorizontalAlignment="Left" Margin="80,217,0,0" Name="buttontest" VerticalAlignment="Top" Width="75" >
                        <Button.RenderTransform>
                            <!--旋转度数-->
                            <RotateTransform Angle="13"/>
                        </Button.RenderTransform>
                    </Button>
                </Canvas>
            </Canvas>
        </Grid>
    </Grid>
</Window>
using System.Windows;
using System.Windows.Controls;

namespace WPFDemos
{
    /// <summary>
    /// MainWindow.xaml 的交互逻辑
    /// </summary>
    public partial class MainWindow : Window
    {
        public MainWindow()
        {
            InitializeComponent();

            //当同一个UI中存在多个相同控件的相同事件时可考虑使用,例如计算器中的Button事件
            this.GridRoot.AddHandler(Button.ClickEvent, new RoutedEventHandler(this.ButtonClicked));
        }

        private void ButtonClicked(object sender,RoutedEventArgs e)
        {
            MessageBox.Show("Test==" +(e.OriginalSource as FrameworkElement).Name);
        }
    }
}

以上是关于WPF Demo511 控件共用事件的主要内容,如果未能解决你的问题,请参考以下文章