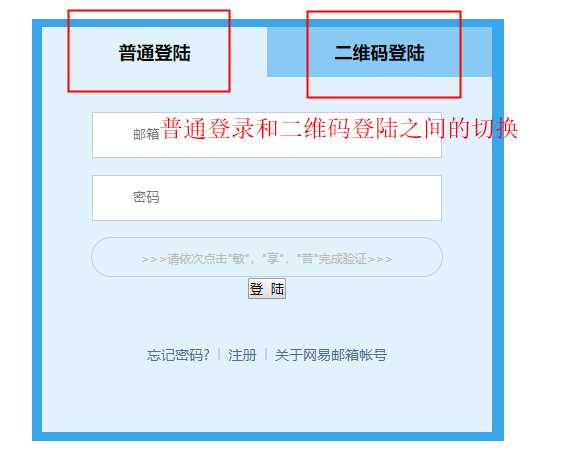
登陆页面的卡片切换效果
Posted maibao666
tags:
篇首语:本文由小常识网(cha138.com)小编为大家整理,主要介绍了登陆页面的卡片切换效果相关的知识,希望对你有一定的参考价值。
原理:给要显示的元素加上属性,同时给相邻元素去掉该属性,就会有变化效果,
注意:父元素的子元素,应该只有两个子元素。才能做到相临切换。


以下代码直接复制,放到html页面里面
原理:
<!DOCTYPE html>
<html lang="en">
<head>
<meta charset="UTF-8">
<meta name="viewport" content="width=device-width, initial-scale=1.0">
<meta http-equiv="X-UA-Compatible" content="ie=edge">
<title>Document</title>
<style>
*{
margin: 0;
padding: 0;
box-sizing: border-box;
}
.section{
margin: 100px auto;
width: 472px;
height: 422px;
background-color: #39a6eb;
padding: 8px 10px;
font-family: "Microsoft YaHei";
}
.all{
width: 450px;
height: 405px;
}
.nav{
height: 50px;
}
.nav>a{
padding: 0 15px;
width: 225px;
height: 50px;
line-height: 50px;
display: block;
font-size: 18px;
font-weight: bold;
text-align: center;
float: left;
cursor: pointer;
}
.nav>a[class="on-2-login"]{
background-color: #89caf4;
border-bottom: 1px solid #eee;
}
.login{
background-color: #89caf4;
}
.login.on{
background-color: #e1f2fc;
}
.contentbox{
width: 450px;
}
.cont-1>input{
width: 350px;
height: 46px;
border: 1px solid #c6cddc;
}
.email{
background-image: url("../img/img1-coin1_03.png");
background-repeat: no-repeat;
background-position: 3px 0px;
}
.password{
background-image: url("../img/img1-coin2_03.png");
background-repeat: no-repeat;
}
.cont-1>input{
line-height: 46px;
padding-left: 40px;
}
.cont-1>input[name="txt"]{
margin-top: 35px;
}
.cont-1>input[name="psd"]{
margin-top: 17px;
}
.verify{
margin: 0 auto;
width: 352px;
height: 40px;
margin-top: 16px;
border: 1px solid #c4cbd1;
text-align: center;
line-height: 40px;
font-size: 12px;
color: #b9bbb8;
border-radius: 20px;
position: relative;
z-index: 2;
behavior: url(PIE.htc);
}
.about{
width: 350px;
height: 26px;
font-size: 14px;
margin: 0 auto;
margin-top: 46px;
}
.about>a{
text-decoration: none;
color: #4e6d99;
}
.about>a>span{
width: 1px;
height: 12px;
display: inline-block;
border: 1px solid #ccd2d0;
}
/*cont:2*/
.cont-2>.text{
margin: 0 auto;
width: 350px;
height: 30px;
font-size: 15px;
display: inline-block;
margin-top: 30px;
}
.cont-2>.text>a{
text-decoration: none;
color: #4174a9;
font-weight: bold;
}
.cont-2>img{
margin-top: 12px;
}
.contentbox>div{
width: 450px;
height: 355px;
text-align: center;
display: none;
background-color: #e1f2fc;
}
.cont-2>.about{
margin-top: 54px;
}
.contentbox>div[class="box active"]{
display: block;
}
</style>
</head>
<body>
<div class="section">
<div class="all">
<div class="nav">
<a class="login on">普通登陆</a>
<a class="login">二维码登陆</a>
</div>
<div class="contentbox">
<div class="box active">
<div class="cont-1">
<input class="icon email" name="txt" type="text" placeholder="邮箱">
<input class="icon password" name="psd" type="password" placeholder="密码">
<div class="verify">
>>>请依次点击"敏","享","昔"完成验证>>>
</div>
<button class="btn">登 陆</button>
<div class="about"><a href="#">忘记密码? <span></span> 注册 <span></span> 关于网易邮箱帐号</a></div>
</div>
</div>
<div class="box">
<div class="cont-2">
<span class="text">使用 <a href="#">网易帐号管家</a> 或 <a href="#">邮箱大师</a> 扫一扫快速登陆</span>
<img src="img/img2_01.png" width="150" height="150">
<div class="about"><a href="#">忘记密码? <span></span> 注册 <span></span> 关于网易邮箱帐号</a></div>
</div>
</div>
</div>
</div>
</div>
<script src="https://cdn.bootcss.com/jquery/3.3.1/jquery.min.js"></script>
<script>
$().ready(function(){
$(function(){
$(".nav a").off("click").on("click",function(){
var index = $(this).index();
console.log(index);
$(this).addClass("on").siblings().removeClass("on");
$(".contentbox .box").eq(index).addClass("active").siblings().removeClass("active");
});
});
})
</script>
</html>
以上是关于登陆页面的卡片切换效果的主要内容,如果未能解决你的问题,请参考以下文章