Hololens官方教程精简版 - 07. Spatial mapping(空间映射)
Posted PhiloChou
tags:
篇首语:本文由小常识网(cha138.com)小编为大家整理,主要介绍了Hololens官方教程精简版 - 07. Spatial mapping(空间映射)相关的知识,希望对你有一定的参考价值。
前言
注意:本文已更新到5.5.1f1版本
个人建议,学习Holograms 230之前,一定完成《Hololens官方教程精简版 - 02. Introduction with Device》的学习。
本篇集中学习空间映射功能,完成以下目标:
Chapter 1 - 空间扫描
目标
- 完成空间扫描
- 替换三角面材质
实践
完成空间扫描
- 请按照第一篇的教程,完成项目的创建。
- 新建文件夹:”Assets/_Scenes/Holograms 230/”
- 新建场景:”Assets/_Scenes/Holograms 230/Holograms 230.unity”
- 打开场景,删除默认的Main Camera
- 将”Assets/HoloToolkit/Input/Prefabs/HololensCamera.prefab”添加到Hierarchy根级
- 将”Assets/HoloToolkit/Input/Prefabs/InputManager.prefab”添加到Hierarchy根级
- 将”Assets/HoloToolkit/Input/Prefabs/Cursor/DefaultCursor.prefab”添加到Hierarchy根级
- 将”Assets/HoloToolkit/SpatialMapping/Prefabs/SpatialMapping.prefab”添加到Hierarchy根级
本节完成!
使用Hololens远程连接Unity进行调试,等待“一段时间”(这个一段时间,第一次可能很长……)。将会看到Hololens根据空间扫描结果,绘制了很多三角面。
替换三角面材质
- 点击SpatialMapping
- 找到Inspector面板中的Surface Material,替换为SpatialUnderstandingSurface
本节完成!
再次测试,会发现三角面的材质被替换。
Chapter 2 - 扫描结果处理
目标
扫描结束后,用手势点击,将扫描结果转换为地板模型
实践
- 在Hierarchy面板根级,新建空对象,重命名为:Controller
- 点击Controller,在Inspector面板中点击Add Component,加入:Surface Meshes To Planes组件
- 点击Surface Meshes To Planes组件属性Surface Plane Prefab右侧的圆钮,选择:SurfacePlane
- 同第2步相同的方法,为Controller添加Remove Surface Vertices
- 新建文件夹:”Assets/_Scenes/Holograms 230/Scripts/”
- 新建脚本文件:”Assets/_Scenes/Holograms 230/Scripts/Controller230.cs“,并附加到Controller上
编辑脚本如下:
using System.Collections.Generic;
using UnityEngine;
using HoloToolkit.Unity;

public class Controller230 : Singleton<Controller230>

    [Tooltip("扫描过多少秒开始转换")]
    public float scanTime = 30.0f;

    [Tooltip("扫描时使用的材质")]
    public Material defaultMaterial;

    [Tooltip("停止扫描所使用的材质")]
    public Material secondaryMaterial;

    [Tooltip("最小Plane实体数量")]
    public uint minimumPlanes = 10;

    /// <summary>
    /// 判断是否正在处理Mesh
    /// </summary>
    private bool meshesProcessed = false;

    private void Start()

        // 设置空间扫描器的材质为默认材质
        SpatialMappingManager.Instance.SetSurfaceMaterial(defaultMaterial);

        // 网格转Plane实体完成后的事件监听
        SurfaceMeshesToPlanes.Instance.MakePlanesComplete += SurfaceMeshesToPlanes_MakePlanesComplete;


    private void Update()

        if (!meshesProcessed)

            if ((Time.time - SpatialMappingManager.Instance.StartTime) < scanTime)

                // 还未到指定扫描耗时,则跳过

            else

                // 停止扫描器
                if (SpatialMappingManager.Instance.IsObserverRunning())

                    SpatialMappingManager.Instance.StopObserver();


                // 开始将网格转换为Plane
                CreatePlanes();

                meshesProcessed = true;


    private void SurfaceMeshesToPlanes_MakePlanesComplete(object source, System.EventArgs args)

        // 获取转换后得到的Plane实体对象
        List<GameObject> planes = new List<GameObject>();
        planes = SurfaceMeshesToPlanes.Instance.GetActivePlanes(PlaneTypes.Wall | PlaneTypes.Floor | PlaneTypes.Table);

        // 如果大于我们设置的最小Plane识别值,则对Plane做进一步处理
        if (planes.Count >= minimumPlanes)

            // 将与Plane实体重叠的顶点删除
            RemoveVertices(SurfaceMeshesToPlanes.Instance.ActivePlanes);

            // 扫描结束后,切换第二个材质,本例中使用了“剔除材质(使用了一个剔除Shader)”,即除了Plane外,其他的三角面将被隐藏
            SpatialMappingManager.Instance.SetSurfaceMaterial(secondaryMaterial);

        else

            // 未达到最小Plane识别数,继续扫描
            SpatialMappingManager.Instance.StartObserver();

            meshesProcessed = false;


    /// <summary>
    /// 扫描网格转Plane实体
    /// </summary>
    private void CreatePlanes()

        SurfaceMeshesToPlanes surfaceToPlanes = SurfaceMeshesToPlanes.Instance;
        if (surfaceToPlanes != null && surfaceToPlanes.enabled)

            surfaceToPlanes.MakePlanes();


    /// <summary>
    /// 移除与指定对象组重叠的顶点
    /// </summary>
    private void RemoveVertices(IEnumerable<GameObject> boundingObjects)

        RemoveSurfaceVertices removeVerts = RemoveSurfaceVertices.Instance;
        if (removeVerts != null && removeVerts.enabled)

            removeVerts.RemoveSurfaceVerticesWithinBounds(boundingObjects);


    protected override void OnDestroy()

        if (SurfaceMeshesToPlanes.Instance != null)

            SurfaceMeshesToPlanes.Instance.MakePlanesComplete -= SurfaceMeshesToPlanes_MakePlanesComplete;


        base.OnDestroy();
注意:5.5.1f1版本中,名称空间有所变化,大家可自行引入
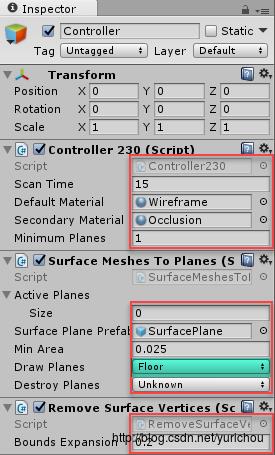
- 如下图设置各个组件:

本节完成!
设备远程连接Unity进行调试,等待片刻,空间扫描的网格会转换为地板
说明
- Surface Meshes To Planes脚本
将扫描的网格转换为实体,在其Inspector面板中,找到Draw Planes属性,可以设置需要转换的类型,本例中设置了只转换Floor(地板),见上图标注青色的部分。 - Remove Surface Vertices脚本
把与实体重合的网格删除
Chapter 3 - 放置物体
目标
将物体放置到地板上
实践
根级创建一个Cube,设置如下:

给Cube添加Tap To Place脚本
- 给Controller添加World Anchor Manager脚本
本节完成!
点击Cube后,Cube会随视线移动,但只能贴合到已经创建的地板上。
再次点击Cube进行放置操作。同时,系统会记录下Cube的空间位置。下次启动时,Cube回还原到该位置。
说明
- World Anchor Manager
用来管理全息空间的物体锚点
使用WorldAnchorManager.Instance.AttachAnchor(GameObject gameObjectToAnchor, string anchorName),即可为物体添加全息空间锚点信息,从而“固化”物体的空间位置(混合现实的显著特征之一)。 - Tap To Place
放置物体(包含空间模型的检测)。核心功能就两个:
- 放置过程中,使用
Raycast方法,实时设置物体的位置 - 放置完成后,使用上面提到的
AttachAnchor(...)来”固化”物体位置
- 放置过程中,使用
Chapter 4 - 空间遮挡
本节主要通过射线判断摄像机和目标物体间有没有被其他物体遮挡,进而对物体进行进行类似隐藏的处理(当然,官方使用了自己的Shader来实现)。不作为精简版的内容。有兴趣的朋友可以自行研究。
小结
- SpatialMapping.prefab
空间扫描最核心的组件,内部使用Unity提供的SurfaceObserver工具进行空间扫描,从而获取到扫描数据。 - Surface Meshes To Planes
识别扫描数据的类型(墙、地、桌等),进而转换为对应的模型。内部使用PlaneFinding类对扫描数据进行分析。 - PlaneFinding
空间扫描物体的类型识别算法核心组件。涉及到大量的运算,生产环境中,禁止参与Unity的主线程运算。可参考Surface Meshes To Planes源码自行使用。 - Remove Surface Vertices
移除与指定物体列表相重叠的空间三角形。 - World Anchor Manager
空间锚点管理器,“固化”物体到空间的核心组件。
参考文档
官方教程Holograms 230:https://developer.microsoft.com/en-us/windows/mixed-reality/holograms_230
VR/AR/MR技术交流QQ群:594299228

以上是关于Hololens官方教程精简版 - 07. Spatial mapping(空间映射)的主要内容,如果未能解决你的问题,请参考以下文章