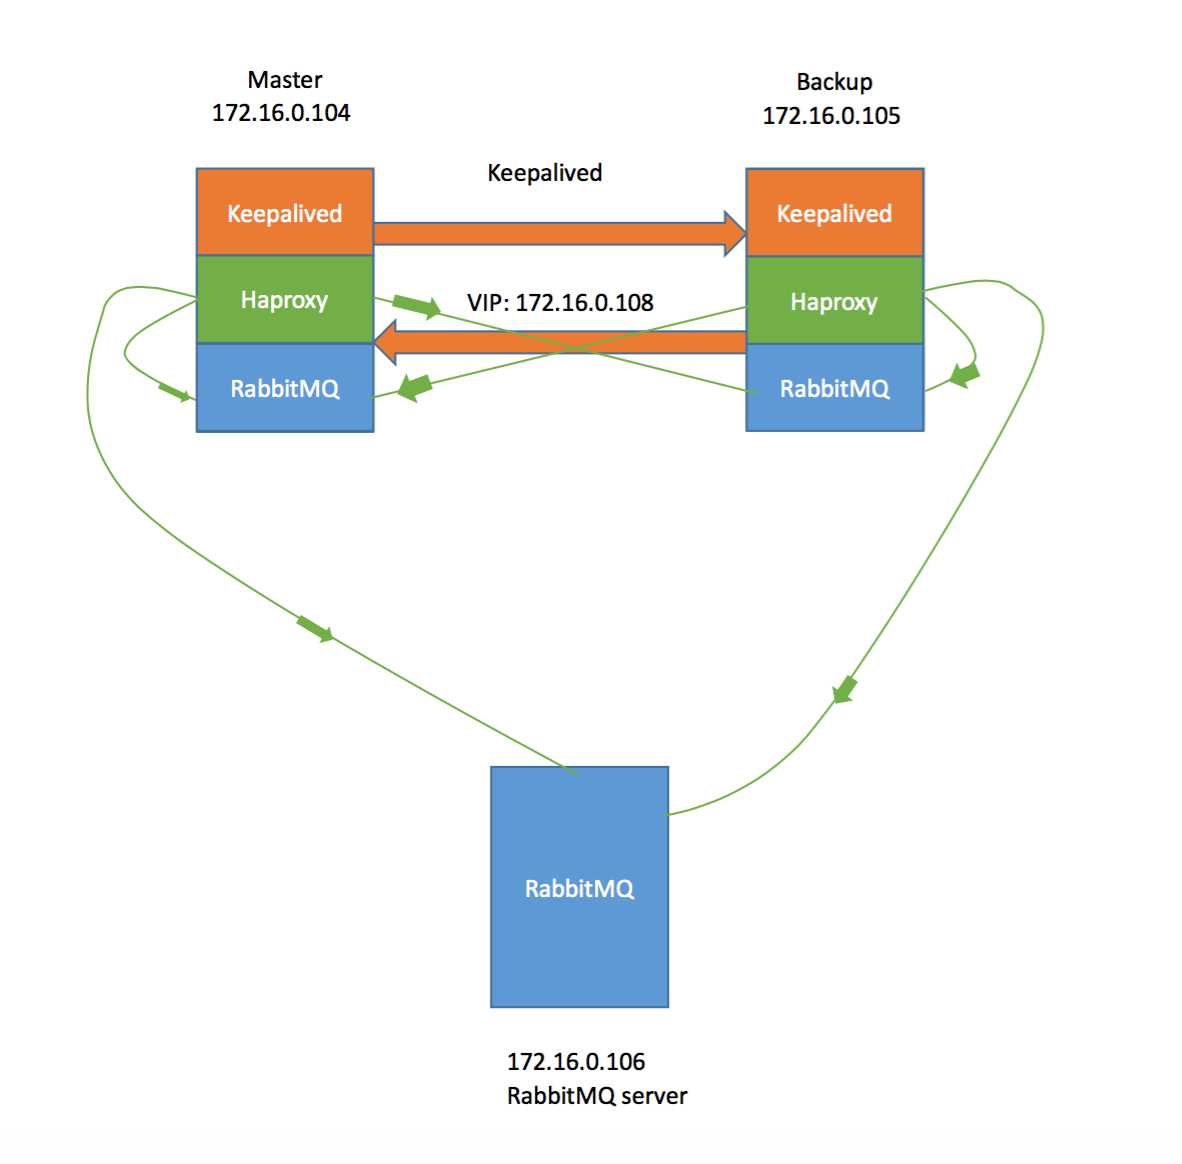
网络结构如下图:
共有104、105、106三台RabbitMQ Server,互为集群
其中104和105安装了Haproxy,每个Haproxy承担三台RabbitMQ server的负载均衡
两台Harpoxy采用Keepalived互为主备,VIP是172.16.0.108
操作系统为Ubuntu
以下介绍操作步骤:
1、三台主机安装RabbitMQ
apt-get install rabbitmq-server
开启RabbitMQ management,激活控制台以方便MQ的管理与监控
sudo rabbitmq-plugins enable rabbitmq_management
开启监控后可以输入http://ip:15672可以登录管理界面,默认账户guest/guest
2、配置MQ集群
2.1 cookie文件
因为RabbitMQ的集群是通过Erlang的集群来实现的,所以,要求三台机器的
/var/lib/rabbitmq/.erlang.cookie 文件内容一致,用VI等工具将它的内容修改为 zHDCGETPYWOWREASJUAB
由于RabbitMQ在启动Booker时会检查该文件的权限,必须为400,否则会报错,所以要修改文件的权限
chmod 400 .erlang.cookie
2.2 修改各机器hosts
172.16.0.104 pzs-test-1
172.16.0.105 pzs-test-2
172.16.0.106 pzs-test-3
保证三台机器可以互相访问对方
2.3 加入集群
对主节点(104):
#启动Broker
rabbitmq-server –detached > nohup.out&
#启动集群
rabbitmqctl start_app
#查看集群状态
rabbitmqctl cluster_status
对备节点(105、106):
rabbitmq-server –detached > nohup.out&
rabbitmqctl start_app
rabbitmqctl stop_app
#加入集群
rabbitmqctl join_cluster --ram rabbit@pzs-test-1
rabbitmqctl start_app
#查看集群状态
rabbitmqctl cluster_status
在三台机器运行以下命令:
设置成镜像队列
# rabbitmqctl set_policy ha-all "^" ‘{"ha-mode":"all"}‘ //["^"匹配所有]
3、安装配置HaProxy
安装过程省略
修改/etc/haproxy/haproxy.cfg,在文件后面添加以下内容
listen rabbitmq_local_cluster 0.0.0.0:25672
#配置TCP模式
mode tcp
option tcplog
#简单的轮询
balance roundrobin
#rabbitmq集群节点配置
server rabbit1 172.16.0.104:5672 check inter 5000 rise 2 fall 2
server rabbit2 172.16.0.105:5672 check inter 5000 rise 2 fall 2
server rabbit3 172.16.0.106:5672 check inter 5000 rise 2 fall 2
mode tcp
option tcplog
#简单的轮询
balance roundrobin
#rabbitmq集群节点配置
server rabbit1 172.16.0.104:5672 check inter 5000 rise 2 fall 2
server rabbit2 172.16.0.105:5672 check inter 5000 rise 2 fall 2
server rabbit3 172.16.0.106:5672 check inter 5000 rise 2 fall 2
#配置haproxy web监控,查看统计信息
listen private_monitoring :8100
mode http
option httplog
stats enable
#设置haproxy监控地址为http://localhost:8100/stats
stats uri /stats
stats refresh 30s
#添加用户名密码认证
mode http
option httplog
stats enable
#设置haproxy监控地址为http://localhost:8100/stats
stats uri /stats
stats refresh 30s
#添加用户名密码认证
stats auth admin:1234
启动haproxy: haproxy -f haproxy.cfg
访问http://172.16.0.104:8100/stats和http://172.16.0.105:8100/stats
可以查看haproxy的运行状态及一些统计信息
4、安装配置Keepalived
安装过程省略
【haproxy_check.sh文件内容】
#!/bin/bash
LOGFILE="/var/log/keepalived-haproxy-state.log"
date >> $LOGFILE
if [ `ps -C haproxy --no-header |wc -l` -eq 0 ];then
echo "fail: check_haproxy status" >> $LOGFILE
exit 1
else
echo "success: check_haproxy status" >> $LOGFILE
exit 0
fi
【haproxy_master.sh文件内容】
LOGFILE="/var/log/keepalived-haproxy-state.log"
echo "Being Master ..." >> $LOGFILE
然后修改/etc/keepalived/keepalived.conf文件
主机(104)
global_defs {
router_id test
}
vrrp_script chk_haproxy
{
script "/etc/keepalived/scripts/haproxy_check.sh"
interval 2
timeout 2
fall 3
}
vrrp_instance haproxy {
state MASTER # 主也配置为SLAVE
interface eth0
virtual_router_id 61
priority 150
virtual_ipaddress {
172.16.0.108
}
track_script {
chk_haproxy
}
notify_master "/etc/keepalived/scripts/haproxy_master.sh"
}
备机(105)
global_defs {
router_id redis
}
vrrp_script chk_haproxy
{
script "/etc/keepalived/scripts/haproxy_check.sh"
interval 2
timeout 2
fall 3
}
vrrp_instance haproxy {
state BACKUP # 主也配置为SLAVE
interface eth0
virtual_router_id 61
priority 100
virtual_ipaddress {
172.16.0.108
}
track_script {
chk_haproxy
}
notify_master "/etc/keepalived/scripts/haproxy_master.sh"
}
注意:keepalived可能运行多个实例,比如redis和haproxy共存,在这种情况下,必须注意几点:
一、VIP必须各实例不同
二、virtual_router_id必须各实例不同
三、脚本文件中不允许出现kill keepalived进程的操作
运行keepalived -D 启动keepalived