YOLO V2 代码分析
Posted demian
tags:
篇首语:本文由小常识网(cha138.com)小编为大家整理,主要介绍了YOLO V2 代码分析相关的知识,希望对你有一定的参考价值。
3.3 passthrough操作
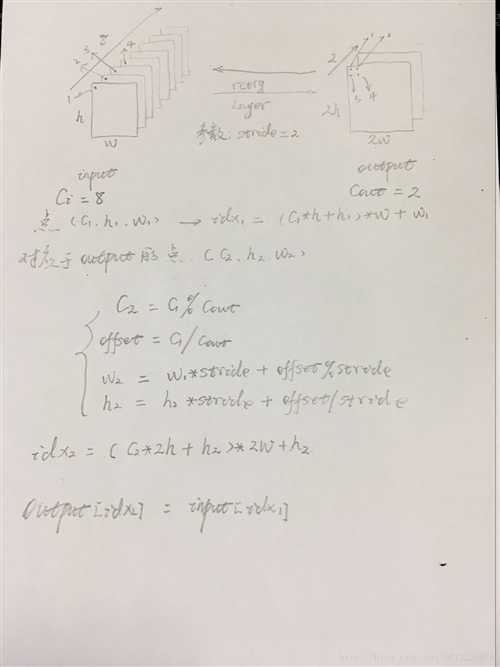
regorg layer分析:这里ReorgLayer层就是将26∗26∗512的张量中26∗26切割成4个13∗13,然后连接起来,使得原来的512通道变成了2048。
1 #darknet.py
2         self.reorg = ReorgLayer(stride=2)   # stride*stride times the channels of conv1s
 1 #reorg_layer.py
 2     def forward(self, x):
 3         stride = self.stride
 4
 5         bsize, c, h, w = x.size()
 6         out_w, out_h, out_c = int(w / stride), int(h / stride), c * (stride * stride)
 7         out = torch.FloatTensor(bsize, out_c, out_h, out_w)
 8
 9         if x.is_cuda:
10             out = out.cuda()
11             reorg_layer.reorg_cuda(x, out_w, out_h, out_c, bsize, stride, 0, out)
12         else:
13             reorg_layer.reorg_cpu(x, out_w, out_h, out_c, bsize, stride, 0, out)
14
15         return out
 1 //reorg_cpu.c
 2 int reorg_cpu(THFloatTensor *x_tensor, int w, int h, int c, int batch, int stride, int forward, THFloatTensor *out_tensor)
 3 {
 4     // Grab the tensor
 5     float * x = THFloatTensor_data(x_tensor);
 6     float * out = THFloatTensor_data(out_tensor);
 7
 8     // https://github.com/pjreddie/darknet/blob/master/src/blas.c
 9     int b,i,j,k;
10     int out_c = c/(stride*stride);
11
12     for(b = 0; b < batch; ++b){
13         //batch_size
14         for(k = 0; k < c; ++k){
15            //channel
16             for(j = 0; j < h; ++j){
17                 //height
18                 for(i = 0; i < w; ++i){
19                     //width
20                     int in_index  = i + w*(j + h*(k + c*b));
21                     int c2 = k % out_c;
22                     int offset = k / out_c;
23                     int w2 = i*stride + offset % stride;
24                     int h2 = j*stride + offset / stride;
25                     int out_index = w2 + w*stride*(h2 + h*stride*(c2 + out_c*b));
26                     if(forward) out[out_index] = x[in_index]; // 压缩channel
27                     else out[in_index] = x[out_index];        // 扩展channel
28                 }
29             }
30         }
31     }
32
33     return 1;
34 }
图片有错误,待改,输入的1,3点分布在输出的第1个feature map上,输入的2,4点分布在输出的第2个feature map上,idx2后面+w2
下图从右到左为forward计算方向,从左到右为backward求导方向

3.4 目标函数计算
 1 #darknet.py
 2     def loss(self):
 3         #可以看出,损失值也是基于预测框bbox,预测的iou,分类三个不同的误差和
 4         return self.bbox_loss + self.iou_loss + self.cls_loss
 5
 6     def forward(self, im_data, gt_boxes=None, gt_classes=None, dontcare=None):
 7         conv1s = self.conv1s(im_data)
 8         conv2 = self.conv2(conv1s)
 9         conv3 = self.conv3(conv2)
10         conv1s_reorg = self.reorg(conv1s)
11         cat_1_3 = torch.cat([conv1s_reorg, conv3], 1)
12         conv4 = self.conv4(cat_1_3)
13         conv5 = self.conv5(conv4)   # batch_size, out_channels, h, w
14         ……
15         ……
16         # tx, ty, tw, th, to -> sig(tx), sig(ty), exp(tw), exp(th), sig(to)
17         ‘‘‘预测tx ty‘‘‘
18         xy_pred = F.sigmoid(conv5_reshaped[:, :, :, 0:2])
19         ‘‘‘预测tw th ‘‘‘
20         wh_pred = torch.exp(conv5_reshaped[:, :, :, 2:4])
21         bbox_pred = torch.cat([xy_pred, wh_pred], 3)
22         ‘‘‘预测置信度to ‘‘‘
23         iou_pred = F.sigmoid(conv5_reshaped[:, :, :, 4:5])
24         ‘‘‘预测分类class  ‘‘‘
25         score_pred = conv5_reshaped[:, :, :, 5:].contiguous()
26         prob_pred = F.softmax(score_pred.view(-1, score_pred.size()[-1])).view_as(score_pred)
27
28         # for training
29         if self.training:
30             bbox_pred_np = bbox_pred.data.cpu().numpy()
31             iou_pred_np = iou_pred.data.cpu().numpy()
32             _boxes, _ious, _classes, _box_mask, _iou_mask, _class_mask = self._build_target(
33                                          bbox_pred_np, gt_boxes, gt_classes, dontcare, iou_pred_np)
34             _boxes = net_utils.np_to_variable(_boxes)
35             _ious = net_utils.np_to_variable(_ious)
36             _classes = net_utils.np_to_variable(_classes)
37             box_mask = net_utils.np_to_variable(_box_mask, dtype=torch.FloatTensor)
38             iou_mask = net_utils.np_to_variable(_iou_mask, dtype=torch.FloatTensor)
39             class_mask = net_utils.np_to_variable(_class_mask, dtype=torch.FloatTensor)
40
41             num_boxes = sum((len(boxes) for boxes in gt_boxes))
42
43             # _boxes[:, :, :, 2:4] = torch.log(_boxes[:, :, :, 2:4])
44             box_mask = box_mask.expand_as(_boxes)
45             #计算预测的平均bbox损失值
46             self.bbox_loss = nn.MSELoss(size_average=False)(bbox_pred * box_mask, _boxes * box_mask) / num_boxes
47            #计算预测的平均iou损失值
48             self.iou_loss = nn.MSELoss(size_average=False)(iou_pred * iou_mask, _ious * iou_mask) / num_boxes
49            #计算预测的平均分类损失值
50             class_mask = class_mask.expand_as(prob_pred)
51             self.cls_loss = nn.MSELoss(size_average=False)(prob_pred * class_mask, _classes * class_mask) / num_boxes
52
53         return bbox_pred, iou_pred, prob_pred
参考自:仙守
以上是关于YOLO V2 代码分析的主要内容,如果未能解决你的问题,请参考以下文章