Java Spring 框架初步学习总结简单实现 IoC 和 AOP
Posted bwmaple
tags:
篇首语:本文由小常识网(cha138.com)小编为大家整理,主要介绍了Java Spring 框架初步学习总结简单实现 IoC 和 AOP相关的知识,希望对你有一定的参考价值。
Spring 是一个开源的设计层面的轻量级框架,Spring 的好处网上有太多,这里就不在赘述。
IoC 控制反转和 AOP 面向切面编程是 Spring 的两个重要特性。
IoC(Inversion of Control)控制反转意思大概就是,原本需要我们手动创建的对象,现在交给 Spring 来创建和管理,我们只需要拿过来用就行了。
有的地方会把 IoC 称为 DI(Dependency Injection)依赖注入,大概是说我们所需要的对象,由 Spring 提供并注入到我们要使用的地方。
AOP(Aspect Oriented Programming)面前向切面编程简单的说,在不改动代码的情况下,给代码增加新的功能。
概念讲完,就该实践了,首先要把 Spring 添加到项目中,有两种方法。
第一种方法是直接添加 MyEclipse 内置的 Spring。
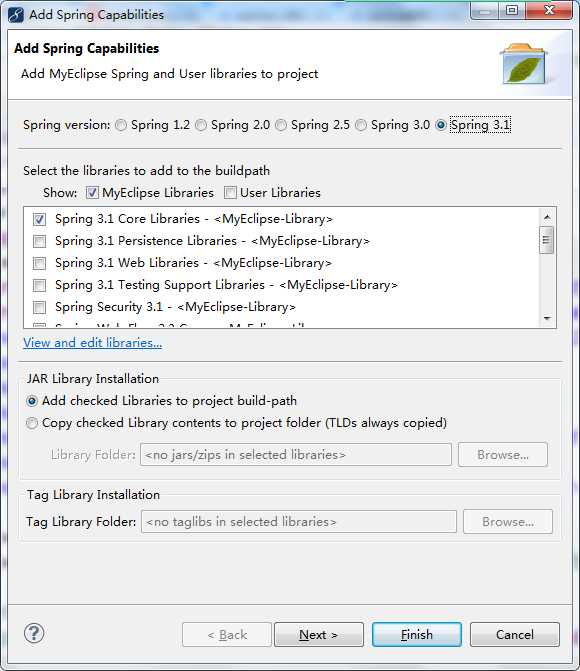
打开 MyEclipse,我用的是10.6版本,选中一个项目,单击界面顶端的菜单栏的 MyEclipse,选中 Project Capabilities,再单击 Add Spring Capabilities,就会弹出如下的窗体。

Spring version 选择 Spring 的版本,我这里最高只能选择 3.1 ,其他的可以先不用管,单击 Next 继续。

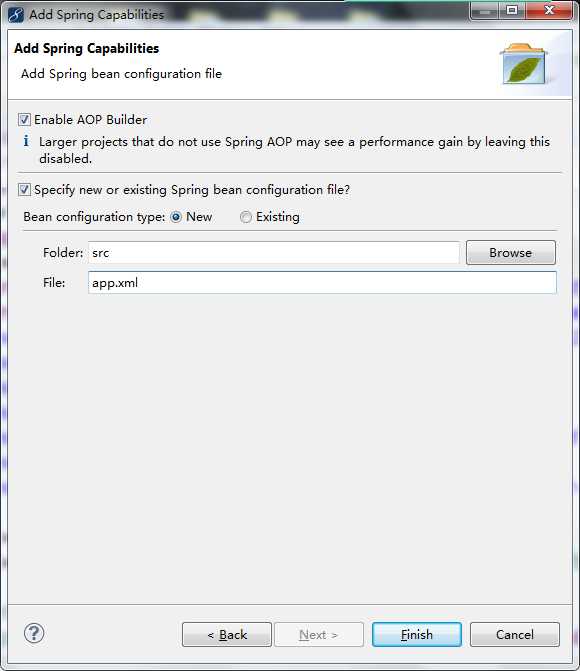
Folder 是选择 Spring 核心配置文件的存放路径,默认是 src,不可以写不存在的路径,会出问题。
File 是给 Spring 核心配置文件命名,默认是 applicationContext.xml,为了方便我改成了 app.xml。
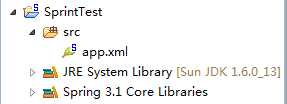
单击 Finish 完成,我的项目的结构就变成了这样。

Spring 就添加到了我们的项目当中。
第二种方法是从 官网下载 Spring 的 jar 包,手动添加到项目中。
官方下载地址 http://repo.spring.io/release/org/springframework/spring/,选一个版本下载其中spring-framework-x.x.x.RELEASE-dist.zip 压缩文件。
压缩包解压出来,docs 文件夹里是 Spring 的 api,schema 文件夹里规定 Spring 的 xml 配置文件所需要的 xsd 文件,而 libs 文件夹里所有 spring-xxx-x.x.x.RELEASE.jar 就是我们所需要的 jar 包。
在项目中新建一个 lib 文件夹,把 Spring 的 jar 包都复制进去,全部选中右键 Add to Bulid Path 导入。
因为我们是手动添加的 jar 包,所以还需要手动创建 Spring 的配置文件。
在 src 目录下创建 xml 文件命名为 app.xml,再将下面代码复制到 app.xml文件中。
1 <?xml version="1.0" encoding="UTF-8"?>
2 <beans
3     xmlns="http://www.springframework.org/schema/beans"
4     xmlns:xsi="http://www.w3.org/2001/XMLSchema-instance"
5     xmlns:p="http://www.springframework.org/schema/p"
6     xsi:schemaLocation="http://www.springframework.org/schema/beans http://www.springframework.org/schema/beans/spring-beans-3.1.xsd">
7
8 </beans>
这段代码是使用 MyEclipse 添加 Spring 时自动创建的配置文件中复制出来的,如果用的不是 Spring 3.1,最好把第 6 行末尾的 3.1 改成对应的版本号,防止出现因为版本问题造成的错误。
使用上述两种方法将 Spring 添加到项目中后,就可以开始使用 Spring 了。
先编写两个类供我们测试使用。
 1 /**
 2  * 人
 3  * @author BWM
 4  *
 5  */
 6 public class Person {
 7     private String name;
 8     private String context;
 9     public String getName() {
10         return name;
11     }
12     public void setName(String name) {
13         this.name = name;
14     }
15     public String getContext() {
16         return context;
17     }
18     public void setContext(String context) {
19         this.context = context;
20     }
21     public void say(){
22         System.out.println(name + "说:" + context);
23     }
24 }
25 /**
26  * 展示
27  * @author BWM
28  *
29  */
30 public class Show {
31     private Person person;
32     public Person getPerson() {
33         return person;
34     }
35     public void setPerson(Person person) {
36         this.person = person;
37     }
38     public void show(){
39         person.say();
40     }
41 }
属性的 seter 方法是必须要有的,有了这两个以后,就可以在 app.xml 里写代码了。
 1 <?xml version="1.0" encoding="UTF-8"?>
 2 <beans
 3     xmlns="http://www.springframework.org/schema/beans"
 4     xmlns:xsi="http://www.w3.org/2001/XMLSchema-instance"
 5     xmlns:p="http://www.springframework.org/schema/p"
 6     xsi:schemaLocation="http://www.springframework.org/schema/beans http://www.springframework.org/schema/beans/spring-beans-3.1.xsd">
 7
 8     <bean id="person" class="cn.bwm.pojo.Person">
 9         <property name="name" value="小枫"></property>
10         <property name="context" value="树叶的一生,只是为了归根吗?"></property>
11     </bean>
12
13     <bean id="show" class="cn.bwm.pojo.Show">
14         <property name="person" ref="person"></property>
15     </bean>
16
17 </beans>
beans 标签是 Spring 配置文件的根标签,两个 beans 之间就是我们发挥的地方。
bean 标签定义了 一个对象,id 属性是唯一标识且不可重复,class 属性表示这个对象的类型,需要填写完整路径。
property 标签表示对象的属性,name 属性填写属性名,value 为基本类型的值,ref 表示引用其他的 bean。需要有对应属性的 seter 方法,否则会报错。
通过配置文件,Spring 就会知道我们需要几个对象,该给对象的什么属性赋什么值,就可以在我们需要的时候提供给我们。
现在可以写代码测试一下。
1 public class Test {
2     public static void main(String[] args) {
3         ApplicationContext context = new ClassPathXmlApplicationContext("app.xml");
4         Show show = (Show)context.getBean("show");
5         show.show();
6     }
7 }
ApplicationContext 是一个接口,负责读取 Spring 配置文件,管理对象加载、生命,维护 Bean 对象与 Bean 对象之间的依赖关系,负责 Bean 的生命周期等。
ClassPathXmlApplicaionContext 是 ApplicationContext 接口的实现类,用于从 classpath 路径中读取 Spring 配置文件。
getBean 方法用于获取 bean 对象,参数是 bean 对象的 id,返回的是 Object 类型的所以需要强制转换一下。
以上就是 IoC 的简单使用。
我们再来试试 AOP,为此我们需要一个工具类。
 1 /**
 2  * 增强工具
 3  * @author Administrator
 4  *
 5  */
 6 public class AdviceUtil {
 7     public void before(){
 8         System.out.println("这是前置增强");
 9     }
10
11     public void afterReturning(){
12         System.out.println("这是后置增强");
13     }
14 }
这个类定义了 before 和 afterReturning 两个方法,我们就可以去写配置文件了。
 1 <?xml version="1.0" encoding="UTF-8"?>
 2 <beans
 3     xmlns="http://www.springframework.org/schema/beans"
 4     xmlns:xsi="http://www.w3.org/2001/XMLSchema-instance"
 5     xmlns:aop="http://www.springframework.org/schema/aop"
 6     xmlns:p="http://www.springframework.org/schema/p"
 7     xsi:schemaLocation="http://www.springframework.org/schema/beans http://www.springframework.org/schema/beans/spring-beans-3.1.xsd
 8     http://www.springframework.org/schema/aop
 9     http://www.springframework.org/schema/aop/spring-aop-3.1.xsd">
10
11     <bean id="person" class="cn.bwm.pojo.Person">
12         <property name="name" value="小枫"></property>
13         <property name="context" value="树叶的一生,只是为了归根吗?"></property>
14     </bean>
15
16     <bean id="show" class="cn.bwm.pojo.Show">
17         <property name="person" ref="person"></property>
18     </bean>
19
20     <bean id="util" class="cn.bwm.util.AdviceUtil"></bean>
21
22     <aop:config>
23         <aop:pointcut expression="execution(* cn.bwm.pojo.Show.show())" id="pointcut"/>
24         <aop:aspect ref="util">
25             <aop:before method="before" pointcut-ref="pointcut"/>
26             <aop:after-returning method="afterReturning" pointcut-ref="pointcut"/>
27         </aop:aspect>
28     </aop:config>
29
30 </beans>
这里要注意,beans 标签中多了 xmlns:aop 属性以及 xsi:schemaLocation 里对 AOP 的相关代码。
多了一个 id 为 util 的 bean,class 是我们刚才创建的类。
aop:config 标签,与 AOP 相关的配置都放在其中。
aop:pointcut 声明切面,表示在什么地方。id 为唯一标识符,expression 配置切入点表达式,execution 声明切入点,括号中是一个切点表达式,用来匹配符合条件的方法。
public * show(..):* 表示匹配所有类型的返回值,..表示匹配所有参数类型个数和类型。
public void *(..):* 表示匹配所有方法名。
* cn.bwm.pojo.*.*(..):这个表达式匹配 cn.bwm.pojo 包下所有类的所有方法。
* cn.bwm..*.*(..):这个表达式匹配 cn.bwm 包及其子包下的所有类的所有方法。
aop:aspect 使用 ref 引用含有增强方法的 bean。
aop:after 声明前置增强,aop:after-renturning声明后置增强,表示做什么。method 属性表示调用的增强方法,pointcut-ref 引用 pointcut 切入点。
测试代码可以不用改,直接运行,就能够看到运行效果。

以上就是简单的 AOP 的实现,我们规定切面,指定要执行的增强处理,从而达到不改变原代码添加功能的效果。
实际上 AOP 并不只有 前置增强和后置增强两种,还有异常抛出增强、最终增强和环绕增强,这里先不详细介绍。
------------------------------------------------------------------------------------------------------------------------------------------------------------------------------------------------------------------------------
Spring 的第一篇总结就结束了,希望对看到这里的你有所帮助。
如有问题,欢迎交流。
以上是关于Java Spring 框架初步学习总结简单实现 IoC 和 AOP的主要内容,如果未能解决你的问题,请参考以下文章