使用Beautiful Soup
Posted wanglinjie
tags:
篇首语:本文由小常识网(cha138.com)小编为大家整理,主要介绍了使用Beautiful Soup相关的知识,希望对你有一定的参考价值。
使用Beautiful Soup
Beautiful Soup在解析时实际上依赖解析器,它除了支持Python标准库中的html解析器外,还支持一些第三方解析器(比如lxml)。
|
解析器 |
使用方法 |
优势 |
劣势 |
|---|---|---|---|
|
Python标准库 |
|
Python的内置标准库、执行速度适中、文档容错能力强 |
Python 2.7.3及Python 3.2.2之前的版本文档容错能力差 |
|
lxml HTML解析器 |
|
速度快、文档容错能力强 |
需要安装C语言库 |
|
lxml XML解析器 |
|
速度快、唯一支持XML的解析器 |
需要安装C语言库 |
|
html5lib |
|
最好的容错性、以浏览器的方式解析文档、生成HTML5格式的文档 |
速度慢、不依赖外部扩展 |
一、lxml解析器有解析HTML和XML的功能,而且速度快,容错能力强,所以先用它来解析。
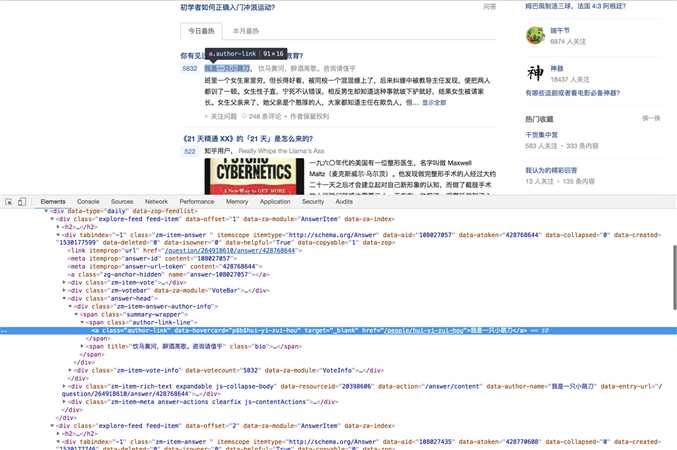
用户名(1) 
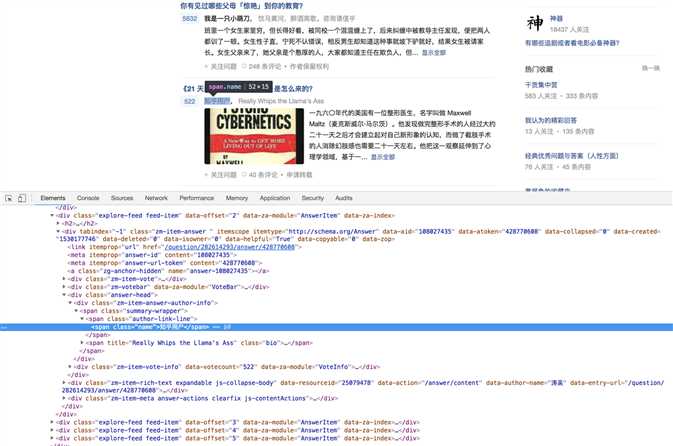
用户名(2)

if item.find_all(class_ = ‘author-link‘):
author = item.find_all(class_ = ‘author-link‘)[0].string
else:
author = item.find_all(class_ = ‘name‘)[0].string
另外,还有许多查询方法,其用法与find_all()、find()方法完全相同,只不过查询范围不同。
另外,还有许多查询方法,其用法与前面介绍的find_all()、find()方法完全相同,只不过查询范围不同,这里简单说明一下。
find_parents()和find_parent():前者返回所有祖先节点,后者返回直接父节点。
find_next_siblings()和find_next_sibling():前者返回后面所有的兄弟节点,后者返回后面第一个兄弟节点。
find_previous_siblings()和find_previous_sibling():前者返回前面所有的兄弟节点,后者返回前面第一个兄弟节点。
find_all_next()和find_next():前者返回节点后所有符合条件的节点,后者返回第一个符合条件的节点。
find_all_previous()和find_previous():前者返回节点后所有符合条件的节点,后者返回第一个符合条件的节点。
既可以为属性值,也可以为文本
q = item.find_all(class_ = ‘bio‘)[0].string
q = item.find_all(class_ = ‘bio‘)[0].attrs[‘title‘]
 1 import requests
 2 import json
 3 from bs4 import BeautifulSoup
 4
 5 url = ‘https://www.zhihu.com/explore‘
 6 headers = {
 7     ‘User-Agent‘: ‘Mozilla/5.0 (Macintosh; Intel Mac OS X 10_12_3) AppleWebKit/537.36 (KHTML, like Gecko) Chrome/58.0.3029.110 Safari/537.36‘
 8 }
 9 r = requests.get(url, headers=headers)
10 soup = BeautifulSoup(r.text, ‘lxml‘)
11 explore = {}
12 items = soup.find_all(class_ = ‘explore-feed feed-item‘)
13 for item in items:
14     question = item.find_all(‘h2‘)[0].string
15     #print(question)
16     if item.find_all(class_ = ‘author-link‘):
17         author = item.find_all(class_ = ‘author-link‘)[0].string
18     else:
19         author = item.find_all(class_ = ‘name‘)[0].string
20     #print(author)
21     answer = item.find_all(class_ = ‘content‘)[0].string
22     #print(answer)
23     #q = item.find_all(class_ = ‘bio‘)[0].string
24     q = item.find_all(class_ = ‘bio‘)[0].attrs[‘title‘]
25     #print(q)
26
27     explore = {
28         "question" : question,
29         "author" : author,
30         "answer" : answer,
31         "q": q,
32     }
33
34     with open("explore.json", "a") as f:
35         #f.write(json.dumps(items, ensure_ascii = False).encode("utf-8") + "
")
36         f.write(json.dumps(explore, ensure_ascii = False) + "
")
     for t in item.find_all(class_ = ‘bio‘):
         q =t.get(‘title‘)
 1 import requests
 2 import json
 3 from bs4 import BeautifulSoup
 4
 5 url = ‘https://www.zhihu.com/explore‘
 6 headers = {
 7     ‘User-Agent‘: ‘Mozilla/5.0 (Macintosh; Intel Mac OS X 10_12_3) AppleWebKit/537.36 (KHTML, like Gecko) Chrome/58.0.3029.110 Safari/537.36‘
 8 }
 9 r = requests.get(url, headers=headers)
10 soup = BeautifulSoup(r.text, ‘lxml‘)
11 explore = {}
12 items = soup.find_all(class_ = ‘explore-feed feed-item‘)
13 for item in items:
14     question = item.find_all(‘h2‘)[0].string
15     #print(question)
16     if item.find_all(class_ = ‘author-link‘):
17         author = item.find_all(class_ = ‘author-link‘)[0].string
18     else:
19         author = item.find_all(class_ = ‘name‘)[0].string
20     #print(author)
21     answer = item.find_all(class_ = ‘content‘)[0].string
22     #print(answer)
23     #q = item.find_all(class_ = ‘bio‘)[0].string
24     #q = item.find_all(class_ = ‘bio‘)[0].attrs[‘title‘]
25     for t in item.find_all(class_ = ‘bio‘):
26         q =t.get(‘title‘)
27     print(q)
28
29     explore = {
30         "question" : question,
31         "author" : author,
32         "answer" : answer,
33         "q": q,
34     }
35
36     with open("explore.json", "a") as f:
37         #f.write(json.dumps(items, ensure_ascii = False).encode("utf-8") + "
")
38         f.write(json.dumps(explore, ensure_ascii = False) + "
")
二、使用Python标准库中的HTML解析器
soup = BeautifulSoup(r.text, ‘html.parser‘)
三、Beautiful Soup还提供了另外一种选择器,那就是CSS选择器。
使用CSS选择器时,只需要调用select()方法,传入相应的CSS选择器即可。
以上是关于使用Beautiful Soup的主要内容,如果未能解决你的问题,请参考以下文章
