元素层级提高
Posted ericzlin
tags:
篇首语:本文由小常识网(cha138.com)小编为大家整理,主要介绍了元素层级提高相关的知识,希望对你有一定的参考价值。
一、7阶层叠水平
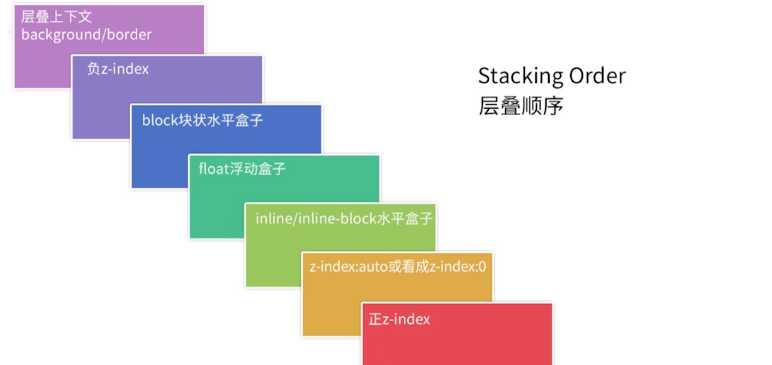
- 一般了解z-index,position(值非static),display ,float:left 可以控制元素的层级。经过例子验证,当元素有内容时,内容的层级会更高。
- 任何元素都有层叠顺序,当元素发生层叠时,层级高的会显示在上面,覆盖层级低的元素。当元素的层级相同时,则会根据DOM的先后顺序依次显示。层叠优先级如下图所示:

二、层叠上下文
- 层叠上下文是html元素的三维概念,这些HTML元素在一条假想的相对于面向视点或者网页的用户的z轴上延伸,HTML元素依据其自身属性按照优先级顺序占据着层叠上下文的空间。 页面的根元素<html>具有根层叠上下文。
- 当元素有层叠上下文时,其层级比普通元素(block元素,float元素等)要高还有其他的方法,通过给元素设置如下属性即可让元素拥有层叠上下文环境,,下面的四种是较常用的。给元素设置上面这些属性后,即可提高元素的层级。提高的层级在z-index:0的位置。当元素都有较高的z-index值时,层叠顺序按值的高低排列。当我们遇到元素层叠的现象时,找出元素是属于哪个层级的,修改元素的属性或者创建层叠上下文来调整元素的层级。
①定位元素中z-index不等于auto,为大于0的值
②元素设置opacity为不等于1的值
③元素的transform属性不为none
④will-change指定的属性值为上面任意一个(了解)

!DOCTYPE html>
<html>
<head>
<meta http-equiv="Content-Type" Content="text/html; charset=utf-8;">
<title>层级上下文</title>
<style>
body{background:#aaa;color:#fff;}
.box{margin:0 0 100px;overflow:hidden;}

.wrap{width:300px;height:300px;margin-top:-100px;}
.wrap-1{position:relative;z-index:-1;background:#f60;margin-top:0;}
.wrap-2{display:block;background:#000;}
.wrap-3{float:left;background:#23A42B;}
.wrap-4{display:inline-block;background:#5171E4;}
.wrap-5{position:relative;z-index:auto;background:#53D6EA;}
.wrap-6{position:relative;z-index:2;background:#E68787;}
.wrap-6-1{margin:0;}
.wrap-6-1 .cnt{position:relative;z-index:2;}
.wrap-6-2{z-index:1;background:#000;}
.wrap-6-2 .cnt{position:relative;z-index:100;}
</style>
</head>

<body>
<div class="box">
    <h2>Demo1:七个层级的元素</h2>
    <div class="wrap wrap-1">z-index:-1的层</div>
    <div class="wrap wrap-2">display:block的层</div>
    <div class="wrap wrap-3">float的层</div>
    <div class="wrap wrap-4">display:inline-block的层</div>
    <div class="wrap wrap-5">z-index:auto/0的层</div>
    <div class="wrap wrap-6">z-index > 0的层</div>
</div>

<div class="box">
    <h2>Demo2:inline-block的元素层级比block要高</h2>
    <div class="wrap wrap-4">display:inline-block的层</div>
    <div class="wrap wrap-2">display:block的层</div>
</div>

<div class="box">
    <h2>Demo3:使用opacity使元素拥有层叠上下文</h2>
    <div class="wrap wrap-4">display:inline-block的层</div>
    <div class="wrap wrap-2" style="opacity:0.8;">display:block的层</div>
</div>

<div class="box">
    <h2>Demo4:使用transform使元素拥有层叠上下文</h2>
    <div class="wrap wrap-4">display:inline-block的层</div>
    <div class="wrap wrap-2" style="transform:rotate(3deg);">display:block的层</div>
</div>

<div class="box">
    <h2>Demo5:不同父元素的子节点的层级比较</h2>
    <div class="wrap wrap-6 wrap-6-1">
        <div class="cnt">z-index:2,子元素z-index:2的层</div>
    </div>
    <div class="wrap wrap-6 wrap-6-2">
        <div class="cnt">z-index:1,子元素z-index:100的层<div>
    </div>
</div>
</body>
</html>
以上是关于元素层级提高的主要内容,如果未能解决你的问题,请参考以下文章
