android怎么实现apk的静默安装
Posted
tags:
篇首语:本文由小常识网(cha138.com)小编为大家整理,主要介绍了android怎么实现apk的静默安装相关的知识,希望对你有一定的参考价值。
这儿介绍的两种方法各自需要的苛刻条件如下:
1.内置到ROM。即APK包的安装位置是/system/app下。
2.使用APK的目标安装系统同样的签名。
好了,先不管这些苛刻的条件,下面讲下如何编写直接安装APK的代码,这儿使用pm install <apk_path>命令,而不是繁杂的未公开的PackageManager.install()方法。
String[] args = "pm", "install", "-r", apkAbsolutePath ;String result = "";
ProcessBuilder processBuilder = new ProcessBuilder(args);
Process process = null;
InputStream errIs = null;
InputStream inIs = null;
try
ByteArrayOutputStream baos = new ByteArrayOutputStream();
int read = -1;
process = processBuilder.start();
errIs = process.getErrorStream();
while ((read = errIs.read()) != -1)
baos.write(read);
baos.write(\'/n\');
inIs = process.getInputStream();
while ((read = inIs.read()) != -1)
baos.write(read);
byte[] data = baos.toByteArray();
result = new String(data);
catch (IOException e)
e.printStackTrace();
catch (Exception e)
e.printStackTrace();
finally
try
if (errIs != null)
errIs.close();
if (inIs != null)
inIs.close();
catch (IOException e)
e.printStackTrace();
if (process != null)
process.destroy();
return result;
代码执行后,如果安装成功的话获取到的result值是“ pkg: /data/local/tmp/Calculator.apk /nSuccess”,如果是失败的话,则没有结尾的“Success”。
安装代码有了,现在开始介绍第一种方法,将你自己的APK内置到ROM中。前提是,你这手机已经刷机过并且保留了recovery-windows.bat/recover-linux.sh 文件。
针对HTC-Legend的具体操作步骤为:
1.USB连接你的设备然后在命令行输入 "adb reboot recovery" ,机子重启,启动后将显示一个红色的三角形和箭头图标
2 .(在PC下)进入到你的刷机文件夹然后运行 \'./recover-linux.sh\' ,屏幕将显示绿色的菜单
3 .如果得到的结果是 "error:device not found" ,运行 "./adb-linux kill-server" 后再一次运行 \'./recovery-linux.sh\' 直到显示绿色菜单.
4 .执行 "adb shell mount /dev/block/mtdblock3 /system" ,至此,可对/system进行写操作。
5.在PC上运行命令:adb push <your_apk_path> /system/<your_apk_name>。至此,内置成功。
第二种方法,需要先打一个未签名的APK包,然后用系统签名对其进行签名。这个方面的东西在我之前的一篇博文已说明,这儿就不重复了。[android]使用platform密钥来给apk文件签名的命令
由于HTC-Legend是“原装”的,所以静默安装倒是顺利。但对于一些MOTO或乐Phone的手机,一般上是不支持的。
以上这两种方法都在AndroidManifest中声明android.permission.INSTALL_PACKAGES,有一点比较奇怪的是执行“ int result = checkCallingOrSelfPermission(Intent.ACTION_PACKAGE_INSTALL) ”,result的值为android.content.pm.PackageManager.PERMISSION_DENIED而不是PERMISSION_GRANTED。
参考技术A 需要root权限,静默安装在各大应用市场都有 参考技术B 需要获取root权限 并且使用一些手机市场Android 静默安装(自动安装)和静默卸载的实现方法
1 简单介绍
目前很多应用市场,做了静默安装的功能,静默安装就是无声无息的在后台安装apk,没有任何界面提示。智能安装就是有安装界面,但全部是自动的,不需要用户去点击。
首先强调两点:静默安装必须要root权限 智能安装必须要用户手动开启无障碍服务。
2 原理
静默安装、卸载的原理就是利用pm install命令来安装apk,pm uninstall 来卸载apk. 智能安装是利用android系统提供的无障碍服务AccessibilityService,来模拟用户点击,从而自动安装.
3 pm命令介绍
(1) pm install
pm install 命令的用法及参数解释如下:
pm install [-l][-r] [-t] [-i INSTALLER_PACKAGE_NAME] [-s] [-f] PATH
Options:
-l: install the package with FORWARD_LOCK.
-r: reinstall an exisiting app, keeping itsdata.
-t: allow test .apks to be installed.
-i: specify the installer package name.
-s: install package on sdcard.
-f: install package on internal flash.
(2) pm uninstall
pm uninstall 命令的用法及参数解释如下:
pm uninstall[-k] PACKAGE
Options:
-k: keep the data and cache directoriesaround.
上面英语很简单,不解释了.
4 静默安装
为了方便演示,我把爱奇艺的安装包重命名为test.apk后放在了sdcard上。你可以自己去爱奇艺官网去下载,也可以自己找一个apk放到sdcard上,但是要知道apk的包名,后面卸载的时候要用到。
先上代码:
//静默安装
private void installSlient()
String cmd = "pm install -r/mnt/sdcard/test.apk";
Process process = null;
DataOutputStream os = null;
BufferedReader successResult = null;
BufferedReader errorResult = null;
StringBuilder successMsg = null;
StringBuilder errorMsg = null;
try
//静默安装需要root权限
process = Runtime.getRuntime().exec("su");
os = newDataOutputStream(process.getOutputStream());
os.write(cmd.getBytes());
os.writeBytes("\\n");
os.writeBytes("exit\\n");
os.flush();
//执行命令
process.waitFor();
//获取返回结果
successMsg = new StringBuilder();
errorMsg = new StringBuilder();
successResult = newBufferedReader(new InputStreamReader(process.getInputStream()));
errorResult = newBufferedReader(new InputStreamReader(process.getErrorStream()));
String s;
while ((s =successResult.readLine()) != null)
successMsg.append(s);
while ((s = errorResult.readLine())!= null)
errorMsg.append(s);
catch (Exception e)
e.printStackTrace();
finally
try
if (os != null)
os.close();
if (process != null)
process.destroy();
if (successResult != null)
successResult.close();
if (errorResult != null)
errorResult.close();
catch (Exception e)
e.printStackTrace();
//显示结果
tvTest.setText("成功消息:" + successMsg.toString() +"\\n" + "错误消息: " + errorMsg.toString());
这段代码就是在程序中执行pm命令,和在adb下执行 pm install -r /mnt/sdcard/test.apk 效果是一样的, 关键的代码是 Runtime.getRuntime().exec(“su”) ,这段代码会要求获取root权限,所以你的手机必须root,不想root的话,直接用模拟器也可以。
通过 Runtime.getRuntime().exec(“su”) 获取到 process 对象后就可以写入命令了,每写入一条命令就要换行,写入‘\\n’ 即可,最后写入exit后离开命令执行的环境.
5 静默卸载
静默卸载和静默安装是一样的,只是命令不同,静默卸载需要用到包名,同样,静默卸载也需要root权限
看代码:
//爱奇艺apk的包名
private staticfinal String PACKAGE_NAME = "com.qiyi.video";
//静默卸载
private void uninstallSlient()
String cmd = "pm uninstall "+ PACKAGE_NAME;
Process process = null;
DataOutputStream os = null;
BufferedReader successResult = null;
BufferedReader errorResult = null;
StringBuilder successMsg = null;
StringBuilder errorMsg = null;
try
//卸载也需要root权限
process =Runtime.getRuntime().exec("su");
os = newDataOutputStream(process.getOutputStream());
os.write(cmd.getBytes());
os.writeBytes("\\n");
os.writeBytes("exit\\n");
os.flush();
//执行命令
process.waitFor();
//获取返回结果
successMsg = new StringBuilder();
errorMsg = new StringBuilder();
successResult = newBufferedReader(new InputStreamReader(process.getInputStream()));
errorResult = newBufferedReader(new InputStreamReader(process.getErrorStream()));
String s;
while ((s =successResult.readLine()) != null)
successMsg.append(s);
while ((s = errorResult.readLine())!= null)
errorMsg.append(s);
catch (Exception e)
e.printStackTrace();
finally
try
if (os != null)
os.close();
if (process != null)
process.destroy();
if (successResult != null)
successResult.close();
if (errorResult != null)
errorResult.close();
catch (Exception e)
e.printStackTrace();
//显示结果
tvTest.setText("成功消息:" + successMsg.toString() +"\\n" + "错误消息: " + errorMsg.toString());
和静默安装一样的代码就不解释了。还有,如果你不知道一个apk的包名,那么请反编译后去看AndroidManifest.xml文件,如果这个文件打开全是乱码,说明是被混淆过的,那么直接安装它,然后到/data/data下面去找它的包,当然,手机得root才能进/data/data目录。
6 智能安装
智能安装就稍微麻烦点了,原理是用到了android提供的AccessibilityService服务,这个服务可以获取屏幕上的节点,一个节点也就是一个view,我们写的xml文件中每个标签就是一个节点,然后可以模拟用户的操作,对这些节点进行点击、滑动等操作。我们就是利用这个原理,来自动点击安装按钮的,当然使用这个服务必须用户手动开启无障碍服务。下面我们来看具体的实现方法。
(1) 创建AccessibilityService配置文件
在res目录下创建xml目录,然后在xml目录下创建一个accessibility_service_config.xml文件,内容如下
res/xml/accessibility_service_config.xml:
accessibilityEventTypes:指定我们在监听窗口中可以模拟哪些事件,typeAllMask表示所有的事件都能模拟.
accessibilityFeedbackType:指定无障碍服务的反馈方式.
canRetrieveWindowContent:指定是否允许我们的程序读取窗口中的节点和内容,当然是true.
description: 当用户手动配置服务时,会显示给用户看.
packageNames: 指定我们要监听哪个应用程序下的窗口活动,这里写com.android.packageinstaller表示监听Android系统的安装界面。
其余参数照写即可。
res/strings.xml:
SlientInstallTest
智能安装app功能演示
(2) 创建AccessibilityService服务
public classMyAccessibilityService extends AccessibilityService
private static final String TAG ="[TAG]";
private Map handleMap = newHashMap<>();
@Override
public voidonAccessibilityEvent(AccessibilityEvent event)
AccessibilityNodeInfo nodeInfo =event.getSource();
if (nodeInfo != null)
int eventType =event.getEventType();
if (eventType ==AccessibilityEvent.TYPE_WINDOW_CONTENT_CHANGED || eventType ==AccessibilityEvent.TYPE_WINDOW_STATE_CHANGED)
if(handleMap.get(event.getWindowId()) == null)
boolean handled =iterateNodesAndHandle(nodeInfo);
if (handled)
handleMap.put(event.getWindowId(), true);
@Override
public void onInterrupt()
//遍历节点,模拟点击安装按钮
private booleaniterateNodesAndHandle(AccessibilityNodeInfo nodeInfo)
if (nodeInfo != null)
int childCount =nodeInfo.getChildCount();
if("android.widget.Button".equals(nodeInfo.getClassName()))
String nodeCotent =nodeInfo.getText().toString();
Log.d(TAG, "content is:" + nodeCotent);
if ("安装".equals(nodeCotent) || "完成".equals(nodeCotent) || "确定".equals(nodeCotent))
nodeInfo.performAction(AccessibilityNodeInfo.ACTION_CLICK);
return true;
//遇到ScrollView的时候模拟滑动一下
else if("android.widget.ScrollView".equals(nodeInfo.getClassName()))
nodeInfo.performAction(AccessibilityNodeInfo.ACTION_SCROLL_FORWARD);
for (int i = 0; i < childCount;i++)
AccessibilityNodeInfochildNodeInfo = nodeInfo.getChild(i);
if(iterateNodesAndHandle(childNodeInfo))
return true;
return false;
当进入apk安装界面就会回调onAccessibilityEvent()这个方法,我们只关心TYPE_WINDOW_CONTENT_CHANGED和TYPE_WINDOW_STATE_CHANGED两个事件,为了防止重复处理事件,用一个map来过滤事件,后面递归遍历节点,找到’安装’ ‘完成’ ‘确定’ 的按钮,就点击,由于安装界面需要滚动一下才能出现安装按钮,所以遇到ScrollView的时候就滚动一下.
(3) 在AndroidManifest中配置服务
重点是后面的service标签:
android:label:这个就是用户看到的无障碍服务的名称
android:permission:需要用到BIND_ACCESSIBILITY_SERVICE这个权限.
action:android.accessibilityservice.AccessibilityService 有了这个action,用户才能在设置里面看到我们的服务,否则用户无法开启我们写的服务,也就不能进到我们写的MyAccessibilityService里面了.所以,注意不要写错了,如果你发现无障碍服务里面没有我们写的服务,请检查这里.
(4) 调用智能安装代码
前面准备工作完毕后,现在要用了,调用智能安装的代码如下:
//智能安装
private void smartInstall()
Uri uri = Uri.fromFile(newFile("/mnt/sdcard/test.apk"));
Intent localIntent = newIntent(Intent.ACTION_VIEW);
localIntent.setDataAndType(uri,"application/vnd.android.package-archive");
startActivity(localIntent);
(5) 手动配置智能安装服务
代码运行之后,还要用户选择开启智能安装服务,让用户自己去找是不明智的,因此,我们要主动跳到配置界面,代码如下:
//跳转到开启智能安装服务的界面
Intent intent =new Intent(Settings.ACTION_ACCESSIBILITY_SETTINGS);
startActivity(intent);
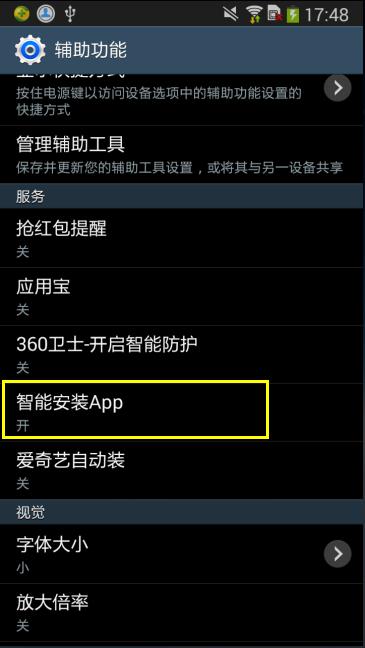
配置如下图:

看到了吗,上面显示的就是Service里面的label的值,如果你没有上面的选项,请检查AndroidManifest里面Service的配置.
点击’智能安装App’,开启服务,如下图:

其中的提示文字就是我们在res/xml/accessibility_service_config.xml文件中配置的description属性
7 只能我们写的app可以自动安装
这样写完代码可以运行,点击按钮自动安装sdcard上的test.apk.但是你会发现,所有apk都会自动安装,这就不符合我们的要求了,我们要求只能通过我们写的app来自动安装,其他apk还是要用户手动去点。怎么解决这个问题呢?
思路是:在MainActivity中创建一个public static boolean flag,在MyAccessibilityService的onAccessibilityEvent()中加一个flag判断,然后调用智能安装前flag设为true,创建apk安装事件的广播接收器,当apk安装完成后,设置falg为false,这样其他apk就不能自动安装了,就解决了这个问题
下面上完整代码.
8 完整代码
app/MainActivity.java:
public classMainActivity extends AppCompatActivity implements View.OnClickListener
private static final String TAG ="[TAG][MainActivity]";
private static final String PACKAGE_NAME ="com.qiyi.video";
private String apkPath ="/mnt/sdcard/test.apk";
public static boolean flag = false;//控制只能自己的app才能执行智能安装
private TextView tvTest;
private MyInstallReceiver receiver;
@Override
protected void onCreate(BundlesavedInstanceState)
super.onCreate(savedInstanceState);
setContentView(R.layout.activity_main);
tvTest = (TextView)findViewById(R.id.tv_test);
findViewById(R.id.btn_install).setOnClickListener(this);
findViewById(R.id.btn_uninstall).setOnClickListener(this);
findViewById(R.id.btn_set).setOnClickListener(this);
findViewById(R.id.btn_smart_install).setOnClickListener(this);
//注册apk安装监听
receiver = new MyInstallReceiver();
IntentFilter filter = newIntentFilter();
filter.addAction("android.intent.action.PACKAGE_ADDED");
filter.addAction("android.intent.action.PACKAGE_REMOVED");
filter.addDataScheme("package");
this.registerReceiver(receiver,filter);
@Override
public void onClick(View v)
switch (v.getId())
//静默安装
case R.id.btn_install:
installSlient();
break;
//静默卸载
case R.id.btn_uninstall:
uninstallSlient();
break;
//设置无障碍服务
case R.id.btn_set:
//跳转到开启无障碍服务的界面
Intent intent = newIntent(Settings.ACTION_ACCESSIBILITY_SETTINGS);
startActivity(intent);
break;
//智能安装
case R.id.btn_smart_install:
//控制只能自己的app才能智能安装
flag = true;
smartInstall();
break;
//静默安装
private void installSlient()
String cmd = "pm install -r/mnt/sdcard/test.apk";
Process process = null;
DataOutputStream os = null;
BufferedReader successResult = null;
BufferedReader errorResult = null;
StringBuilder successMsg = null;
StringBuilder errorMsg = null;
try
//静默安装需要root权限
process =Runtime.getRuntime().exec("su");
os = newDataOutputStream(process.getOutputStream());
os.write(cmd.getBytes());
os.writeBytes("\\n");
os.writeBytes("exit\\n");
os.flush();
//执行命令
process.waitFor();
//获取返回结果
successMsg = new StringBuilder();
errorMsg = new StringBuilder();
successResult = newBufferedReader(new InputStreamReader(process.getInputStream()));
errorResult = newBufferedReader(new InputStreamReader(process.getErrorStream()));
String s;
while ((s = successResult.readLine())!= null)
successMsg.append(s);
while ((s = errorResult.readLine())!= null)
errorMsg.append(s);
catch (Exception e)
e.printStackTrace();
finally
try
if (os != null)
os.close();
if (process != null)
process.destroy();
if (successResult != null)
successResult.close();
if (errorResult != null)
errorResult.close();
catch (Exception e)
e.printStackTrace();
//显示结果
tvTest.setText("成功消息:" + successMsg.toString() +"\\n" + "错误消息: " + errorMsg.toString());
//静默卸载
private void uninstallSlient()
String cmd = "pm uninstall "+ PACKAGE_NAME;
Process process = null;
DataOutputStream os = null;
BufferedReader successResult = null;
BufferedReader errorResult = null;
StringBuilder successMsg = null;
StringBuilder errorMsg = null;
try
//卸载也需要root权限
process =Runtime.getRuntime().exec("su");
os = newDataOutputStream(process.getOutputStream());
os.write(cmd.getBytes());
os.writeBytes("\\n");
os.writeBytes("exit\\n");
os.flush();
//执行命令
process.waitFor();
//获取返回结果
successMsg = new StringBuilder();
errorMsg = new StringBuilder();
successResult = newBufferedReader(new InputStreamReader(process.getInputStream()));
errorResult = newBufferedReader(new InputStreamReader(process.getErrorStream()));
String s;
while ((s =successResult.readLine()) != null)
successMsg.append(s);
while ((s = errorResult.readLine())!= null)
errorMsg.append(s);
catch (Exception e)
e.printStackTrace();
finally
try
if (os != null)
os.close();
if (process != null)
process.destroy();
if (successResult != null)
successResult.close();
if (errorResult != null)
errorResult.close();
catch (Exception e)
e.printStackTrace();
//显示结果
tvTest.setText("成功消息:" + successMsg.toString() +"\\n" + "错误消息: " + errorMsg.toString());
//智能安装
private void smartInstall()
Uri uri = Uri.fromFile(newFile(apkPath));
Intent localIntent = newIntent(Intent.ACTION_VIEW);
localIntent.setDataAndType(uri,"application/vnd.android.package-archive");
startActivity(localIntent);
//监听apk安装
private class MyInstallReceiver extendsBroadcastReceiver
@Override
public void onReceive(Context context,Intent intent)
if(intent.getAction().equals("android.intent.action.PACKAGE_ADDED")) // install
String packageName =intent.getDataString();
Log.i(TAG, "安装了 :" + packageName);
//安装完毕,设置flag,从而使得其余的apk不能自动安装
flag = false;
if(intent.getAction().equals("android.intent.action.PACKAGE_REMOVED")) // uninstall
String packageName =intent.getDataString();
Log.i(TAG, "卸载了 :" + packageName);
@Override
protected void onDestroy()
super.onDestroy();
if (receiver != null)
unregisterReceiver(receiver);
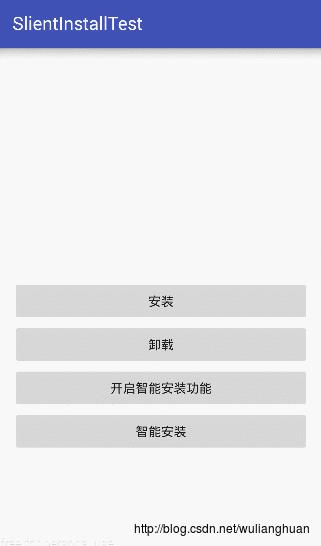
界面上就三个按钮
res/layout/activity_main.xml:
服务配置文件
res/xml/accessibility_service_config.xml
智能安装服务
app/MyAccessibilityService.java:
public classMyAccessibilityService extends AccessibilityService
private static final String TAG ="[TAG]";
private Map handleMap = newHashMap<>();
@Override
public voidonAccessibilityEvent(AccessibilityEvent event)
AccessibilityNodeInfo nodeInfo =event.getSource();
if (nodeInfo != null &&MainActivity.flag)
int eventType = event.getEventType();
if (eventType ==AccessibilityEvent.TYPE_WINDOW_CONTENT_CHANGED || eventType ==AccessibilityEvent.TYPE_WINDOW_STATE_CHANGED)
if(handleMap.get(event.getWindowId()) == null)
boolean handled =iterateNodesAndHandle(nodeInfo);
if (handled)
handleMap.put(event.getWindowId(), true);
@Override
public void onInterrupt()
//遍历节点,模拟点击安装按钮
private booleaniterateNodesAndHandle(AccessibilityNodeInfo nodeInfo)
if (nodeInfo != null)
int childCount =nodeInfo.getChildCount();
if ("android.widget.Button".equals(nodeInfo.getClassName()))
String nodeCotent =nodeInfo.getText().toString();
Log.d(TAG, "content is:" + nodeCotent);
if ("安装".equals(nodeCotent) || "完成".equals(nodeCotent) || "确定".equals(nodeCotent))
nodeInfo.performAction(AccessibilityNodeInfo.ACTION_CLICK);
return true;
//遇到ScrollView的时候模拟滑动一下
else if("android.widget.ScrollView".equals(nodeInfo.getClassName()))
nodeInfo.performAction(AccessibilityNodeInfo.ACTION_SCROLL_FORWARD);
for (int i = 0; i < childCount;i++)
AccessibilityNodeInfochildNodeInfo = nodeInfo.getChild(i);
if(iterateNodesAndHandle(childNodeInfo))
return true;
return false;
注意:请把自己要安装的apk放到sdcard上,并且修改代码中的apk路径和包名
9 运行效果

10 总结
Android智能安装的原理就是利用了类似钩子的服务,这个服务还可以用于微信抢红包的开发,怎么样,是不是比ios好玩儿的多呢.
以上是关于android怎么实现apk的静默安装的主要内容,如果未能解决你的问题,请参考以下文章