Matlab 双目标定 自动化程序
Posted
tags:
篇首语:本文由小常识网(cha138.com)小编为大家整理,主要介绍了Matlab 双目标定 自动化程序相关的知识,希望对你有一定的参考价值。
参考技术A %实现.m文件自动化双目标定% Auto-generated by stereoCalibrator app on 10-Jul-2019
%-------------------------------------------------------
%function stereoParams = tereoCameraCalibrator01(file_path01,file_path02)
h=waitbar(0,'计算中,请稍候!');%增加进度条
file_path01 = 'left\';% 图像文件夹路径
file_path02 = 'right\';% 图像文件夹路径
img_path_list01 = dir(strcat(file_path01,'*.png'));%获取该文件夹中所有.PNG格式的图像
img_num01 = length(img_path_list01);%获取图像总数
imageFileNames1 = cell(1,img_num01);
if img_num01 > 0 %有满足条件的图像
for pn = 1:img_num01 %逐一读取图像
image_name = img_path_list01(pn).name;% 图像名
%img_origin = imread(strcat(file_path01,image_name));%读取图像
imageFileNames1(1,pn) = strcat(file_path01,image_name);
%fprintf('%d %s\n',pn,strcat(file_path01,image_name));% 显示正在处理的图像名
%%此处添加具体的图像处理程序
end
end
img_path_list02 = dir(strcat(file_path02,'*.png'));%获取该文件夹中所有.PNG格式的图像
img_num02 = length(img_path_list02);%获取图像总数
imageFileNames2 = cell(1,img_num02);
if img_num02 > 0 %有满足条件的图像
for pn = 1:img_num02 %逐一读取图像
image_name = img_path_list02(pn).name;% 图像名
%img_origin = imread(strcat(file_path01,image_name));%读取图像
imageFileNames2(1,pn) = strcat(file_path02,image_name);
%fprintf('%d %s\n',pn,strcat(file_path01,image_name));% 显示正在处理的图像名
%%此处添加具体的图像处理程序
end
end
waitbar(0.1);
% Detect checkerboards in images
[imagePoints, boardSize, imagesUsed] = detectCheckerboardPoints(imageFileNames1, imageFileNames2);
waitbar(0.2);
% Generate world coordinates of the checkerboard keypoints
squareSize = 24; % in units of 'millimeters'
worldPoints = generateCheckerboardPoints(boardSize, squareSize);
waitbar(0.3);
% Read one of the images from the first stereo pair
I1 = imread(imageFileNames11);
[mrows, ncols, ~] = size(I1);
waitbar(0.4);
% Calibrate the camera
[stereoParams, pairsUsed, estimationErrors] = estimateCameraParameters(imagePoints, worldPoints, ...
'EstimateSkew', false, 'EstimateTangentialDistortion', true, ...
'NumRadialDistortionCoefficients', 3, 'WorldUnits', 'millimeters', ...
'InitialIntrinsicMatrix', [], 'InitialRadialDistortion', [], ...
'ImageSize', [mrows, ncols]);
waitbar(0.8);
% View reprojection errors
h1=figure; showReprojectionErrors(stereoParams);
% Visualize pattern locations
h2=figure; showExtrinsics(stereoParams, 'CameraCentric');
waitbar(0.9);
% Display parameter estimation errors
%displayErrors(estimationErrors, stereoParams);
% You can use the calibration data to rectify stereo images.
%I2 = imread(imageFileNames21);
%[J1, J2] = rectifyStereoImages(I1, I2, stereoParams);
% See additional examples of how to use the calibration data. At the prompt type:
% showdemo('StereoCalibrationAndSceneReconstructionExample')
% showdemo('DepthEstimationFromStereoVideoExample')
fid=fopen('CameraParameter.txt','wt');
fprintf(fid,'stereoParams.RotationOfCamera2:\n');
fprintf(fid,'%f %f %f \n',stereoParams.RotationOfCamera2);
fprintf(fid,'stereoParams.TranslationOfCamera2:\n');
fprintf(fid,'%f %f %f\n',stereoParams.TranslationOfCamera2);
fprintf(fid,'stereoParams.CameraParameters1.IntrinsicMatrix:\n');
fprintf(fid,'%f %f %f\n',stereoParams.CameraParameters1.IntrinsicMatrix);
fprintf(fid,'stereoParams.CameraParameters2.IntrinsicMatrix:\n');
fprintf(fid,'%f %f %f\n',stereoParams.CameraParameters2.IntrinsicMatrix);
fclose(fid);
close(h);
%mcc -mv tereoCameraCalibrator01.m
Matlab双目相机标定
1 概述
现在有许多双目相机在出厂时就已经标定好了,用户拿到手后可以直接使用,例如Intel Realsense系列。但是有些相机出厂的时候并没有完成标定工作,因而这个时候就需要我们自己来标定。由于笔者曾改装过一个双目相机,最远可以测至50m,因此有一些心得体会想给大家分享一下。本文主要介绍双目相机标定的整个过程,以及导出标定数据的方法。
相机标定主要分为手动标定和自动标定,手动标定比较繁琐,这里主要介绍基于matlab工具箱的自动标定方式来对双目相机进行标定。具体的相关标定细节也可以参照这篇博客:matlab双目标定(详细过程),里面有详细介绍。
2 Matlab工具箱标定
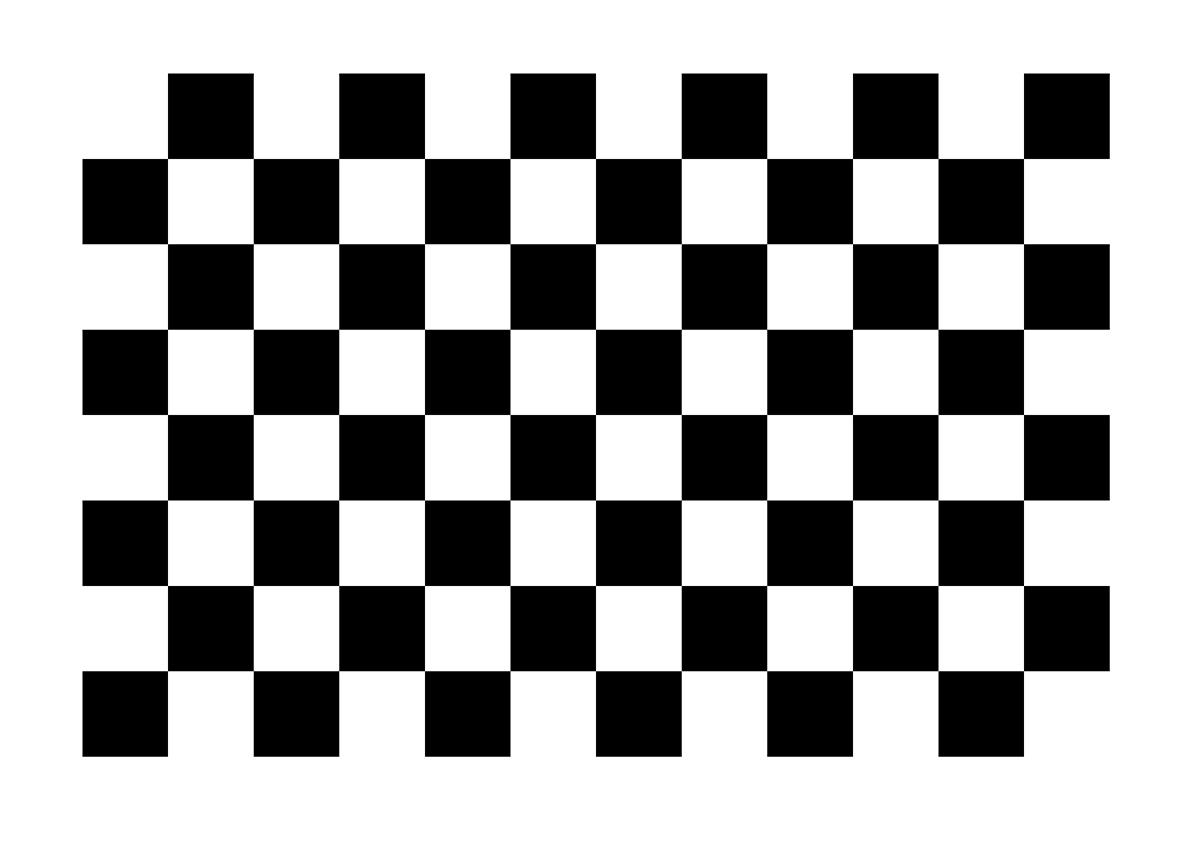
首先需要准备一张棋盘,如下图所示。对于标定不同测距范围相机所用的棋盘方格宽度会有所不同。对于短焦双目相机(测距范围在20m以内),棋盘中方格的宽度达到20mm即可;对于长焦双目相机(测距范围在40m左右),棋盘中方格的宽度需要尽量大,否则会影响标定的精度,一般至少达到60mm。
笔者在标定长焦相机时方格长宽选择60mm。然后运行项目文件中photo.py脚本文件对棋盘进行多角度拍摄,每按下一次s键,会保存一组左右镜头的照片,照片保存的路径参数可以由用户自由设定,参数名为folder。
# !/usr/bin/python
# -*- coding: utf-8 -*-
import cv2
import time

AUTO = False  # 自动拍照,或手动按s键拍照
INTERVAL = 2  # 自动拍照间隔

cap = cv2.VideoCapture(0 + cv2.CAP_DSHOW)  # windows下开启摄像头是采用如下语句(微软特有):cv2.VideoCapture( camera_number + cv2.CAP_DSHOW)
cap.set(cv2.CAP_PROP_FRAME_WIDTH, 2560)  # 设置双目的宽度
cap.set(cv2.CAP_PROP_FRAME_HEIGHT, 720)  # 设置双目的高度

# 显示缓存数
# print(cap.get(cv2.CAP_PROP_BUFFERSIZE))
# 设置缓存区的大小
# cap.set(cv2.CAP_PROP_BUFFERSIZE, 1)

print(cap.get(cv2.CAP_PROP_FRAME_WIDTH))
print(cap.get(cv2.CAP_PROP_FRAME_HEIGHT))

#设置FPS
# print('setfps', cap.set(cv2.CAP_PROP_FPS, 25))
# print(cap.get(cv2.CAP_PROP_FPS))

counter = 0
utc = time.time()
folder = "images/"  # 拍照文件目录


def shot(pos, frame):
    global counter
    path = folder + pos + "_" + str(counter) + ".jpg"
    cv2.imwrite(path, frame)
    print("snapshot saved into: " + path)


while True:
    ret, frame = cap.read()

    if not ret:
        print("camera is not connected!")
        break

    left_frame = frame[0:720, 0:1280]
    right_frame = frame[0:720, 1280:2560]

    cv2.imshow("left", left_frame)
    cv2.imshow("right", right_frame)

    now = time.time()
    if AUTO and now - utc >= INTERVAL:
        shot("left", left_frame)
        shot("right", right_frame)
        counter += 1
        utc = now

    key = cv2.waitKey(1)
    if key == ord("q"):
        break
    elif key & 0xFF == ord("s"):
        shot("left", left_frame)
        shot("right", right_frame)
        counter += 1

cap.release()注意尽量拍摄多组照片,这样可以提高标定效果,标定效果的好坏直接影响到测距的精度。对于短焦相机通常拍摄40组照片即可;长焦相机通常会需要更多组照片,笔者在标定长焦相机时拍摄了60组。
照片拍摄好后,进入matlab标定工具箱,如下图所示。注意:不要选择matlab2020b版本,笔者测试过该版本无法正常使用标定工具箱,可以使用matlab2020a版本。

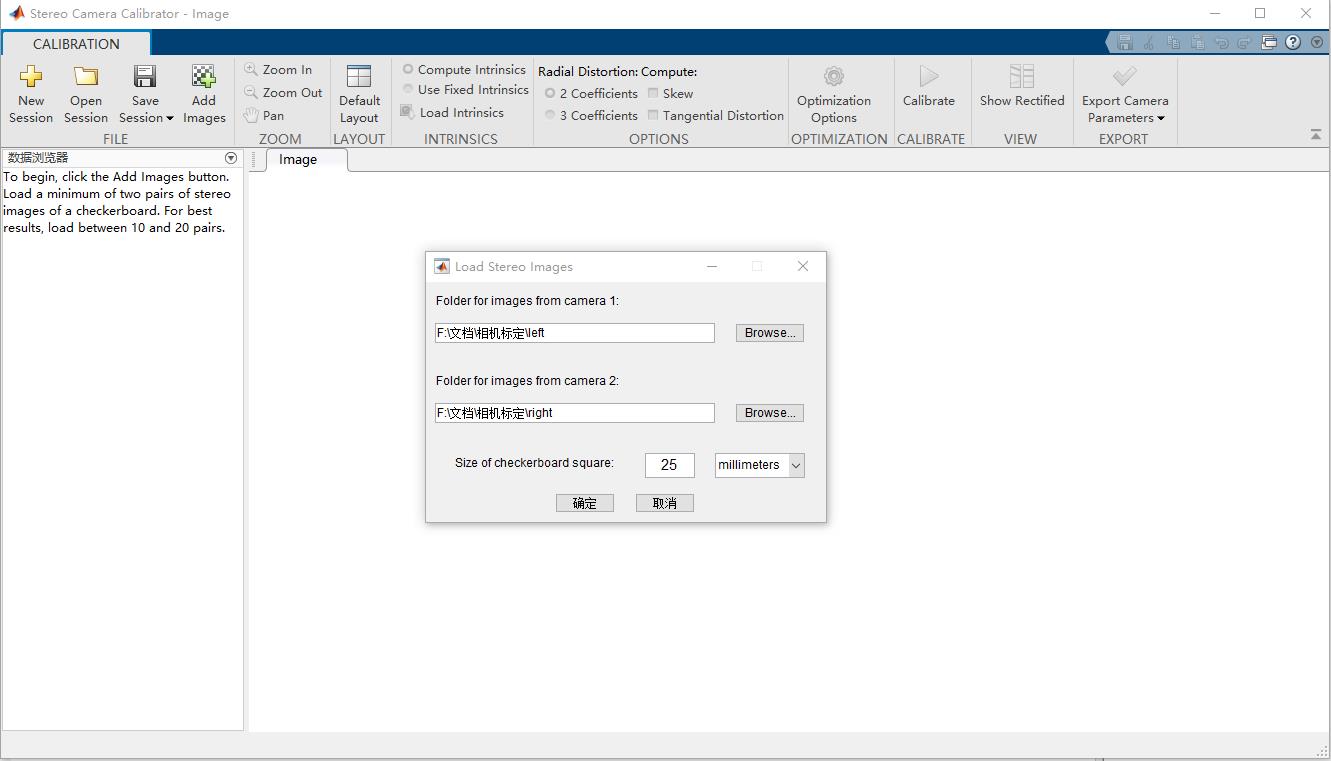
其中Stero Camera Cailbrator为双目标定工具箱,Camera Cailbrator为单目相机标定工具箱,因此这里选择Stero Camera Cailbrator工具箱。进入工具箱以后,选择Add Images。然后选择左右相机照片的路径,Size of checkerboard square为棋盘中每一个方格的长度,单位为毫米,一定要准确测量方格的长度,如下图所示。
点击确定以后,Radial Distortion Compute选择3 Coefficients和Tangential Distortion,然后点击Calibrate进行校准。不过校准前需要剔除一些原点不一致的点,保证所有照片的原点一致。校准过程中可以可以Reprojection Errors曲线,降低误差,如下图所示。

3 导出标定数据
标定好后将标定数据导入到工作空间,点击Export Camera Parameters即可。此时我们已经拿到标定数据了,为了避免手工获取数据时出错,笔者写了一个脚本可以直接获取标定数据,并保存到表格文件中,之后直接复制粘贴即可。
rowName = cell(1,10);
rowName1,1 = '平移矩阵';
rowName1,2 = '旋转矩阵';
rowName1,3 = '相机1内参矩阵';
rowName1,4 = '相机1径向畸变';
rowName1,5 = '相机1切向畸变';
rowName1,6 = '相机2内参矩阵';
rowName1,7 = '相机2径向畸变';
rowName1,8 = '相机2切向畸变';
rowName1,9 = '相机1畸变向量';
rowName1,10 = '相机2畸变向量';
xlswrite('out.xlsx',rowName(1,1),1,'A1');
xlswrite('out.xlsx',rowName(1,2),1,'A2');
xlswrite('out.xlsx',rowName(1,3),1,'A5');
xlswrite('out.xlsx',rowName(1,4),1,'A8');
xlswrite('out.xlsx',rowName(1,5),1,'A9');
xlswrite('out.xlsx',rowName(1,6),1,'A10');
xlswrite('out.xlsx',rowName(1,7),1,'A13');
xlswrite('out.xlsx',rowName(1,8),1,'A14');
xlswrite('out.xlsx',rowName(1,9),1,'A15');
xlswrite('out.xlsx',rowName(1,10),1,'A16');
xlswrite('out.xlsx',stereoParams.TranslationOfCamera2,1,'B1'); % 平移矩阵
xlswrite('out.xlsx',stereoParams.RotationOfCamera2.',1,'B2'); % 旋转矩阵
xlswrite('out.xlsx',stereoParams.CameraParameters1.IntrinsicMatrix.',1,'B5'); % 相机1内参矩阵
xlswrite('out.xlsx',stereoParams.CameraParameters1.RadialDistortion,1,'B8'); % 相机1径向畸变(1,2,5)
xlswrite('out.xlsx',stereoParams.CameraParameters1.TangentialDistortion,1,'B9'); % 相机1切向畸变(3,4)
xlswrite('out.xlsx',stereoParams.CameraParameters2.IntrinsicMatrix.',1,'B10'); % 相机2内参矩阵
xlswrite('out.xlsx',stereoParams.CameraParameters2.RadialDistortion,1,'B13'); % 相机2径向畸变(1,2,5)
xlswrite('out.xlsx',stereoParams.CameraParameters2.TangentialDistortion,1,'B14'); % 相机2切向畸变(3,4)
xlswrite('out.xlsx',[stereoParams.CameraParameters1.RadialDistortion(1:2), stereoParams.CameraParameters1.TangentialDistortion,...
stereoParams.CameraParameters1.RadialDistortion(3)],1,'B15'); % 相机1畸变向量
xlswrite('out.xlsx',[stereoParams.CameraParameters2.RadialDistortion(1:2), stereoParams.CameraParameters2.TangentialDistortion,...
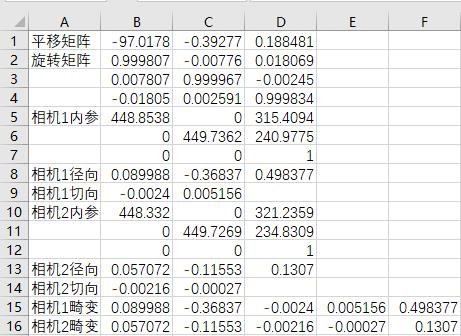
stereoParams.CameraParameters2.RadialDistortion(3)],1,'B16'); % 相机2畸变向量标定数据文件保存的路径即为当前程序的路径,要想保存到其他路径直接修改脚本中的路径即可,导出的参数如下图所示。
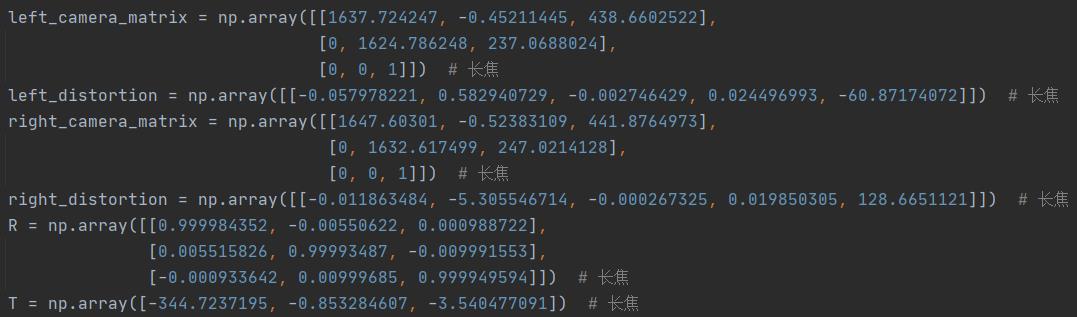
将表格中的数据复制到双目相机配置文件中,其中相机1内参复制到left_camera_matrix中,相机1畸变复制到left_distortion中,相机2内参复制到right_camera_matrix中,相机2畸变复制到right_distortion中,旋转矩阵复制到R中,转移矩阵复制到T中,如下图所示。
至此,双目标定部分就已经完成。注意:标定时照片的尺寸与测距时照片的尺寸一定要保持一致。
以上是关于Matlab 双目标定 自动化程序的主要内容,如果未能解决你的问题,请参考以下文章