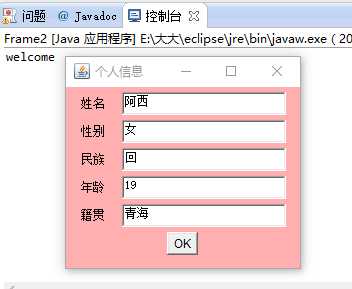
事件监听 计算器界面
Posted kongdexiu-13
tags:
篇首语:本文由小常识网(cha138.com)小编为大家整理,主要介绍了事件监听 计算器界面相关的知识,希望对你有一定的参考价值。
1.事件监听:
package 事件监听;
import java.awt.*;
import java.awt.event.*;
public class Frame2 extends Frame implements ActionListener{
private Button button1;
public Frame2()
{
super("个人信息");
this.setSize(250,220);//设计组件的尺寸
this.setLocation(800,600);//设计组件显示的位置
this.setBackground(Color.pink);//设计背景颜色
this.setLayout(new FlowLayout());//设计容器为流布局,居中
this.add(new Label("姓名"));
this.add(new TextField("大大",20));
this.add(new Label("性别"));
this.add(new TextField("女",20));
this.add(new Label("民族"));
this.add(new TextField("汉",20));
this.add(new Label("年龄"));
this.add(new TextField("19",20));
this.add(new Label("籍贯"));
this.add(new TextField("青海",20));
button1=new Button("OK");
this.add(button1);
button1.addActionListener(this);
this.addWindowListener(new WinClose());
this.setVisible(true);
}
public void actionPerformed(ActionEvent ev)
{
if(ev.getSource()==button1)
{
System.out.print("welcome");
}
}
public static void main(String arg[])
{
new Frame2();
}
class WinClose implements WindowListener
{
public void windowClosing(WindowEvent ev)
{
System.exit(0);
}
public void windowOpened(WindowEvent ev) {}
public void windowActivated(WindowEvent ev) {}
public void windowDeactivated(WindowEvent ev) {}
public void windowClose(WindowEvent ev) {}
public void windowIconified(WindowEvent ev) {}
public void windowDeiconified(WindowEvent ev) {}
@Override
public void windowClosed(WindowEvent arg0) {
// TODO 自动生成的方法存根
}
}
}

2.计算器:
package 计算器;
import java.awt.*;
import java.awt.event.*;
import javax.swing.*;
import java.util.Stack; //Stack是一个后进先出的堆栈
public class Frame2 extends JFrame implements ActionListener {
String []An= {"7","8","9","+","4","5","6","-",
"1","2","3","*","0",".","=","/"};
JButton b[]=new JButton[16];
JTextField jt;
String input=""; //输入的字符串
public Frame2() {
Container P=getContentPane(); //用getContentPane()方法获得JFrame的内容面板
JPanel jp1=new JPanel();
JPanel jp2=new JPanel();
JPanel jp3=new JPanel();
JButton b1=new JButton("清零");
JButton b2=new JButton("退格");
GridLayout g=new GridLayout(4,4,3,3); //4*4网格,间距3
jp1.setLayout(new BorderLayout()); //边布局
jp2.setLayout(g);
jp3.setLayout(new GridLayout(1, 2,3,3));
jt=new JTextField();
jt.setPreferredSize(new Dimension(160,30)); //文本大小
jt.setHorizontalAlignment(SwingConstants.LEFT); //左对齐
P.add(jp1,BorderLayout.NORTH); //北
jp1.add(jt,BorderLayout.WEST); //西
jp1.add(jp3,BorderLayout.EAST); //东
jp3.add(b1);
jp3.add(b2);
b1.setBackground(Color.lightGray);
b2.setBackground(Color.lightGray);
b1.addActionListener(this); //定义处理事件的方法
b2.addActionListener(this);
for(int i=0;i<16;i++) //添加按钮
{
b[i]=new JButton(An[i]);
jp2.add(b[i]);
b[i].addActionListener(this);
}
P.add(jp2,BorderLayout.CENTER);
setVisible(true);
setDefaultCloseOperation(WindowConstants.EXIT_ON_CLOSE);
setSize(300, 250);
setTitle("计算器");
}
@Override
public void actionPerformed(ActionEvent e) {
int t=0;
String s=e.getActionCommand();
if(s.equals("+")||s.equals("-")||s.equals("*")||s.equals("/")) {
input+=" "+s+" "; //如果碰到运算符,就在运算符前后分别加一个空格
}else if(s.equals("清零")) {
input="";
}else if(s.equals("退格")) {
if((input.charAt(input.length()-1))==‘ ‘) //检测字符串的最后一个字符是否为空格
{
input=input.substring(0,input.length()-3); //如果是则删除末尾3个字符
}
else //否则删除1个字符
{
input=input.substring(0,input.length()-1);
}
}
else if(s.equals("=")) {
input=compute(input);
jt.setText(input);
input="";
t=1;
}
else
input += s;
if(t==0) {
jt.setText(input);
}
}
private String compute(String str) {
String array[];
array=str.split(" ");
Stack<Double> s=new Stack<Double>();
Double a=Double.parseDouble(array[0]);
s.push(a);
for(int i=1;i<array.length;i++) {
if(i%2==1) {
if(array[i].compareTo("+")==0)
{
double b= Double.parseDouble(array[i+1]);
s.push(b);
}
if(array[i].compareTo("-")==0)
{
double b= Double.parseDouble(array[i+1]);
s.push(-b);
}
if(array[i].compareTo("*")==0)
{
double b= Double.parseDouble(array[i+1]);
double c=s.pop();
c*=b;
s.push(c);
}
if(array[i].compareTo("/")==0)
{
double b= Double.parseDouble(array[i+1]);
double c=s.peek();
s.pop();
c/=b;
s.push(c);
}
}
}
double sum=0;
while(!s.isEmpty()) {
sum+=s.pop();
}
String result=String.valueOf(sum);
return result;
}
public static void main(String[] args) {
new Frame2();
}
}

以上是关于事件监听 计算器界面的主要内容,如果未能解决你的问题,请参考以下文章