Gitlab基本管理
Posted zangxueyuan
tags:
篇首语:本文由小常识网(cha138.com)小编为大家整理,主要介绍了Gitlab基本管理相关的知识,希望对你有一定的参考价值。
一. Gitlab分支
1. 切换到项目位置。
2. 创建一个项目的一新分支。
[email protected] MINGW64 ~/cookbook/cookbook (master)
$ git branch first-branch
3. 切换到新建的分支下。
[email protected] MINGW64 ~/cookbook/cookbook (master)
$ git checkout first-branch
Switched to branch ‘first-branch‘[email protected] MINGW64 ~/cookbook/cookbook (first-branch)
4. 第2步和第3步可以合并成一步。
[email protected] MINGW64 ~/cookbook/cookbook (first-branch)
$ git checkout -b first-branch
5. 改变文件的内容。
[email protected] MINGW64 ~/cookbook/cookbook (first-branch)
$ echo "Change" >> README.md
6. 提交这个改变
$ git commit -a -m ‘Readme changed‘
warning: LF will be replaced by CRLF in README.md.
The file will have its original line endings in your working directory.
[first-branch dc7b6d5] Readme changed
1 file changed, 1 insertion(+)
7. 推送分支到gitlab服务器
[email protected] MINGW64 ~/cookbook/cookbook (first-branch)
$ git push -u origin first-branch
Counting objects: 3, done.
Writing objects: 100% (3/3), 262 bytes | 131.00 KiB/s, done.
Total 3 (delta 0), reused 0 (delta 0)
remote:
remote: To create a merge request for first-branch, visit:
remote: http://gitlab.aishangwei.net/root/cookbook/merge_requests/new?merge_request%5Bsource_branch%5D=first-branch
remote:
To gitlab.aishangwei.net:root/cookbook.git
* [new branch] first-branch -> first-branch
Branch ‘first-branch‘ set up to track remote branch ‘first-branch‘ from ‘origin‘.
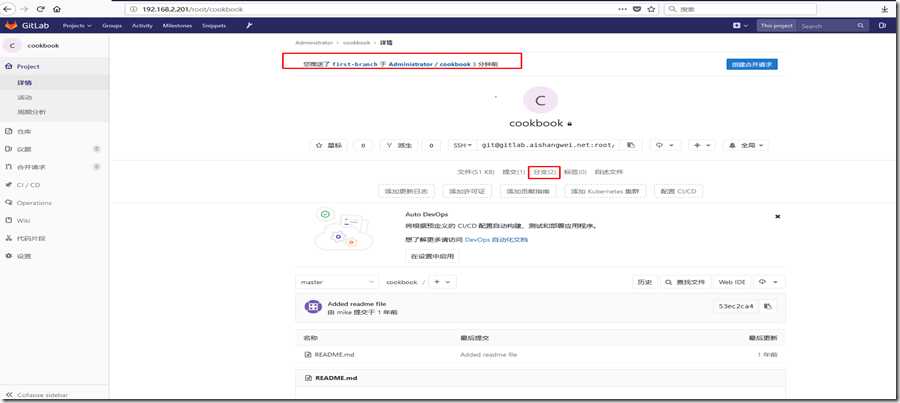
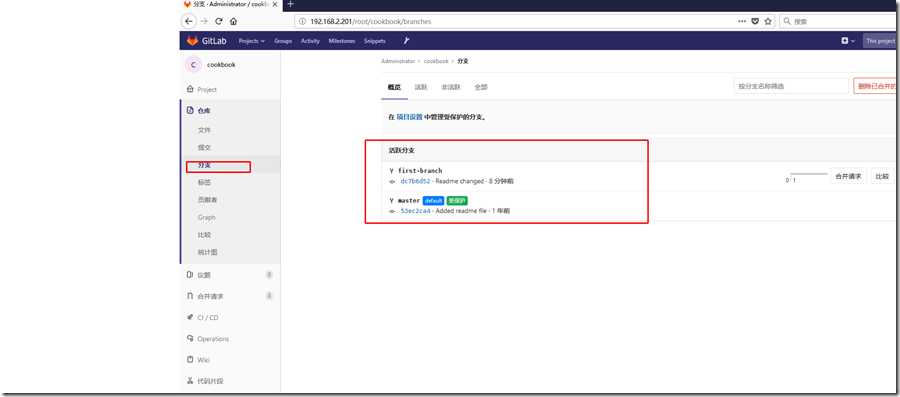
8. 在Gitlab服务器查看我们推送的分支
9. 从以下图可以看到创建的分支first-branch和master分支。
10. 切换到master分支。
$ git checkout master
Switched to branch ‘master‘
Your branch is up to date with ‘origin/master‘.
11. 合并first-branch分支到master分支。
$ git merge first-branch –no-ff
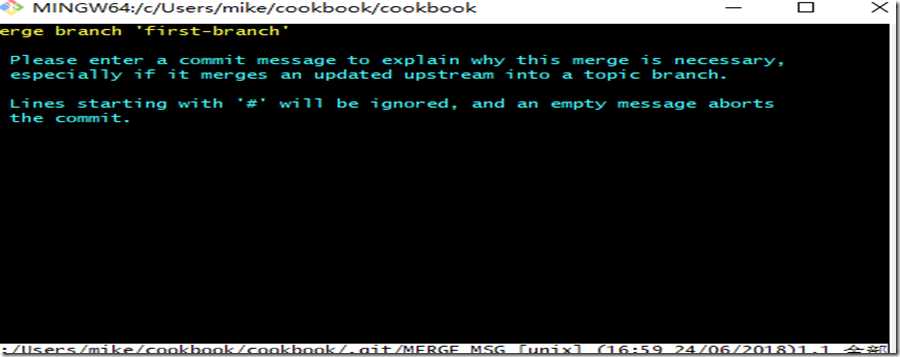
12. 从第11步输出的信息可以看到,给我们一个机会去改变提交的信息。在我们保存和关闭编辑器的时候,这个分支将会合并,具体信息如下.
[email protected] MINGW64 ~/cookbook/cookbook (master)
$ git merge first-branch --no-ff
Merge made by the ‘recursive‘ strategy.
README.md | 1 +
1 file changed, 1 insertion(+)
13. 推送改变到Gitlab上的master.
[email protected] MINGW64 ~/cookbook/cookbook (master)
$ git push origin master
Counting objects: 1, done.
Writing objects: 100% (1/1), 223 bytes | 223.00 KiB/s, done.
Total 1 (delta 0), reused 0 (delta 0)
To gitlab.aishangwei.net:root/cookbook.git
53ec2ca..5e1ebdd master –> master
14. 删除所创建的分支。
[email protected] MINGW64 ~/cookbook/cookbook (master)
$ git push origin --delete first-branch
To gitlab.aishangwei.net:root/cookbook.git
- [deleted] first-branch
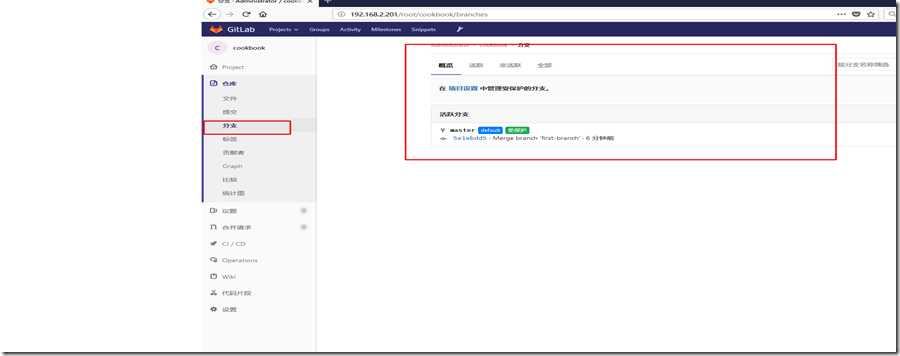
15. 在gitlab服务器上查看信息如下。
二. 执行rebase操作
当我们长时间的运行在分支上的话,我们有时想要同步master,可以通过合并到master后,再切换到我们所在的分支,Git有一个更好的方式来这个,叫做rebasing。 在rebasing中,相当于把你当前的branch分支合并到master,并同步master状态。不过是一步完成了。
1. 使用终端进入到cookbook项目,并创建一个分支。
[email protected] MINGW64 ~/cookbook/cookbook (master)
$ git checkout -b rebase-branch
Switched to a new branch ‘rebase-branch‘
2. 创建一个新的文件并提交它。
[email protected] MINGW64 ~/cookbook/cookbook (rebase-branch)
$ echo "File content" >> another_file.md[email protected] MINGW64 ~/cookbook/cookbook (rebase-branch)
$ git add .
warning: LF will be replaced by CRLF in another_file.md.
The file will have its original line endings in your working directory.[email protected] MINGW64 ~/cookbook/cookbook (rebase-branch)
$ git commit -m ‘Another commit‘
[rebase-branch c20f042] Another commit
1 file changed, 1 insertion(+)
create mode 100644 another_file.md
3. 切换到master分支。
[email protected] MINGW64 ~/cookbook/cookbook (rebase-branch)
$ git checkout master
Switched to branch ‘master‘
Your branch is up to date with ‘origin/master‘.
4. 假如先前推送过代码分支到Gitlab服务器,再执行rebase,那么在推送时候,可能服务器会报错。为了克服这个问题,可以使用-f参数。
$ git push origin rebase-branch –f
5. 在master分支上创建提交。
[email protected] MINGW64 ~/cookbook/cookbook (master)
$ echo "1" >> README.md[email protected] MINGW64 ~/cookbook/cookbook (master)
$ git add .
warning: LF will be replaced by CRLF in README.md.
The file will have its original line endings in your working directory.[email protected] MINGW64 ~/cookbook/cookbook (master)
$ git commit -m ‘Commit in master‘
[master acb491e] Commit in master
1 file changed, 1 insertion(+)
6. 切换到rebase-branch 分支
[email protected] MINGW64 ~/cookbook/cookbook (rebase-branch)
$ git rebase master
First, rewinding head to replay your work on top of it...
Applying: Another commit
三. 挤压提交信息(Squashing your commits)
在开发的时候可能由于频繁的提交信息,比较零散和片断,比如在提交多少次后,想做一个总结。这时候可以把前面几个合并成一个提交信息。
执行案例:
1. 进入到cookbook项目,并切换到squash-branch分支。
[email protected] MINGW64 ~/cookbook/cookbook (rebase-branch)
$ git checkout -b squash-branch
Switched to a new branch ‘squash-branch‘
2. 在squash-branch分支下创建两个提交 ,并把它两个提交挤压到一起。
[email protected] MINGW64 ~/cookbook/cookbook (squash-branch)
$ echo "1" >> README.md[email protected] MINGW64 ~/cookbook/cookbook (squash-branch)
$ git add .
warning: LF will be replaced by CRLF in README.md.
The file will have its original line endings in your working directory.[email protected] MINGW64 ~/cookbook/cookbook (squash-branch)
$ git commit -a -m ‘wip1‘
[squash-branch 4e54db8] wip1
1 file changed, 1 insertion(+)[email protected] MINGW64 ~/cookbook/cookbook (squash-branch)
$ echo "2" >> README.md[email protected] MINGW64 ~/cookbook/cookbook (squash-branch)
$ git add .
warning: LF will be replaced by CRLF in README.md.
The file will have its original line endings in your working directory.[email protected] MINGW64 ~/cookbook/cookbook (squash-branch)
$ git commit -a -m ‘wip2‘
[squash-branch 5d37a65] wip2
1 file changed, 1 insertion(+)
3. 通过以下命令可以查看我们的提交历史。
[email protected] MINGW64 ~/cookbook/cookbook (squash-branch)
$ git log --oneline
5d37a65 (HEAD -> squash-branch) wip2
4e54db8 wip1
f5f7fde (rebase-branch) Another commit
acb491e (master) Commit in master
5e1ebdd (origin/master) Merge branch ‘first-branch‘
dc7b6d5 (first-branch) Readme changed
53ec2ca Added readme file
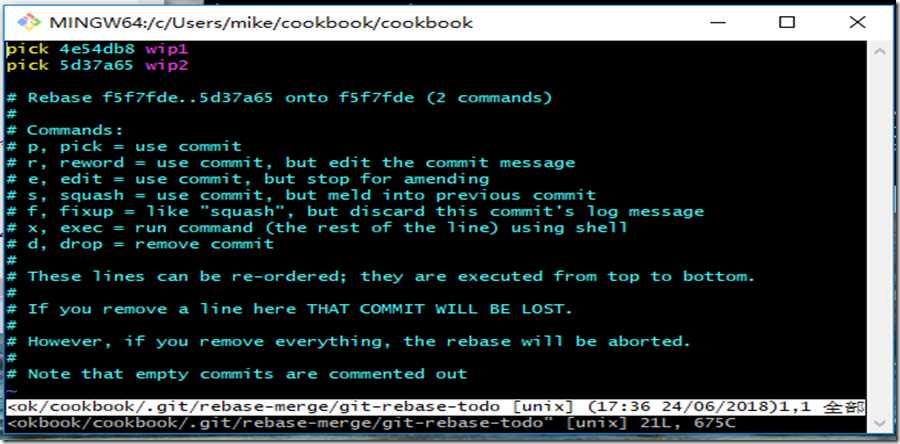
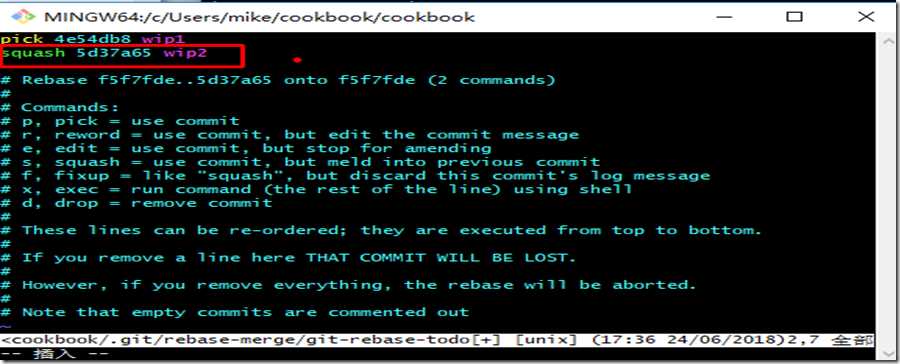
4. 把wip1和wip2的提交信息挤压在一个更好的提交信息中,执行以下命令。此时会打开一个编辑器。
$ git rebase –i HEAD~2
注解: HEAD~2 代表着我们想挤压最后两个提交。假如你想要挤压最后4个提交,那么使用HEAD~4
原始:
改变后:
5. 第4步编辑保存后,Git会打开另外一个编辑窗口,在这个窗口中,编辑提交信息并保存。会弹出如下画面。
$ git rebase -i HEAD~2
[detached HEAD 48f7dae] Added two number to the readme
Date: Sun Jun 24 17:33:08 2018 +0800
1 file changed, 2 insertions(+)
Successfully rebased and updated refs/heads/squash-branch.
6. push该分支到gitlab服务器。
$ git push origin squash-branch
Counting objects: 9, done.
Delta compression using up to 4 threads.
Compressing objects: 100% (5/5), done.
Writing objects: 100% (9/9), 839 bytes | 104.00 KiB/s, done.
Total 9 (delta 0), reused 0 (delta 0)
remote:
remote: To create a merge request for squash-branch, visit:
remote: http://gitlab.aishangwei.net/root/cookbook/merge_requests/new?merge_request%5Bsource_branch%5D=squash-branch
remote:
To gitlab.aishangwei.net:root/cookbook.git
* [new branch] squash-branch -> squash-branch
以上是关于Gitlab基本管理的主要内容,如果未能解决你的问题,请参考以下文章
