Elasticsearch7.x 配置解析jvm参数
Posted
tags:
篇首语:本文由小常识网(cha138.com)小编为大家整理,主要介绍了Elasticsearch7.x 配置解析jvm参数相关的知识,希望对你有一定的参考价值。
参考技术A 源码地址 https://github.com/elastic/elasticsearchES配置文件在$ES_HOME/config目录下,包含三个配置文件
jvm.options 关于JVM配置相关的
## JVM configuration
################################################################
## IMPORTANT: JVM heap size 重要的配置 堆内存
################################################################
##
## You should always set the min and max JVM heap
## size to the same value. For example, to set
## the heap to 4 GB, set:
## 初始堆和最大堆 设置相等 原因 : JVM初始分配的内存由-Xms指定,默认是物理内存的1/64;JVM最大分配的内存由-Xmx指定,默认是物理内存的1/4。默认空余堆内存小于40%时,JVM就会增大堆直到-Xmx的最大限制;空余堆内存大于70%时,JVM会减少堆直到-Xms的最小限制。因此服务器一般设置-Xms、-Xmx相等以避免在每次GC后调整堆的大小。
## -Xms4g
## -Xmx4g
## 关于堆的大小,参考官方文章,64位机器上大内存的使用最佳建议。
## See https://www.elastic.co/guide/en/elasticsearch/reference/current/heap-size.html
## for more information
##
################################################################
# Xms represents the initial size of total heap space
# Xmx represents the maximum size of total heap space
-Xms$heap.min
-Xmx$heap.max
################################################################
## Expert settings 顾名思义,没事不要乱动
################################################################
##
## All settings below this section are considered
## expert settings. Don't tamper with them unless
## you understand what you are doing
##
################################################################
## GC configuration CMS收集器 重点说下这两个参数,一般是成对出现,
XX:CMSInitiatingOccupancyFraction 指设定CMS在对内存占用率达到75%的时候开始GC
-XX+UseCMSInitiatingOccupancyOnly JVM通过CMSInitiatingOccupancyFraction设置的阀值来启动gc动作,划重点 1每一次 2 意味着gc动作不是通过运行时收集的数据来启动。
-XX:+UseConcMarkSweepGC
-XX:CMSInitiatingOccupancyFraction=75
-XX:+UseCMSInitiatingOccupancyOnly
## G1GC Configuration
# NOTE: G1GC is only supported on JDK version 10 or later. g1就不多说了,生产环境10+的应该很少。
# To use G1GC uncomment the lines below.
# 10-:-XX:-UseConcMarkSweepGC
# 10-:-XX:-UseCMSInitiatingOccupancyOnly
# 10-:-XX:+UseG1GC
# 10-:-XX:G1ReservePercent=25
# 10-:-XX:InitiatingHeapOccupancyPercent=30
那么,到底是选择CMS还是G1还是ZGC 其实取决你最终的节点内存配置,按照官方建议不超过64G的话,小于32G CMS 大于32小于64 G1。
## DNS cache policy
稍微解释一下,ES本身用自己的DNS缓存策略覆盖了JDK默认策略,还是贴个源码来看
启动类 org.elasticsearch.bootstrap.Elasticsearch.java
private static void overrideDnsCachePolicyProperties()
for(final String property:new String[] "networkaddress.cache.ttl","networkaddress.cache.negative.ttl")
final String overrideProperty = "es."+property;
final String overrideValue = System.getProperty(overrideProperty);
if(overrideValue!=null)
try
//为啥是Security.setProperty 自己领悟。历史原因!!!
Security.setProperty(property,Integer.toString(Integer.valueOf(overrideValue)));
catch(finalNumberFormatExceptione)
thrownewIllegalArgumentException(
"failed to parse ["+overrideProperty+"] with value ["+overrideValue+"]", e);
这两个参数解释下
networkaddress.cache.ttl DNS解析成功缓存时间
networkaddress.cache.negative.ttl DNS解析失败缓存时间
当然你也可以直接修改jdk默认值来实现,jdk1.8.0_202.jdk/Contents/Home/jre/lib/security/java.security 默认分别是-1永不过期 10秒过期
# cache ttl in seconds for positive DNS lookups noting that this overrides the
# JDK security property networkaddress.cache.ttl; set to -1 to cache forever
-Des.networkaddress.cache.ttl=60
# cache ttl in seconds for negative DNS lookups noting that this overrides the
# JDK security property networkaddress.cache.negative ttl; set to -1 to cache
# forever
-Des.networkaddress.cache.negative.ttl=10
## optimizations
# pre-touch memory pages used by the JVM during initialization
这个参数至关重要,虽然说配置了JVM内存,但是真实的内存诉求要等到JVM真正使用的时候才分配。一句话,操作系统给JVM画的内存饼啥时候实现?
优势 1加速Eden分配速度 2 减少YGC时间
劣势 进程启动需要更多时间
自行选择吧
-XX:+AlwaysPreTouch
## basic
# explicitly set the stack size 不多讲了,栈的大小自行调节。
-Xss1m
# set to headless, just in case 不重要的参数,可以不关注了。。。。
-Djava.awt.headless=true
# ensure UTF-8 encoding by default (e.g. filenames)
-Dfile.encoding=UTF-8
# use our provided JNA always versus the system one
-Djna.nosys=true
# turn off a JDK optimization that throws away stack traces for common
# exceptions because stack traces are important for debugging
-XX:-OmitStackTraceInFastThrow
# flags to configure Netty
-Dio.netty.noUnsafe=true
-Dio.netty.noKeySetOptimization=true
-Dio.netty.recycler.maxCapacityPerThread=0
-Dio.netty.allocator.numDirectArenas=0
# log4j 2
-Dlog4j.shutdownHookEnabled=false
-Dlog4j2.disable.jmx=true
-Djava.io.tmpdir=$ES_TMPDIR
## heap dumps
# generate a heap dump when an allocation from the Java heap fails
# heap dumps are created in the working directory of the JVM
-XX:+HeapDumpOnOutOfMemoryError
# specify an alternative path for heap dumps; ensure the directory exists and
# has sufficient space
$heap.dump.path
# specify an alternative path for JVM fatal error logs
$error.file
## JDK 8 GC logging
8:-XX:+PrintGCDetails
8:-XX:+PrintGCDateStamps
8:-XX:+PrintTenuringDistribution
8:-XX:+PrintGCApplicationStoppedTime
8:-Xloggc:$loggc
8:-XX:+UseGCLogFileRotation
8:-XX:NumberOfGCLogFiles=32
8:-XX:GCLogFileSize=64m
# JDK 9+ GC logging
9-:-Xlog:gc*,gc+age=trace,safepoint:file=$loggc:utctime,pid,tags:filecount=32,filesize=64m
# due to internationalization enhancements in JDK 9 Elasticsearch need to set the provider to COMPAT otherwise
# time/date parsing will break in an incompatible way for some date patterns and locals
9-:-Djava.locale.providers=COMPAT
Cloud ❀ 构建Docker仓库Harbor过程详解(配置文件全参解析注释)
文章目录
1、安装底层版本要求
- Python 2.7或更高版本
- Docker 1.10或更高版本
- Docker Compose 1.6.0或更高版本
Docker Compose下载URL:https://github.com/docker/compose/releases/
点击此处进行跳转下载
此处附带本人使用的Docker Compose安装包,百度网盘下载链接如下:
- 链接:https://pan.baidu.com/s/1IdnR0v3EgL0lOuBgV2hCdw
- 提取码:4t8r
[root@localhost ~]# curl -L https://github.com/docker/compose/releases/download/1.24.1/docker-compose-$(uname -s)-$(uname -m) -o /usr/local/bin/docker-compose
[root@localhost ~]# chmod +x /usr/local/bin/docker-compose
检查部署底层要求版本是否符合
[root@localhost ~]# python3 --version
Python 3.6.8
[root@localhost ~]# docker --version
Docker version 20.10.8, build 3967b7d
[root@localhost ~]# docker-compose --version
docker-compose version 1.24.1, build 4667896b
2、安装Harbor
Harbor下载URL:https://github.com/goharbor/harbor/releases
点击此处进行跳转下载
此处附带本人使用的Harbor安装包,百度网盘下载链接如下:
- 链接:https://pan.baidu.com/s/1zXm2y_sv6t7S_U-lXD8dqg
- 提取码:5o2c
(1)校验文件
[root@localhost ~]# md5sum harbor-offline-installer-v1.10.1.tgz
e9ccca33e9a25b6b64425943c06f5fe6  harbor-offline-installer-v1.10.1.tgz
(2)创建私钥文件、证书请求文件、证书文件
使用算法3DES生成大小为2048的秘钥文件KEY
[root@localhost harbor]# openssl genrsa -des
-des   -des3
[root@localhost ~]# openssl genrsa -des3 -out server.key 2048
Generating RSA private key, 2048 bit long modulus (2 primes)
.....................................................................................................+++++
...............+++++
e is 65537 (0x010001)
Enter pass phrase for server.key:redhat
Verifying - Enter pass phrase for server.key:redhat
生成根证书请求文件CSR
[root@localhost ~]# openssl req -new -key server.key -out server.csr
Enter pass phrase for server.key:
You are about to be asked to enter information that will be incorporated
into your certificate request.
What you are about to enter is what is called a Distinguished Name or a DN.
There are quite a few fields but you can leave some blank
For some fields there will be a default value,
If you enter '.', the field will be left blank.
-----
Country Name (2 letter code) [XX]:CN
State or Province Name (full name) []:BJ
Locality Name (eg, city) [Default City]:BJ
Organization Name (eg, company) [Default Company Ltd]:AAA
Organizational Unit Name (eg, section) []:BBB
Common Name (eg, your name or your server's hostname) []:CCC
Email Address []:qq.com

Please enter the following 'extra' attributes
to be sent with your certificate request
A challenge password []:nsfocus        /不需要修改密码,此处直接回车即可;
An optional company name []:nsfocus    /不需要修改密码,此处直接回车即可;
备份私钥文件
[root@localhost ~]# cp server.key server.key.org
[root@localhost ~]# openssl rsa -in server.key.org -out server.key
Enter pass phrase for server.key.org:nsfocus
writing RSA key
生成根证书CA
[root@localhost ~]# openssl x509 -req -days 365 -in server.csr -signkey server.key -out server.crt
Signature ok
subject=C = CN, ST = BJ, L = BJ, O = AAA, OU = BBB, CN = CCC, emailAddress = qq.com
Getting Private key
参数详解:
- -new:表示生成一个新的证书签署请求;
- -x509:专用于生成CA自签证书;
- -key:指定生成证书用到的私钥文件;
- -out FILNAME:指定生成的证书的保存路径;
- -days:指定证书的有效期限,单位为day,默认是365天;
查看证书信息
[root@localhost harbor]# openssl x509 -in /data/cert/server.crt -noout -serial -dates -subject
serial=18C7ED02FEEEE804C2557DEA151EE2EE7748DA68
notBefore=Oct 26 13:57:09 2021 GMT
notAfter=Oct 26 13:57:09 2022 GMT
subject=C = CN, ST = BJ, L = BJ, O = AAA, OU = BBB, CN = CCC, emailAddress = qq.com
创建证书存放目录与修改权限
[root@localhost ~]# mkdir /data/cert -pv
[root@localhost ~]# mv server.* /data/cert/
[root@localhost ~]# chmod -R 777 /data/cert/
[root@localhost ~]# cd /data/cert/
[root@localhost cert]# ll
total 16
-rwxrwxrwx. 1 root root 1220 Oct 26 21:57 server.crt
-rwxrwxrwx. 1 root root 1005 Oct 26 21:52 server.csr
-rwxrwxrwx. 1 root root 1679 Oct 26 21:55 server.key
-rwxrwxrwx. 1 root root 1751 Oct 26 21:54 server.key.org
(3)修改Harbor配置文件
[root@localhost cert]# cd harbor/
[root@localhost harbor]# ll
total 662128
drwxr-xr-x. 3 root root        20 Oct 26 22:36 common
-rw-r--r--. 1 root root      3398 Feb 10  2020 common.sh
-rw-r--r--. 1 root root      5346 Oct 26 22:50 docker-compose.yml
-rw-r--r--. 1 root root 677974489 Feb 10  2020 harbor.v1.10.1.tar.gz
-rw-r--r--. 1 root root      5878 Oct 26 22:50 harbor.yml
-rwxr-xr-x. 1 root root      2284 Feb 10  2020 install.sh
-rw-r--r--. 1 root root     11347 Feb 10  2020 LICENSE
-rwxr-xr-x. 1 root root      1749 Feb 10  2020 prepare
Harbor配置文件参数详解(重点)
[root@localhost harbor]# vim harbor.yml
# Configuration file of Harbor
# Harbor的配置文件

# The IP address or hostname to access admin UI and registry service.
# 配置访问管理UI和注册表服务的IP地址或主机名
# DO NOT use localhost or 127.0.0.1, because Harbor needs to be accessed by external clients.
# 不要使用localhost或127.0.0.1,因为Harbor需要被外部客户端访问
hostname: 10.81.20.166

-----------------------------------------------------------------------
# http related config
# http相关配置
http:
  # port for http, default is 80. If https enabled, this port will redirect to https port
  # 若https端口开启,此端口重定向至https端口
  port: 80

-----------------------------------------------------------------------
# https related config
# https相关配置
https:
  # https port for harbor, default is 443
  port: 443
  # The path of cert and key files for nginx
  # nginx的cert和key文件路径
  certificate: /data/cert/server.crt
  private_key: /data/cert/server.key

# Uncomment external_url if you want to enable external proxy
# 取消注释external_url,如果你想启用外部代理
# And when it enabled the hostname will no longer used
# 当它启用时,主机名将不再使用
# external_url: https://reg.mydomain.com:8433

# The initial password of Harbor admin
# Harbour admin的初始密码
# It only works in first time to install harbor
# 只有在第一次安装时有效
# Remember Change the admin password from UI after launching Harbor.
# 请记住在启动Harbor UI后更改admin登录密码
harbor_admin_password: Harbor12345

-----------------------------------------------------------------------
# Harbor DB configuration
# Harbor数据库配置
database:
  # The password for the root user of Harbor DB. Change this before any production use.
  password: root123
  # The maximum number of connections in the idle connection pool. If it <=0, no idle connections are retained.
  max_idle_conns: 50
  # The maximum number of open connections to the database. If it <= 0, then there is no limit on the number of open connections.
  # Note: the default number of connections is 100 for postgres.
  max_open_conns: 100

# The default data volume
# 默认数据卷路径
data_volume: /data

# Harbor Storage settings by default is using /data dir on local filesystem
# Uncomment storage_service setting If you want to using external storage
# 设置外部存储则取消下面配置注释
# storage_service:

#   # ca_bundle is the path to the custom root ca certificate, which will be injected into the truststore
# 自定义CA根证书的路径
#   # of registry's and chart repository's containers.  This is usually needed when the user hosts a internal storage with self signed certificate.
#   ca_bundle:

#   # storage backend, default is filesystem, options include filesystem, azure, gcs, s3, swift and oss
# 存储后端的文件系统选项有azure, gcs, s3, swift, oss
#   # for more info about this configuration please refer
https://docs.docker.com/registry/configuration/
#   filesystem:
#     maxthreads: 100
#   # set disable to true when you want to disable registry redirect
# 禁用注册表重定向需要将下面修改为true
#   redirect:
#     disabled: false

-----------------------------------------------------------------------
# Clair configuration
clair:
  # The interval of clair updaters, the unit is hour, set to 0 to disable the updaters.
  # clair更新时间间隔,单位为小时,0表示禁用
  updaters_interval: 12

jobservice:
  # Maximum number of job workers in job service
  # 最大工作连接数
  max_job_workers: 10

notification:
  # Maximum retry count for webhook job
  # 最大重试次数
  webhook_job_max_retry: 10

chart:
  # Change the value of absolute_url to enabled can enable absolute url in chart
  # 将absolute_url的值更改为enabled可以在图表中启用绝对url
  absolute_url: disabled

-----------------------------------------------------------------------
# Log configurations
# 日志配置
log:
  # options are debug, info, warning, error, fatal
  # 选项有:调试、信息、警告、错误、致命
  level: info
  # configs for logs in local storage
  # 配置本地存储的日志
  local:
    # Log files are rotated log_rotate_count times before being removed. If count is 0, old versions are removed rather than rotated.
    # 日志文件在被删除之前会被旋转log_rotate_count次。如果count为0,则删除旧版本,而不是旋转旧版本。
    rotate_count: 50
    # Log files are rotated only if they grow bigger than log_rotate_size bytes. If size is followed by k, the size is assumed to be in kilobytes.
    # If the M is used, the size is in megabytes, and if G is used, the size is in gigabytes. So size 100, size 100k, size 100M and size 100G
    # are all valid.
    rotate_size: 200M
    # The directory on your host that store log
    # 存储日志的主机上的目录
    location: /var/log/harbor

  # Uncomment following lines to enable external syslog endpoint.
  # 取消注释以下行以启用外部syslog端点。
  # external_endpoint:
  #   # protocol used to transmit log to external endpoint, options is tcp or udp
  # 用于向外部终端发送日志的协议,选项为TCP或udp
  #   protocol: tcp
  #   # The host of external endpoint
  # 外部端点的主机
  #   host: localhost
  #   # Port of external endpoint
  # 外部端点的端口
  #   port: 5140

#This attribute is for migrator to detect the version of the .cfg file, DO NOT MODIFY!
#这个属性是用来检测。cfg文件的版本的,不要修改!
_version: 1.10.0

# Uncomment external_database if using external database.
# 如果使用外部数据库,取消注释external_database。
# external_database:
#   harbor:
#     host: harbor_db_host
#     port: harbor_db_port
#     db_name: harbor_db_name
#     username: harbor_db_username
#     password: harbor_db_password
#     ssl_mode: disable
#     max_idle_conns: 2
#     max_open_conns: 0
#   clair:
#     host: clair_db_host
#     port: clair_db_port
#     db_name: clair_db_name
#     username: clair_db_username
#     password: clair_db_password
#     ssl_mode: disable
#   notary_signer:
#     host: notary_signer_db_host
#     port: notary_signer_db_port
#     db_name: notary_signer_db_name
#     username: notary_signer_db_username
#     password: notary_signer_db_password
#     ssl_mode: disable
#   notary_server:
#     host: notary_server_db_host
#     port: notary_server_db_port
#     db_name: notary_server_db_name
#     username: notary_server_db_username
#     password: notary_server_db_password
#     ssl_mode: disable

# Uncomment external_redis if using external Redis server
# 如果使用外部Redis服务器,取消注释external_redis
# external_redis:
#   host: redis
#   port: 6379
#   password:
#   # db_index 0 is for core, it's unchangeable
#   registry_db_index: 1
#   jobservice_db_index: 2
#   chartmuseum_db_index: 3
#   clair_db_index: 4

# Uncomment uaa for trusting the certificate of uaa instance that is hosted via self-signed cert.
# 取消对uaa的注释,因为它信任通过自签名证书托管的uaa实例的证书。
# uaa:
#   ca_file: /path/to/ca

# Global proxy
# 全球代理
# Config http proxy for components, e.g. http://my.proxy.com:3128
# Components doesn't need to connect to each others via http proxy.
# Remove component from `components` array if want disable proxy
# for it. If you want use proxy for replication, MUST enable proxy
# for core and jobservice, and set `http_proxy` and `https_proxy`.
# Add domain to the `no_proxy` field, when you want disable proxy
# for some special registry.
proxy:
  http_proxy:
  https_proxy:
  # no_proxy endpoints will appended to 127.0.0.1,localhost,.local,.internal,log,db,redis,nginx,core,portal,postgresql,jobservice,registry,registryctl,clair,chartmuseum,notary-server
  no_proxy:
  components:
    - core
    - jobservice
    - clair
执行安装操作
[root@localhost harbor]# ./install.sh

[Step 0]: checking if docker is installed ...

Note: docker version: 20.10.8

[Step 1]: checking docker-compose is installed ...

Note: docker-compose version: 1.24.1

[Step 2]: loading Harbor images ...
Loaded image: goharbor/clair-adapter-photon:v1.0.1-v1.10.1
Loaded image: goharbor/harbor-jobservice:v1.10.1
Loaded image: goharbor/redis-photon:v1.10.1
Loaded image: goharbor/notary-server-photon:v0.6.1-v1.10.1
Loaded image: goharbor/clair-photon:v2.1.1-v1.10.1
Loaded image: goharbor/harbor-log:v1.10.1
Loaded image: goharbor/registry-photon:v2.7.1-patch-2819-2553-v1.10.1
Loaded image: goharbor/notary-signer-photon:v0.6.1-v1.10.1
Loaded image: goharbor/chartmuseum-photon:v0.9.0-v1.10.1
Loaded image: goharbor/harbor-registryctl:v1.10.1
Loaded image: goharbor/nginx-photon:v1.10.1
Loaded image: goharbor/harbor-migrator:v1.10.1
Loaded image: goharbor/prepare:v1.10.1
Loaded image: goharbor/harbor-portal:v1.10.1
Loaded image: goharbor/harbor-core:v1.10.1
Loaded image: goharbor/harbor-db:v1.10.1


[Step 3]: preparing environment ...

[Step 4]: preparing harbor configs ...
prepare base dir is set to /root/harbor
Clearing the configuration file: /config/log/logrotate.conf
Clearing the configuration file: /config/log/rsyslog_docker.conf
Clearing the configuration file: /config/nginx/nginx.conf
Clearing the configuration file: /config/core/env
Clearing the configuration file: /config/core/app.conf
Clearing the configuration file: /config/registry/config.yml
Clearing the configuration file: /config/registry/root.crt
Clearing the configuration file: /config/registryctl/env
Clearing the configuration file: /config/registryctl/config.yml
Clearing the configuration file: /config/db/env
Clearing the configuration file: /config/jobservice/env
Clearing the configuration file: /config/jobservice/config.yml
Generated configuration file: /config/log/logrotate.conf
Generated configuration file: /config/log/rsyslog_docker.conf
Generated configuration file: /config/nginx/nginx.conf
Generated configuration file: /config/core/env
Generated configuration file: /config/core/app.conf
Generated configuration file: /config/registry/config.yml
Generated configuration file: /config/registryctl/env
Generated configuration file: /config/db/env
Generated configuration file: /config/jobservice/env
Generated configuration file: /config/jobservice/config.yml
loaded secret from file: /secret/keys/secretkey
Generated configuration file: /compose_location/docker-compose.yml
Clean up the input dir


Note: stopping existing Harbor instance ...
Stopping harbor-jobservice ... done
Stopping harbor-log        ... done
Removing harbor-jobservice ... done
Removing nginx             ... done
Removing harbor-core       ... done
Removing registry          ... done
Removing registryctl       ... done
Removing harbor-db         ... done
Removing harbor-portal     ... done
Removing redis             ... done
Removing harbor-log        ... done
Removing network harbor_harbor


[Step 5]: starting Harbor ...
Creating network "harbor_harbor" with the default driver
Creating harbor-log ... done
Creating redis         ... done
Creating harbor-portal ... done
Creating registryctl   ... done
Creating harbor-db     ... done
Creating registry      ... done
Creating harbor-core   ... done
Creating nginx             ... done
Creating harbor-jobservice ... done
✔ ----Harbor has been installed and started successfully.----
查看容器信息
[root@localhost harbor]# docker ps
CONTAINER ID   IMAGE                                                     COMMAND                  CREATED          STATUS                    PORTS                                                                                NAMES
2de6fb4348a2   goharbor/harbor-jobservice:v1.10.1                        "/harbor/harbor_jobs…"   46 minutes ago   Up 46 minutes (healthy)                                                                                        harbor-jobservice
3d39a150124f   goharbor/nginx-photon:v1.10.1                             "nginx -g 'daemon of…"   46 minutes ago   Up 46 minutes (healthy)   0.0.0.0:8003->8080/tcp, :::8003->8080/tcp, 0.0.0.0:443->8443/tcp, :::443->8443/tcp   nginx
c4cb2d9fc8c8   goharbor/harbor-core:v1.10.1                              "/harbor/harbor_core"    46 minutes ago   Up 46 minutes (healthy)                                                                                        harbor-core
ab1601c5b8a9   goharbor/registry-photon:v2.7.1-patch-2819-2553-v1.10.1   "/home/harbor/entryp…"   46 minutes ago   Up 46 minutes (healthy)   5000/tcp                                                                             registry
b86b53dbe902   goharbor/harbor-registryctl:v1.10.1                       "/home/harbor/start.…"   46 minutes ago   Up 46 minutes (healthy)                                                                                        registryctl
5aaa8801f32d   goharbor/harbor-db:v1.10.1                                "/docker-entrypoint.…"   46 minutes ago   Up 46 minutes (healthy)   5432/tcp                                                                             harbor-db
7b906e109223   goharbor/harbor-portal:v1.10.1                            "nginx -g 'daemon of…"   46 minutes ago   Up 46 minutes (healthy)   8080/tcp                                                                             harbor-portal
cd729f5779c5   goharbor/redis-photon:v1.10.1                             "redis-server /etc/r…"   46 minutes ago   Up 46 minutes (healthy)   6379/tcp                                                                             redis
0e0c6c2cb8d0   goharbor/harbor-log:v1.10.1                               "/bin/sh -c /usr/loc…"   46 minutes ago   Up 46 minutes (healthy)   127.0.0.1:1514->10514/tcp                                                            harbor-log
(4)使用浏览器访问站点
此处访问为配置文件内定义的hostname,需要根据环境进行区分
- 登录URL:https://10.81.20.166
- 登录账户:admin/Harbor12345(若配置文件修改则使用自定义密码登录)

登录成功界面如下:
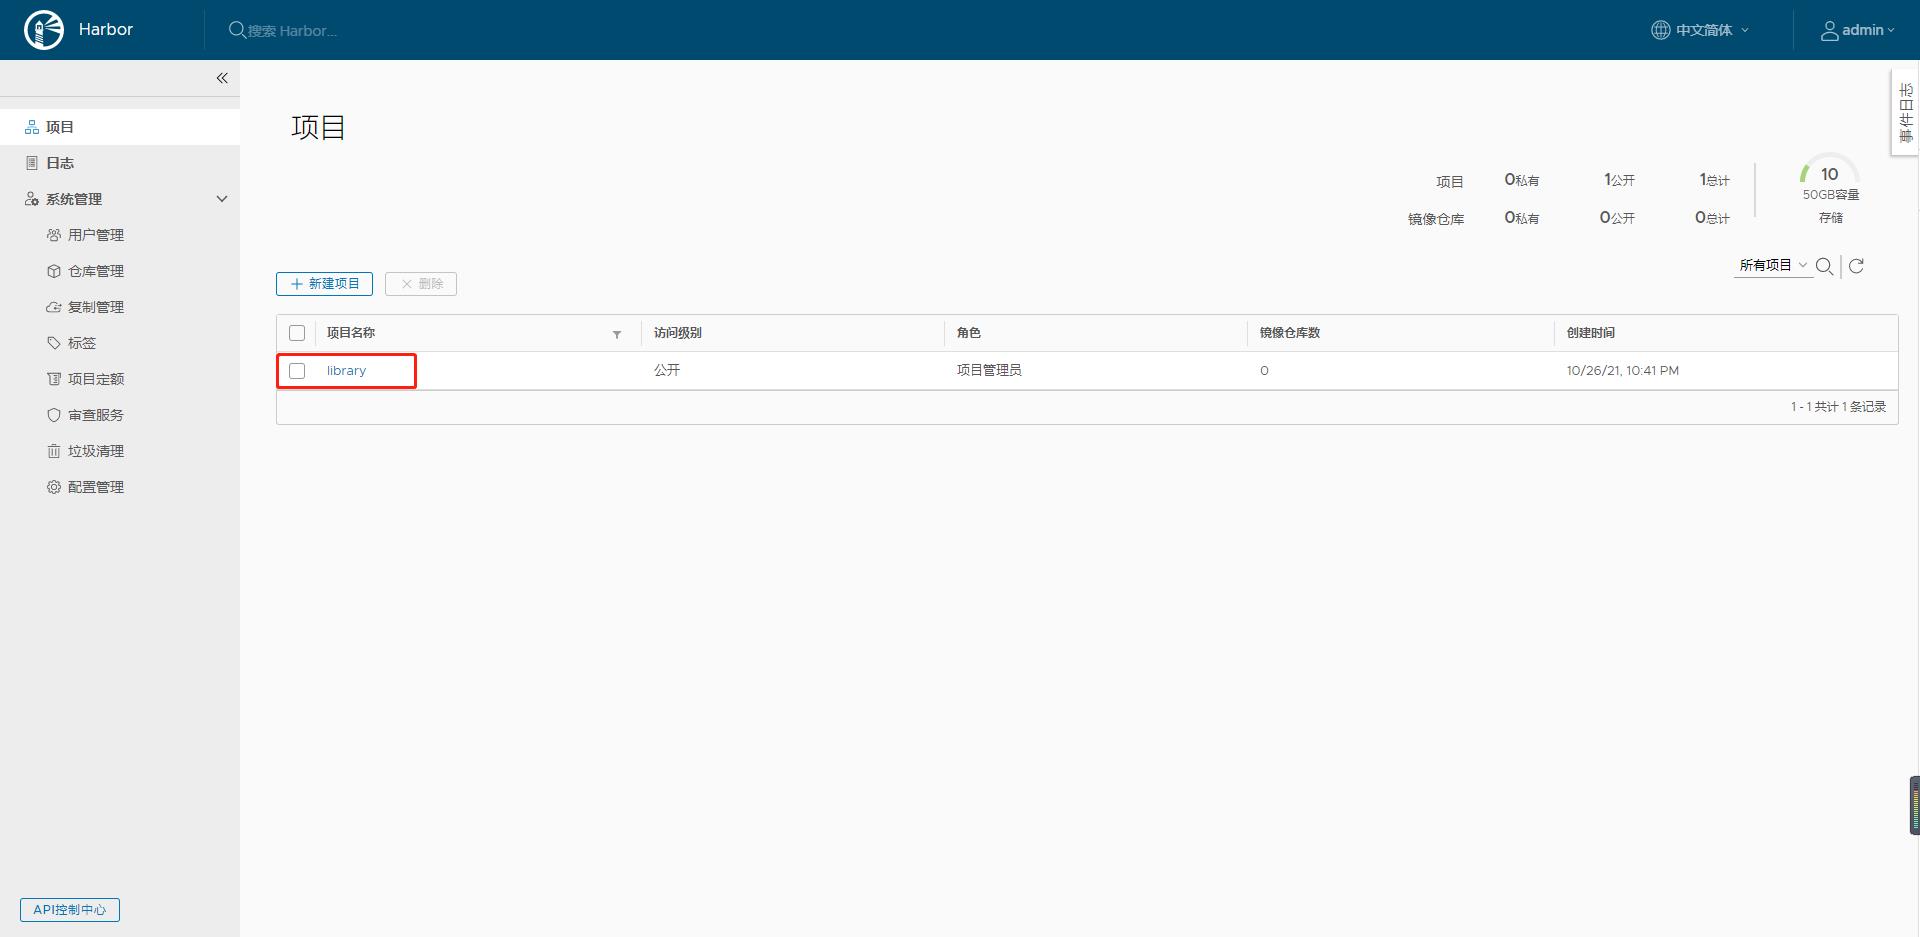
(5)上传镜像至Harbor
点击某个需要上传的项目名称
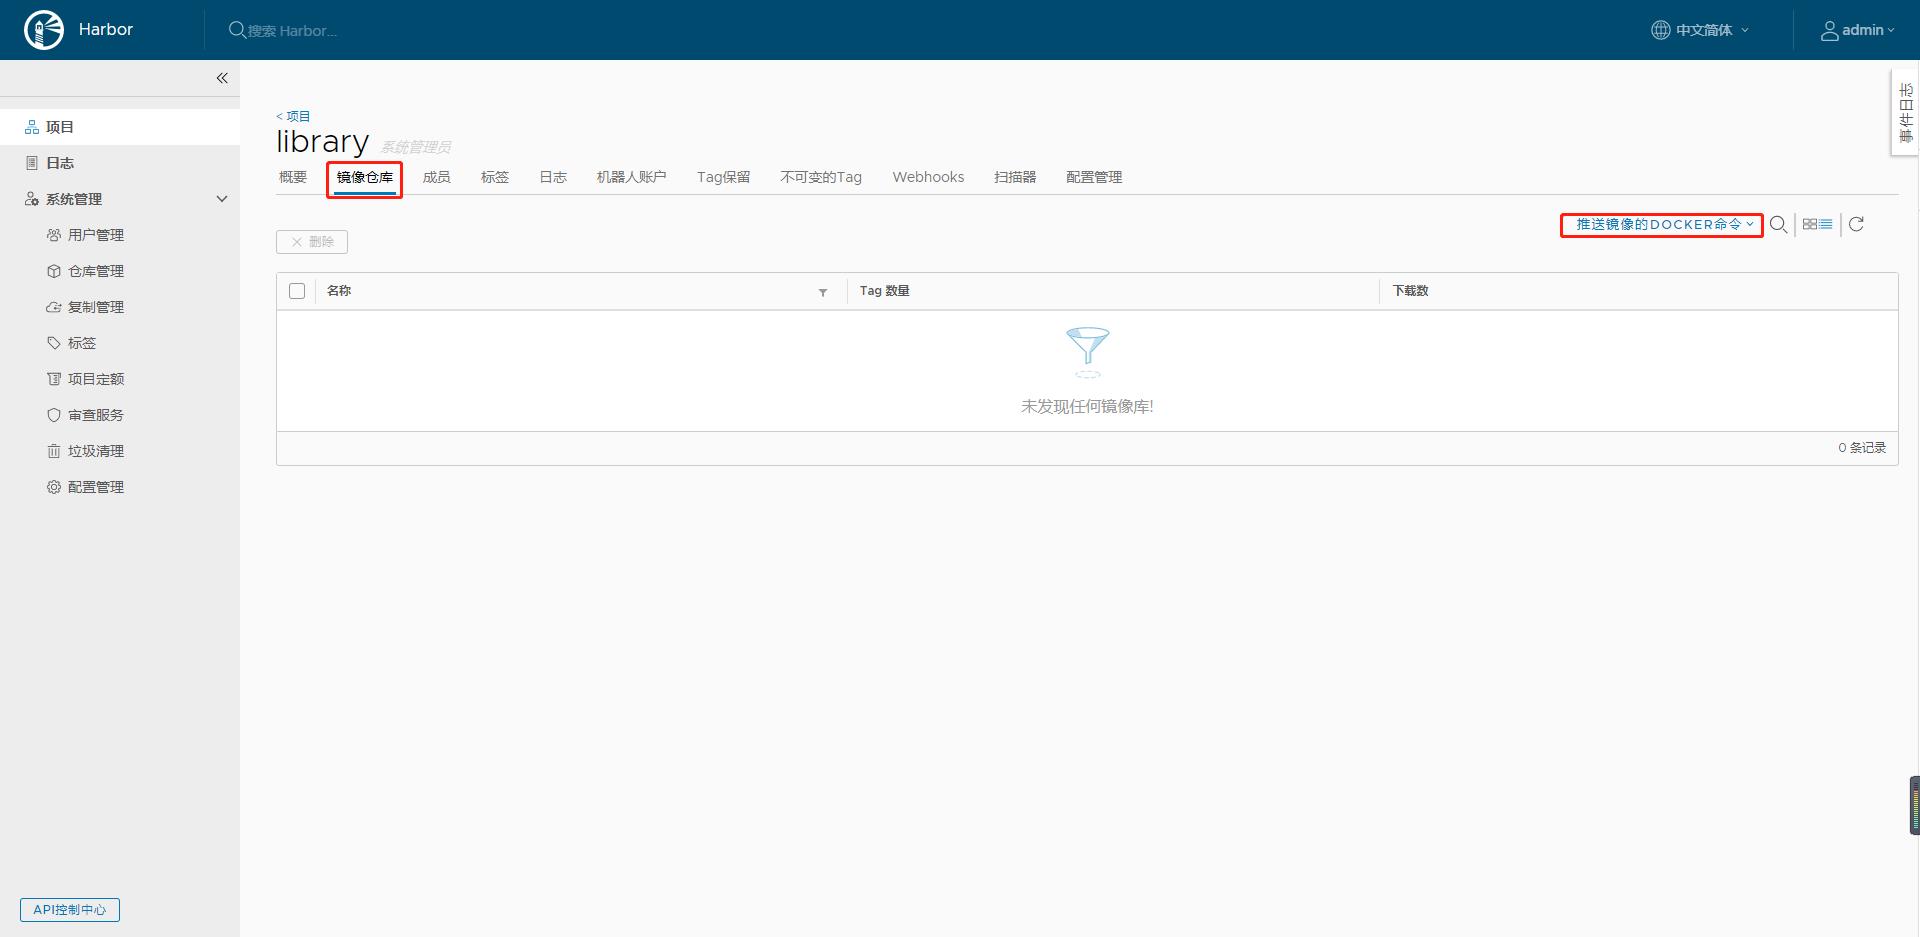
点击[镜像仓库],可以查看到“推送镜像的docker命令”,可以直接复制并修改此两条命令即可
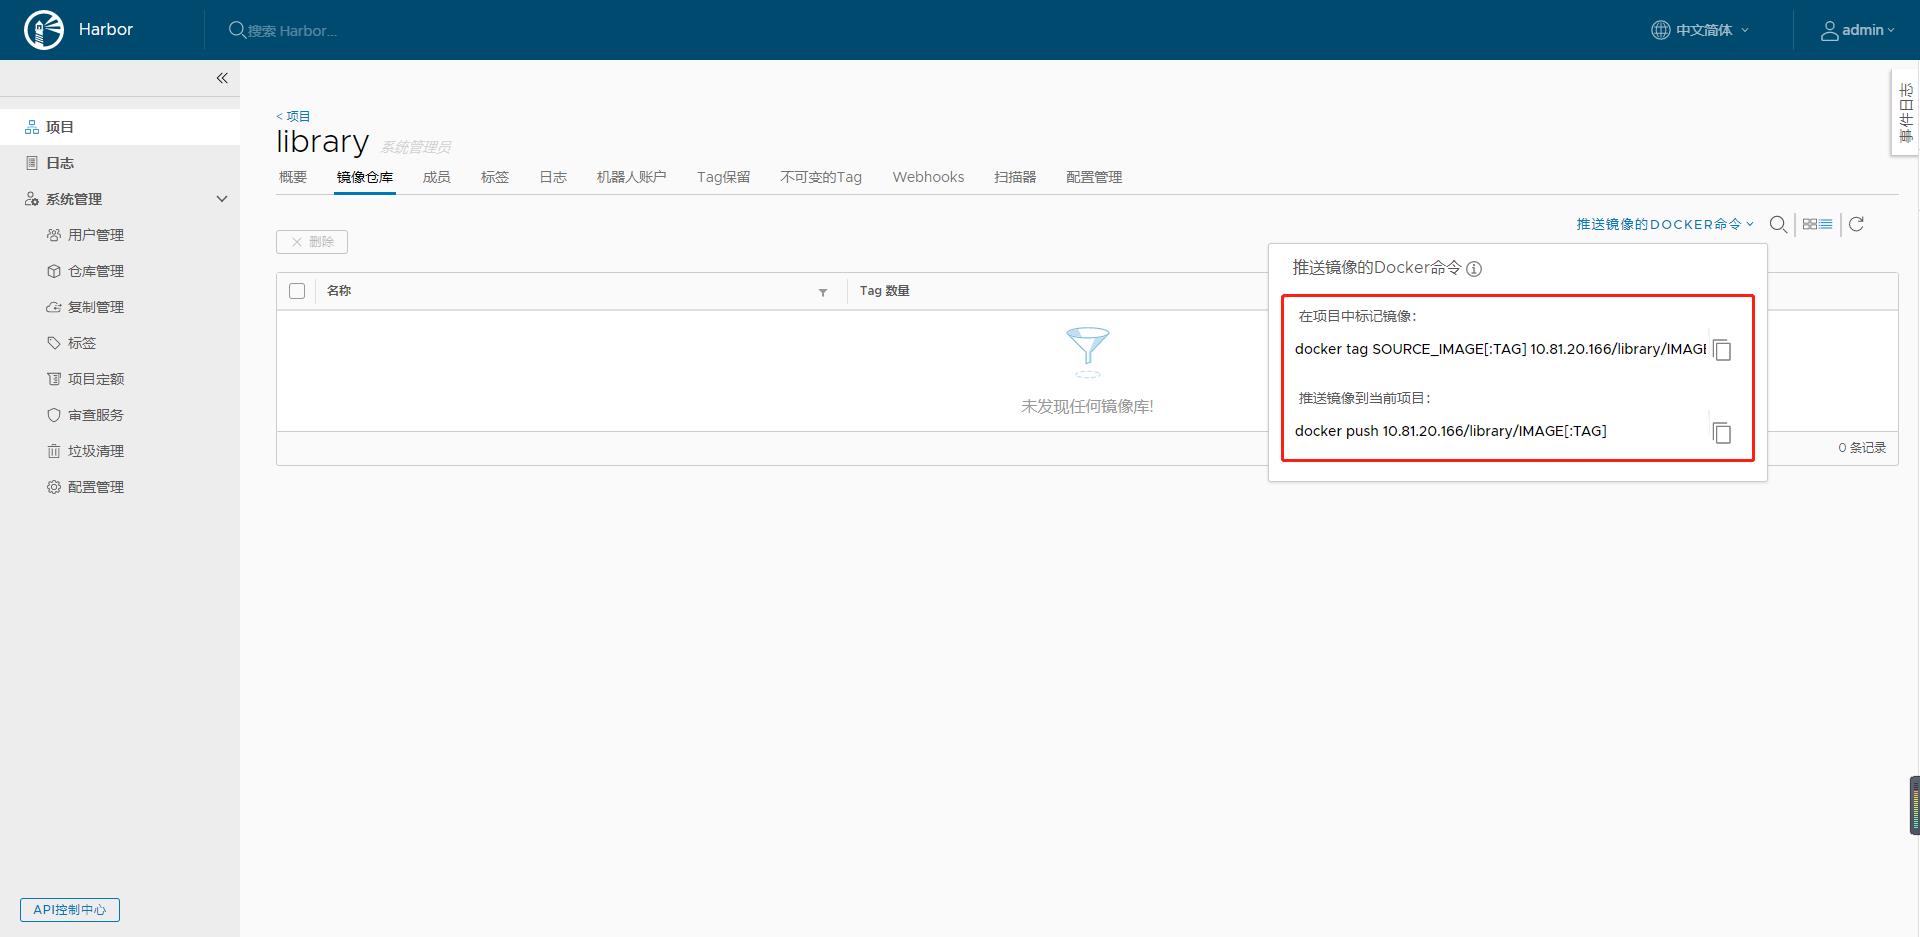
指定镜像仓库地址
[root@localhost harbor]# cat /etc/docker/daemon.json
{
    "insecure-registries": ["10.81.20.166"]
}
重启docker服务
[root@localhost harbor]# systemctl restart docker
确保下面的容器是否开启成功,部分容器重启服务不会自启动,导致服务端口不可达
[root@localhost harbor]# docker ps
CONTAINER ID   IMAGE                                                     COMMAND                  CREATED         STATUS                   PORTS                                                                                NAMES
78db75f19def   goharbor/harbor-jobservice:v1.10.1                        "/harbor/harbor_jobs…"   4 minutes ago   Up 4 minutes (healthy)                                                                                        harbor-jobservice
5c7a0713fcba   goharbor/nginx-photon:v1.10.1                             "nginx -g 'daemon of…"   4 minutes ago   Up 4 minutes (healthy)   0.0.0.0:8003->8080/tcp, :::8003->8080/tcp, 0.0.0.0:443->8443/tcp, :::443->8443/tcp   nginx
38f93397e143   goharbor/harbor-core:v1.10.1                              "/harbor/harbor_core"    4 minutes ago   Up 4 minutes (healthy)                                                                                        harbor-core
b74d02970546   goharbor/registry-photon:v2.7.1-patch-2819-2553-v1.10.1   "/home/harbor/entryp…"   4 minutes ago   Up 4 minutes (healthy)   5000/tcp                                                                             registry
245f015d8c91   goharbor/harbor-db:v1.10.1                                "/docker-entrypoint.…"   4 minutes ago   Up 4 minutes (healthy)   5432/tcp                                                                             harbor-db
46bbe79a972e   goharbor/harbor-registryctl:v1.10.1                       "/home/harbor/start.…"   4 minutes ago   Up 4 minutes (healthy)                                                                                        registryctl
a61ec9d2dcd7   goharbor/redis-photon:v1.10.1                             "redis-server /etc/r…"   4 minutes ago   Up 4 minutes (healthy)   6379/tcp                                                                             redis
6982dc6079c2   goharbor/harbor-portal:v1.10.1                            "nginx -g 'daemon of…"   4 minutes ago   Up 4 minutes (healthy)   8080/tcp                                                                             harbor-portal
0e52d040fff9   goharbor/harbor-log:v1.10.1                               "/bin/sh -c /usr/loc…"   4 minutes ago   Up 4 minutes (healthy)   127.0.0.1:1514->10514/tcp
配置登录验证
未验证账户进行推送,产生报错
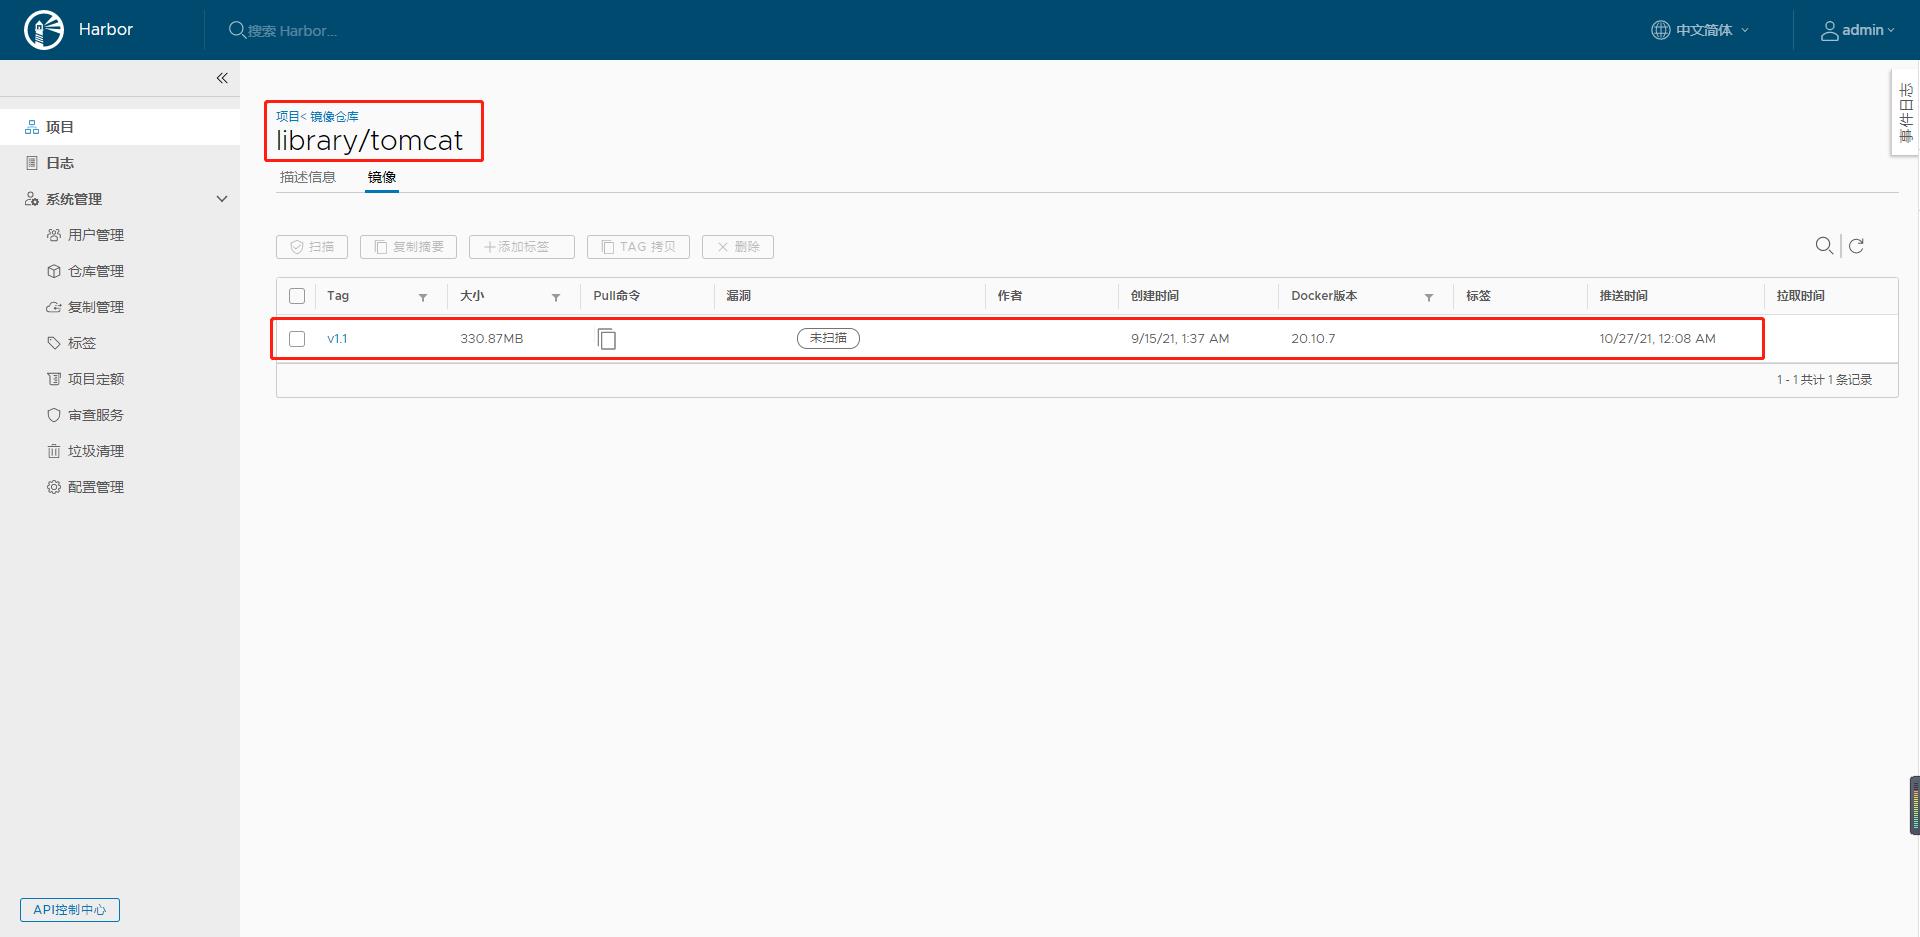
[root@localhost harbor]# docker push 10.81.20.166/library/tomcat:v1.1
The push refers to repository [10.81.20.166/library/tomcat]
4831bcd1167f: Preparing
977cfcbcf0fa: Preparing
4e4de253c94d: Preparing
3891808a925b: Preparing
d402f4f1b906: Preparing
00ef5416d927: Waiting
8555e663f65b: Waiting
d00da3cd7763: Waiting
4e61e63529c2: Waiting
799760671c38: Waiting
denied: requested access to the resource is denied
验证登录账户
[root@localhost harbor]# docker login 10.81.20.166
Username: admin
Password: Harbor12345
WARNING! Your password will be stored unencrypted in /root/.docker/config.json.
Configure a credential helper to remove this warning. See
https://docs.docker.com/engine/reference/commandline/login/#credentials-store

Login Succeeded
验证成功后重新推送镜像文件
[root@localhost harbor]# docker push 10.81.20.166/library/tomcat:v1.1
The push refers to repository [10.81.20.166/library/tomcat]
4831bcd1167f: Pushed
977cfcbcf0fa: Pushed
4e4de253c94d: Pushed
3891808a925b: Pushed
d402f4f1b906: Pushed
00ef5416d927: Pushed
8555e663f65b: Pushed
d00da3cd7763: Pushed
4e61e63529c2: Pushed
799760671c38: Pushed
v1.1: digest: sha256:709c112a87273828f4df9caa99540a1d4f59891455cdfff7ec0ec99edc49f59b size: 2422
查看镜像推送结果
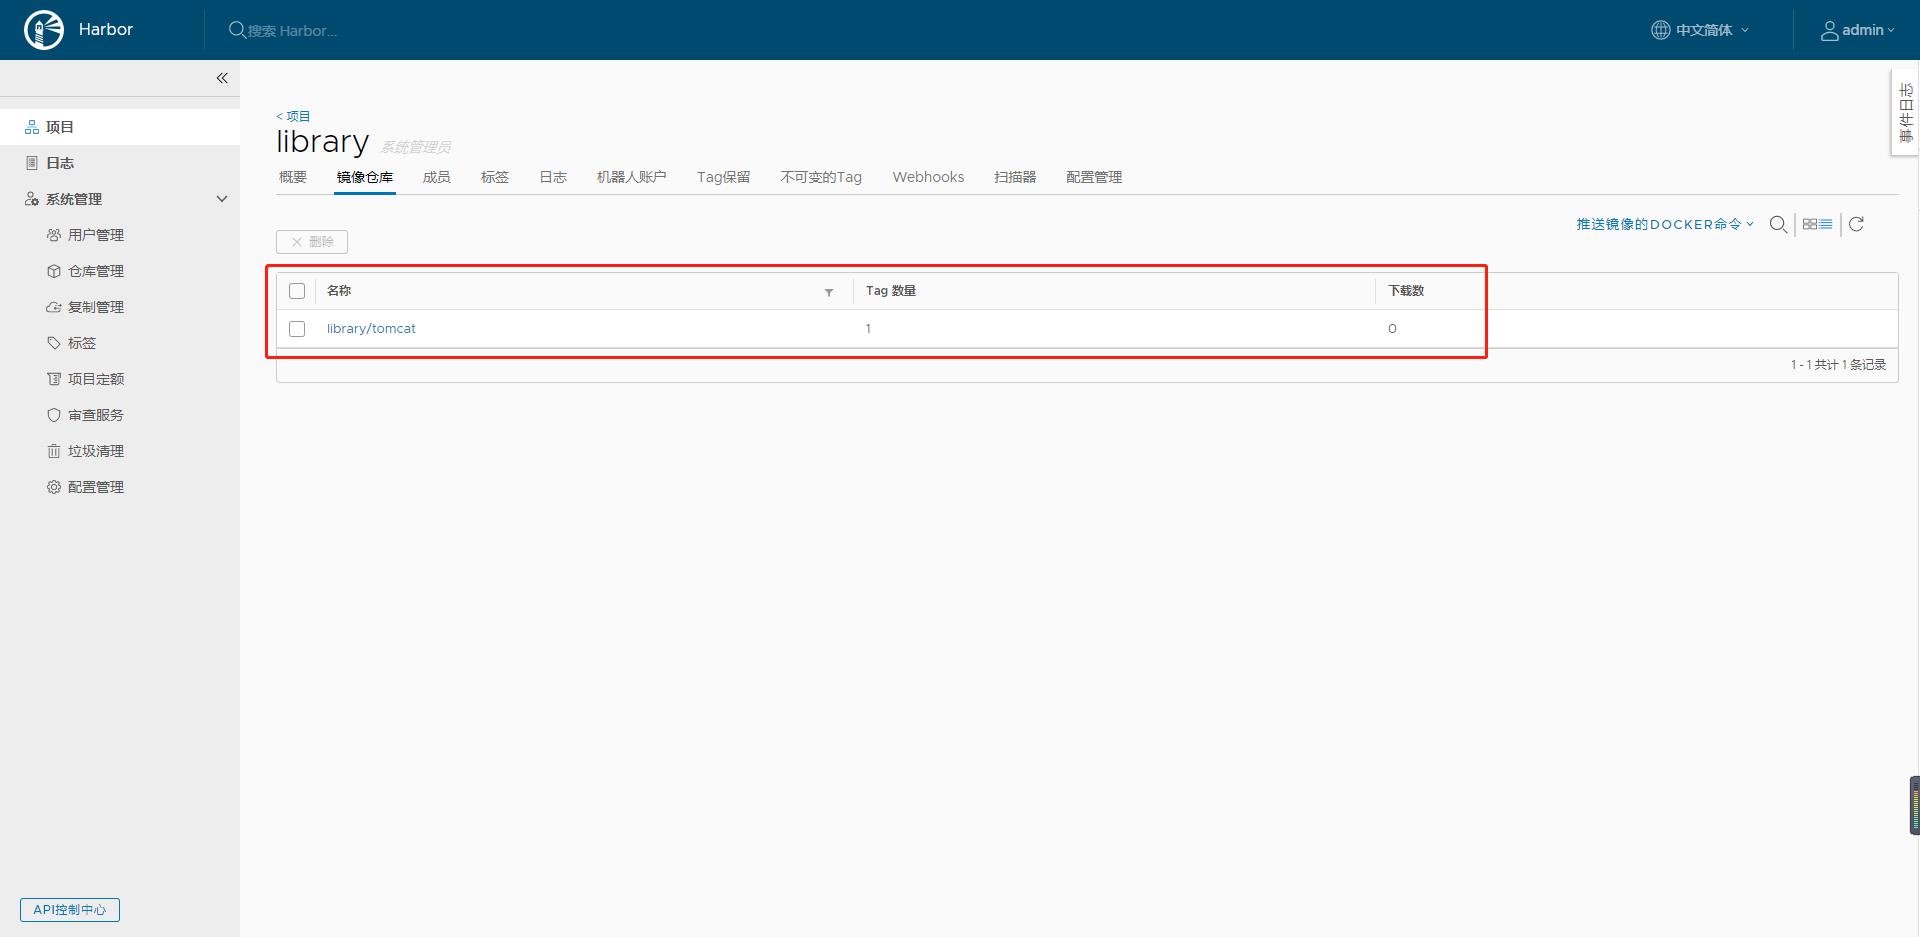
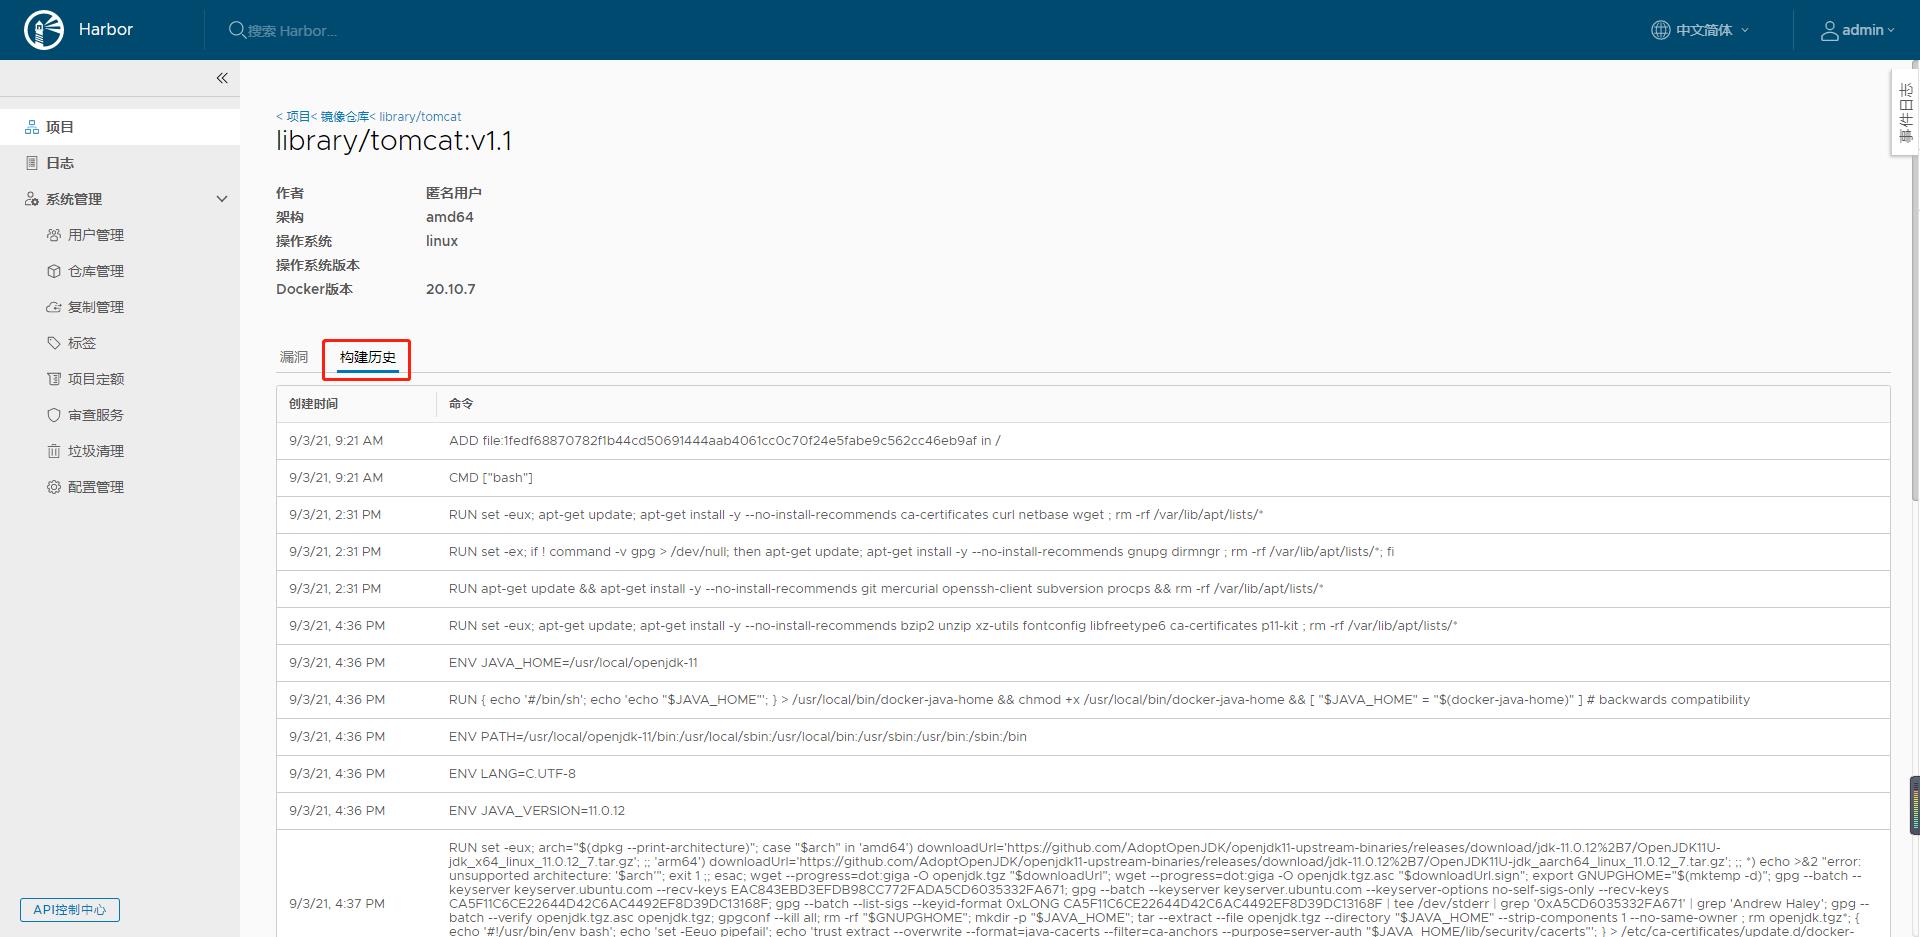
打开镜像具体信息
查看对应的DockerFile
以上是关于Elasticsearch7.x 配置解析jvm参数的主要内容,如果未能解决你的问题,请参考以下文章