高可用OpenStack(Queen版)集群-5.Glance集群
Posted netonline
tags:
篇首语:本文由小常识网(cha138.com)小编为大家整理,主要介绍了高可用OpenStack(Queen版)集群-5.Glance集群相关的知识,希望对你有一定的参考价值。
参考文档:
- Install-guide:https://docs.openstack.org/install-guide/
- OpenStack High Availability Guide:https://docs.openstack.org/ha-guide/index.html
- 理解Pacemaker:http://www.cnblogs.com/sammyliu/p/5025362.html
- Ceph: http://docs.ceph.com/docs/master/start/intro/
九.Glance集群
1. 创建glance数据库
# 在任意控制节点创建数据库,后台数据自动同步,以controller01节点为例
[[email protected] ~]# mysql -u root -pmysql_pass

MariaDB [(none)]> CREATE DATABASE glance;
MariaDB [(none)]> GRANT ALL PRIVILEGES ON glance.* TO ‘glance‘@‘localhost‘ IDENTIFIED BY ‘glance_dbpass‘;
MariaDB [(none)]> GRANT ALL PRIVILEGES ON glance.* TO ‘glance‘@‘%‘ IDENTIFIED BY ‘glance_dbpass‘;

MariaDB [(none)]> flush privileges;
MariaDB [(none)]> exit;
2. 创建glance-api
# 在任意控制节点操作,以controller01节点为例;
# 调用keystone服务需要认证信息,加载环境变量脚本即可
[[email protected] ~]# . admin-openrc
1)创建service项目
# 创建1个project,glance/nova/neutron等服务加入到此project;
# service项目在”default” domain中
[[email protected] ~]# openstack project create --domain default --description "Service Project" service

2)创建glance用户
# glance用户在”default” domain中
[[email protected] ~]# openstack user create --domain default --password=glance_pass glance

3)glance用户赋权
# 为glance用户赋予admin权限
[[email protected] ~]# openstack role add --project service --user glance admin
4)创建glance服务实体
# 服务实体类型”image”
[[email protected] ~]# openstack service create --name glance --description "OpenStack Image" image

5)创建glance-api
# 注意--region与初始化admin用户时生成的region一致;
# api地址统一采用vip,如果public/internal/admin分别使用不同的vip,请注意区分;
# 服务类型为image;
# public api
[[email protected] ~]# openstack endpoint create --region RegionTest image public http://controller:9292

# internal api
[[email protected] ~]# openstack endpoint create --region RegionTest image internal http://controller:9292

# admin api
[[email protected] ~]# openstack endpoint create --region RegionTest image admin http://controller:9292

3. 安装glance
# 在全部控制节点安装glance,以controller01节点为例
[[email protected] ~]# yum install openstack-glance python-glance python-glanceclient -y
4. 配置glance-api.conf
# 在全部控制节点操作,以controller01节点为例;
# 注意”bind_host”参数,根据节点修改;
# 注意glance-api.conf文件的权限:root:glance
[[email protected] ~]# cp /etc/glance/glance-api.conf /etc/glance/glance-api.conf.bak
[[email protected] ~]# egrep -v "^$|^#" /etc/glance/glance-api.conf
[DEFAULT]
enable_v1_api = false
bind_host = 172.30.200.31
[cors]
[database]
connection = mysql+pymysql://glance:[email protected]/glance
[glance_store]
stores = file,http
default_store = file
filesystem_store_datadir = /var/lib/glance/images/
[image_format]
[keystone_authtoken]
auth_uri = http://controller:5000
auth_url = http://controller:35357
memcached_servers = controller01:11211,controller02:11211,controller03:11211
auth_type = password
project_domain_name = default
user_domain_name = default
project_name = service
username = glance
password = glance_pass
[matchmaker_redis]
[oslo_concurrency]
[oslo_messaging_amqp]
[oslo_messaging_kafka]
[oslo_messaging_notifications]
[oslo_messaging_rabbit]
[oslo_messaging_zmq]
[oslo_middleware]
[oslo_policy]
[paste_deploy]
flavor = keystone
[profiler]
[store_type_location_strategy]
[task]
[taskflow_executor]

# 创建镜像存储目录并赋权限;
# /var/lib/glance/images是默认的存储目录
[[email protected] ~]# mkdir -p /var/lib/glance/images
[[email protected] ~]# chown glance:nobody /var/lib/glance/images
5. 配置glance-registry.conf(optional)
# 官方文档指出:glance-registry服务与其api在Q版已经弃用,并且在S版时完全删除,本章节可忽略;
# 在全部控制节点操作,以controller01节点为例;
# 注意”bind_host”参数,根据节点修改;
# 注意glance-registry.conf文件的权限:root:glance
[[email protected] ~]# cp /etc/glance/glance-registry.conf /etc/glance/glance-registry.conf.bak
[[email protected] ~]# egrep -v "^$|^#" /etc/glance/glance-registry.conf
[DEFAULT]
bind_host = 172.30.200.31
[database]
connection = mysql+pymysql://glance:[email protected]/glance
[keystone_authtoken]
auth_uri = http://controller:5000
auth_url = http://controller:35357
memcached_servers = controller01:11211,controller02:11211,controller03:11211
auth_type = password
project_domain_name = default
user_domain_name = default
project_name = service
username = glance
password = glance_pass
[matchmaker_redis]
[oslo_messaging_amqp]
[oslo_messaging_kafka]
[oslo_messaging_notifications]
[oslo_messaging_rabbit]
[oslo_messaging_zmq]
[oslo_policy]
[paste_deploy]
flavor = keystone
[profiler]
6. 同步glance数据库
# 任意控制节点操作;
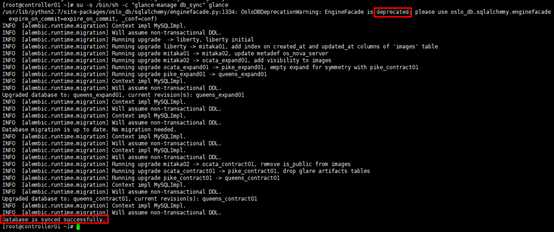
# 忽略输出的“deprecated”信息
[[email protected] ~]# su -s /bin/sh -c "glance-manage db_sync" glance

# 查看验证
[[email protected] ~]# mysql -h controller01 -uglance -pglance_dbpass -e "use glance;show tables;"
7. 启动服务
# 在全部控制节点操作,以controller01节点为例;
# glance-registry在Q版已弃用;
[[email protected] ~]# systemctl enable openstack-glance-api.service openstack-glance-registry.service
[[email protected] ~]# systemctl restart openstack-glance-api.service openstack-glance-registry.service

# 查看服务状态
[[email protected] ~]# systemctl status openstack-glance-api.service openstack-glance-registry.service

# 查看端口
[[email protected] ~]# netstat -tunlp | grep python2
8. 验证
在不启用ceph存储时,通常采用nfs共享存储做image的后端存储,如可将controller01节点的本地存储做共享,controller02/03节点远端挂载即可。
这里后续使用ceph存储,暂时使用本地验证,以controller01节点为例。
1)下载镜像
2)上传镜像
[[email protected] ~]# . admin-openrc

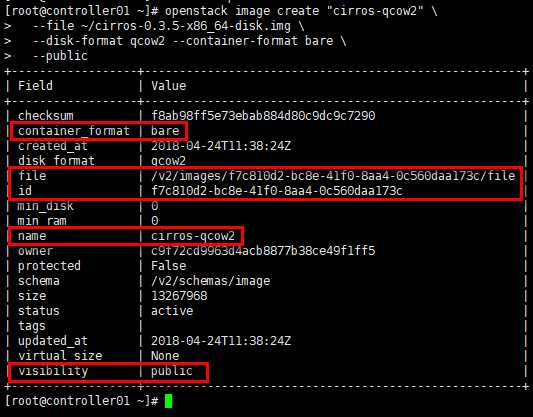
# “上传”指将已下载的原始镜像经过一定的格式转换上传到image服务;
# 格式指定为qcow2,bare;设置public权限;
# 镜像生成后,在指定的存储目录下生成以镜像id命名的镜像文件
[[email protected] ~]# openstack image create "cirros-qcow2"
   --file ~/cirros-0.3.5-x86_64-disk.img    --disk-format qcow2 --container-format bare    --public

3)查看镜像
[[email protected] ~]# openstack image list

9. 设置pcs资源
# 在任意控制节点操作;
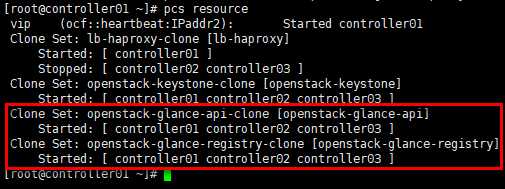
# 添加资源openstack-glance-api与openstack-glance-registry
[[email protected] ~]# pcs resource create openstack-glance-api systemd:openstack-glance-api --clone interleave=true
[[email protected] ~]# pcs resource create openstack-glance-registry systemd:openstack-glance-registry --clone interleave=true

# 查看pcs资源
[[email protected] ~]# pcs resource

以上是关于高可用OpenStack(Queen版)集群-5.Glance集群的主要内容,如果未能解决你的问题,请参考以下文章