android 皮肤包换肤之Resources加载
Posted 史大拿
tags:
篇首语:本文由小常识网(cha138.com)小编为大家整理,主要介绍了android 皮肤包换肤之Resources加载相关的知识,希望对你有一定的参考价值。
android 换肤之资源(Resources)加载(一)
本系列计划3篇:
- Android 换肤之资源(Resources)加载(一) — 本篇
- setContentView() / LayoutInflater源码分析(二)
- 换肤框架搭建(三)
看完本篇你可以学会什么?
-
Resources在什么时候被解析并加载的
- Application#Resources
- Activity#Resources
-
drawable 如何加载出来的
-
创建自己的Resources加载自己的资源
-
制作皮肤包"皮肤包"
-
加载“皮肤包”中的资源
tips:源码基于android-30
阅读源码后本篇实现的效果:

效果很简单,2个按钮
- 换肤
- 还原
效果很简单,重点是换肤的时候是加载“皮肤包”中的资源
Resources在什么时候被解析并加载的
Application#Resources
众所周知,java程序都是由main方法开始的,所以我们就从ActivityThread#main()方法开始阅读源码
在ActivityThread#main()方法中,我们经常会说到一些关于Looper,handler的逻辑代码,本篇不展开说Looper
#ActivityThread.java
public static void main(String[] args)
....
// looper
Looper.prepareMainLooper();
// szj 创建 activityThread
ActivityThread thread = new ActivityThread();
thread.attach(false, startSeq);
.....
Looper.loop();
throw new RuntimeException("Main thread loop unexpectedly exited");
本篇重点不是Looper, 来看看 thread.attach(false, startSeq); 方法
 #ActivityThread.java
 #ActivityThread.java
private void attach(boolean system, long startSeq)
   if (!system)  // app进程创建Application
			...
            //
            final IActivityManager mgr = ActivityManager.getService();
            try
                // 执行这里,创建Application
                // 通过AMS 调用 ActivityManagerService#attachApplication()
                mgr.attachApplication(mAppThread, startSeq);
             catch (RemoteException ex)
                throw ex.rethrowFromSystemServer();

   else  // system进程创建application
     try
       // 很关键的一个类,用来分发activity生命周期
       mInstrumentation = new Instrumentation();
       mInstrumentation.basicInit(this);

       // szj 创建Application Context
       ContextImpl context = ContextImpl.createAppContext(
         this, getSystemContext().mPackageInfo);

       // szj 反射创建 application
       mInitialApplication = context.mPackageInfo.makeApplication(true, null);

       // 执行application的onCreate() 方法
       mInitialApplication.onCreate();
      catch (Exception e)
       throw new RuntimeException(
         "Unable to instantiate Application():" + e.toString(), e);
这里需要分析if 分支中的内容,
在if分支中会通过AMS 执行到 ActivityManagerService#attachApplication()
# ActivityManagerService.java

 @Override
  public final void attachApplication(IApplicationThread thread, long startSeq)

  synchronized (this)

    ...
    // 绑定application
    attachApplicationLocked(thread, callingPid, callingUid, startSeq);
	  ...
# ActivityManagerService.java
private boolean attachApplicationLocked(@NonNull IApplicationThread thread,
        int pid, int callingUid, long startSeq)
  .....
  if (app.isolatedEntryPoint != null)
             ...
      else if (instr2 != null)
		  // 通过ActivityThread#bindApplication() 来创建并绑定application
          thread.bindApplication(processName, appInfo, providerList,
                  instr2.mClass,
                  profilerInfo, instr2.mArguments,
                  instr2.mWatcher,
                  instr2.mUiAutomationConnection, testMode,
                  mBinderTransactionTrackingEnabled, enableTrackAllocation,
                  isRestrictedBackupMode || !normalMode, app.isPersistent(),
                  new Configuration(app.getWindowProcessController().getConfiguration()),
                  app.compat, getCommonServicesLocked(app.isolated),
                  mCoreSettingsObserver.getCoreSettingsLocked(),
                  buildSerial, autofillOptions, contentCaptureOptions,
                  app.mDisabledCompatChanges);
       else
          ....
# ActivityThread.java
@Override
public final void bindApplication(String processName, ApplicationInfo appInfo,
        ProviderInfoList providerList, ComponentName instrumentationName,
        ProfilerInfo profilerInfo, Bundle instrumentationArgs,
        IInstrumentationWatcher instrumentationWatcher,
        IUiAutomationConnection instrumentationUiConnection, int debugMode,
        boolean enableBinderTracking, boolean trackAllocation,
        boolean isRestrictedBackupMode, boolean persistent, Configuration config,
        CompatibilityInfo compatInfo, Map services, Bundle coreSettings,
        String buildSerial, AutofillOptions autofillOptions,
        ContentCaptureOptions contentCaptureOptions, long[] disabledCompatChanges)

		// 将传递过来的消息保存起来
    AppBindData data = new AppBindData();
    data.processName = processName;
    data.appInfo = appInfo;
    data.providers = providerList.getList();
    data.instrumentationName = instrumentationName;
    data.instrumentationArgs = instrumentationArgs;
    data.instrumentationWatcher = instrumentationWatcher;
    data.instrumentationUiAutomationConnection = instrumentationUiConnection;
    data.debugMode = debugMode;
    data.enableBinderTracking = enableBinderTracking;
    data.trackAllocation = trackAllocation;
    data.restrictedBackupMode = isRestrictedBackupMode;
    data.persistent = persistent;
    data.config = config;
    data.compatInfo = compatInfo;
    data.initProfilerInfo = profilerInfo;
    data.buildSerial = buildSerial;
    data.autofillOptions = autofillOptions;
    data.contentCaptureOptions = contentCaptureOptions;
    data.disabledCompatChanges = disabledCompatChanges;
  	// 发送handler
    sendMessage(H.BIND_APPLICATION, data);
# ActivityThread#H.java

 class H extends Handler
   public void handleMessage(Message msg)
      switch (msg.what)
          case BIND_APPLICATION:
         	// 最终消息在handler中获取
          AppBindData data = (AppBindData)msg.obj;
          /// 在这里处理application
          handleBindApplication(data);
          break;
# ActivityThread.java
private void handleBindApplication(AppBindData data)
  ...
 		 Application app;
   try
     // 在这里创建application
     app = data.info.makeApplication(data.restrictedBackupMode, null);
# ActivityThread.java
// 创建application
public Application makeApplication(boolean forceDefaultAppClass,
        Instrumentation instrumentation)
	 // 创建Context
  ContextImpl appContext = ContextImpl.createAppContext(mActivityThread, this);
  NetworkSecurityConfigProvider.handleNewApplication(appContext);
  // 反射创建application
  app = mActivityThread.mInstrumentation.newApplication(
    cl, appClass, appContext);

  // 这里不会马上执行,因为默认传入的Instrumentation == null
  // 当分发activity(performLaunchActivity)时候
  // 才会调用  Application app = r.packageInfo.makeApplication(false, mInstrumentation); 来分发Application#onCreate()
  if (instrumentation != null)
    try
      // 通过 instrumentation 来调用 Application#onCreate()方法
      instrumentation.callApplicationOnCreate(app);
     catch (Exception e)
      ...
- 通过ContextImpl.createAppContext() 创建Context
- 通过反射创建application
- 创建好application后会调用 Application#onCreate()方法
接着执行ContextImpl.createAppContext()
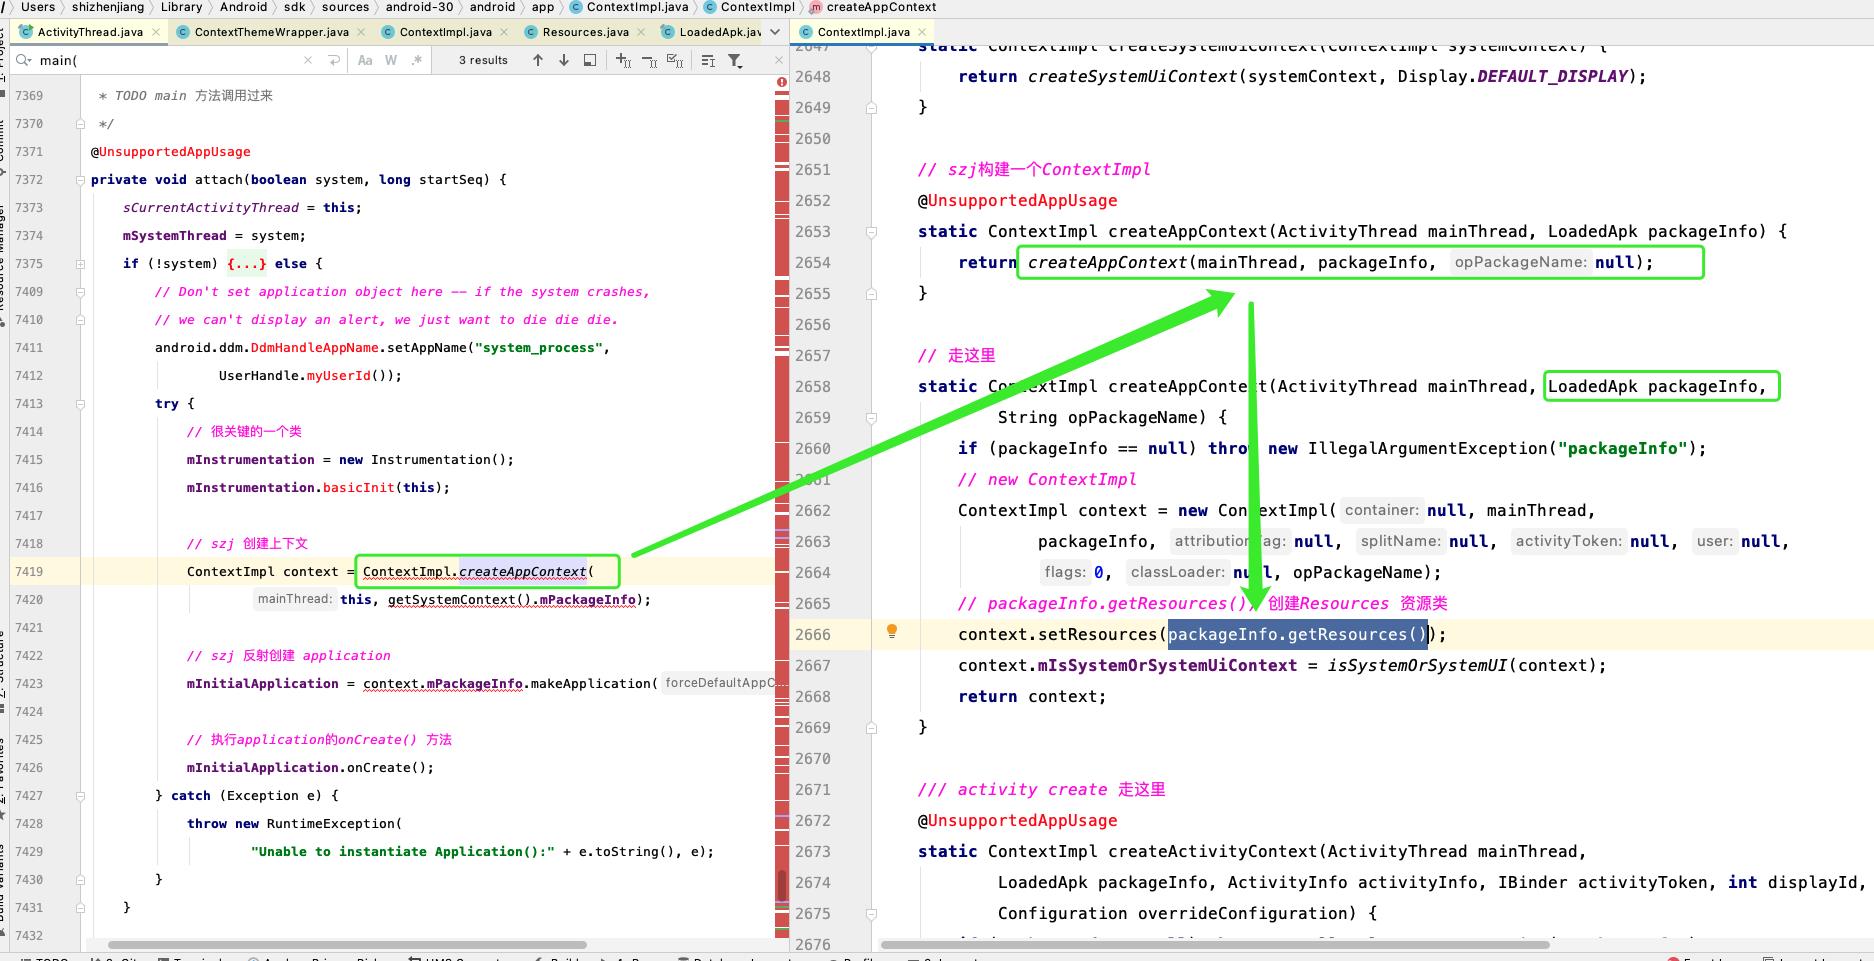
最终会走到LoadedApk#getResources() 上
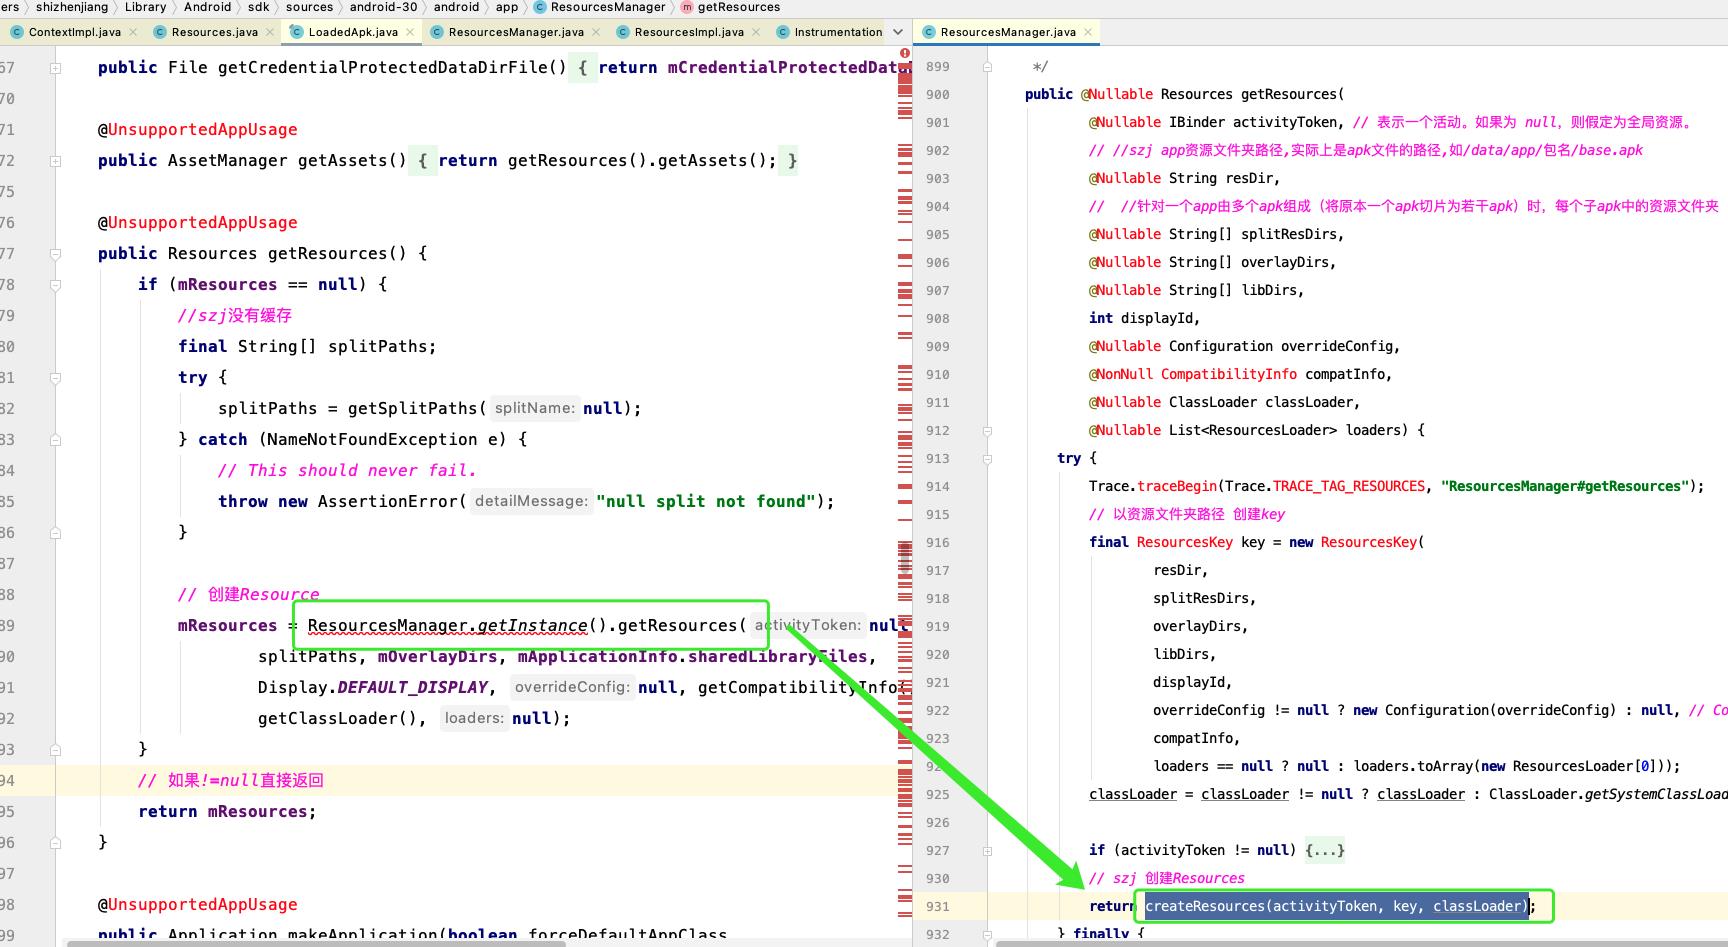
然后会从LoadedApk#getResources() 执行到 ResourcesManager#getResources()
最终在ResourcesManager中创建Resources
这段源码我们知道:
-
在程序运行到main方法的时候,我们会在
ActivtyThread.#attach()中创建Context,创建Application,并且执行Application#onCreate() -
然后会执行到
LoadedApk.getResources()去解析获取Resources()- LoadedApk.java 从类名我们就知道这个类是用来对apk信息解析的
-
最终解析Resources的任务交给了
ResourcesManager#createResources()
Application源码参考自:
好了,读到这里就可以了,来看看Activity#Resources是如何解析并加载的
Activity#Resources
源码分析从 ActivityThread#performLaunchActivity()开始
为什么要从这里开始? 写完换肤之后开始framework系列,到时候具体聊~
#ActivityThread.java
private Activity performLaunchActivity(ActivityClientRecord r, Intent customIntent)
.... 省略部分代码
// szj 创建 activity 的上下文
ContextImpl appContext = createBaseContextForActivity(r);
Activity activity = null;
try
java.lang.ClassLoader cl = appContext.getClassLoader();
// 通过反射创建 activity 的实例
activity = mInstrumentation.newActivity(
cl, component.getClassName(), r.intent);
catch (Exception e)
.....
try
if (activity != null)
// szj 创建 PhoneWindow,设置windowManager等操作
activity.attach(appContext, this, getInstrumentation(), r.token,
r.ident, app, r.intent, r.activityInfo, title, r.parent,
r.embeddedID, r.lastNonConfigurationInstances, config,
r.referrer, r.voiceInteractor, window, r.configCallback,
r.assistToken);
activity.mCalled = false;
// szj 分发 onCreate() 事件
if (r.isPersistable())
mInstrumentation.callActivityOnCreate(activity, r.state, r.persistentState);
else
mInstrumentation.callActivityOnCreate(activity, r.state);
// 判断是否调用super.onCreate() 方法
if (!activity.mCalled)
throw new SuperNotCalledException(
"Activity " + r.intent.getComponent().toShortString() +
" did not call through to super.onCreate()");
...
catch (Exception e)
...
return activity;
在performLaunchActivity()这段代码中有几个重点:
- createBaseContextForActivity() 创建ContextImpl
- mInstrumentation.newActivity(,); 通过反射创建Activity实例
- 然后会调用Activity#attach() 方法绑定window等操作
- 绑定了window之后会立即调用Activity#onCreate()进行页面初始化
本篇重点是Context,其他的先不关注,先来看看createBaseContextForActivity() 代码
# ContextImpl.java
@UnsupportedAppUsage
static ContextImpl createActivityContext(ActivityThread mainThread,
LoadedApk packageInfo, ActivityInfo activityInfo, IBinder activityToken, int displayId,
Configuration overrideConfiguration)
....
/// szj创建Context
ContextImpl context = new ContextImpl(null, mainThread, packageInfo, null,
activityInfo.splitName, activityToken, null, 0, classLoader, null);
...
final ResourcesManager resourcesManager = ResourcesManager.getInstance();
/// szj 通过ResourcesManager创建Resources
context.setResources(resourcesManager.createBaseTokenResources(activityToken,
packageInfo.getResDir(),
....));
return context;
最终会调用到 ResourcesManager.getInstance().createBaseTokenResources() 方法

最终
- activity创建Resurces
- application创建Resurces
都是调用到ResourcesManager#createResources()来创建Resources
这里还用到了一个类:ResourcesKey 这个类主要作用就是来存储数据,以及做一些校验等
ResourcesManager#createResources()源码分析
#ResourcesManager.java
private @Nullable Resources createResources(@Nullable IBinder activityToken,
@NonNull ResourcesKey key, @NonNull ClassLoader classLoader)
synchronized (this)
//szj 从缓存中找 ResourcesImpl 如果不存在就创建
代码1: ResourcesImpl resourcesImpl = findOrCreateResourcesImplForKeyLocked(key);
if (resourcesImpl == null)
return null;
if (activityToken != null)
// 创建Resources
return createResourcesForActivityLocked(activityToken, classLoader,
resourcesImpl, key.mCompatInfo);
else
// 直接创建Resources对象
return createResourcesLocked(classLoader, resourcesImpl, key.mCompatInfo);
先来看findOrCreateResourcesImplForKeyLocked(key);
 #ResourcesManager.java

 private @Nullable ResourcesImpl findOrCreateResourcesImplForKeyLocked(
         @NonNull ResourcesKey key)
     // szj查找与ResourcesImpl匹配的缓存资源
     ResourcesImpl impl = findResourcesImplForKeyLocked(key);
     if (impl == null)
         // szj 创建ResourcesImpl
         impl = createResourcesImpl(key);
         if (impl != null)
             // 加入到缓存中
             mResourceImpls.put(key, new WeakReference<>(impl));


     return impl;
这段代码很简单,做了一些缓存,通过createResourcesImpl() 创建了ResourcesImpl
#ResourcesManager.java
private @Nullable ResourcesImpl createResourcesImpl(@NonNull ResourcesKey key)
final DisplayAdjustments daj = new DisplayAdjustments(key.mOverrideConfiguration);
daj.setCompatibilityInfo(key.mCompatInfo);
// szj创建 AssetManager
final AssetManager assets = createAssetManager(key);
if (assets == null)
return null;
final DisplayMetrics dm = getDisplayMetrics(key.mDisplayId, daj);
final Configuration config = generateConfig(key, dm);
// 根据assetManager 创建一个ResourceImpl
// 其实找资源是 Resources -> ResourcesImpl -> AssetManager
final ResourcesImpl impl = new ResourcesImpl(assets, dm, config, daj);
...
return impl;
关键点又来了:
创建ResourcesImpl需要4个参数:
-
参数一: AssetManager 具体资源管理
(重要) -
参数二: DisplayMetrics 屏幕的一些封装
- 通过getResources().getDisplayMetrics().density 获取过屏幕的密度
- 通过getResources().getDisplayMetrics().widthPixels 获取过屏幕的宽度等
-
参数三: Configuration 一些配置信息[对本篇来说不重要]
-
参数四: DisplayAdjustments 资源的兼容性等 [对本篇来说不重要]
createAssetManager方法:
#ResourcesManager.java
protected @Nullable AssetManager createAssetManager(@NonNull final ResourcesKey key)
// szj 创建AssetManager对象
final AssetManager.Builder builder = new AssetManager.Builder();
// key.mResDir 就是apk在手机内存中的的完整路径
if (key.mResDir != null)
try
builder.addApkAssets(loadApkAssets(key.mResDir, false, false));
catch (IOException e)
return null;
....
if (key.mLibDirs != null)
/// 循环lib中的资源
for (final String libDir : key.mLibDirs)
// .apk
/// 只有.apk文件中才有资源,所以只要有资源的地方
if (libDir.endsWith(".apk"))
try
builder.addApkAssets(loadApkAssets(libDir, true /*sharedLib*/,
false /*overlay*/));
catch (IOException e)
...
return builder.build();
这段代码通过Builder设计模式,将多个资源文件下的资源都保存起来
多个资源指的是一个项目中的多个lib
来看看单个资源是如何加载的的(loadApkAssets):
#ResourcesManager.java
// path 表示当前apk在手机中的的完整路径
private @NonNull ApkAssets loadApkAssets(String path,