阅读《Android 从入门到精通》——多项选择
Posted SweetLoverFT
tags:
篇首语:本文由小常识网(cha138.com)小编为大家整理,主要介绍了阅读《Android 从入门到精通》——多项选择相关的知识,希望对你有一定的参考价值。
多项选择(CheckBox)
CheckBox 类是 Button 的子类,层次关系如下:
android.widget.Button
android.widget.CompoundButton
android.widget.CheckBox
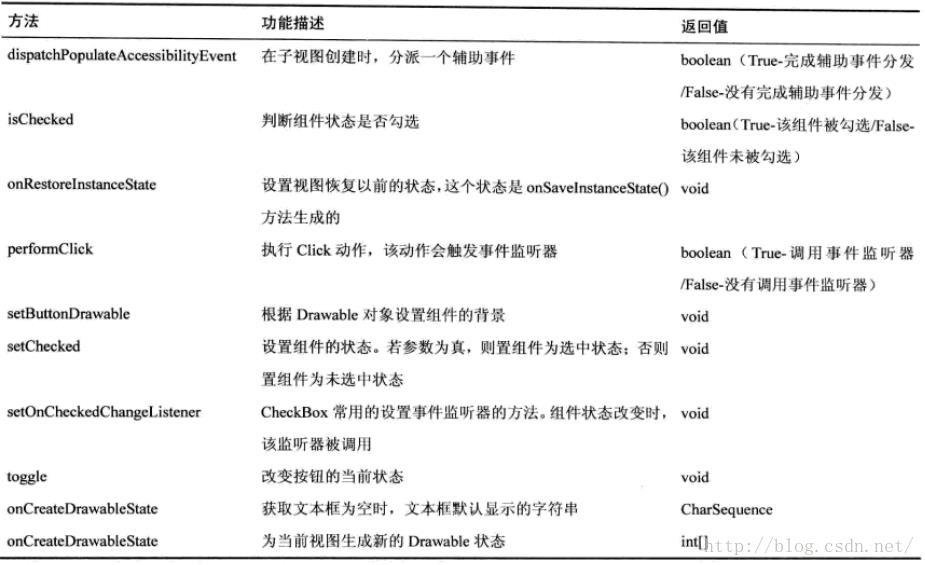
CheckBox 类方法

CheckBox 示例
完整工程: http://download.csdn.net/detail/sweetloveft/9400761下述程序中,主要学习 CheckBox 和 Toast 的用法,CheckBox 作为复选框,选中未选中只有 true 和 false 的数值,必须添加具体的监听事件,才能确保其在状态改变时执行对应动作,而 Toast 通知的作用是创建一个浮动文本,浮于文字上方,显现一段时间后退出,需要注意这个延时是累积的,同时快速触发多个 Toast 时,每个 Toast 必须在前者显示结束后才能显示
此外要学习下 Toast 的 Gravity 位置有哪些,要知道以下内容,其中 setGravity 中,x > 0 右移反之左移,y > 0 上移反之下移。

1.MainActivity.java
package com.sweetlover.activity;

import com.sweetlover.checkboxdemo.R;

import android.app.Activity;
import android.os.Bundle;
import android.view.Gravity;
import android.view.View;
import android.widget.CheckBox;
import android.widget.CompoundButton;
import android.widget.CompoundButton.OnCheckedChangeListener;
import android.widget.Toast;

public class MainActivity extends Activity

	private static final int CTRL_NUM = 4;

	private CheckBox[] checkBox = null;

	@Override
	protected void onCreate(Bundle savedInstanceState)
		// TODO Auto-generated method stub
		super.onCreate(savedInstanceState);
		setContentView(R.layout.activity_main);

		checkBox = new CheckBox[CTRL_NUM];
		checkBox[0] = (CheckBox)findViewById(R.id.checkBox1);
		checkBox[1] = (CheckBox)findViewById(R.id.checkBox2);
		checkBox[2] = (CheckBox)findViewById(R.id.checkBox3);
		checkBox[3] = (CheckBox)findViewById(R.id.checkBox4);

		// TODO Register events
		for (int i = 0; i < CTRL_NUM; i++)
			checkBox[i].setOnCheckedChangeListener(new CheckBoxListener());


	public void onClickSubmit(View view)
		String str = "";
		for (int i = 0; i < CTRL_NUM; i++)
			if (checkBox[i].isChecked())
				str += checkBox[i].getText() + " ";

		Toast.makeText(this, str + "被选择", Toast.LENGTH_LONG).show();


	class CheckBoxListener implements OnCheckedChangeListener

		@Override
		public void onCheckedChanged(CompoundButton buttonView, boolean isChecked)
			// TODO Auto-generated method stub
			String text = buttonView.getText().toString();
			if (isChecked)
				text += " 被选择";
			else
				text += " 取消选择";
			Toast toast = Toast.makeText(MainActivity.this, text, Toast.LENGTH_SHORT);
			toast.setGravity(Gravity.CENTER, 5, 5);
			toast.show();
2.activity_main.xml
<?xml version="1.0" encoding="utf-8"?>
<LinearLayout xmlns:android="http://schemas.android.com/apk/res/android"
    android:layout_width="match_parent"
    android:layout_height="match_parent"
    android:orientation="vertical"
    android:padding="30dp" >

    <TextView
        android:id="@+id/textView1"
        android:layout_width="wrap_content"
        android:layout_height="wrap_content"
        android:layout_gravity="center_horizontal"
        android:text="@string/Tittle"
        android:textAppearance="?android:attr/textAppearanceMedium" />

    <CheckBox
        android:id="@+id/checkBox1"
        android:layout_width="wrap_content"
        android:layout_height="wrap_content"
        android:layout_gravity="center_horizontal"
        android:layout_marginTop="30dp"
        android:text="@string/Profile1" />

    <CheckBox
        android:id="@+id/checkBox2"
        android:layout_width="wrap_content"
        android:layout_height="wrap_content"
        android:layout_gravity="center_horizontal"
        android:layout_marginTop="30dp"
        android:text="@string/Profile2" />

    <CheckBox
        android:id="@+id/checkBox3"
        android:layout_width="wrap_content"
        android:layout_height="wrap_content"
        android:layout_gravity="center_horizontal"
        android:layout_marginTop="30dp"
        android:text="@string/Profile3" />

    <CheckBox
        android:id="@+id/checkBox4"
        android:layout_width="wrap_content"
        android:layout_height="wrap_content"
        android:layout_gravity="center_horizontal"
        android:layout_marginTop="30dp"
        android:text="@string/Profile4" />

    <Button
        android:id="@+id/button1"
        android:layout_width="wrap_content"
        android:layout_height="wrap_content"
        android:layout_gravity="center_horizontal"
        android:layout_marginTop="30dp"
        android:onClick="onClickSubmit"
        android:text="@string/Submit" />

</LinearLayout>
3.string.xml
<resources>

    <string name="app_name">CheckBoxDemo</string>
    <string name="Tittle">请选择喜欢的情景模式</string>
    <string name="Profile1">上班模式</string>
    <string name="Profile2">家庭模式</string>
    <string name="Profile3">旅游模式</string>
    <string name="Profile4">会议模式</string>
    <string name="Submit">提交</string>

</resources>
4.AndroidManifest.xml
<manifest xmlns:android="http://schemas.android.com/apk/res/android"
    package="com.sweetlover.checkboxdemo"
    android:versionCode="1"
    android:versionName="1.0" >

    <uses-sdk
        android:minSdkVersion="8"
        android:targetSdkVersion="19" />

    <application
        android:allowBackup="true"
        android:icon="@drawable/ic_launcher"
        android:label="@string/app_name"
        android:theme="@style/AppTheme" >
        <activity android:name="com.sweetlover.activity.MainActivity">
            <intent-filter>
                <action android:name="android.intent.action.MAIN"/>
                <category android:name="android.intent.category.LAUNCHER"/>
            </intent-filter>
        </activity>
    </application>

</manifest>
以上是关于阅读《Android 从入门到精通》——多项选择的主要内容,如果未能解决你的问题,请参考以下文章