PostgreSQL高可用套件repmgr+pgpool
Posted PostgreSQLChina
tags:
篇首语:本文由小常识网(cha138.com)小编为大家整理,主要介绍了PostgreSQL高可用套件repmgr+pgpool相关的知识,希望对你有一定的参考价值。
作者:徐田原
一、背景概述
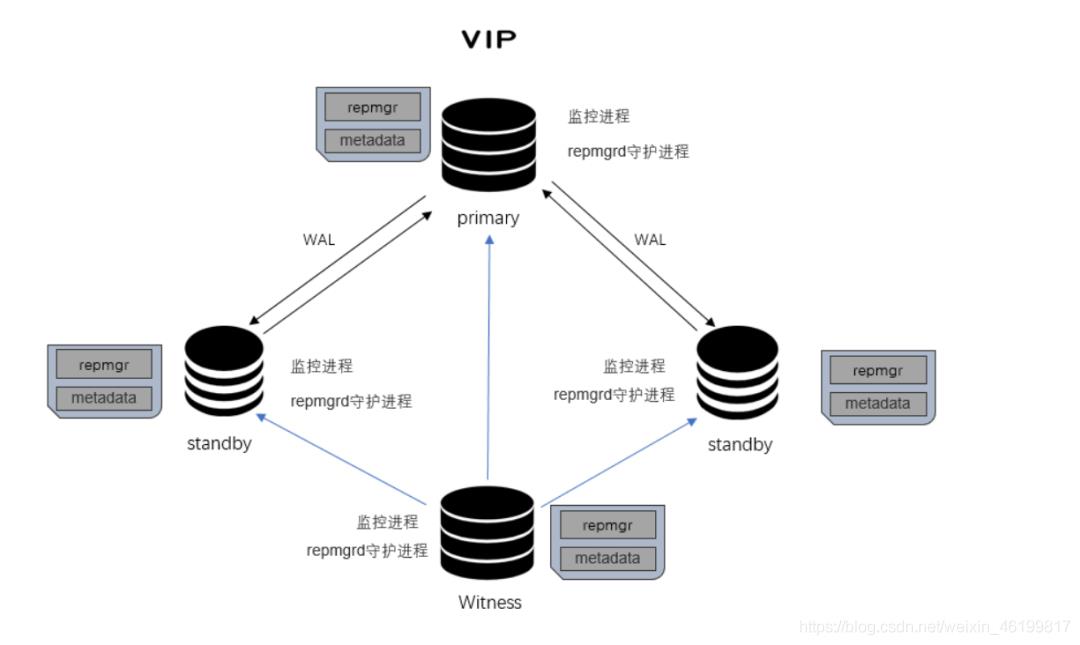
关于PosgreSQL高可用管理套件,PG生态圈提供许多人气比较高的开源高可用和故障转移工具,比如Patroni、Repmgr、PAF、Stolon等。下面重点给大家推荐关于repmgr这款精简易用的流复制工具。个人觉得,repmgr与声名远扬的ORACLE ADG逻辑复制工具非常类似。它的功能强大,安装和配置简单,有很强的可操控性。下面也会介绍两种异构数据库不用的复制方式的工具。
repmgr是一个2ndQuadrant开发的一款复制的开源工具套件,用于管理PostgreSQL服务器集群中的复制和故障转移。最初,它主要是为了简化流副本的管理,后来发展成为一个完整的故障转移管理套件。它通过设置备用服务器,监视复制以及执行管理任务(如故障转移或手动切换操作)的工具,增强了PostgreSQL内置的热备份功能。Repmgr体系架构如下:
在入门repmgr之前务必需要了解的组件功能模块:
1.1 Repmgrd 守护进程
它主动监视复制集群中的服务器并执行以下任务:
- 监控和记录集群复制性能
- 通过检测主服务器故障并提升最合适的备用服务器来执行故障转移
- 将有关群集中事件的通知提供给用户定义的脚本,该脚本可以执行诸如通过电子邮件发送警报等任务
- repmgrd 根据本地数据库角色不同,其功能也不同:
主库:repmgrd仅监控本地数据库,负责自动恢复、同异步切换
备库:repmgrd监控本地数据库和主数据库,负责自动切换、复制槽删除
1.2 Repmgr命令管理
用于执行管理任务的命令行工具,主要有以下方面作用:
- 设置备用服务器
- 将备用服务器升级为主服务器
- 切换主服务器和备用服务器
- 显示复制群集中的服务器状态
1.3 用户和元数据
为了有效地管理复制集群,repmgr提供专用数据库存储和管理有关repmgr集群服务的相关信息。此模式在部署repmgr服务时,由repmgr扩展自动创建,该扩展在初始化repmgr -administered集群(repmgr主寄存器)的第一步中安装,包含以下对象:
1、表
repmgr.events:记录感兴趣的事件
repmgr.nodes:复制群集中每个服务器的连接和状态信息
repmgr.monitoring_history:repmgrd写入的历史备用监视信息
2、视图
repmgr.show_nodes:基于表repmgr.nodes,另外显示服务器上游节点的名称
repmgr.replication_status:启用repmgrd的监视时,显示每个备用数据库的当前监视状态。
repmgr元数据模式可以存储在现有的数据库或在自己的专用数据库。
请注意,repmgr元数据模式不能驻留在不属于repmgr管理的复制集群的数据库服务器上。
数据库用户必须可供repmgr访问此数据库并执行必要的更改。
此用户不需要是超级用户,但是某些操作(如初始安装repmgr扩展)将需要超级用户连接(可以使用命令行选项–superuser在需要时指定 )。
二、安装部署
2.1 环境准备
安装环境需要注意以下要求:
服务主机名主机IP操作系统部署版本主节点lightdb1192.168.127.135CentOS 8.4pg13.3 repmgr-5.2.1备节点1lightdb2192.168.127.136CentOS 8.4pg13.3 repmgr-5.2.1备节点
2lightdb3192.168.127.137CentOS 8.4pg13.3 repmgr-5.2.1见证节点lightdb4192.168.127.138CentOS 8.4pg13.3 repmgr-5.2.1连接池1lightdb5192.168.127.126CentOS 8.4pgpool-II-4.2.2连接池2lightdb6192.168.127.127CentOS 8.4pgpool-II-4.2.2
版本要求:repmgr必须安装在复制群集中的每台服务器上。如果从软件包安装repmgr,则软件包版本必须与PostgreSQL版本匹配。如果从源安装,则必须针对相同的主版本编译repmgr。
环境依赖:repmgr有一些必要的依赖项,以使其能够最佳地运行,并且应该为系统提供某些最低限度的功能。本案例是在Centos7.X操作系统使用repmgr最新5.1的版本。在生产环境,可以选择根据实际情况选择操作系统和对应的repmgr和PostgreSQL版本。
如果是Rehat的操作系统系统可通过安装相应的RPM来添加PostgreSQL存储库:https://yum.postgresql.org/repopackages.php,也可以通过源码来进行安装。
通信配置:建议repmgr通过配置SSH免密在节点之间进行通信,方便运维操作。但如果您企业对主机互信有特定的安全要求和约束,可以使用配置管理来管理服务器密钥,比如Ansible、Puppet或Salt等。
2.2 安装步骤
步骤1:配置主机hosts文件vim /etc/hosts,添加主机ip和name
192.168.127.135 lightdb1
192.168.127.136 lightdb2
192.168.127.137 lightdb3
192.168.127.138 lightdb4
192.168.127.126 lightdb5
192.168.127.127 lightdb6
[root@localhost ~]# hostnamectl set-hostname lightdb1
[root@localhost ~]# hostname
lightdb1
[root@localhost ~]# systemctl stop firewalld.service
[root@localhost ~]# systemctl disable firewalld.service
Removed /etc/systemd/system/multi-user.target.wants/firewalld.service.
Removed /etc/systemd/system/dbus-org.fedoraproject.FirewallD1.service.
[root@localhost ~]# cat >> /etc/hosts << EOF
> 192.168.127.135 lightdb1
> 192.168.127.136 lightdb2
> 192.168.127.137 lightdb3
> 192.168.127.138 lightdb4
>192.168.127.126 lightdb5
>192.168.127.127 lightdb6
> EOF
[root@localhost ~]# systemctl stop firewalld
[root@localhost ~]# systemctl disable firewalld
[root@localhost ~]# sed -i 's/enforcing/disabled/' /etc/selinux/config
[root@localhost ~]# setenforce 0
[root@localhost ~]# dnf install -y https://download.postgresql.org/pub/repos/yum/reporpms/EL-8-x86_64/pgdg-redhat-repo-latest.noarch.rpm
CentOS Linux 8 - AppStream 688 kB/s | 8.1 MB 00:12
CentOS Linux 8 - BaseOS 674 kB/s | 3.6 MB 00:05
CentOS Linux 8 - Extras 16 kB/s | 9.8 kB 00:00
pgdg-redhat-repo-latest.noarch.rpm 3.0 kB/s | 12 kB 00:03
Dependencies resolved.
===========================================================================================================================================================================
Package Architecture Version Repository Size
===========================================================================================================================================================================
Installing:
pgdg-redhat-repo noarch 42.0-18 @commandline 12 k
Transaction Summary
===========================================================================================================================================================================
Install 1 Package
Total size: 12 k
Installed size: 12 k
Downloading Packages:
Running transaction check
Transaction check succeeded.
Running transaction test
Transaction test succeeded.
Running transaction
Preparing : 1/1
Installing : pgdg-redhat-repo-42.0-18.noarch 1/1
Verifying : pgdg-redhat-repo-42.0-18.noarch 1/1
Installed products updated.
Installed:
pgdg-redhat-repo-42.0-18.noarch
Complete!
步骤2:在lightdb1主机用postgres用户创建mkdir ~/.ssh目录并执行以下命令,通过SSH访问postgres用户到所有节点,rmha2和rmha3重复执行。
ssh-keygen
ssh-copy-id -i /home/postgres/.ssh/id_rsa.pub postgres@192.168.127.135
ssh-copy-id -i /home/postgres/.ssh/id_rsa.pub postgres@192.168.127.136
ssh-copy-id -i /home/postgres/.ssh/id_rsa.pub postgres@192.168.127.137
ssh-copy-id -i /home/postgres/.ssh/id_rsa.pub postgres@192.168.127.138
2.3 repmgr源代码安装
要安装repmgr,必须安装编译PostgreSQL的先决条件。大多数主流Linux发行版和其他UNIX变体都提供了从包中安装先决条件的简单方法。为您的目标repmgr版本选择适当的PostgreSQL版本。
Rhel或CentOSx或7.X:从yum.postgresql.org为你的系统安装适当的存储库RPM。然后安装构建PostgreSQL的先决条件:
sudo yum check-update
sudo yum groupinstall 'Development Tools'
sudo yum install yum-utils openjade docbook-dtds docbook-style-dsssl docbook-style-xsl
sudo yum-builddep postgresql96
可通过两种方式获取repmgr源代码:使用git或者下载发布版本的压缩包。示例使用git下载源码包。每个repmgr版本都有相应的标签。repmgr的源文件下载地址在:https://github.com/2ndQuadrant/repmgr
git clone https://github.com/2ndQuadrant/repmgr
在使用tar -xvzf解压源代码归档文件之后,安装过程与从git克隆文件安装相同。从源代码安装repmgr,使用postgres用户执行编译:
tar -zxvf repmgr-5.2.1.tar.gz
sudo mv repmgr-5.2.1 /home/postgres/postgresql-13.3/contrib/repmgr
cd /home/postgres/postgresql-13.3/contrib/repmgr
./configure
sudo make && sudo make install
源码编译之后会自动在PGHOME的extension/生成repmgr.control以及对应的repmgrd服务。
2.4 配置服务
- 配置主库
我们将需要一台名为lightdb1的服务器。/data/postgresql/data是本案例默认的PGDATA。配置遵循以下步骤:
1)连接到PostgreSQL并执行以下命令来创建一个用于管理repmgr的用户和数据库
create user repmgr with password 'repmgr' superuser replication;
create database repmgr owner repmgr;
2)修改postgresql.conf文件并设置以下参数:
listen_addresses = '*'
shared_preload_libraries = 'repmgr'
wal_log_hints = 'on'
wal_level = replica
hot_standby = on
- 修改pg_hba.conf文件并添加以下行:
# TYPE  DATABASE        USER            ADDRESS                 METHOD

# 'local' is for Unix domain socket connections only
local   all             all                                     trust
local   repmgr        repmgr                              trust
# IPv4 local connections:
host    all             all             127.0.0.1/32            trust
host  all all 0.0.0.0/0 trust
host    repmgr         repmgr         192.168.127.135/0          trust
host    repmgr         repmgr         192.168.127.136/0          trust
host    repmgr         repmgr         192.168.127.137/0         trust
host    repmgr         repmgr         192.168.127.138/0         trust
# IPv6 local connections:
host    all             all             ::1/128                 trust
# Allow replication connections from localhost, by a user with the
# replication privilege.
local   replication     all                                     trust
host    replication     all             127.0.0.1/32            trust
host    replication     all             ::1/128                 trust
local   replication   repmgr                              trust
host    replication   repmgr      192.168.127.135/0           trust
host    replication   repmgr      192.168.127.136/0           trust
host    replication   repmgr      192.168.127.137/0         trust
host    replication   repmgr      192.168.127.138/0          trust
-
重新加载PostgreSQL服务
-
创建一个名为/data/postgresql/etc/repmgr.conf的文件,包含以下内容:
sudo mkdir -pv /data/postgresql/etc/
sudo chown -R postgres:postgres /data/postgresql/
touch   /data/postgresql/etc/repmgr.conf
cat >> /data/postgresql/etc/repmgr.conf << EOF
/*repmgr基本配置*/
node_id=1
node_name='lightdb1'
conninfo='host=192.168.127.135 port=5432 dbname=repmgr user=repmgr connect_timeout=2'
data_directory ='/data/postgresql/data'
pg_bindir='/data/postgresql/bin'
config_directory='/data/postgresql/data'
/*设置日志参数*/
log_level=INFO
log_facility=STDERR
log_file='/data/postgresql/etc/repmgr.log'
EOF
在使用repmgr命令需要指定repmgr.conf路径,通过-f/–config-file参数指定路径。如果找不到或无法读取该文件,则会引发错误,并且不会尝试检查默认位置。这是为了防止repmgr意外读取错误的配置文件。为了解决这个问题,可以将repmgr.con创建在pg_conf默认的sysconfidir路径下:
例如:通过查询sysconfdir路径
[postgres@lightdb1 etc]$ pg_config --sysconfdir
/data/postgresql/etc
创建/data/postgresql/etc/repmgr.conf,并配置文件。
这样可以避免使用repmgr命令还需要指定配置文件目录。
注意:Red Hat和CentOS系统及类似的系统,如果是通过yum源安装repmgr,安装完会在/etc/repmgr/12/目录自动生成一个repmgr.conf配置文件。repmgr.conf配置文件是管理repmgr服务非常关键的一个配置文件,若要让repmgr集群更好的服务您的数据库框架,需要了解repmgr参数和命令的语法和含义:参数名称参数解释配置要求node_id大于零的唯一整数,用于标识节点必配项node_name任意(但唯一)字符串.字符串的最大长度为63个字符,并且只能包含可打印的ASCII字符。必配项node_name数据库连接信息。群集中的所有服务器必须能够使用此字符串连接到本地节点。如果使用repmgrd,请考虑connect_timeout在conninfo字符串中进行显式设置,以确定放弃网络连接尝试的时间;必配项data_directoryPostgreSQL节点的数据目录必配项config_directory如果PostgreSQL配置文件位于数据目录之外,请指定主postgresql.conf文件所在的目录。可选项replication_user与PostgreSQL用户建立复制连接。如果未设置默认值,则为conninfo中定义的用户可选项replication_type必须为physical(默认值)可选项location定义节点位置的任意字符串;在故障转移期间使用它来检查当前主节点的可见性可选项use_replication_slots是否使用物理复制插槽。注意:使用复制插槽时, max_replication_slots应至少配置为要连接到主数据库的备用数据库的数量可选项ssh_options建议添加-q以抑制任何多余的SSH信息,例如登录标语,以及一个显式 ConnectTimeout值,例如:ssh_options =’-q -o ConnectTimeout = 10’可选项log_levelDEBUG,INFO,NOTICE, WARNING,ERROR,ALERT,CRIT 或EMERG。默认值为INFO。需要注意,这DEBUG将产生大量的日志输出,因此在正常使用中不应启用它。可选项log_facility日志工具:可能的值是STDERR(默认),或Syslog集成,一LOCAL0,LOCAL1,LOCAL7,USER可选项log_file如果将log_facility设置为STDERR,则可以将日志输出重定向到指定的文件可选项log_status_interval此设置使repmgrd以指定的时间间隔(以秒为单位,默认为300)发出状态日志行可选项
repmgr命令
repmgr -f /etc/repmgr.conf node service --list-actions --action=stop
repmgr -f /etc/repmgr.conf node service --list-actions --action=start
repmgr -f /etc/repmgr.conf node service --list-actions --action=restart
repmgr -f /etc/repmgr.conf node service --list-actions --action=reload
- 要使repmgr支持复制集群,必须向repmgr注册主节点。这将安装repmgr扩展和元数据对象,并为主服务器添加元数据记录:
[postgres@lightdb1 etc]$ pwd
/data/postgresql/etc
[postgres@lightdb1 etc]$ repmgr primary register
INFO: connecting to primary database...
NOTICE: attempting to install extension 'repmgr'
NOTICE: 'repmgr' extension successfully installed
NOTICE: primary node record (ID: 1) registered
[postgres@lightdb1 etc]$ repmgr service status
 ID | Name     | Role    | Status    | Upstream | repmgrd     | PID | Paused? | Upstream last seen
----+----------+---------+-----------+----------+-------------+-----+---------+--------------------
 1  | lightdb1 | primary | * running |          | not running | n/a | n/a     | n/a
psql -h 192.168.127.135 -U repmgr -d postgres -c 'select version()'
psql -h 192.168.127.135 -U repmgr -d repmgr -c 'SELECT * FROM repmgr.nodes;'

[postgres@lightdb1 ~]$ psql -h 192.168.127.135 -U repmgr -d repmgr -c 'SELECT * FROM repmgr.nodes;'
 node_id | upstream_node_id | active | node_name |  type   | location | priority |                                  conninfo                                  | repluser |
slot_name |  config_file
---------+------------------+--------+-----------+---------+----------+----------+----------------------------------------------------------------------------+----------+-
----------+---------------
       1 |                  | t      | lightdb1  | primary | default  |      100 | host=192.168.127.135 port=5432 dbname=repmgr user=repmgr connect_timeout=2 | repmgr   |
          | ./repmgr.conf
(1 row)
- 开启主库守护进程repmgrd
复制集群中的每个服务器都有自己的记录。如果使用了repmgrd,则当节点的状态或角色发生更改时,将更新upstream_node_id、active和type字段。
[postgres@lightdb1 etc]$ repmgrd -d
[2021-07-16 00:52:22] [NOTICE] redirecting logging output to '/data/postgresql/etc/repmgr.log'
1.克隆从库
2.由于repmgr是一个客户端/服务器端PostgreSQL管理套件,在真正使用它之前,我们至少需要两个或两个以上节点,备库不需要初始化数据库。如备库在搭建的过程中,需要停止数据库或者删除data目录下面的文件。通过复制主库,在备库创建克隆副本,并注册到repmgr中。此处为了演示,在实际生成环境中,部署多个节点,数据丢失或系统中断的几率会降低,提高整个框架的高可用性。
3.下面操作需要在所有的备库repmgr2、repmgr3执行。
1)配置repmgr.conf文件,对指定的参数进行以下更改:
sudo mkdir -pv /data/postgresql/etc/
sudo chown -R postgres:postgres /data/postgresql/
touch   /data/postgresql/etc/repmgr.conf
cat >> /data/postgresql/etc/repmgr.conf << EOF
node_id=2
node_name='lightdb2'
conninfo='host=192.168.127.136 port=5432 dbname=repmgr user=repmgr connect_timeout=2'
data_directory ='/data/postgresql/data'
pg_bindir='/data/postgresql/bin'
config_directory='/data/postgresql/data'
log_level=INFO
log_facility=STDERR
log_file='/data/postgresql/etc/repmgr.log'
EOF
2)从库需要停止数据数据服务,使用-dry-run选项检查待机是否可以克隆.repmgr命令
[postgres@lightdb2 etc]$ repmgr -h 192.168.127.135 -U repmgr -d repmgr -f /data/postgresql/etc/repmgr.conf standby clone
WARNING: following problems with command line parameters detected:
  'config_directory' set in repmgr.conf, but --copy-external-config-files not provided
NOTICE: destination directory '/data/postgresql/data' provided
INFO: connecting to source node
DETAIL: connection string is: host=192.168.127.135 user=repmgr dbname=repmgr
DETAIL: current installation size is 30 MB
INFO: replication slot usage not requested;  no replication slot will be set up for this standby
NOTICE: checking for available walsenders on the source node (2 required)
NOTICE: checking replication connections can be made to the source server (2 required)
INFO: creating directory '/data/postgresql/data'...
NOTICE: starting backup (using pg_basebackup)...
HINT: this may take some time; consider using the -c/--fast-checkpoint option
INFO: executing:
  /data/postgresql/bin/pg_basebackup -l 'repmgr base backup'  -D /data/postgresql/data -h 192.168.127.135 -p 5432 -U repmgr -X stream
NOTICE: standby clone (using pg_basebackup) complete
NOTICE: you can now start your PostgreSQL server
HINT: for example: pg_ctl -D /data/postgresql/data start
HINT: after starting the server, you need to register this standby with 'repmgr standby register'
[postgres@lightdb2 etc]$ repmgr standby register
INFO: connecting to local node 'lightdb2' (ID: 2)
INFO: connecting to primary database
WARNING: --upstream-node-id not supplied, assuming upstream node is primary (node ID 1)
INFO: standby registration complete
NOTICE: standby node 'lightdb2' (ID: 2) successfully registered
[postgres@lightdb2 etc]$
3)使用以下命令克隆lightdb1节点作为postgres用户。在lightdb2、lightdb3上执行此命令:
repmgr -h 192.168.127.135 -U repmgr -d repmgr -f /data/postgresql/etc/repmgr.conf standby clone
注意:如果是要做级联复制,则需要在克隆时候添加–upstream-node-id=1参数,这个参数,它指定了数据流的来源
- 启动新副本数据库
pg_ctl -D /data/postgresql/data -l logfile start
- 注册rmha2为备节点:
repmgr standby register
- 启动repmgrd守护进程
[postgres@lightdb2 ~]$ repmgrd -d
[2021-07-18 19:23:18] [NOTICE] redirecting logging output to '/data/postgresql/etc/repmgr.log'
- 查看从库repmgr状态
[postgres@lightdb2 ~]$ repmgr service status
 ID | Name     | Role    | Status    | Upstream | repmgrd | PID   | Paused? | Upstream last seen
----+----------+---------+-----------+----------+---------+-------+---------+--------------------
 1  | lightdb1 | standby |   running | lightdb3 | running | 40872 | no      | 1 second(s) ago
 2  | lightdb2 | standby |   running | lightdb3 | running | 8665  | no      | 1 second(s) ago
 3  | lightdb3 | primary | * running |          | running | 2324  | no      | n/a
 4  | witness  | witness | * running | lightdb3 | running | 2387  | no      | 0 second(s) ago
通过repmgr服务状态查看,主从三个节点目前状态均已正常在线。
1.配置见证服务
2.见证节点主要的工作是帮助备用数据库达到法定的数量。简单来讲,备机连不上主机了,就会连接见证节点,如果也连接不上见证节点,那判断自己网络故障了,如果能连上见证节点,则认为主机故障,见证节点的作用类似于一个信任的网关。
3.所有见证节点安装在witness服务上,需要在此节点重新初始化数据。按照以下步骤生成一个功能齐全的repmgr证人:
1)使用initdb创建一个新的空的PostgreSQL实例
initdb -D /data/postgresql/data
2)修改postgresql.conf文件并设置如下参数:
shared_preload_libraries = 'repmgr'
3)修改pg_hba.conf文件:
拷贝主库pg_hba.conf即可
4)启动PostgreSQL服务
pg_ctl -D /data/postgresql/data -l logfile start
5)连接到PostgreSQL并执行以下操作来创建一个用户和数据库来管理repmgr:
create user repmgr with password 'repmgr' superuser replication;
create database repmgr owner repmgr;
6)创建一个名为/data/postgresql/etc/repmgr.conf的文件,包含以下内容:
[root@lightdb4 ~]# more /data/postgresql/etc/repmgr.conf
node_id=4
node_name='witness'
conninfo='host=192.168.127.138 port=5432 dbname=repmgr user=repmgr connect_timeout=2'
data_directory ='/data/postgresql/data'
pg_bindir='/data/postgresql/bin'
config_directory='/data/postgresql/data'
log_level=INFO
log_facility=STDERR
log_file='/data/postgresql/etc/repmgr.log'
7)使用以下命令将此节点注册为见证节点postgres用户:
[postgres@lightdb4 ~]$ repmgr witness register -h192.168.127.137 -drepmgr -Urepmgr
INFO: connecting to witness node 'witness' (ID: 4)
INFO: connecting to primary node
NOTICE: attempting to install extension 'repmgr'
NOTICE: 'repmgr' extension successfully installed
INFO: witness registration complete
NOTICE: witness node 'witness' (ID: 4) successfully registered
8)作为根用户,使用以下命令启用和重启repmgrd守护进程:
sudo systemctl enable repmgrd
sudo systemctl restart repmgrd
9)验证目击者可以使用以下命令作为postgres用户看到集群:
[postgres@lightdb4 ~]$ repmgr cluster show
 ID | Name     | Role    | Status    | Upstream | Location | Priority | Timeline | Connection string
----+----------+---------+-----------+----------+----------+----------+----------+----------------------------------------------------------------------------
 1  | lightdb1 | primary | * running |          | default  | 100      | 1        | host=192.168.127.135 port=5432 dbname=repmgr user=repmgr connect_timeout=2
 2  | lightdb2 | standby |   running | lightdb1 | default  | 100      | 1        | host=192.168.127.136 port=5432 dbname=repmgr user=repmgr connect_timeout=2
 3  | lightdb3 | standby |   running | lightdb1 | default  | 100      | 1        | host=192.168.127.137 port=5432 dbname=repmgr user=repmgr connect_timeout=2
 4  | witness  | witness | * running | lightdb1 | default  | 0        | n/a      | host=192.168.127.138 port=5432 dbname=repmgr user=repmgr connect_timeout=2
Witness作用:
通常,这对于保证在主节点不可用时建立投票法定人数是必要的。必须选择一个现有的备用系统来提升和接管集群。证人节点作为一个客观的第三方,帮助保护我们免受这些情况。如果它们与当前主服务器位于同一数据中心,那么网络分区将完全阻止它进行投票,我们将受到网络分区的保护。如果它位于远离当前主节点或备用节点的第三数据中心,那么将有两个独立的路由来验证主节点实际上是否脱机或不可访问。以此来防止集群出现脑裂的情况。
三、服务管理
3.1 手动故障切换
当主服务器发生宕机或者服务不可用,就需要新的备服务器来接管故障的主服务器,以确保整个repmgr集群对外可用。这时可以通过repmgr Standby Promotion来完成。
1)$repmgr cluster show
[postgres@lightdb4 ~]$ repmgr cluster show
ID | Name | Role | Status | Upstream | Location | Priority | Timeline | Connection string
----+----------+---------+-----------+----------+----------+----------+----------+----------------------------------------------------------------------------
1 | lightdb1 | primary | * running | | default | 100 | 1 | host=192.168.127.135 port=5432 dbname=repmgr user=repmgr connect_timeout=2
2 | lightdb2 | standby | running | lightdb1 | default | 100 | 1 | host=192.168.127.136 port=5432 dbname=repmgr user=repmgr connect_timeout=2
3 | lightdb3 | standby | running | lightdb1 | default | 100 | 1 | host=192.168.127.137 port