Android笔记之自定义View—超简易下拉式抽屉控件
Posted mictoy_朱
tags:
篇首语:本文由小常识网(cha138.com)小编为大家整理,主要介绍了Android笔记之自定义View—超简易下拉式抽屉控件相关的知识,希望对你有一定的参考价值。
前言
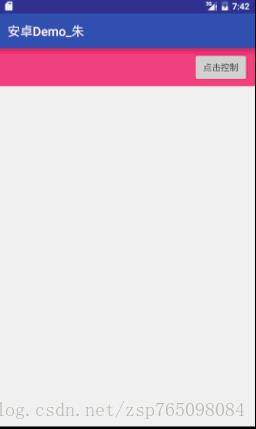
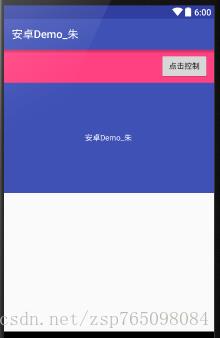
最近项目里要做一个下拉式筛选菜单的效果,有点像爱奇艺的筛选菜单。这种效果在很多app中也可以看到,并不稀奇。于是我在百度上找啊找,看有没有现成的代码直接down下来用。找了一圈下来,结果不是效果不行,就是得要花软妹币才能下载源码 。得,不找了,还是自己写一个吧。先看看效果图(抱歉,开启模拟器后电脑卡成狗,所以录制的gif图片也一卡一卡的):

效果图就是这样,非常简单。原来想过用PopupWindow实现,早在之前的项目里就有过同样的需求,结果发现PopupWindow并不好实现(原因自己可以去摸索),在当时作为菜菜鸟的我也没有想过用自定义控件,结果在经过项目经理同意下,用PopupWindow的一个类似的效果替代了。如今再遇这种需求,当然要破除魔咒,发誓把这个简单效果写出来 。
。
制定布局
在集成为自定义控件之前,用常规方法,通过在xml文件里将该布局布好
<?xml version="1.0" encoding="utf-8"?>
<RelativeLayout xmlns:android="http://schemas.android.com/apk/res/android"
    android:layout_width="match_parent"
    android:layout_height="match_parent">

    <LinearLayout
        android:layout_width="match_parent"
        android:layout_height="wrap_content"
        android:orientation="vertical">

       <LinearLayout
            android:id="@+id/top_bar"
            android:layout_width="match_parent"
            android:layout_height="60dp"
            android:background="@color/colorAccent"
            android:gravity="center_vertical|right">

            <Button
                android:layout_width="wrap_content"
                android:layout_height="wrap_content"
                android:layout_marginRight="10dp"
                android:onClick="onClick"
                android:text="点击控制" />
        </LinearLayout>

            <LinearLayout
                android:layout_width="match_parent"
                android:layout_height="200dp"
                android:background="@color/colorPrimary"
                android:gravity="center"
                android:orientation="vertical">
                <TextView
                    android:layout_width="wrap_content"
                    android:layout_height="wrap_content"
                    android:text="@string/app_name"
                    android:textColor="#ffffff"/>
            </LinearLayout>

        </LinearLayout>

</RelativeLayout>

上图中上面红色部分和下面蓝色部分是一体的,所以我们要将它们的父布局作为一个自定义控件,以便对这两部分进行操控。思考再三,我将它们的父布局命名为DropdownLayout,并让它继承LinearLayout。下面,按照自定义控件一般步骤来实现我们的核心代码。
设置自定义控件属性
这里只设置下蓝色部分显示隐藏速度dropSpeed
<declare-styleable name="DropdownLayout">
        <attr name="dropSpeed" format="integer"/>
    </declare-styleable>
获取自定义属性
public DropdownLayout(Context context, AttributeSet attrs, int defStyleAttr)
        super(context, attrs, defStyleAttr);
        this.setOrientation(VERTICAL);
        TypedArray array = context.obtainStyledAttributes(attrs, R.styleable.DropdownLayout);
        mDropSpeed = array.getInteger(R.styleable.DropdownLayout_dropSpeed,300);
        array.recycle();
重写onMeasure()
@Override
    protected void onMeasure(int widthMeasureSpec, int heightMeasureSpec)
        super.onMeasure(widthMeasureSpec, heightMeasureSpec);
        if (null != this.getChildAt(1) && this.getChildAt(1) instanceof ViewGroup)
            ViewGroup rootDropView = (ViewGroup) this.getChildAt(1);
            int childCount = rootDropView.getChildCount();
            if (childCount>0)
                mDropView = rootDropView.getChildAt(0);
                mDropHeight = mDropView.getMeasuredHeight();
                Log.i(TAG,"onMeasure dropHeight:"+mDropHeight);
                mDropView.setY(-mDropHeight);//一般第一次进入页面,这部分是隐藏的
public void toggle()
        if (isOpen)
            ObjectAnimator translationY = ObjectAnimator.ofFloat(mDropView, "translationY", 0, -mDropHeight);
            translationY.setDuration(mDropSpeed);
            translationY.start();
            isOpen = false;
        else
            ObjectAnimator translationY = ObjectAnimator.ofFloat(mDropView, "translationY", -mDropHeight, 0);
            translationY.setDuration(mDropSpeed);
            translationY.start();
            isOpen = true;
完成上面步骤,我们改写下我们的布局文件,将DropdownLayout引入我们的布局:
<?xml version="1.0" encoding="utf-8"?>
<RelativeLayout xmlns:android="http://schemas.android.com/apk/res/android"
    xmlns:zhusp="http://schemas.android.com/apk/res-auto"
    android:layout_width="match_parent"
    android:layout_height="match_parent">

    <com.zhusp.androiddemo.views.DropdownLayout
        android:id="@+id/dropdown_layout"
        android:layout_width="match_parent"
        android:layout_height="wrap_content"
        zhusp:dropSpeed="300">

        <LinearLayout
            android:id="@+id/top_bar"
            android:layout_width="match_parent"
            android:layout_height="60dp"
            android:background="@color/colorAccent"
            android:gravity="center_vertical|right">

            <Button
                android:layout_width="wrap_content"
                android:layout_height="wrap_content"
                android:layout_marginRight="10dp"
                android:onClick="onClick"
                android:text="点击控制" />
        </LinearLayout>

        <LinearLayout
            android:layout_width="match_parent"
            android:layout_height="wrap_content">

            <LinearLayout
                android:layout_width="match_parent"
                android:layout_height="200dp"
                android:background="@color/colorPrimary"
                android:gravity="center"
                android:orientation="vertical">
                <TextView
                    android:layout_width="wrap_content"
                    android:layout_height="wrap_content"
                    android:text="@string/app_name"
                    android:textColor="#ffffff"/>
            </LinearLayout>

        </LinearLayout>
    </com.zhusp.androiddemo.views.DropdownLayout>

</RelativeLayout>
最后编写我们的Activity文件,也非常简单:
package com.zhusp.androiddemo.activity.selfwidget;

import android.support.v7.app.AppCompatActivity;
import android.os.Bundle;
import android.view.View;

import com.zhusp.androiddemo.R;
import com.zhusp.androiddemo.views.DropdownLayout;

public class DropdownViewActivity extends AppCompatActivity

    private DropdownLayout mDropdownView;

    @Override
    protected void onCreate(Bundle savedInstanceState)
        super.onCreate(savedInstanceState);
        setContentView(R.layout.activity_top_slide_menu);
        mDropdownView = (DropdownLayout) findViewById(R.id.dropdown_layout);


    public void onClick(View v)
        mDropdownView.toggle();
OK,这样就可以运行了,是不是超级简单呢 。
。
最后附上源码链接:源码链接
以上是关于Android笔记之自定义View—超简易下拉式抽屉控件的主要内容,如果未能解决你的问题,请参考以下文章