SpringBoot整合SpringSecurity
Posted AlaGeek
tags:
篇首语:本文由小常识网(cha138.com)小编为大家整理,主要介绍了SpringBoot整合SpringSecurity相关的知识,希望对你有一定的参考价值。
1、前言
之前写过一篇SSM整合SpringSecurity,没看过的可以看看,可以发现在SSM框架里整合Security框架是很繁琐的,所以很多人选择用Shiro搭配SSM使用。而在SpringBoot中,这个情况就不一样了,如果说是简单使用,只需要在SpringBoot项目中加入Security的依赖就可以了,不需要写什么其他的东西。
2、简单使用
首先建一个SpringBoot项目,在pom文件中加入以下依赖:
<dependency>
    <groupId>org.springframework.boot</groupId>
    <artifactId>spring-boot-starter-web</artifactId>
</dependency>
<dependency>
    <groupId>org.springframework.boot</groupId>
    <artifactId>spring-boot-starter-security</artifactId>
</dependency>
为了看Security是否已被整合进SpringBoot,可以编写一个HelloController,如下:
@Controller
public class HelloController
    @ResponseBody
    @GetMapping("/hello")
    public String hello()
        return "hello";
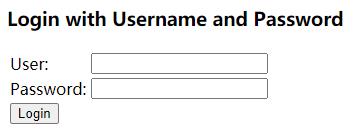
再接下来就可以启动项目了,在浏览器中访问localhost:8080/hello,此时会看到如下页面:

这里用户名为user,密码会在启动项目时打印到控制台,登录进去即可看到hello字符串。
3、进阶使用
我们使用SpringSecurity不可能每次都去重新生成一个密码,所以有以下几种策略来对帐户密码进行配置。
3.1 配置文件
在application.properties文件中,加入以下代码即可自行配置SpringSecurity的帐户密码:
spring.security.user.name=sang
spring.security.user.password=123
spring.security.user.roles=admin
这下启动程序后,就不会再生成一个密码了,登录账户就变成了sang,密码就变成了123,同时这个账户的角色是admin。
3.2 配置类
要是还是嫌配置文件配置的东西不够多,还可以使用配置类进行配置,首先新建一个类,比如叫MyWebSecurityConfig,这个类需要继承WebSecurityConfigurerAdapter,其代码如下:
@Configuration
@EnableGlobalMethodSecurity(prePostEnabled = true, securedEnabled = true)
public class MyWebSecurityConfig extends WebSecurityConfigurerAdapter

    @Bean
    PasswordEncoder passwordEncoder()
        // 加密算法
        return new BCryptPasswordEncoder(10);


    @Override
    protected void configure(AuthenticationManagerBuilder auth) throws Exception
        // 在内存中配置账号密码
        auth.inMemoryAuthentication()
                // 账号
                .withUser("admin")
                // 密码【此处需要将密码加密】
                .password(passwordEncoder().encode("123"))
                // 账号的角色
                .roles("ADMIN")
                .and()
                // 账号
                .withUser("user")
                // 密码【此处需要将密码加密】
                .password(passwordEncoder().encode("123"))
                // 账号的角色
                .roles("USER")
                ;


    @Override
    protected void configure(HttpSecurity http) throws Exception
        http.authorizeRequests()
                // 配置admin目录下的所有页面都需要ADMIN角色才能访问
                .antMatchers("/admin/**").hasRole("ADMIN")
                // 其他请求都需要验证权限
                .anyRequest().authenticated()
                .and()
                // 开启表单登录
                .formLogin()
                // 登录处理URL
                .loginProcessingUrl("/login")
                // 允许登录页和登录处理链接不经过权限验证
                .permitAll()
                .and()
                // 关闭csrf
                .csrf().disable()
                ;
代码的解释都在注释里,接下来在HelloController中添加一个函数:
@ResponseBody
@GetMapping("/admin/hello")
public String adminHello()
    return "hello admin";
启动程序,访问localhost:8080/hello,在登录页面尝试登录admin和user两个账号,都可以访问hello,而访问localhost:8080/admin/hello,则会发现只有admin账户才可访问,user账户没有权限。
3.3 数据库
像这种在内存中配置帐户密码的操作,在实际中并不实用,因为不可能每加个账户,就该代码并重启服务,所以要把数据库也整合进去,有关于数据库的整合,我写过一篇SpringBoot整合Mybatis的博客,不会的可以看一下。
首先我们需要从数据库中将数据拿出来,那么需要定义个实体类对象,用于接收拿到的数据,实体类有两个,一个是User,对应账户,一个是Role,对应角色:
User:
public class User implements UserDetails

    private Integer id;
    private String username;
    private String password;
    private Boolean enabled;
    private Boolean locked;
    private List<Role> roles;

    @Override
    public String toString()
        return "User" +
                "id=" + id +
                ", username='" + username + '\\'' +
                ", password='" + password + '\\'' +
                ", enabled=" + enabled +
                ", locked=" + locked +
                ", roles=" + roles +
                '';


    public User()


    public User(Integer id, String username, String password, Boolean enabled, Boolean locked, List<Role> roles)
        this.id = id;
        this.username = username;
        this.password = password;
        this.enabled = enabled;
        this.locked = locked;
        this.roles = roles;


    @Override
    public Collection<? extends GrantedAuthority> getAuthorities()
        List<SimpleGrantedAuthority> authorities = new ArrayList<>();
        for(Role role:roles)
            authorities.add(new SimpleGrantedAuthority(role.getName()));

        return authorities;


    @Override
    public String getPassword()
        return password;


    @Override
    public String getUsername()
        return username;


    @Override
    public boolean isAccountNonExpired()
        return true;


    @Override
    public boolean isAccountNonLocked()
        return !locked;


    @Override
    public boolean isCredentialsNonExpired()
        return true;


    @Override
    public boolean isEnabled()
        return enabled;


    public Integer getId()
        return id;


    public void setId(Integer id)
        this.id = id;


    public void setUsername(String username)
        this.username = username;


    public void setPassword(String password)
        this.password = password;


    public void setEnabled(Boolean enabled)
        this.enabled = enabled;


    public void setLocked(Boolean locked)
        this.locked = locked;


    public List<Role> getRoles()
        return roles;


    public void setRoles(List<Role> roles)
        this.roles = roles;
注意User类实现了UserDetails接口,这是为了跟Security配合使用,以及User类中有个Role的列表,是为了在Security获取用户相关信息时,将用户的角色一起带过去。
Role:
public class Role
    private Integer id;
    private String name;
    private String nameZh;

    @Override
    public String toString()
        return "Role" +
                "id=" + id +
                ", name='" + name + '\\'' +
                ", nameZh='" + nameZh + '\\'' +
                '';


    public Role()


    public Role(Integer id, String name, String nameZh)
        this.id = id;
        this.name = name;
        this.nameZh = nameZh;


    public Integer getId()
        return id;


    public void setId(Integer id)
        this.id = id;


    public String getName()
        return name;


    public void setName(String name)
        this.name = name;


    public String getNameZh()
        return nameZh;


    public void setNameZh(String nameZh)
        this.nameZh = nameZh;
有了实体类,接下来就是Mapper,也就是Dao层,首先是UserMapper接口:
@Mapper
public interface UserMapper
    User loadUserByUsername(String username);
    List<Role> getUserRolesByUid(Integer id);
其对应的UserMapper.xml如下:
<?xml version="1.0" encoding="UTF-8"?>
<!DOCTYPE mapper PUBLIC "-//mybatis.org//DTC Mapper 3.0//EN"
        "http://mybatis.org/dtd/mybatis-3-mapper.dtd">
<mapper namespace="com.alageek.study.mapper.UserMapper">
    <select id="loadUserByUsername" parameterType="string" resultType="com.alageek.study.entity.User">
        select * from user where username = #username
    </select>
    <select id="getUserRolesByUid" parameterType="integer" resultType="com.alageek.study.entity.Role">
        select role.* from role, user_role where user_role.uid = #id and user_role.rid = role.id
    </select>
</mapper>
然后在service层定义UserService:
@Service
public class UserService implements UserDetailsService

    @Autowired
    UserMapper userMapper;

    @Override
    public UserDetails loadUserByUsername(String s) throws UsernameNotFoundException
        User user = userMapper.loadUserByUsername(s);
        if(user == null)
            throw new UsernameNotFoundException("账户不存在");

        user.setRoles(userMapper.getUserRolesByUid(user.getId()));
        return user;
与User一样,为了配合Security使用,UserService需要实现接口UserDetailsService,其代码先根据用户名s获取到用户信息,再通过用户id获取到相关角色,再将组合后的用户信息返回。
有了Service后,还需要在Security的配置类中进行相关配置,代码如下:
@Override
    protected void configure(AuthenticationManagerBuilder auth) throws Exception
        auth.userDetailsService(userService);
在配置类中加入上述代码即可,就能从数据库中获取账户数据进行比对,从而登录,而注册只需往数据库中插入数据即可。
写完上述数据库相关代码后,测试功能跟上面一样,写一个Controller启动项目登录下试试即可。
4、相关资源
5、博主的话
源码没有跟博客说的一模一样,不过我觉得能看到这里的小伙伴,借鉴应该是没有问题的,加油,一起学习吧,有什么问题请在评论说出来。
以上是关于SpringBoot整合SpringSecurity的主要内容,如果未能解决你的问题,请参考以下文章