Keras CIFAR-10图像分类 DenseNet 篇
Posted 风信子的猫Redamancy
tags:
篇首语:本文由小常识网(cha138.com)小编为大家整理,主要介绍了Keras CIFAR-10图像分类 DenseNet 篇相关的知识,希望对你有一定的参考价值。
Keras CIFAR-10图像分类 DenseNet 篇
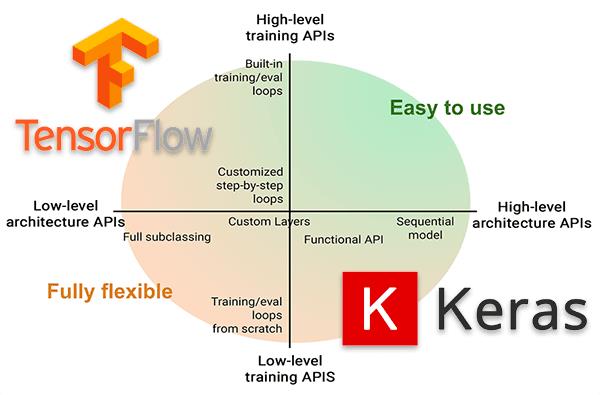
除了用pytorch可以进行图像分类之外,我们也可以利用tensorflow来进行图像分类,其中利用tensorflow的后端keras更是尤为简单,接下来我们就利用keras对CIFAR10数据集进行分类。
keras介绍

keras是python深度学习中常用的一个学习框架,它有着极其强大的功能,基本能用于常用的各个模型。
keras具有的特性
1、相同的代码可以在cpu和gpu上切换;
2、在模型定义上,可以用函数式API,也可以用Sequential类;
3、支持任意网络架构,如多输入多输出;
4、能够使用卷积网络、循环网络及其组合。
keras与后端引擎
Keras 是一个模型级的库,在开发中只用做高层次的操作,不处于张量计算,微积分计算等低级操作。但是keras最终处理数据时数据都是以张量形式呈现,不处理张量操作的keras是如何解决张量运算的呢?
keras依赖于专门处理张量的后端引擎,关于张量运算方面都是通过后端引擎完成的。这也就是为什么下载keras时需要下载TensorFlow 或者Theano的原因。而TensorFlow 、Theano、以及CNTK都属于处理数值张量的后端引擎。

keras设计原则
- 用户友好:Keras是为人类而不是天顶星人设计的API。用户的使用体验始终是我们考虑的首要和中心内容。Keras遵循减少认知困难的最佳实践:Keras提供一致而简洁的API, 能够极大减少一般应用下用户的工作量,同时,Keras提供清晰和具有实践意义的bug反馈。
- 模块性:模型可理解为一个层的序列或数据的运算图,完全可配置的模块可以用最少的代价自由组合在一起。具体而言,网络层、损失函数、优化器、初始化策略、激活函数、正则化方法都是独立的模块,你可以使用它们来构建自己的模型。
- 易扩展性:添加新模块超级容易,只需要仿照现有的模块编写新的类或函数即可。创建新模块的便利性使得Keras更适合于先进的研究工作。
- 与Python协作:Keras没有单独的模型配置文件类型(作为对比,caffe有),模型由python代码描述,使其更紧凑和更易debug,并提供了扩展的便利性。

安装keras
安装也是很简单的,我们直接安装keras即可,如果需要tensorflow,就还需要安装tensorflow
pip install keras
导入库
import keras
from keras.models import Sequential
from keras.datasets import cifar10
from keras.layers import Conv2D, MaxPooling2D, Dropout, Flatten, Dense, Activation
from keras.optimizers import adam_v2
from keras.utils.vis_utils import plot_model
from keras.utils.np_utils import to_categorical
from keras.callbacks import ModelCheckpoint
import matplotlib.pyplot as plt
import numpy as np
import os
import shutil
import matplotlib
matplotlib.style.use('ggplot')
%matplotlib inline
plt.rcParams['figure.figsize'] = (10.0, 8.0) # set default size of plots
plt.rcParams['image.interpolation'] = 'nearest'
plt.rcParams['image.cmap'] = 'gray'
控制GPU显存(可选)
这个是tensorflow来控制选择的GPU,因为存在多卡的时候可以指定GPU,其次还可以控制GPU的显存
这段语句就是动态显存,动态分配显存
config.gpu_options.allow_growth = True
这段语句就是说明,我们使用的最大显存不能超过50%
config.gpu_options.per_process_gpu_memory_fraction = 0.5
import tensorflow as tf
import os
os.environ['TF_CPP_MIN_LOG_LEVEL'] = '2' # 忽略低级别的警告
os.environ["CUDA_DEVICE_ORDER"]="PCI_BUS_ID"
# The GPU id to use, usually either "0" or "1"
os.environ["CUDA_VISIBLE_DEVICES"]="0"
config = tf.compat.v1.ConfigProto()
# config = tf.ConfigProto()
# config.gpu_options.per_process_gpu_memory_fraction = 0.5
config.gpu_options.allow_growth = True
session = tf.compat.v1.Session(config=config)
加载 CIFAR-10 数据集
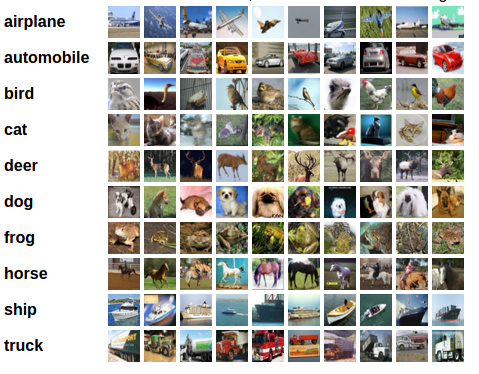
CIFAR-10 是由 Hinton 的学生 Alex Krizhevsky 和 Ilya Sutskever 整理的一个用于识别普适物体的小型数据集。一共包含 10 个类别的 RGB 彩色图 片:飞机( arplane )、汽车( automobile )、鸟类( bird )、猫( cat )、鹿( deer )、狗( dog )、蛙类( frog )、马( horse )、船( ship )和卡车( truck )。图片的尺寸为 32×32 ,数据集中一共有 50000 张训练圄片和 10000 张测试图片。
与 MNIST 数据集中目比, CIFAR-10 具有以下不同点:
- CIFAR-10 是 3 通道的彩色 RGB 图像,而 MNIST 是灰度图像。
- CIFAR-10 的图片尺寸为 32×32, 而 MNIST 的图片尺寸为 28×28,比 MNIST 稍大。
- 相比于手写字符, CIFAR-10 含有的是现实世界中真实的物体,不仅噪声很大,而且物体的比例、 特征都不尽相同,这为识别带来很大困难。

num_classes = 10 # 有多少个类别
(x_train, y_train), (x_val, y_val) = cifar10.load_data()
print("训练集的维度大小:",x_train.shape)
print("验证集的维度大小:",x_val.shape)
训练集的维度大小: (50000, 32, 32, 3)
验证集的维度大小: (10000, 32, 32, 3)
可视化数据
class_names = ['airplane','automobile','bird','cat','deer',
               'dog','frog','horse','ship','truck']
fig = plt.figure(figsize=(20,5))
for i in range(num_classes):
    ax = fig.add_subplot(2, 5, 1 + i, xticks=[], yticks=[])
    idx = np.where(y_train[:]==i)[0] # 取得类别样本
    features_idx = x_train[idx,::] # 取得图片
    img_num = np.random.randint(features_idx.shape[0]) # 随机挑选图片
    im = features_idx[img_num,::]
    ax.set_title(class_names[i])
    plt.imshow(im)
plt.show()

数据预处理
x_train = x_train.astype('float32')/255
x_val = x_val.astype('float32')/255
# 将向量转化为二分类矩阵,也就是one-hot编码
y_train = to_categorical(y_train, num_classes)
y_val = to_categorical(y_val, num_classes)
output_dir = './output'  # 输出目录
if os.path.exists(output_dir) is False:
    os.mkdir(output_dir)
    print('%s已创建' % output_dir)
print('%s文件夹已存在' % output_dir)
model_name = 'densenet'
./output已创建
./output文件夹已存在
DenseNet网络
之前的ResNet通过前层与后层的“短路连接”(Shortcuts),加强了前后层之间的信息流通,在一定程度上缓解了梯度消失现象,从而可以将神经网络搭建得很深。更进一步,DenseNet最大化了这种前后层信息交流,通过建立前面所有层与后面层的密集连接,实现了特征在通道维度上的复用,使其可以在参数与计算量更少的情况下实现比ResNet更优的性能。如果想详细了解并查看论文,可以看我的另一篇博客【论文泛读】 DenseNet:稠密连接的卷积网络
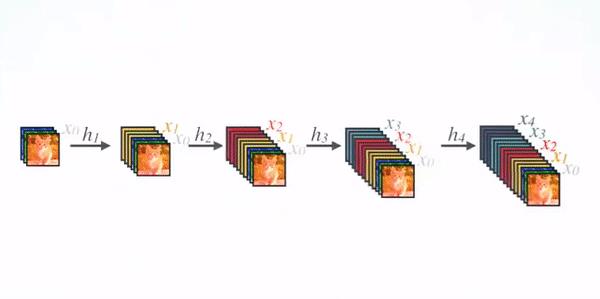
DenseNet 和 ResNet 不同在于 ResNet 是跨层求和,而 DenseNet 是跨层将特征在通道维度进行拼接,下面可以看看他们两者的图示
这个是最标准的卷积神经网络

这是ResNet,是跨层求和

这个就是DenseNet,是跨层将特征在通道维度进行拼接

DenseNet的网络架构如下图所示,了便于下采样的实现,我们将网络划分为多个稠密连接的dense block,网络由多个Dense Block与中间的卷积池化组成,核心就在Dense Block中。Dense Block中的黑点代表一个卷积层,其中的多条黑线代表数据的流动,每一层的输入由前面的所有卷积层的输出组成。注意这里使用了通道拼接(Concatnate)操作,而非ResNet的逐元素相加操作。

我们将每个block之间的层称为过渡层,完成卷积和池化的操作。在我们的实验中,过渡层由BN层、1x1卷积层和2x2平均池化层组成。
具体的Block实现细节如下图所示,每一个Block由若干个Bottleneck的卷积层组成,对应上面图中的黑点。Bottleneck由BN、ReLU、1×1卷积、BN、ReLU、3×3卷积的顺序构成,也被称为DenseNet-B结构。其中1x1 Conv得到 4k 个特征图它起到的作用是降低特征数量,从而提升计算效率。

关于Block,有以下4个细节需要注意:
- 每一个Bottleneck输出的特征通道数是相同的,例如这里的32。同时可以看到,经过Concatnate操作后的通道数是按32的增长量增加的,因此这个32也被称为GrowthRate。
- 这里1×1卷积的作用是固定输出通道数,达到降维的作用。当几十个Bottleneck相连接时,Concatnate后的通道数会增加到上千,如果不增加1×1的卷积来降维,后续3×3卷积所需的参数量会急剧增加。1×1卷积的通道数通常是GrowthRate的4倍。
- 上图中的特征传递方式是直接将前面所有层的特征Concatnate后传到下一层,这种方式与具体代码实现的方式是一致的。
- Block采用了激活函数在前、卷积层在后的顺序,这与一般的网络上是不同的。

DenseNet 的网络结构
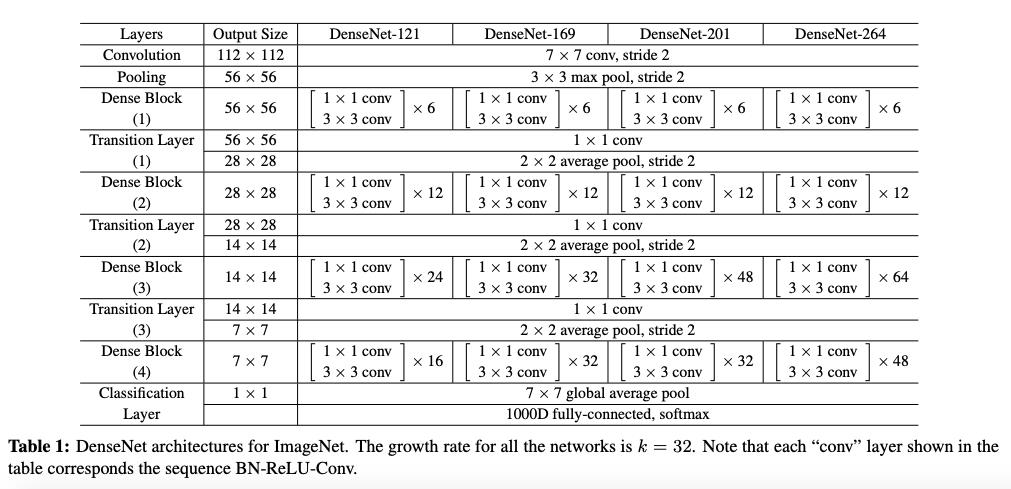
在ImageNet数据集上的网络如下图所示

from keras.models import Model
from keras.layers.core import Dense, Dropout, Activation
from keras.layers.convolutional import Convolution2D
from keras.layers.pooling import AveragePooling2D
from keras.layers.pooling import GlobalAveragePooling2D
from keras.layers import Input
from keras.layers.merge import Concatenate
from tensorflow.keras.layers import BatchNormalization
from keras.regularizers import l2
import keras.backend as K
input_shape = (32,32,3)
def conv_block(input, nb_filter, dropout_rate=None, weight_decay=1E-4):
    ''' Apply BatchNorm, Relu 3x3, Conv2D, optional dropout
    Args:
        input: Input keras tensor
        nb_filter: number of filters
        dropout_rate: dropout rate
        weight_decay: weight decay factor
    Returns: keras tensor with batch_norm, relu and convolution2d added
    '''

    x = Activation('relu')(input)
    x = Convolution2D(nb_filter, (3, 3), kernel_initializer="he_uniform", padding="same", use_bias=False,
                      kernel_regularizer=l2(weight_decay))(x)
    if dropout_rate is not None:
        x = Dropout(dropout_rate)(x)

    return x
Transition
def transition_block(input, nb_filter, dropout_rate=None, weight_decay=1E-4):
    ''' Apply BatchNorm, Relu 1x1, Conv2D, optional dropout and Maxpooling2D
    Args:
        input: keras tensor
        nb_filter: number of filters
        dropout_rate: dropout rate
        weight_decay: weight decay factor
    Returns: keras tensor, after applying batch_norm, relu-conv, dropout, maxpool
    '''

    concat_axis = 1 if K.image_data_format() == 'channels_first' else -1

    x = Convolution2D(nb_filter, (1, 1), kernel_initializer="he_uniform", padding="same", use_bias=False,
                      kernel_regularizer=l2(weight_decay))(input)
    if dropout_rate is not None:
        x = Dropout(dropout_rate)(x)
    x = AveragePooling2D((2, 2), strides=(2, 2))(x)

    x = BatchNormalization(axis=concat_axis, gamma_regularizer=l2(weight_decay),
                           beta_regularizer=l2(weight_decay))(x)

    return x
DenseNet-BC
def dense_block(x, nb_layers, nb_filter, growth_rate, dropout_rate=None, weight_decay=1E-4):
    ''' Build a dense_block where the output of each conv_block is fed to subsequent ones
    Args:
        x: keras tensor
        nb_layers: the number of layers of conv_block to append to the model.
        nb_filter: number of filters
        growth_rate: growth rate
        dropout_rate: dropout rate
        weight_decay: weight decay factor
    Returns: keras tensor with nb_layers of conv_block appended
    '''

    concat_axis = 1 if K.image_data_format() == 'channels_first' else -1

    feature_list = [x]

    for i in range(nb_layers):
        x = conv_block(x, growth_rate, dropout_rate, weight_decay)
        feature_list.append(x)
        x = Concatenate(axis=concat_axis)(feature_list)
        nb_filter += growth_rate

    return x, nb_filter
def DenseNet(nb_classes=10, img_dim=(32,32,3), depth=40, nb_dense_block=3, growth_rate=12, nb_filter=16, dropout_rate=None,
                     weight_decay=1e-4, verbose=True):
    ''' Build the create_dense_net model
    Args:
        nb_classes: number of classes
        img_dim: tuple of shape (channels, rows, columns) or (rows, columns, channels)
        depth: number or layers
        nb_dense_block: number of dense blocks to add to end
        growth_rate: number of filters to add
        nb_filter: number of filters
        dropout_rate: dropout rate
        weight_decay: weight decay
    Returns: keras tensor with nb_layers of conv_block appended
    '''

    model_input = Input(shape=img_dim)

    concat_axis = 1 if K.image_data_format() == "channels_first" else -1

    assert (depth - 4) % 3 == 0, "Depth must be 3 N + 4"

    # layers in each dense block
    nb_layers = int((depth - 4) / 3)

    # Initial convolution
    x = Convolution2D(nb_filter, (3, 3), kernel_initializer="he_uniform", padding="same", name="initial_conv2D", use_bias=False,
                      kernel_regularizer=l2(weight_decay))(model_input)

    x = BatchNormalization(axis=concat_axis, gamma_regularizer=l2(weight_decay),
                            beta_regularizer=l2(weight_decay))(x)

    # Add dense blocks
    for block_idx in range(nb_dense_block - 1):
        x, nb_filter = dense_block(x, nb_layers, nb_filter, growth_rate, dropout_rate=dropout_rate,
                                   weight_decay=weight_decay)
        # add transition_block
        x = transition_block(x, nb_filter, dropout_rate=dropout_rate, weight_decay=weight_decay)

    # The last dense_block does not have a transition_block
    x, nb_filter = dense_block(x, nb_layers, nb_filter, growth_rate, dropout_rate=dropout_rate,weight_decay=weight_decay)

    x = Activation('relu')(x)
    x = GlobalAveragePooling2D()(x)
    x = Dense(nb_classes, activation='softmax', kernel_regularizer=l2(weight_decay), bias_regularizer=l2(weight_decay))(x)

    densenet = Model(inputs=model_input, outputs=x)

    if verbose:
        print("DenseNet-%d-%d created." % (depth, growth_rate))

    return densenet
model = DenseNet()
model.summary()
DenseNet-40-12 created.
Model: "model"
__________________________________________________________________________________________________
 Layer (type)                   Output Shape         Param #     Connected to
==================================================================================================
 input_1 (InputLayer)           [(None, 32, 32, 3)]  0           []

 initial_conv2D (Conv2D)        (None, 32, 32, 16)   432         ['input_1[0][0]']

 batch_normalization (BatchNorm  (None, 32, 32, 16)  64          ['initial_conv2D[0][0]']
 alization)

 activation (Activation)        (None, 32, 32, 16)   0           ['batch_normalization[0][0]']

 conv2d (Conv2D)                (None, 32, 32, 12)   1728        ['activation[0][0]']

 concatenate (Concatenate)      (None, 32, 32, 28)   0           ['batch_normalization[0][0]',
                                                                  'conv2d[0][0]']

 activation_1 (Activation)      (None, 32, 32, 28)   0           ['concatenate[0][0]']

 conv2d_1 (Conv2D)              (None, 32, 32, 12)   3024        ['activation_1[0][0]']

 concatenate_1 (Concatenate)    (None, 32, 32, 40)   0           ['batch_normalization[0][0]',
                                                                  'conv2d[0][0]',
                                                                  'conv2d_1[0][0]']

 activation_2 (Activation)      (None, 32, 32, 40)   0           ['concatenate_1[0][0]']

 conv2d_2 (Conv2D)              (None, 32, 32, 12)   4320        ['activation_2[0][0]']

 concatenate_2 (Concatenate)    (None, 32, 32, 52)   0           ['batch_normalization[0][0]',
                                                                  'conv2d[0][0]',
                                                                  'conv2d_1[0][0]',
                                                                  'conv2d_2[0][0]']

 activation_3 (Activation)      (None, 32, 32, 52)   0           ['concatenate_2[0][0]']

 conv2d_3 (Conv2D)              (None, 32, 32, 12)   5616        ['activation_3[0][0]']

 concatenate_3 (Concatenate)    (None, 32, 32, 64)   0           ['batch_normalization[0][0]',
                                                                  'conv2d[0][0]',
                                                                  'conv2d_1[0][0]',
                                                                  'conv2d_2[0][0]',
                                                                  'conv2d_3[0][0]']

 activation_4 (Activation)      (None, 32, 32, 64)   0           ['concatenate_3[0][0]']

 conv2d_4 (Conv2D)              (None, 32, 32, 12)   6912        ['activation_4[0][0]']

 concatenate_4 (Concatenate)    (None, 32, 32, 76)   0           ['batch_normalization[0][0]',
                                                                  'conv2d[0][0]',
                                                                  'conv2d_1[0][0]',
                                                                  'conv2d_2[0][0]',
                                                                  'conv2d_3[0][0]',
                                                                  'conv2d_4[0][0]']

 activation_5 (Activation)      (None, 32, 32, 76)   0           ['concatenate_4[0][0]']

 conv2d_5 (Conv2D)              (None, 32, 32, 12)   8208        ['activation_5[0][0]']

 concatenate_5 (Concatenate)    (None, 32, 32, 88)   0           ['batch_normalization[0][0]',
                                                                  'conv2d[0][0]',
                                                                  'conv2d_1[0][0]',
                                                                  'conv2d_2[0][0]',
                                                                  'conv2d_3[0][0]',
                                                                  'conv2d_4[0][0]',
                                                    以上是关于Keras CIFAR-10图像分类 DenseNet 篇的主要内容,如果未能解决你的问题,请参考以下文章